Linux正则表达式、shell基础、文件查找及打包压缩
一、正则表达式
Linux正则表达式分为2类:
1、基本正则表达式(BRE)
2、扩展正则表达式(ERE)
两者的区别:
1、使用扩展正则表达式时,正则表达式之前的命令需要带上指定的选项,如:grep命令需要带上 -E选项,即“grep -E”或使用“egrep”命令,sed命令需要带上-r选项,即“sed -r”。
2、扩展正则表达式省略了基本正则表达元字符上带有的反斜线\符号,使得正则表达式代码看起来更为简洁明了。
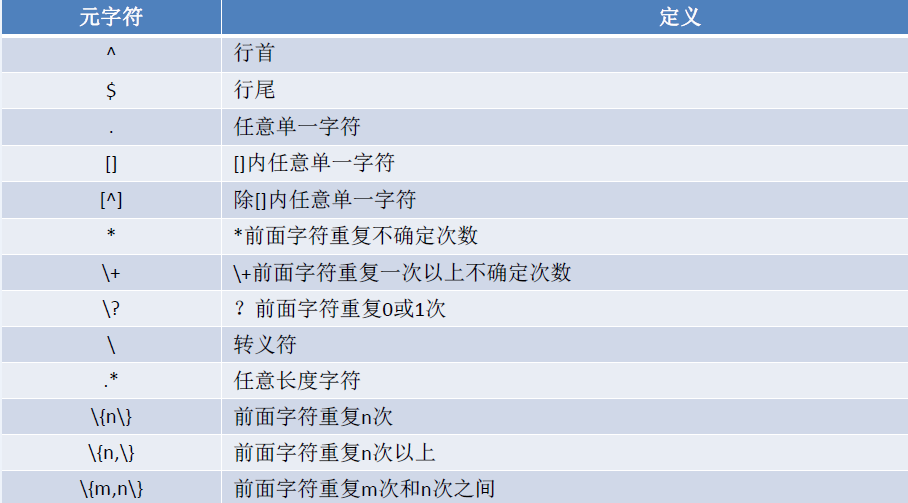
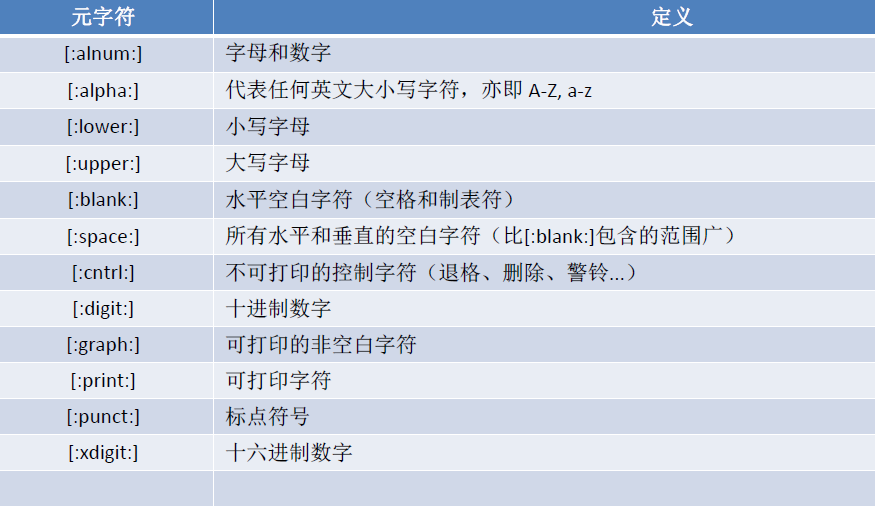
正则表达式的元字符如下:
正则表达式使用小技巧:
1、使用正则表达式查找本级IP地址:(nes33为本机网卡名)
[root@centos7 ~]#ifconfig ens33 |egrep -o '([0-9]{1,3}\.){3}[0-9]{1,3}'|head -n1
192.168.234.7
[root@centos7 ~]#
2、使用正则表达式表示一个合法的IPv4地址:
思路提示:将0-255范围拆分为0-99,100-199,200-249,250-255
IPv4地址正则表达式写法如下:
(([1-9]?[0-9]|1[0-9]{2}|2[0-4][0-9]|25[0-5])\.){3}([1-9]?[0-9]|1[0-9]{2}|2[0-4][0-9]|25[0-5])二、shell基础
1、编写脚本 systeminfo.sh,显示当前主机系统信息,包括主机名,IPv4地址,操作系统版本,内核版本,CPU型号,内存大小,硬盘大小
#!/bin/bash
#
#********************************************************************
#Author:                Eddie
#Date:                  2019-07-31
#FileName:              systeminfo.sh
#Description:           The systeminfo script
#********************************************************************
COLOR="\033[1;$[RANDOM%7+31]m"
COLOREND='\033[0m'
echo -e "The hostname is ${COLOR}`hostname`$COLOREND"
echo -e "The IP is ${COLOR}`ifconfig ens33|egrep -o "(([1-9]?[0-9]|1[0-9]{2}|2[0-4][0-9]|25[0-5])\.){3}([1-9]?[0-9]|1[0-9]{2}|2[0-4][0-9]|25[0-5]$)"|head -n1`$COLOREND"
echo -e "The OS Version is ${COLOR}`cat /etc/redhat-release`$COLOREND"
echo -e "The Kernel Version is ${COLOR}`uname -r`$COLOREND"
echo -e "The CPU type is ${COLOR}`lscpu |grep 'Model name'|tr -s ' '|cut -d : -f 2`$COLOREND"
echo -e "The Mem Size is ${COLOR}`free -h |grep "Mem"|tr -s ' ' :|cut -d: -f2`$COLOREND"
echo -e "The Disk Size is ${COLOR}`lsblk |head -n2|tail -n1|tr -s ' ' :|cut -d: -f5`$COLOREND"
运行效果如下:
[root@centos7 scripts]#./systeminfo.sh
The hostname is centos7.localdomain
The IP is 192.168.234.7
The OS Version is CentOS Linux release 7.6.1810 (Core)
The Kernel Version is 3.10.0-957.el7.x86_64
The CPU type is  Intel(R) Core(TM) i5-3320M CPU @ 2.60GHz
The Mem Size is 1.8G
The Disk Size is 200G
[root@centos7 scripts]#
2、编写脚本 backup.sh,实现将/etc每天录备份到/data/etcYYYY-mm-dd中
#!/bin/bash
#
#********************************************************************
#Author:            Eddie
#Date:              2019-07-31
#FileName:         backup.sh
#Description:      This script used to backup etc everyday
#********************************************************************
COLOR="\033[1;35m"
COLOREND='\033[0m'
echo -e "${COLOR}Starting backup,please waite...${COLOREND}"
cp -a /etc/   /data/etc`date +%Y-%m-%d`
echo -e "${COLOR}Backup is finished${COLOREND}"
3、编写脚本 diskckeck.sh,显示当前硬盘分区中空间利用率最大的值,大于80%即给root用户发送报警提示邮件。
#!/bin/bash
#
#********************************************************************
#Author:                Eddie
#Date:                  2019-07-31
#FileName:             diskcheck.sh
#Description:          The disk space ckeck script
#********************************************************************
DISKUSE=80
[ `df |grep '/dev/sd' |egrep -o "[0-9]{1,3}%" |sort -nr|head -n1|tr '%' ' '` -gt $DISKUSE ] && mail -s WANNING! root  <<EOF
Disk will be full!
EOF
4、编写脚本,判断登录用户是root用户还是普通用户,如果是以普通用户登录,提示用户当需要运行系统命令时前面需要加sudo命令,如果是以root用户登录,则提示用户小心谨慎操作。
#!/bin/bash
#
#********************************************************************
#Author:        Eddie
#Date:          2019-08-02
#FileName:     root_user.sh
#Description:  The test script
#********************************************************************
if [ `id -u` -ne 0 ];then
    echo -e "\033[1;32m You are login as a normal user,you need to use 'sudo' before the command which is a system command you want to run. \033[0m"
else
    echo -e "\033[1;31m you are login as root,be carefull for your operation! \033[0m"
fi
5、编写脚本 nologin.sh 和 login.sh,实现禁止和允许普通用户登录。
禁止普通用户登录
#!/bin/bash
[ -f /etc/nologin ] && echo "nologin" ||(touch /etc/nologin;echo "nologin")
允许普通用户登录
#!/bin/bash
[ -f /etc/nologin ] && (rm -f /etc/nologin;echo "login") ||echo "login"
6、编写脚本 filetype.sh,判断用户输入的文件件路径,显示其文件类型(普通,目录,链接,其它的文件类型)
#!/bin/bash
#
#********************************************************************
#Author:        Eddie
#Date:          2019-08-03
#FileName:      filetype.sh
#Description:   The test script
#********************************************************************
if [ -z "$1" ];then
    echo "You must input a file path "
    exit
elif [ ! -e "$1" ];then
    echo "No such file"
elif [ -f "$1" ];then
    echo "Is a common file"
elif [ -d "$1" ];then
    echo "Is a directoy"
elif [ -L "$1"];then
    echo "Is a link file"
else
    echo "Is an other file"
fi
7、vim编辑器自动生成脚本基本格式信息,包括作者,联系方式,版本,时间,描述等信息
[root@centos7 ~]#vim .vimrc
set cul
set hlsearch
set autoindent
set ts=4
autocmd BufNewFile *.sh exec ":call SetTitle()"
func SetTitle()
    if expand("%:e") == 'sh'
    call setline(1,"#!/bin/bash")
    call setline(2,"#")
    call setline(3,"#********************************************************************")
    call setline(4,"#Author:        Eddie")
    call setline(5,"#QQ:            3********")
    call setline(6,"#Date:          ".strftime("%Y-%m-%d"))
    call setline(7,"#FileName:      ".expand("%"))
    call setline(8,"#Description:   The test script")
    call setline(9,"#Copyright (C): ".strftime("%Y")." All rights reserved")
    call setline(10,"#********************************************************************")
    call setline(11,"")
    endif
endfunc
autocmd BufNewFile * normal G
8、系统初始化脚本 reset.sh(持续完善中)
cat /etc/profile.d/env.sh << EOF
PS1="\[\e[1;31m\][\u@\h \W]\\$\[\e[0m\]"
EDITOR=vim
HISTTIMEFORMAT="%F %T "
HISTCONTROL=ignoreboth
EOF

cat > ~/.bashrc << EOF
alias rm='rm -i'
alias cp='cp -i'
alias mv='mv -i'
alias vi='vim'
alias cdnet='cd /etc/sysconfig/network-scripts/'
alias editnet='vim /etc/sysconfig/network-scripts/ifcfg-ens33'

cat > ~/.vimrc << EOF
set ignorecase
set cursorline
set autoindent
set hlsearch
set ts=4
autocmd BufNewFile *.sh exec ":call SetTitle()"
func SetTitle()
    if expand("%:e") == 'sh'
    call setline(1,"#!/bin/bash")
    call setline(2,"#")
    call setline(3,"#********************************************************************")
    call setline(4,"#Author:        Eddie")
    call setline(5,"#QQ:            3********")
    call setline(6,"#Date:          ".strftime("%Y-%m-%d"))
    call setline(7,"#FileName:      ".expand("%"))
    call setline(8,"#Description:   The test script")
    call setline(9,"#********************************************************************")
    call setline(10,"")
    endif
endfunc
autocmd BufNewFile * normal G

#关闭selinux
sed -i  's/SELINUX=enforcing/SELINUX=disabled/ ' /etc/selinux/config
#centos7中将网卡ens33改为eth0
sed -ri '/^[[:space:]]+linux16/s#(.*)#\1 net.ifnames=0#' /boot/grub2/grub.cfg
#7版本关闭防火墙
systemctl stop firewalld.service
systemctl disable firewalld.service
三、文件查找命令 locate与find
locate:
非实时查找(依赖/var/lib/mlocate/mlocate.db文件索引数据库),查找速度快,适合查找不频繁修改变动的历史文件,搜索的是文件的全路径。
使用updatedb命令可以手动更新locate命令所依赖的mlocate.db文件索引数据库文件
find:
实时查找,通过遍历指定路径完成文件精确查找,查找速度略慢。
1、查找/var目录下属主为root,且属组为mail的所有文件
[root@centos7 ~]#find /var/ -user root -group mail 2、查找/var目录下不属于root、lp、gdm的所有文件
[root@centos7 ~]#find /var -not \( -user root -o -user lp -o -user gdm \)3、找出/home/var/log目录下删除所有以.log结尾的文件并无需人工确认删除
[root@centos7 ~]#find /home/var/log -name "*.log" -exec rm {} \;4、找出/etc目录下所有以.conf结尾的文件
[root@centos7 ~]#find /etc -name "*.conf"5、将30天前的.log文件移动到old目录中
[root@centos7 ~]#find ./ -type f -ctime +30 -name "*.log" -exec mv {} old \;6、查找/tmp目录下,u,g,o任何一类用户(至少有一类)中有读或写权限的文件
[root@centos7 ~]#find /tmp/ -perm /666 -ls7、查找/tmp目录下,权限为104的文件
[root@centos7 ~]#find /tmp/ -perm 104 -ls8、查找/tmp目录下,任何一类用户的任何一位权限有执行或读权限的文件
[root@centos7 ~]#find /tmp/ /555 -ls四、文件压缩及打包
文件压缩命令
compress/uncompress/zcat
compress [-dfvcVr] [-b maxbits] [file ...]
-d 解压缩,相当于uncompress
-c 结果输出至标准输出,不删除原文件
-v 显示详情
uncompress file.Z 解压缩
zcat file.Z 不显式解压缩的前提下查看文本文件内容
示例:zcat file.Z >file
gzip/gunzip/zcat
gzip [OPTION]... FILE ...
-d 解压缩,相当于gunzip
-c 结果输出至标准输出,保留原文件不改变
-# 指定压缩比,#取值为1-9,值越大压缩比越大
gunzip file.gz 解压缩
zcat file.gz 不显式解压缩的前提下查看文本文件内容
示例:
gzip -c messages >messages.gz
gzip -c -d messages.gz > messages
zcat messages.gz > messages
cat messages | gzip > m.gz
bzip2/bunzip2/bzcat
bzip2 [OPTION]... FILE ...
-k keep, 保留原文件
-d 解压缩
-# 1-9,压缩比,默认为9
bunzip2 file.bz2 解压缩
bzcat file.bz2 不显式解压缩的前提下查看文本文件内容
xz/unxz/xzcat
xz [OPTION]... FILE ...
-k keep, 保留原文件
-d 解压缩
-# 压缩比,取值1-9,默认为6
unxz file.xz 解压缩
xzcat file.xz 不显式解压缩的前提下查看文本文件内容
zip/unzip
打包压缩
zip –r /backup/sysconfig /etc/sysconfig/
解包解压缩
unzip sysconfig.zip
cat /var/log/messages | zip messages -
unzip -p message > message
文件打包命令 tar与cpio
tar
tar(Tape ARchive,磁带归档的缩写)
tar [OPTION]...
(1) 创建归档
tar -cpvf /PATH/FILE.tar FILE...
(2) 追加文件至归档: 注:不支持对压缩文件追加
tar -r -f /PATH/FILE.tar FILE...
(3) 查看归档文件中的文件列表
tar -t -f /PATH/FILE.tar
(4) 展开归档
tar -x -f /PATH/FILE.tar
tar -x -f /PATH/FILE.tar -C /PATH/
(5) 结合压缩工具实现:归档并压缩
-j: bzip2, -z: gzip, -J: xz
-exclude 排除文件
tar zcvf /root/a3.tgz --exclude=/app/host1 --exclude=/app/host2 /app
-T 选项指定输入文件 -X 选项指定包含要排除的文件列表
tar zcvf mybackup.tgz -T /root/includefilelist -X /root/excludefilelist
split:分割一个文件为多个文件
split -b Size –d tar-file-name prefix-name
split -b 1M –d mybackup.tgz mybackup-parts
split -b 1M mybackup.tgz mybackup-parts
合并:cat mybackup-parts* > mybackup.tar.gz
cpio
功能:复制文件从或到归档
cpio命令是通过重定向的方式将文件进行打包备份,还原恢复的工具,它可以解压以“.cpio”或者“.tar”结尾的文件

cpio [选项] > 文件名或者设备名
cpio [选项] < 文件名或者设备名

选项
-o 将文件拷贝打包成文件或者将文件输出到设备上
-O filename 输出到指定的归档文件名
-A 向已存在的归档文件中追加文件
-i 解包,将打包文件解压或将设备上的备份还原到系统
-I filename 对指定的归档文件名解压
-t 预览,查看文件内容或者输出到设备上的文件内容
-F filename 使用指定的文件名替代标准输入或输出
-d 解包生成目录,在cpio还原时,自动的建立目录
-v 显示打包过程中的文件名称

示例:
将etc目录备份:
find ./etc -print |cpio -ov >bak.cpio
将/data内容追加bak.cpio
find /data | cpio -oA -F bak.cpio
内容预览
cpio –tv < etc.cpio
解包文件
cpio –idv < etc.cpio
例1、把old整个目录打包压缩且文件名为bak.tar
[root@centos7 ~]#tar -cvf bak.tar old例2、把httpd压缩归档文件,展开到/tmp目录下
[root@centos7 ~]#tar -xvf httpd-2.4.25.tar.bz2 -C /tmp/例3、使用gzip归档压缩,将test目录归档压缩到tmp目录下名为test.tar.gz
[root@centos7 ~]#tar -zcvf /tmp/test.tar.gz ./test例4、使用bzip2归档压缩,将test目录归档压缩到tmp目录下名为test.tar.bz2
[root@centos7 ~]#tar -jcvf /tmp/test.tar.bz2 ./test例5、使用xz归档压缩,将test目录归档压缩到tmp目录下名为test.tar.xz
[root@centos7 ~]#tar -Jcvf /tmp/test.tar.xz ./test例6、使用zip打包压缩,把testdir目录,打包压缩名称为testdir.zip
[root@centos7 ~]#zip -r testdir.zip ./testdir例7、压testdir.zip文件
[root@centos7 ~]#unzip testdir.zip