Linux各种软件的安装(Ubuntu18.04为例)
1.google浏览器的安装
参见我的博客
2.anaconda的安装
参见我的博客
3.markdown文档的安装
参见我的博客
4.NVIDA,CUDA等的安装
参见我的博客
5.WPS的安装
进入wps官网,下载linux版(.deb格式),双击直接安装即可
6.网易云音乐的安装
进入网易云音乐官网,下载linux版(.deb格式),双击直接安装即可
7.搜狗输入法的安装
进入搜狗输入法官网,下载linux版(.deb格式),双击直接安装。
进入到系统设置,语言设置,进入Manage installed languages,即这个界面
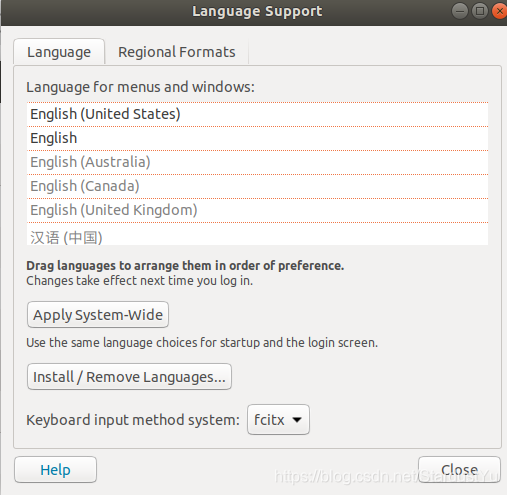
将Keyboard input method system 更改为fcitx。
重启计算机,点击右上角的图标
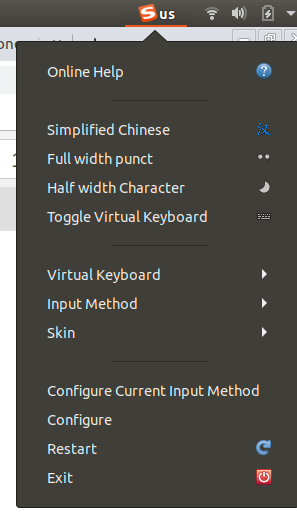
进入congfigure,点击左下角加号
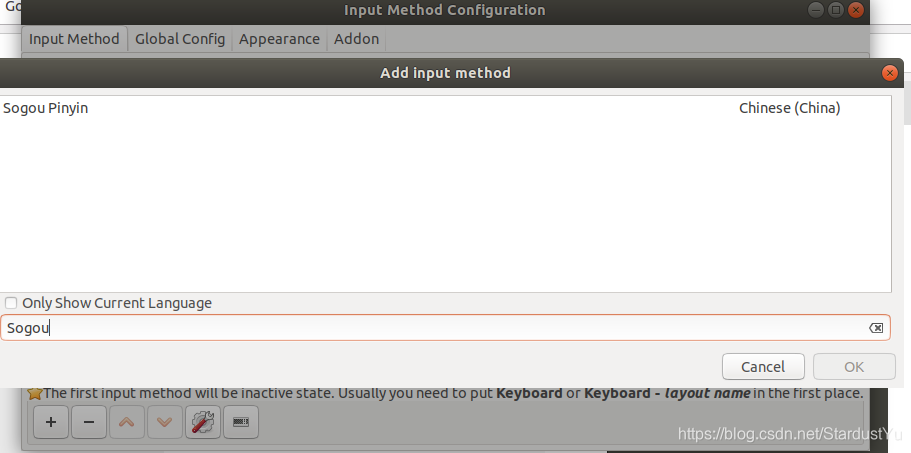
将Only Show Current Language取消勾选,搜索Sogou,添加即可。
8.pycharm的安装
下载
进入pycharm官网下载
安装
打开刚才下载的目录。右击文件,点击提取到此处。
解压完成后,打开刚才解压好的文件夹,然后再打开bin目录。
在文件夹空白处右击,在此处打开终端然后输入:sh ./pycharm.sh 回车
接着就打开了pycharm。
激活
sudo nautilus
去此网站,获取注册码
在安装的过程中,输入此注册码,即可
在pycharm中的顶部菜单栏tools -> Create desktop entry。即可将pycharm加入菜单中
9.guake的安装
sudo apt-get install guake
10.QQ的安装
下载Wine-QQ
进入下载的文件夹,打开终端
chmod a+x *.AppImage
./*.AppImage
或者
https://github.com/wszqkzqk/deepin-wine-ubuntu
根据步骤安装deepin
然后下载QQ,双击安装即可
如果是64位系统,可能需要依赖支持
sudo dpkg --add-architecture i386
sudo apt-get update
# 可能需要添加下列32位库
sudo apt-get install lib32z1 lib32ncurses5
11.Shell软件(ZSH的安装)
zsh安装
sudo apt-get install zsh
oh-my-zsh安装
curl 方式:
sh -c "$(curl -fsSL https://raw.github.com/robbyrussell/oh-my-zsh/master/tools/install.sh)"

wget 方式:
sh -c "$(wget https://raw.github.com/robbyrussell/oh-my-zsh/master/tools/install.sh -O -)"
切换默认Shell
chsh -s /bin/zsh
安装autojump自动跳转插件
sudo apt-get install autojump
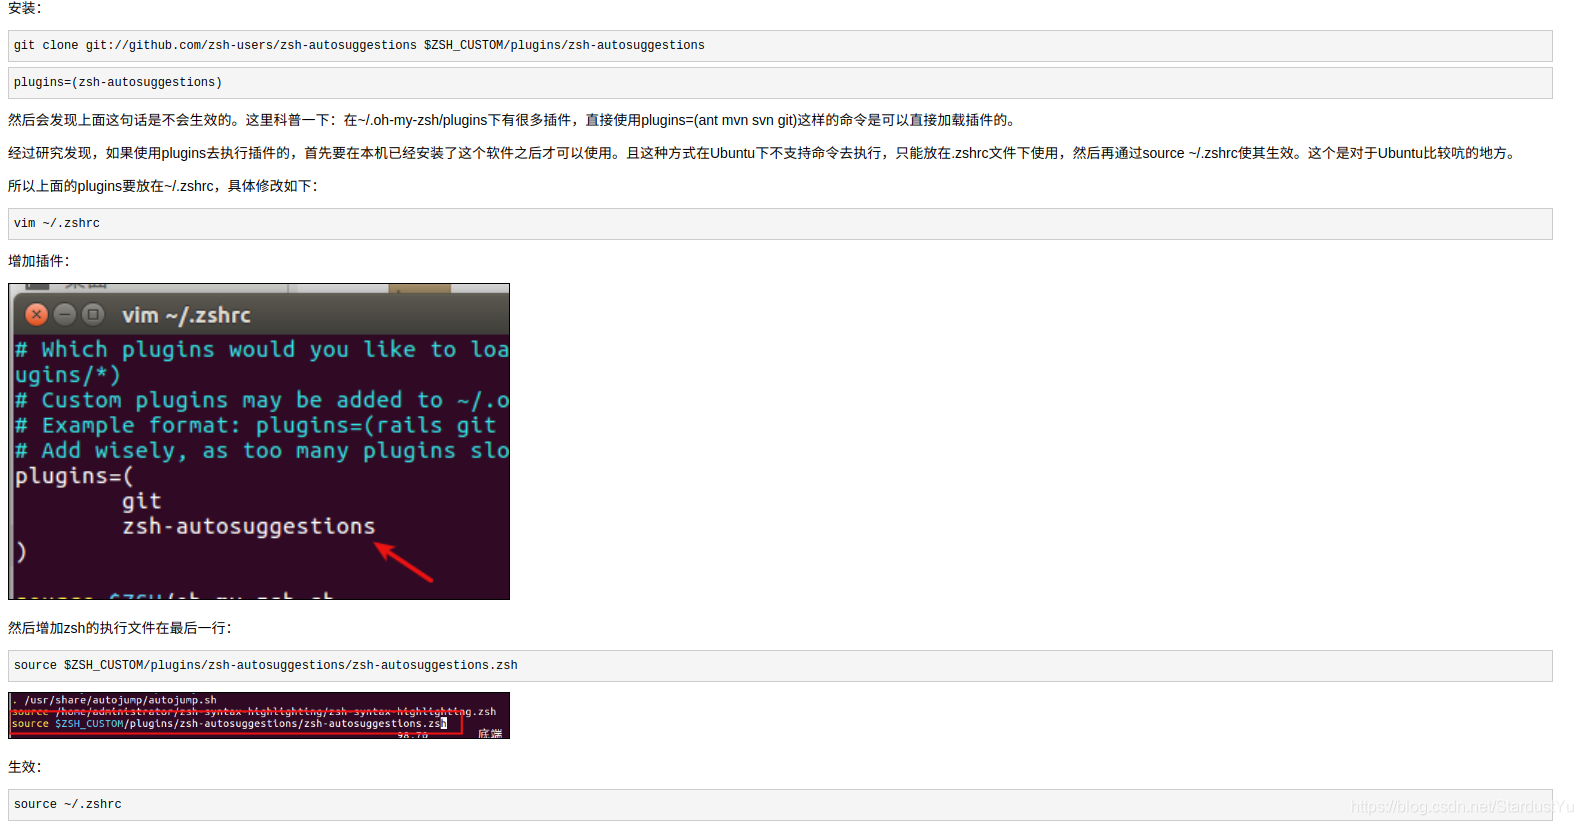
vim .zshrc
#在最后一行加入,注意点后面是一个空格
. /usr/share/autojump/autojump.sh
source ~/.zshrc
安装zsh-syntax-highlighting语法高亮插件
git clone https://github.com/zsh-users/zsh-syntax-highlighting.git
echo "source ${(q-)PWD}/zsh-syntax-highlighting/zsh-syntax-highlighting.zsh" >> ${ZDOTDIR:-$HOME}/.zshrc
source ~/.zshrc
安装zsh-autosuggestions语法历史记录插件
git clone git://github.com/zsh-users/zsh-autosuggestions $ZSH_CUSTOM/plugins/zsh-autosuggestions
plugins=(zsh-autosuggestions)
vim ~/.zshrc
然后增加zsh的执行文件在最后一行:
source $ZSH_CUSTOM/plugins/zsh-autosuggestions/zsh-autosuggestions.zsh
source ~/.zshrc
zsh主题修改
vim ~/.zshrc

修改ZSH_THEME为自己想要的主题
推荐avit

cd ~/.oh-my-zsh/themes
ls
来查看所有的可用主题,将上面的ZSH_THEME更改成相应的名字即可
可以修改 里面的文件,来对相应的主题进行修改
12.安装sublime
#安装GPG
wget -qO - https://download.sublimetext.com/sublimehq-pub.gpg | sudo apt-key add -

#确保apt被设置为https源
sudo apt-get install apt-transport-https

#选择稳定版本
echo "deb https://download.sublimetext.com/ apt/stable/" | sudo tee /etc/apt/sources.list.d/sublime-text.list

#安装sublime-text
sudo apt-get update
sudo apt-get install sublime-text
13.华科有线校园网客户端
(deb包)下载地址:
MentoHUST V0.3.4 for Ubuntu i386 与 MentoHUST V0.3.4 for Ubuntu amd64 下载
免费下载地址在 http://linux.linuxidc.com/
具体下载目录在 /2013年资料/1月/20日/Ubuntu下使用MentoHUST代替锐捷认证上网
解压后,运行.deb文件即可
sudo mentohust
配置如下
eric@eric-Satellite-C850:~/Downloads/mentohust_0.3.4-1_amd64$ sudo mentohust
欢迎使用MentoHUST	版本: 0.3.4
Copyright (C) 2009-2010 HustMoon Studio
人到华中大,有甜亦有辣。明德厚学地,求是创新家。
Bug report to http://code.google.com/p/mentohust/issues/list

** 网卡[1]:	eth0
** 网卡[2]:	wlan0
** 网卡[5]:	nflog
** 网卡[6]:	nfqueue
** 网卡[7]:	usbmon1
** 网卡[8]:	usbmon2
** 网卡[9]:	usbmon3
** 网卡[10]:	usbmon4
?? 请选择网卡[1-10]: 1
** 您选择了第[1]块网卡。
?? 请输入用户名: yourusername
?? 请输入密码: yourpassword
?? 请选择组播地址(0标准 1锐捷私有 2赛尔): 0
?? 请选择DHCP方式(0不使用 1二次认证 2认证后 3认证前): 2
** 用户名:	M201672859
** 网卡: 	eth0
** 认证超时:	8秒
** 心跳间隔:	30秒
** 失败等待:	15秒
** 允许失败:	8次
** 组播地址:	标准
** DHCP方式:	认证后
** 通知超时:	5秒
** DHCP脚本:	dhclient
!! 在网卡eth0上获取IP失败!
!! 在网卡eth0上获取子网掩码失败!
** 本机MAC:	00:26:6c:11:36:00
** 使用IP:	0.0.0.0
** 子网掩码:	255.255.255.255
** 认证参数已成功保存到/etc/mentohust.conf.
>> 寻找服务器...
** 认证MAC:	00:1a:a9:17:ff:ff
>> 发送用户名...
>> 发送密码...
>> 认证成功!
$$ 系统提示:	1.关于防范ONION勒索软件病毒攻击的紧急通知http://ncc.hust.edu.cn/tz12/945.jhtml
2.关于2017年暑假校园网对外服务的通知http://ncc.hust.edu.cn/tz06/948.jhtml


!! 打开libnotify失败,请检查是否已安装该库文件。
>> 正在获取IP...
>> 操作结束。
** 本机MAC:	00:26:6c:11:36:00
** 使用IP:	115.156.162.119
** 子网掩码:	255.255.254.0
>> 发送心跳包以保持在线...
14.音乐软件cocomusic的下载
Linux版音乐CoCoMusic最新版本是2.0.2,提供deb、tar.xz、AppImage等安装包,它被称为Linux版的QQ音乐,主要是因为它使用了QQ音乐的曲库,当然这款软件不会是自家的软件产品,只是一个热心的程序员无私的奉献精品。下面将为你带来CoCoMusic的安装方法及使用报告。
下载地址
15.vscode的下载
官网https://code.visualstudio.com/
16.shadowsocks配置
此处为windows 安卓 ios版 shadowsocks下载地址
第一步 : 购买一台服务器
博主购买的阿里云服务器
购买完毕后,可以得到 ip地址
同时设置登录密码

第二步 在本地连接远程服务器,配置shadowsocks
以ip为00.00.00.00为例, 以下修改成自己的ip地址即可
ssh [email protected]
输入密码登录成功后,配置shadowsocks
安装
wget --no-check-certificate -O shadowsocks-all.sh https://raw.githubusercontent.com/teddysun/shadowsocks_install/master/shadowsocks-all.sh

chmod +x shadowsocks-all.sh

./shadowsocks-all.sh 2>&1 | tee shadowsocks-all.log
配置如下:

第一步 默认
第二步 设置自己的密码 随你自己
第三步 设置端口号,选一个喜欢的数字即可,博主选择443
配置完成后,显示如下信息
Congratulations, your_shadowsocks_version install completed!
Your Server IP        :your_server_ip       //在这里显示的是00.00.00.00
Your Server Port      :your_server_port      //端口号显示43
Your Password         :your_password        //显示你设置的密码
Your Encryption Method:your_encryption_method

Your QR Code: (For Shadowsocks Windows, OSX, Android and iOS clients)
 ss://your_encryption_method:your_password@your_server_ip:your_server_port
Your QR Code has been saved as a PNG file path:
 your_path.png

Welcome to visit:https://teddysun.com/486.html
Enjoy it!
shadowsocks操作:启动|停止|重启|状态
Shadowsocks-Python 版:
/etc/init.d/shadowsocks-python start | stop | restart | status

ShadowsocksR 版:
/etc/init.d/shadowsocks-r start | stop | restart | status

Shadowsocks-Go 版:
/etc/init.d/shadowsocks-go start | stop | restart | status

Shadowsocks-libev 版:
/etc/init.d/shadowsocks-libev start | stop | restart | status
在这里就配置好了服务器端了,你可以在windows 安卓 ios 使用 shadowsocks客户端 直接连接。
linux的配置如下
第三步 在linux配置shadowsocks
安装shadowsocks
pip install shadowsocks --user
配置
sudo vi /etc/shadowsocks.json
写入如下信息:
{
  "server":"my_server_ip",
  "local_address": "127.0.0.1",
  "local_port":1080,
  "server_port":my_server_port,
  "password":"my_password",
  "timeout":300,
  "method":"aes-256-cfb"
}
 注释:
 \\  my_server_ip 在这里就是00.00.00.00
 \\  my_server_port 在这里就是43
 \\  my_password  在这里就是你自己设置的密码
设置开机自启
sudo vim /etc/systemd/system/shadowsocks.service
写入
[Unit]
Description=Shadowsocks Client Service
After=network.target

[Service]
Type=simple
User=root
ExecStart=/usr/bin/sslocal -c (path to shadowsocks.json)

[Install]
WantedBy=multi-user.target
将(path to shadowsocks.json)替换成自己json文件的目录,如默认的:/etc/shadowsocks.json
配置生效
systemctl enable /etc/systemd/system/shadowsocks.service
第四步 安装Google SwitchyOmega 插件更好的访问各种网站(可选)
这个插件的意义在于,可以在访问国内网站使用本地服务器,访问国外网站使用国外服务器
进入谷歌应用商店 搜索,其配置过程如下:
配置 Proxy
Server填写shadowsocks.json配置中的local_address
Port填写shadowsocks.json配置中的local_port
左边Apply changes保存。

配置 Auto Switch
Rule list rules的Profile填proxy
Default的Profile填[Direct]
Rule List Format选择AutoProxy
Rule List URL填写gfwlist的规则:
https://raw.githubusercontent.com/gfwlist/gfwlist/master/gfwlist.txt
下载规则文件Download Profile Now
左边Apply changes保存

启用 SwitchyOmega ,选择 Auto Switch 模式就可以了。
所有配置完成了