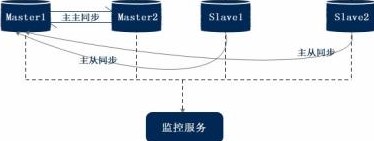
MMM高可用集群案例拓扑图:
环境准备:
主服务器1:192.168.18.146 db1 vip:192.168.18.250
主服务器2:192.168.18.147 db2
从服务器1:192.168.18.128 db3 vip:192.168.18.251
从服务器2:192.168.18.148 db4 vip:192.168.18.252
监控服务器:192.168.18.145
Master1:
[root@localhost ~]# wget -O /etc/yum.repos.d/CentOS-Base.repo http://mirrors.aliyun.com/repo/Centos-7.repo
[root@localhost ~]# yum install epel-release -y
[root@localhost ~]# yum clean all && yum makecache
[root@localhost ~]# vim /etc/my.cnf
//在行首按9dd删除9行
[mysqld]
log_error=/var/lib/mysql/mysql.err
log=/var/lib/mysql/mysql_log.log
log_slow_queries=/var/lib/mysql_slow_queris.log
binlog-ignore-db=mysql,information_schema
character_set_server=utf8
log_bin=mysql_bin
server_id=1
log_slave_updates=true
sync_binlog=1
auto_increment_increment=2
auto_increment_offset=1
//输入:wq保存退出
[root@localhost ~]# systemctl start mariadb.service
[root@localhost ~]# systemctl stop firewalld.service
[root@localhost ~]# setenforce 0
[root@localhost ~]# netstat -ntap | grep 3306
tcp        0      0 0.0.0.0:3306            0.0.0.0:*        LISTEN      2989/mysqld
[root@localhost ~]# mysql
Welcome to the MariaDB monitor.  Commands end with ; or \g.
Your MariaDB connection id is 3
Server version: 5.5.64-MariaDB MariaDB Server
Copyright (c) 2000, 2018, Oracle, MariaDB Corporation Ab and others.
Type 'help;' or '\h' for help. Type '\c' to clear the current input statement.
MariaDB [(none)]> show master status;
+------------------+----------+--------------+--------------------------+
| File             | Position | Binlog_Do_DB | Binlog_Ignore_DB         |
+------------------+----------+--------------+--------------------------+
| mysql_bin.000001 |      245 |              | mysql,information_schema |
+------------------+----------+--------------+--------------------------+
1 row in set (0.00 sec)

MariaDB [(none)]> grant replication slave on *.* to 'replication'@'192.168.18.%' identified by '123456';
Query OK, 0 rows affected (0.02 sec)

MariaDB [(none)]> change master to master_host='192.168.18.147',master_user='replication',master_password='123456',master_log_file='mysql_bin.000001',master_log_pos=245;
Query OK, 0 rows affected (0.01 sec)

MariaDB [(none)]> show slave status\G;
*************************** 1. row ***************************
               Slave_IO_State: Waiting for master to send event
                  Master_Host: 192.168.18.147
                  Master_User: replication
                  Master_Port: 3306
                Connect_Retry: 60
              Master_Log_File: mysql_bin.000001
          Read_Master_Log_Pos: 575
               Relay_Log_File: mariadb-relay-bin.000002
                Relay_Log_Pos: 694
        Relay_Master_Log_File: mysql_bin.000001
             Slave_IO_Running: Yes
            Slave_SQL_Running: Yes
......以下省略多行
//以上两个状态显示为YSE就是正常

MariaDB [(none)]> create database school;
Query OK, 1 row affected (0.00 sec)
//创建school

MariaDB [(none)]> show databases;
+--------------------+
| Database           |
+--------------------+
| information_schema |
| mysql              |
| performance_schema |
| test               |
+--------------------+
4 rows in set (0.00 sec)
//因为从master2中删除了数据库中的school,所以master1中同步删除

MariaDB [(none)]> create database myschool;
Query OK, 1 row affected (0.01 sec)
//两台从服务器上开启同步过后,在master1上创建myschool
Master2:
[root@localhost ~]# yum install epel-release -y
[root@localhost ~]# yum clean all && yum makecache
[root@localhost ~]# vim /etc/my.cnf
//在行首按9dd删除9行
[mysqld]
log_error=/var/lib/mysql/mysql.err
log=/var/lib/mysql/mysql_log.log
log_slow_queries=/var/lib/mysql_slow_queris.log
binlog-ignore-db=mysql,information_schema
character_set_server=utf8
log_bin=mysql_bin
server_id=2
log_slave_updates=true
sync_binlog=1
auto_increment_increment=2
auto_increment_offset=1
//输入:wq保存退出
[root@localhost ~]# systemctl start mariadb.service
[root@localhost ~]# systemctl stop firewalld.service
[root@localhost ~]# setenforce 0
[root@localhost ~]# netstat -ntap | grep 3306
tcp        0      0 0.0.0.0:3306            0.0.0.0:*        LISTEN      2989/mysqld
[root@localhost ~]# mysql
Welcome to the MariaDB monitor.  Commands end with ; or \g.
Your MariaDB connection id is 3
Server version: 5.5.64-MariaDB MariaDB Server
Copyright (c) 2000, 2018, Oracle, MariaDB Corporation Ab and others.
Type 'help;' or '\h' for help. Type '\c' to clear the current input statement.
MariaDB [(none)]> show master status;
+------------------+----------+--------------+--------------------------+
| File             | Position | Binlog_Do_DB | Binlog_Ignore_DB         |
+------------------+----------+--------------+--------------------------+
| mysql_bin.000001 |      245 |              | mysql,information_schema |
+------------------+----------+--------------+--------------------------+
1 row in set (0.00 sec)

MariaDB [(none)]> grant replication slave on *.* to 'replication'@'192.168.18.%' identified by '123456';
Query OK, 0 rows affected (0.02 sec)

MariaDB [(none)]> change master to master_host='192.168.18.146',master_user='replication',master_password='123456',master_log_file='mysql_bin.000001',master_log_pos=245;
Query OK, 0 rows affected (0.01 sec)

MariaDB [(none)]> show slave status\G;
*************************** 1. row ***************************
               Slave_IO_State: Waiting for master to send event
                  Master_Host: 192.168.18.146
                  Master_User: replication
                  Master_Port: 3306
                Connect_Retry: 60
              Master_Log_File: mysql_bin.000001
          Read_Master_Log_Pos: 575
               Relay_Log_File: mariadb-relay-bin.000002
                Relay_Log_Pos: 694
        Relay_Master_Log_File: mysql_bin.000001
             Slave_IO_Running: Yes
            Slave_SQL_Running: Yes
......以下省略多行
//以上两个状态显示为YSE就是正常

MariaDB [(none)]> show databases;
+--------------------+
| Database           |
+--------------------+
| information_schema |
| mysql              |
| performance_schema |
| school             |
| test               |
+--------------------+
5 rows in set (0.00 sec)
//此时可以看到在master1中建的school

MariaDB [(none)]> drop database school;
Query OK, 0 rows affected (0.01 sec)
//删除数据中的school
MariaDB [(none)]> show databases;
+--------------------+
| Database           |
+--------------------+
| information_schema |
| mysql              |
| performance_schema |
| test               |
+--------------------+
4 rows in set (0.00 sec)

MariaDB [(none)]> show databases;
+--------------------+
| Database           |
+--------------------+
| information_schema |
| myschool           |
| mysql              |
| performance_schema |
| test               |
+--------------------+
5 rows in set (0.01 sec)
//此时可以同步到master1上的更新数据
Slave1:
[root@localhost ~]# yum install epel-release -y
[root@localhost ~]# yum clean all && yum makecache
[root@localhost ~]# vim /etc/my.cnf
//在行首按9dd删除9行
[mysqld]
log_error=/var/lib/mysql/mysql.err
log=/var/lib/mysql/mysql_log.log
log_slow_queries=/var/lib/mysql_slow_queris.log
binlog-ignore-db=mysql,information_schema
character_set_server=utf8
log_bin=mysql_bin
server_id=3
log_slave_updates=true
sync_binlog=1
auto_increment_increment=2
auto_increment_offset=1
//输入:wq保存退出
[root@localhost ~]# systemctl start mariadb.service
[root@localhost ~]# systemctl stop firewalld.service
[root@localhost ~]# setenforce 0
[root@localhost ~]# netstat -ntap | grep 3306
tcp        0      0 0.0.0.0:3306            0.0.0.0:*        LISTEN      2989/mysqld
[root@localhost ~]# mysql
Welcome to the MariaDB monitor.  Commands end with ; or \g.
Your MariaDB connection id is 4
Server version: 5.5.64-MariaDB MariaDB Server
Copyright (c) 2000, 2018, Oracle, MariaDB Corporation Ab and others.
Type 'help;' or '\h' for help. Type '\c' to clear the current input statement.
MariaDB [(none)]> change master to master_host='192.168.18.146',master_user='replication',master_password='123456',master_log_file='mysql_bin.000001',master_log_pos=245;

MariaDB [(none)]> start slave;
Query OK, 0 rows affected (0.00 sec)

MariaDB [(none)]> show databases;
+--------------------+
| Database           |
+--------------------+
| information_schema |
| myschool           |
| mysql              |
| performance_schema |
| test               |
+--------------------+
5 rows in set (0.01 sec)
//此时可以同步到master1上的更新数据
Slave2:
[root@localhost ~]# yum install epel-release -y
[root@localhost ~]# yum clean all && yum makecache
[root@localhost ~]# vim /etc/my.cnf
//在行首按9dd删除9行
[mysqld]
log_error=/var/lib/mysql/mysql.err
log=/var/lib/mysql/mysql_log.log
log_slow_queries=/var/lib/mysql_slow_queris.log
binlog-ignore-db=mysql,information_schema
character_set_server=utf8
log_bin=mysql_bin
server_id=4
log_slave_updates=true
sync_binlog=1
auto_increment_increment=2
auto_increment_offset=1
//输入:wq保存退出
[root@localhost ~]# systemctl start mariadb.service
[root@localhost ~]# systemctl stop firewalld.service
[root@localhost ~]# setenforce 0
[root@localhost ~]# netstat -ntap | grep 3306
tcp        0      0 0.0.0.0:3306            0.0.0.0:*        LISTEN      2989/mysqld
[root@localhost ~]# mysql
Welcome to the MariaDB monitor.  Commands end with ; or \g.
Your MariaDB connection id is 4
Server version: 5.5.64-MariaDB MariaDB Server
Copyright (c) 2000, 2018, Oracle, MariaDB Corporation Ab and others.
Type 'help;' or '\h' for help. Type '\c' to clear the current input statement.
MariaDB [(none)]> change master to master_host='192.168.18.146',master_user='replication',master_password='123456',master_log_file='mysql_bin.000001',master_log_pos=245;

MariaDB [(none)]> start slave;
Query OK, 0 rows affected (0.00 sec)

MariaDB [(none)]> show databases;
+--------------------+
| Database           |
+--------------------+
| information_schema |
| myschool           |
| mysql              |
| performance_schema |
| test               |
+--------------------+
5 rows in set (0.01 sec)
//此时可以同步到master1上的更新数据
安装高群集可用软件:
[root@localhost ~]# yum install mysql-mmm* -y
//五台服务器都需要安装,包括监控服务器
//此处监控服务器区别于其他服务器,需要先:yum install epel-release -y

//在master1中修改配置文件:
[root@localhost ~]# cd /etc/mysql-mmm/
[root@localhost mysql-mmm]# ls
mmm_agent.conf  mmm_common.conf  mmm_mon.conf  mmm_mon_log.conf  mmm_tools.conf
[root@localhost mysql-mmm]# vim mmm_common.conf
active_master_role      writer

<host default>
    cluster_interface       ens33
    pid_path                /run/mysql-mmm-agent.pid
    bin_path                /usr/libexec/mysql-mmm/
    replication_user        replication
    replication_password    123456
    agent_user              mmm_agent
    agent_password          123456
</host>

<host db1>
    ip      192.168.18.146      //master1的IP地址
    mode    master
    peer    db2
</host>

<host db2>
    ip      192.168.18.147      //master2的IP地址
    mode    master
    peer    db1
</host>

<host db3>
    ip      192.168.18.128      //slave1的IP地址
    mode    slave
</host>

<host db4>
    ip      192.168.18.148      //slave2的IP地址
    mode    slave
</host>

<role writer>
    hosts   db1, db2
    ips     192.168.18.250
    mode    exclusive
</role>

<role reader>
    hosts   db3, db4
    ips     192.168.18.251, 192.168.18.252
    mode    balanced
</role>
~
//修改完成后输入:wq保存退出

//同步此配置文件到另外四台服务器上,需要输yes确定,并输入对应账户的密码
[root@localhost mysql-mmm]# scp mmm_common.conf [email protected]:/etc/mysql-mmm/
Are you sure you want to continue connecting (yes/no)? yes
[email protected]'s password:
mmm_common.conf                                   100%  837   622.3KB/s   00:00
[root@localhost mysql-mmm]# scp mmm_common.conf [email protected]:/etc/mysql-mmm/
Are you sure you want to continue connecting (yes/no)? yes
[email protected]'s password:
mmm_common.conf                                   100%  837   941.1KB/s   00:00
[root@localhost mysql-mmm]# scp mmm_common.conf [email protected]:/etc/mysql-mmm/
Are you sure you want to continue connecting (yes/no)? yes
[email protected]'s password:
mmm_common.conf                                   100%  837   805.6KB/s   00:00
[root@localhost mysql-mmm]# scp mmm_common.conf [email protected]:/etc/mysql-mmm/
Are you sure you want to continue connecting (yes/no)? yes
[email protected]'s password:
mmm_common.conf                                   100%  837   775.5KB/s   00:00
Monitor监控服务器上的操作:
[root@localhost ~]# systemctl stop firewalld.service
[root@localhost ~]# setenforce 0
[root@localhost ~]# wget -O /etc/yum.repos.d/CentOS-Base.repo http://mirrors.aliyun.com/repo/Centos-7.repo
[root@localhost ~]# yum install mysql-mmm* -y
[root@localhost mysql-mmm]# yum clean all && yum makecache
[root@localhost ~]# yum install mariadb mariadb-server -y
每台数据库服务器中进行授权代理:
[root@localhost mysql-mmm]# mysql
Welcome to the MariaDB monitor.  Commands end with ; or \g.
Your MariaDB connection id is 13
Server version: 5.5.64-MariaDB MariaDB Server
Copyright (c) 2000, 2018, Oracle, MariaDB Corporation Ab and others.
Type 'help;' or '\h' for help. Type '\c' to clear the current input statement.

MariaDB [(none)]> grant super, replication client, process on *.* to 'mmm_agent'@'192.168.18.%' identified by '123456';
Query OK, 0 rows affected (0.01 sec)

MariaDB [(none)]> grant replication client on *.* to 'mmm_monitor'@'192.168.18.%' identified by '123456';
Query OK, 0 rows affected (0.01 sec)

MariaDB [(none)]> flush privileges;         //刷新数据
Query OK, 0 rows affected (0.00 sec)
每台服务器上设定代理名称的操作:
两台主服务器上:
[root@localhost mysql-mmm]# vim mmm_agent.conf
//master1中,this is db1
//master2中,this is db2

两台从服务器上:
[root@localhost ~]# cd /etc/mysql-mmm/
[root@localhost mysql-mmm]# vim mmm_agent.conf
//slave1中,this is db3
//slave2中,this is db4

修改完成后输入:wq保存退出
所有主从服务器上开启代理功能:
[root@localhost mysql-mmm]# systemctl start mysql-mmm-agent.service
[root@localhost mysql-mmm]# systemctl enable mysql-mmm-agent.service
开启监控服务:
[root@localhost mysql-mmm]# systemctl start mysql-mmm-monitor.service验证地址是否漂移:
[root@localhost mysql-mmm]# mmm_control show
  db1(192.168.18.146) master/ONLINE. Roles: writer(192.168.18.250)
  db2(192.168.18.147) master/ONLINE. Roles:
  db3(192.168.18.128) slave/ONLINE. Roles: reader(192.168.18.251)
  db4(192.168.18.148) slave/ONLINE. Roles: reader(192.168.18.252)

//利用命令调整虚拟IP切换至master2:
[root@localhost mysql-mmm]# mmm_control move_role writer db2
OK: Role 'writer' has been moved from 'db1' to 'db2'. Now you can wait some time and check new roles info!
[root@localhost mysql-mmm]# mmm_control show
  db1(192.168.18.146) master/ONLINE. Roles:
  db2(192.168.18.147) master/ONLINE. Roles: writer(192.168.18.250)
  db3(192.168.18.128) slave/ONLINE. Roles: reader(192.168.18.251)
  db4(192.168.18.148) slave/ONLINE. Roles: reader(192.168.18.252)

//检测所有状态是否都正常:
[root@localhost mysql-mmm]# mmm_control checks all
db4  ping         [last change: 2019/11/25 15:25:54]  OK
db4  mysql        [last change: 2019/11/25 15:25:54]  OK
db4  rep_threads  [last change: 2019/11/25 15:25:54]  OK
db4  rep_backlog  [last change: 2019/11/25 15:25:54]  OK: Backlog is null
db2  ping         [last change: 2019/11/25 15:25:54]  OK
db2  mysql        [last change: 2019/11/25 15:25:54]  OK
db2  rep_threads  [last change: 2019/11/25 15:25:54]  OK
db2  rep_backlog  [last change: 2019/11/25 15:25:54]  OK: Backlog is null
db3  ping         [last change: 2019/11/25 15:25:54]  OK
db3  mysql        [last change: 2019/11/25 15:25:54]  OK
db3  rep_threads  [last change: 2019/11/25 15:25:54]  OK
db3  rep_backlog  [last change: 2019/11/25 15:25:54]  OK: Backlog is null
db1  ping         [last change: 2019/11/25 15:25:54]  OK
db1  mysql        [last change: 2019/11/25 15:25:54]  OK
db1  rep_threads  [last change: 2019/11/25 15:25:54]  OK
db1  rep_backlog  [last change: 2019/11/25 15:25:54]  OK: Backlog is null
以上就是所有的群集功能都完成了!
故障测试:
在监控服务器中把地址切回db1:
[root@localhost mysql-mmm]# mmm_control move_role writer db1
OK: Role 'writer' has been moved from 'db2' to 'db1'. Now you can wait some time and check new roles info!
[root@localhost mysql-mmm]# mmm_control show
  db1(192.168.18.146) master/ONLINE. Roles: writer(192.168.18.250)
  db2(192.168.18.147) master/ONLINE. Roles:
  db3(192.168.18.128) slave/ONLINE. Roles: reader(192.168.18.251)
  db4(192.168.18.148) slave/ONLINE. Roles: reader(192.168.18.252)
在master1中关闭服务:
[root@localhost mysql-mmm]# systemctl stop mariadb.service时再回到监控服务器中看是否会自动进行地址漂移:
[root@localhost mysql-mmm]# mmm_control show
  db1(192.168.18.146) master/HARD_OFFLINE. Roles:
  db2(192.168.18.147) master/ONLINE. Roles: writer(192.168.18.250)
  db3(192.168.18.128) slave/ONLINE. Roles: reader(192.168.18.251)
  db4(192.168.18.148) slave/ONLINE. Roles: reader(192.168.18.252)
//此时因为master1宕机,所以地址自动漂移到master2下
如果此时master1再次上线,不会抢占vip虚拟地址!
如果我们把slave1给宕机,再回到监控服务器,此时两个虚拟IP地址后会给到slave2从服务器:
[root@localhost mysql-mmm]# mmm_control show
  db1(192.168.18.146) master/ONLINE. Roles:
  db2(192.168.18.147) master/ONLINE. Roles: writer(192.168.18.250)
  db3(192.168.18.128) slave/HARD_OFFLINE. Roles:
  db4(192.168.18.148) slave/ONLINE. Roles: reader(192.168.18.251), reader(192.168.18.252)
//两个虚拟IP都会给到slave2(db4)
如果此时恢复slave1上线,那么192.168.18.251这个虚拟地址又重新回到slave1上!
在Master1上为监控服务器地址授权登录:
[root@localhost mysql-mmm]# mysql
Welcome to the MariaDB monitor.  Commands end with ; or \g.
Your MariaDB connection id is 796
Server version: 5.5.64-MariaDB MariaDB Server
Copyright (c) 2000, 2018, Oracle, MariaDB Corporation Ab and others.
Type 'help;' or '\h' for help. Type '\c' to clear the current input statement.

MariaDB [(none)]> grant all on *.* to 'zzz'@'192.168.18.145' identified by '123456';
Query OK, 0 rows affected (0.00 sec)

MariaDB [(none)]> flush privileges;
Query OK, 0 rows affected (0.00 sec)
在监控服务器上验证:
[root@localhost mysql-mmm]# mysql -u zzz -p -h 192.168.18.250
Enter password:         //输入zzz用户的密码
Welcome to the MariaDB monitor.  Commands end with ; or \g.
Your MariaDB connection id is 2376
Server version: 5.5.64-MariaDB MariaDB Server
Copyright (c) 2000, 2018, Oracle, MariaDB Corporation Ab and others.
Type 'help;' or '\h' for help. Type '\c' to clear the current input statement.

MariaDB [(none)]> create database KGC;          //创建KGC的数据库
Query OK, 1 row affected (0.01 sec)

**再回到master1上验证是否可以同步:**
MariaDB [(none)]>  show databases;
+--------------------+
| Database           |
+--------------------+
| information_schema |
| KGC                |
| myschool           |
| mysql              |
| performance_schema |
| test               |
+--------------------+
6 rows in set (0.01 sec)