把[root@localhost 1 ~] 源服务器上的/var/www/html目录时实同步到[root@localhost ~2]目标主机上的/web-back目录中。
概述
Linux内核从2.6.13版本开始提供了inotify通知接口,用来监控文件系统的各种变化情况,如文件存取、删除、移动等。利用这一机制,可以非常方便地实现文件异动告警、增量备份,并针对目录或文件的变化及时作出响应。使用rsync工具与inotify机制相结合,可以实现触发式备份(实时同步),只要原始位置的文档发生变化,则立即启动增量备份操作,否则处于静态等侍状态,这样一来,就避免了按固定周期备份进存在的延迟性、周期过密等问题。
环境 系统centos/6.9
inotify-tools源端:xuegod-63 IP:192.168.153.128
目标 端:[root@localhost ~2] IP:192.168.153.133
rsync 包 http://mirrors.163.com/centos/6.9/os/x86_64/Packages/rsync-3.0.6-12.el6.x86_64.rpm
inotify 包 http://github.com/downloads/rvoicilas/inotify-tools/inotify-tools-3.14.tar.gz
查看是否支持inotify,从kernel 2.6.13开始正式并入内核。
[root@localhost 1 ~]# uname -r
2.6.32-220.el6.x86_64
[root@localhost 1 ~]# ls /proc/sys/fs/inotify/
max_queued_events max_user_instances max_user_watches
注:
在linux内核中,默认的inotify机制提供了三个调控参数:
max_queued_events #表示监控事件队列
max_user_instances #表示最多监控实例数
max_user_watches #表示每个实例最多监控文件数
查看具体参数值:
[root@localhost 1 ~]# cat /proc/sys/fs/inotify/max_queued_events
16384
[root@localhost 1 ~]# cat /proc/sys/fs/inotify/max_user_instances
128
[root@localhost 1 ~]# cat /proc/sys/fs/inotify/max_user_watches
8192
注:当要监控的目录、文件数量较多或者变化较频繁时,要加大这三个参数的值。
例如:可直接修改/etc/sysctl.conf配置文件,将管理队列设为32768,实例数设为1024,监控数设为9000000(建议大于监控目标的总文件数)
安装 rsync
[root@localhost 1 ~]# tar zxvf rsync-3.1.2.tar.gz
[root@localhost 1 ~]# cd rsync-3.1.2
[root@localhost rsync-3.1.2]# ./configure && make && make install
自改配置文件
[root@localhost 1 ~]# vim /etc/syscrl.conf #以文件最后,添加以下内容
fs.inotify.max_queued_events = 32768
fs.inotify.max_user_instances = 1024
fs.inotify.max_user_watches = 90000000
[root@localhost 1 ~]# sysctl -p #使修改后的sysctl.conf文件生效
安装inotify-tools-3.13.tar:将拥有inotifywait、inotifywatch辅助工具程序,从而来监控、汇总文件系统改动情况。
[root@localhost 1 ~]# tar -zxvf inotify-tools-3.13.tar.gz #进行都文件的解压
[[root@localhost 1 ~]# cd inotify-tools-3.13
[root@localhost ~1 inotify-tools-3.13]# ./configure
[root@localhost ~1 inotify-tools-3.13]# make
[root@localhost ~1 inotify-tools-3.13]# make install
测试:
使用inotifywait命令监控网站目录/var/www/html发生的变化。然后在另一个终端向/var/www/html目录下添加文件、移动文件,查看屏幕输出结果。
[root@localhost ~1 ]# inotifywait -h
常用参数:
-e 用来指定要监控哪些事件。
这些事件包括: create创建,move移动,delete删除,modify修改文件内容,attrib属性更改。
-m 表示持续监控
-r 表示递归整个目录
-q 表示简化输出信息。
报错
inotifywait: error while loading shared libraries: libinotifytools.so.0: cannot open
shared object file: No such file or directory
[root@localhost 1 ~]# find / -name libinotifytools.so.0
/root/inotify-tools-3.14/libinotifytools/src/.libs/libinotifytools.so.0
/usr/local/lib/libinotifytools.so.0
这里有两种可能
操作系统上没有安装
操作系统找不到该库

如图所示 明明有安装 说明是操作系统找不到
方法一:
echo "/usr/lib64/mysol" >> /etc/ld.so.conf
ldconfig
ld.so.conf动态链接库装载器,操作系统会根据这里面写的路径去找库。
ldconfig是告诉操作系统要引入新的变量了,需要重新识别一下。
方法二:
export LD_LIBRARY_PATH=/usr/local/inotify/lib:$LD_LIBRARY_PATH
/usr/local/inotify/lib为该源码包要用的库的路径,引入该环境变量的时候操作系统就会去找该变量下的类库。

现在就能找到了
1.1上打开两个终端
1终端上开启监控
[root@localhost ~1 ]# inotifywait -mrq -e create,move,delete,modify /var/www/html/
#开启的监控具有创建,移动,删除和修改功能,监控到/var/www/html/下的数据变化‘
2终端上进行创建,移动,删除等命令
[root@localhost 1 ~]# echo aaa > /var/www/html/a.htal
[root@localhost 1 ~]# mkdir /var/www/html/test
[root@localhost 1 ~]# cp /etc/passwd /var/www/html/test/
[root@localhost 1 ~]# rm -rf /var/www/html/test/passwd
查看1终端上的数据信息变化
[root@localhost 1 ~]# inotifywait -mrq -e create,move,delete,modify /var/www/html/
/var/www/html/test/ CREATE passwd
/var/www/html/test/ MODIFY passwd
/var/www/html/test/ DELETE passwd
#我们可以看到,刚才在2终端上的命令意义在2终端上一一呈现出来了,这样就成功的监视了/var/www/html/的数据变化情况!使用inotifywait输出的监控结果中,每行记录中依次包括目录、事件、文件。据此可以识别变动情况。
编写触发式同步脚本
第一步,
同步时不需要输入密码:
[root@localhost 1 ~]发生变化后,直接将发生变化的数据同步到[root@localhost ~2],同步时不需要输入密码
同步秘钥
ssh-keygen -t rsa ##生成本主机的公钥
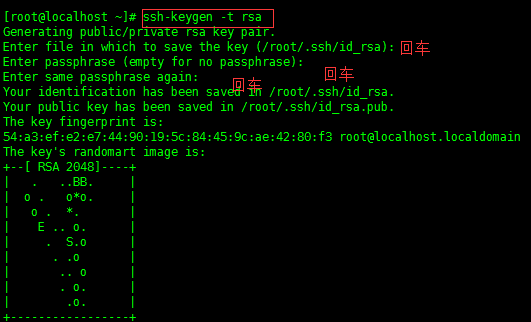
公钥生成成功存放在 /root/.ssh/id_rsa.pub
生成之后会在用户的根目录生成一个 “.ssh”的文件夹
进入“.ssh”会生成以下几个文件
authorized_keys:存放远程免密登录的公钥,主要通过这个文件记录多台机器的公钥
id_rsa : 生成的私钥文件
id_rsa.pub : 生成的公钥文件
know_hosts : 已知的主机公钥清单
如果希望ssh公钥生效需满足至少下面两个条件:
1) .ssh目录的权限必须是700
2) .ssh/authorized_keys文件权限必须是600
[[email protected]]# scp -p /root/.ssh/id_rsa.pub [email protected]:/root/.ssh/authorized_keys
拷贝自己的公钥到要登录的服务器153.133上。
测试
[root@localhost .ssh]# ssh 192.168.153.133
Last login: Thu Sep 14 16:25:04 2017 from 192.168.153.128
[root@localhost ~]# exit
logout
Connection to 192.168.153.133 closed.
#已经成功无需密码登陆远程客户端了
第二步:
编写触发式同步脚本
[root@localhost 1 ~]# vim a.sh
#!/bin/bash
inotifywait -mrq -e create,move,delete,modify /var/www/html/ | while read a b c
do
rsync -azP --delete /var/www/html/ [email protected]:/web-back
done
注意:
这里的rsync链接是默认的ssh端口22 链接 所以ssh端口有改动这里就要改变为
rsync -azP --delete -e 'ssh -p xxx' /var/www/html/ [email protected]:/web-back
给脚本添加课执行权限
[root@localhost 1 ~]# chmod +x a.sh
清空一下/var/www/html/下的所有内容
[root@localhost 1 ~]# rm -rf /var/www/html/*
1终端上执行脚本
[root@localhost 1 ~]# ./a.sh
2终端上测试—拷贝文件及创建目录
[root@localhost 1 ~]# cp -r /boot/grub/ /var/www/html/
[root@localhost 1 ~]# mkdir /var/www/html/test
[root@localhost 1 ~]# mkdir /var/www/html/111
1终端上查看执行脚本
[root@localhost 1 ~]# ./a.sh
wKiom1j4b6qD1080AAA1X7CBDhA744.png
看到
1.64上查看目录
[root@localhost 2 ~]# ls /web-back/
111 grub test
开机启动监控
[root@localhost 1 ~]# echo '/root/a.sh &' >> /etc/rc.local
优化此脚本:
[root@localhost ~1 ]# vim a.sh
#!/bin/sh
SRC=/var/www/html
[email protected]:/web-back
inotifywait -mrq -e modify,delete,create,attrib ${SRC} | while read D E F
do
/usr/bin/rsync -ahqzt --delete $SRC $DST
done
[root@localhost ~1 ]# cp /root/a.sh /opt/inotify_rsync.sh
[root@localhost ~1 ]# echo '/opt/inotify_rsync.sh &' >> /etc/rc.local
另有更完整的 其他操作
https://www.linuxidc.com/Linux/2017-05/143462.htm