虚拟机安装CentOS7最小版本及配置
背景原因:因考虑到CentOS7安装包占用过大,这里我根据个人需要采用CentOS最小安装,后续的一些配置会陆续添加其中
虚拟机安装CentOS最小版本(CentOS-7-x86_64-Minimal-1810.iso)的过程我在这里就不进行阐述,可以参考 :https://blog.csdn.net/hellboy0621/article/details/80392273
1.VMware最小化安装centos7安装共享文件夹实现虚拟机与Windows共享一个文件夹
1.点击虚拟选项卡下的安装VMware Tools

2.以root用户进入虚拟机并创建目录
[root@localhost ~]# mkdir -p /mnt/cdrom

3.装载CD-ROM
[root@localhost mnt]# mount -t auto /dev/cdrom /mnt/cdrom

4.将VMware-Tools安装包拷贝到/tmp下
[root@localhost mnt]# cd /tmp/
[root@localhost tmp]# cp /mnt/cdrom/VMwareTools-9.6.2-1688356.tar.gz ./

5.解压文件得到vmware-tools-distrib
tar -xzvf VMwareTools-9.6.2-1688356.tar.gz

6.进入vmware-tools-distrib 运行vmware-install.pl 命令:./vmware-install.pl

----------------安装VMwere Tools------------------------
遇到问题1:bash: ./vmware-install.pl: /usr/bin/perl: bad interpreter: 没有那个文件或目录

解决方法
yum install perl gcc kernel-devel
yum upgrade kernel kernel-devel
遇到问题2:centos 7 The path "" is not a valid path to the 3.10.0-957.5.1.el7.x86_64 kernel headers. Would you like to change it?
解决方法:Would you like to change it? no 再一路enter
遇到问题3:安装VMWare tools后/mnt中有hgfs但没共享文件
前提:在虚拟机软件中设置了共享目录
此时在linux中进入 /mnt/hgfs 文件夹,但发现共享的文件没有显示
使用以下办法解决(root权限):
1. vmware-hgfsclient 命令查看当前有哪些共享的目录,这里我只使用了share文件夹
[root@centos7 share]# vmware-hgfsclient
share
2.挂在共享文件目录
[root@centos7 hgfs]# mount -t vmhgfs .host:/share /mnt/hgfs
Error: cannot mount filesystem: No such device

补充:
如果显示
Error: cannot mount filesystem: No such device
centos7则先执行 yum install open-vm-tools
然后再执行vmhgfs-fuse .host:/share /mnt/hgfs
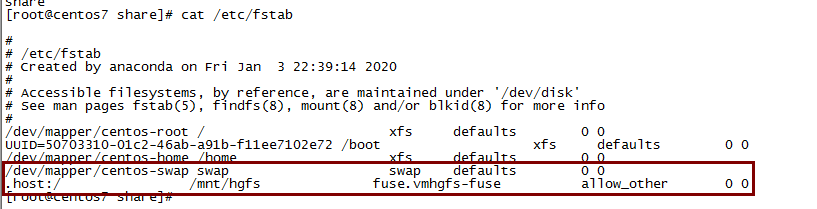
3.永久挂载 ---开机自动挂载
vi /etc/fstab
在最末行添加命令 .host:/ /mnt/hgfs fuse.vmhgfs-fuse allow_other 0 0
此处一定注意字节对齐,不然开不了机
2.安装工具集命令
[root@localhost vmware-tools-distrib]# yum -y install net-tools vim-enhanced wget
3.关闭CentOS7自带的防火墙 firewall 启用 IPtable
停止 Firewall
systemctl stop firewalld
systemctl mask firewalld
关闭firewall自动启动
systemctl disable firewalld.service
安装IPtables防火墙
yum install -y iptables-services
开放端口
vi /etc/sysconfig/iptables
#添加下面三句话到默认的22端口这条规则的下面
#开放443端口(HTTPS)
#开启服务
-A INPUT -m state –state NEW -m tcp -p tcp –dport 80 -j ACCEPT
-A INPUT -m state –state NEW -m tcp -p tcp –dport 4433 -j ACCEPT
-A INPUT -m state –state NEW -m tcp -p tcp –dport 3306 -j ACCEPT
重启iptables
systemctl restart iptables.service
添加iptables开机自启项
systemctl enable iptables.service
查看防火墙状态
service iptables status


4.替换centos7自带的yum源
#先进入源的目录
cd /etc/yum.repo.d
#备份一下官方源
mv CentOS-Base.repo CentOS-Base.repo.bak
#将阿里源文件下载下来
wget -O /etc/yum.repos.d/CentOS-Base.repo http://mirrors.aliyun.com/repo/Centos-7.repo
#重建源数据缓存
yum makecache
ok,换源完成