本篇概要:
1. MySQL 主从复制的工作原理;
解决的问题:
- 数据分布:主从复制可以从一台服务器扩展到 N 台,假设现在扩展到了 150 台,可以把 50 台机器放在电信网络中,50台机器放在联通网络中,另外 50台机器放在移动的网络中,这样无论在哪个网络中访问速度都是比较快的,避免了跨网络访问的问题。其次还可以把机器按照地域分,可以在国外放一部分,北方放一部分,南方放一部分,这样就没有地域性访问差异。
- 负载均衡:可以把 MySQL 做读写分离,专门用一部分机器做写操作,另外一部分机器做读操作,并且读和写的操作都可以做负载均衡。比如现在有 1000 万人来访问,有 100 台机器,可以让 100 台机器去均衡的接受 1000 万人的访问。这样远比 1 台服务器接收 1000 万人访问压力小的多。
- 数据备份:比如 100 台机器,这 100 台机器的数据时一模一样的,那就换句话来说这 100 台机器都是备份。
- 高可用性和容错行:100 台机器中有 5 台机器挂掉了,问题不大,因为还有 95 台机器。
实现原理:
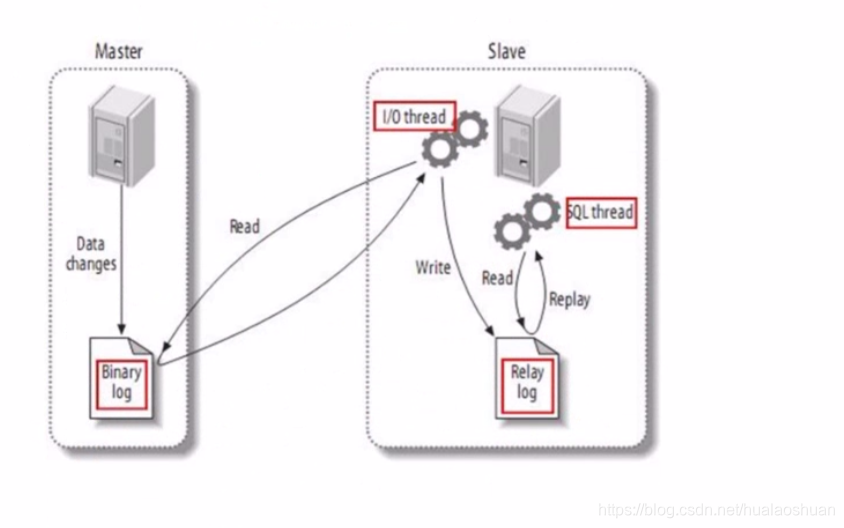
- MySQL 支持单向、异步复制、复制过程中一个服务器充当主服务器,而一个或多个其它服务器充当从服务器。也就是说在一个集群中可以让一台机器作为主的,其它机器作为从的,都听从主服务器。
- MySQL 复制基于主服务器在二进制日志中跟踪所有对数据库的更改(更新、删除等等,也就是写操作)。也就是说在主服务器中会存储所有的写操作(更新、删除、添加数据),存储在一个二进制日志里,存的是 SQL 语句被二进制话。
- 每个从服务器从主服务器接收主服务器已经记录到其二进制日志的保存的更新。也就是说,从服务器会去找到主服务器二进制日志里面的所有的操作,它会把所有的操作拿到从服务器里来,来做一部分的执行。比如主服务器进行了插入操作,然后从服务器会把插入指令拿过来,在它机器上执行,这样的话从服务器也会有一个插入的操作。
实现步骤:
- Master 将改变记录到二进制日志(binary log)中
- Slave 将 Master 的 binary log events 拷贝到它的中继日志(relay log)
- Slave 重做中继日志中的事件(也就是说它将写操作在它的机器上执行一下),变成它自己的数据
2. 配置 MySQL 主从复制;
配置主机 192.168.2.214 开启 Binary log
# 编辑主机的 MySQL 配置文件
vim /usr/local/mysql/etc/my.cnf

# 1. 添加如下内容
# 有 log-bin 代表开启,mysql-bin 是 binlog 日志文件的名称
log-bin=mysql-bin
binlog_format=mixed
# 唯一值,建议填写机器 ip 的最后一位,不会重复
server-id=214
expire_logs_days=10
#early-plugin-load=""

# 2. 保存后重启 MySQL
/etc/init.d/mysqld restart

# 进入到 MySQL 存放数据目录
cd /data/mysql/data/
ll
# 如下所示就是二进制 binlog 文件
-rw-r-----. 1 mysql mysql      154 10月 13 16:19 mysql-bin.000001

# 进入数据库
mysql -uroot -pasdf
mysql> show master status;
# 显示
+------------------+----------+--------------+------------------+-------------------+
| File             | Position | Binlog_Do_DB | Binlog_Ignore_DB | Executed_Gtid_Set |
+------------------+----------+--------------+------------------+-------------------+
| mysql-bin.000001 |      154 |              |                  |                   |
+------------------+----------+--------------+------------------+-------------------+
# 在往数据库做写操作的时候,Position 数值会增大
# 当文件保存到一定内容的时候,会新开文件
配置从机 192.168.2.215 开启 Relay log
# 编辑从机的 MySQL 配置文件
vim /etc/my.cnf

# 1. 首先注释掉 log_bin 和 binlog_format 相关配置
# 在 [mysqld] 下添加如下内容
server-id=215
# 中继日志
relay_log=mysql-relay-bin

# 2. 保存后重启 MySQL
systemctl restart mysql

# 3. 让从机去监听主机的 binlog 文件

# 在从机监听前,让主机同意从机监听
# 主机 214 授权从机 215:
# 相当于给 master 添加了一个用户 slave
# 允许 slave 这个用户通过密码在 215 的机器上访问 214(master)
# 具体操作:回到 主机 214 终端(这里的 slave 是用户名,123456 是 从机 215 的密码)
mysql> grant replication slave on *.* to [email protected] identified by '123456';
mysql> FLUSH PRIVILEGES;
# 查询 File 和 Position,再下面配置用的到
mysql>show master status
# 返回
+------------------+----------+--------------+------------------+-------------------+
| File             | Position | Binlog_Do_DB | Binlog_Ignore_DB | Executed_Gtid_Set |
+------------------+----------+--------------+------------------+-------------------+
| mysql-bin.000001 |      1175 |              |                  |                   |
+------------------+----------+--------------+------------------+-------------------+
# 注意:执行完这个步骤后不要再操作主数据库了,防止主数据库状态值变化

# 回到 215 终端
# 检查网络
ping 192.168.2.214

# 进入数据库
mysql -uroot -p123456
mysql> stop slave;

# 配置 master_log_file 和 master_log_pos 是上面 show master status 得到的
mysql> change master to
master_host='192.168.2.214',
master_port=3306,
master_user='slave',
master_password='123456',
master_log_file='mysql-bin.000001',
master_log_pos=1175;

# 开启 slave 监听
mysql> start slave;

# 查看 slave 状态
mysql> show slave status \G;
# 返回
*************************** 1. row ***************************
               Slave_IO_State: Waiting for master to send event
                  Master_Host: 192.168.2.214
                  Master_User: slave
                  Master_Port: 3306
                Connect_Retry: 60
              Master_Log_File: mysql-bin.000001
          Read_Master_Log_Pos: 1175
               Relay_Log_File: mysql-relay-bin.000002
                Relay_Log_Pos: 286
        Relay_Master_Log_File: mysql-bin.000001
             Slave_IO_Running: Yes
            Slave_SQL_Running: Yes
              Replicate_Do_DB:
          Replicate_Ignore_DB:
           Replicate_Do_Table:
       Replicate_Ignore_Table:
      Replicate_Wild_Do_Table:
  Replicate_Wild_Ignore_Table:
                   Last_Errno: 0
                   Last_Error:
                 Skip_Counter: 0
          Exec_Master_Log_Pos: 1175
              Relay_Log_Space: 459
              Until_Condition: None
               Until_Log_File:
                Until_Log_Pos: 0
           Master_SSL_Allowed: No
           Master_SSL_CA_File:
           Master_SSL_CA_Path:
              Master_SSL_Cert:
            Master_SSL_Cipher:
               Master_SSL_Key:
        Seconds_Behind_Master: 0
Master_SSL_Verify_Server_Cert: No
                Last_IO_Errno: 0
                Last_IO_Error:
               Last_SQL_Errno: 0
               Last_SQL_Error:
  Replicate_Ignore_Server_Ids:
             Master_Server_Id: 214
                  Master_UUID: 0df41401-82d4-11e9-99ed-08002779aa16
             Master_Info_File: /var/lib/mysql/master.info
                    SQL_Delay: 0
          SQL_Remaining_Delay: NULL
      Slave_SQL_Running_State: Slave has read all relay log; waiting for the slave I/O thread to update it
           Master_Retry_Count: 86400
                  Master_Bind:
      Last_IO_Error_Timestamp:
     Last_SQL_Error_Timestamp:
               Master_SSL_Crl:
           Master_SSL_Crlpath:
           Retrieved_Gtid_Set:
            Executed_Gtid_Set:
                Auto_Position: 0
1 row in set (0.00 sec)

# 如果 Slave_IO_Running: Yes
# Slave_SQL_Running: Yes
# 那么主从复制配置成功
3. MySQL 双主热备;
解决的问题:
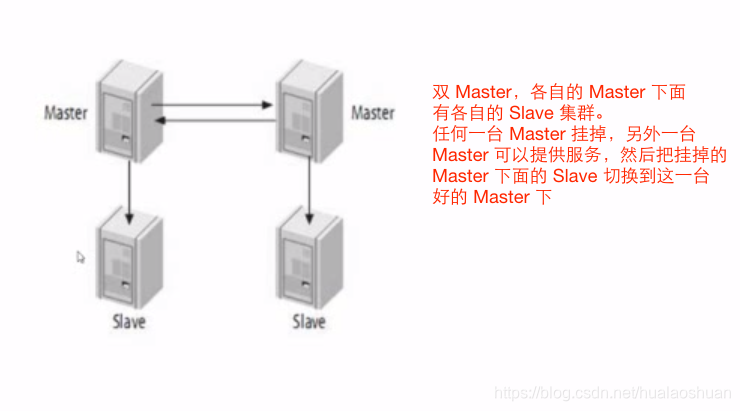
- Master 挂掉不会影响业务。现有架构一个 Master 可以扩展多个 Slave,但是如果 Master 挂掉会影响现有的架构业务。也就是说一旦 Master 挂掉,就无法写数据了、而且 Slave 不知道该去监听哪台 Master。所以需要给 Master 备份另一台 Master,这样就可以实现心跳感应。
- 实现心跳。其中一台 Master 挂掉就可以立马切换到另外一台 Master。
图释:
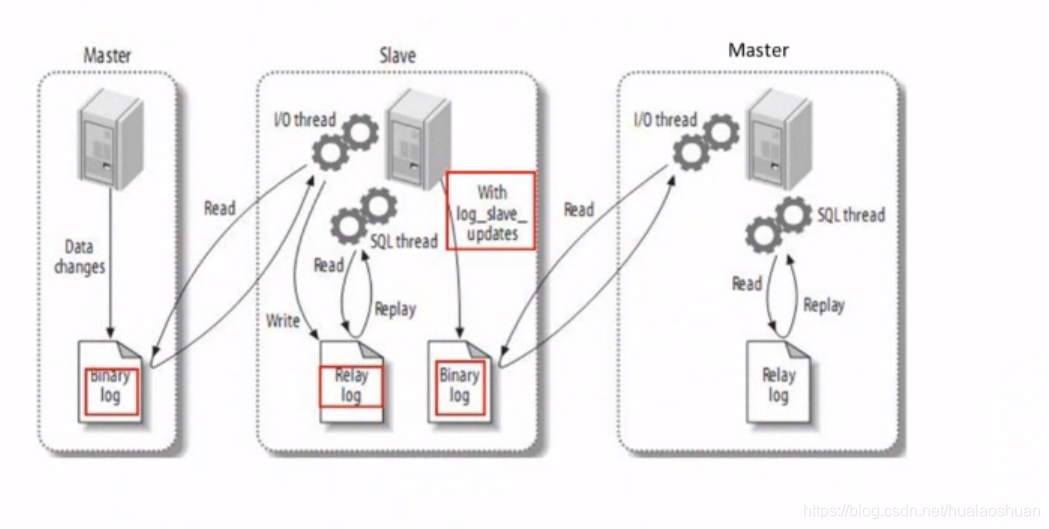
- 现有的一个架构,有一个 Master 有一个 Slave,Master 里开启了 binlog 日志,Slave 监听 binlog。监听回来如果有写操作,就会写入 relaylog,然后 relaylog 就会执行一些 SQL 语句,完成数据的添加、删除、更新,实现了 Slave 和 Master 数据的同步。
- 现在要让中间的 Slave 也作为一个 Master。首先给 Slave 开启 binlog,也就是说,如果要做为主的话,必须要开启 binlog,还要开启一个 log_slave_updates。也就是说,当 relaylog 发生改变的时候,会通过 log_slave_updates 写入到 bin_log 当中,也就是实现了 Slave 当中的 binlog 和 Master 中的 binlog 实现了同步。那现在 Slave 和 Master 拥有的内容是一模一样的。然后此时再让 Master(上图左边的 Master 就是右边的 Master)再去监听 Slave 的 binlog,这时候 Master 也要开启 relaylog,让它作为 Slave 的从机。所以现在就实现了 Master 和 Slave 护为主从。
- 这样的好处是向其中任何一台机器写数据,另外一台机器都会跟着改变,其中任何一台挂掉,另外一台机器可以马上作为主机提供服务。最终达到下图效果。
配置从机 192.168.2.215 变为主
# 编辑从机的 MySQL 配置文件
vim /etc/my.cnf

# 1. 添加如下内容
log-bin=mysql-bin
binlog_format=mixed
# 将 relaylog 写入到 binlog
log_slave_updates=1

# 2. 保存后重启 MySQL
systemctl restart mysql

# 3. 从机给主机授权,slave 让主机监听从机的 binlog
mysql -uroot p123456
mysql> grant replication slave on *.* to [email protected] identified by 'asdf';
mysql> FLUSH PRIVILEGES;

mysql> reset master;
mysql> show master status;
# 返回
+------------------+----------+--------------+------------------+-------------------+
| File             | Position | Binlog_Do_DB | Binlog_Ignore_DB | Executed_Gtid_Set |
+------------------+----------+--------------+------------------+-------------------+
| mysql-bin.000001 |      120 |              |                  |                   |
+------------------+----------+--------------+------------------+-------------------+
- 配置主机 192.168.2.214 监听从机
# 编辑主机的 MySQL 配置文件
vim /usr/local/mysql/etc/my.cnf
# 1. 在 [mysqld] 里添加如下内容
relay_log=mysql-relay-bin
log_slave_updates=1

# 2. 保存后重启 MySQL
/etc/init.d/mysqld restart

# 进入数据库
mysql -uroot -pasdf
# 监听从机
mysql> change master to
master_host='192.168.2.215',
master_port=3306,
master_user='master',
master_password='asdf',
master_log_file='mysql-bin.000001',
master_log_pos=120;

# 此时就指向了 215 机,214 就成为 215 的从机了,
start slave;
show slave status \G;
# 显示
*************************** 1. row ***************************
               Slave_IO_State: Waiting for master to send event
                  Master_Host: 192.168.2.215
                  Master_User: master
                  Master_Port: 3306
                Connect_Retry: 60
              Master_Log_File: mysql-bin.000001
          Read_Master_Log_Pos: 120
               Relay_Log_File: mysql-relay-bin.000002
                Relay_Log_Pos: 317
        Relay_Master_Log_File: mysql-bin.000001
             Slave_IO_Running: Yes
            Slave_SQL_Running: Yes
              Replicate_Do_DB:
          Replicate_Ignore_DB:
           Replicate_Do_Table:
       Replicate_Ignore_Table:
      Replicate_Wild_Do_Table:
  Replicate_Wild_Ignore_Table:
                   Last_Errno: 0
                   Last_Error:
                 Skip_Counter: 0
          Exec_Master_Log_Pos: 120
              Relay_Log_Space: 524
              Until_Condition: None
               Until_Log_File:
                Until_Log_Pos: 0
           Master_SSL_Allowed: No
           Master_SSL_CA_File:
           Master_SSL_CA_Path:
              Master_SSL_Cert:
            Master_SSL_Cipher:
               Master_SSL_Key:
        Seconds_Behind_Master: 0
Master_SSL_Verify_Server_Cert: No
                Last_IO_Errno: 0
                Last_IO_Error:
               Last_SQL_Errno: 0
               Last_SQL_Error:
  Replicate_Ignore_Server_Ids:
             Master_Server_Id: 215
                  Master_UUID: e65d0d4e-85ee-11e9-8c36-080027e1692a
             Master_Info_File: /data/mysql/data/master.info
                    SQL_Delay: 0
          SQL_Remaining_Delay: NULL
      Slave_SQL_Running_State: Slave has read all relay log; waiting for more updates
           Master_Retry_Count: 86400
                  Master_Bind:
      Last_IO_Error_Timestamp:
     Last_SQL_Error_Timestamp:
               Master_SSL_Crl:
           Master_SSL_Crlpath:
           Retrieved_Gtid_Set:
            Executed_Gtid_Set:
                Auto_Position: 0
         Replicate_Rewrite_DB:
                 Channel_Name:
           Master_TLS_Version:

# 此时 214 是 215 的从机,215 也是 214 的从机;
# 此时 214 是 215 的主机,215 也是 214 的主机
配置主机 214 的从机 217
# 进入从机 217 的终端
# 打开配置文件
vim /usr/local/mysql/etc/my.cnf
# 1. 在 [mysqld] 里添加如下内容
server-id=217
relay_log=mysql-relay-bin
expire_logs_days=10

# 2. 保存后重启 MySQL
/etc/init.d/mysqld restart

# 回到主机 214 终端,授权 217
mysql> grant replication slave on *.* to [email protected] identified by 'asdf';
mysql> FLUSH PRIVILEGES;

mysql> show master status;
# 返回
+------------------+----------+--------------+------------------+-------------------+
| File             | Position | Binlog_Do_DB | Binlog_Ignore_DB | Executed_Gtid_Set |
+------------------+----------+--------------+------------------+-------------------+
| mysql-bin.000004 |     7549 |              |                  |                   |
+------------------+----------+--------------+------------------+-------------------+

# 回到从机 217 的终端
mysql -uroot -pasdf
mysql> stop slave;


mysql> change master to
master_host='192.168.2.214',
master_port=3306,
master_user='slave217',
master_password='asdf',
master_log_file='mysql-bin.000004',
master_log_pos=7549;

mysql> start slave;
mysql> show slave status \G;

# 另1:同步过程中发现一个触发器语句有误,导致后续的同步语句没有进行,解决方案:
mysql> stop slave;
mysql> SET GLOBAL sql_slave_skip_counter =1;
mysql> start slave;

# 另2:授权
mysql> GRANT ALL PRIVILEGES ON *.* TO 'root'@'%' IDENTIFIED BY 'password' WITH GRANT OPTION;
mysql> FLUSH PRIVILEGES;
4. 数据库中间件 Mycat;
概念:
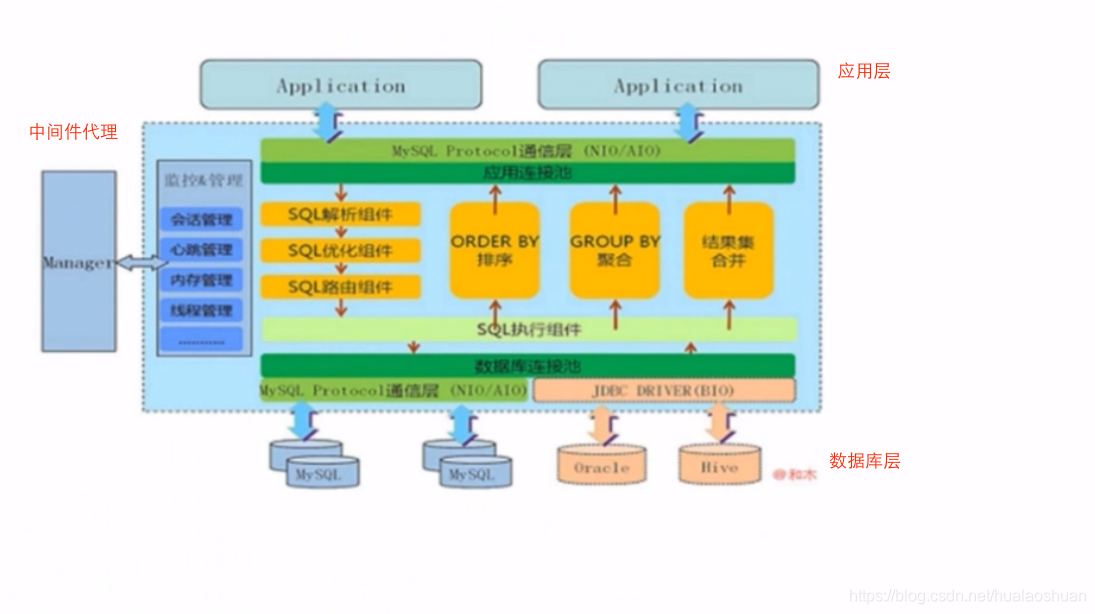
- 数据库中间件就是应用和数据库中间的代理层。这个代理层可以帮助我们完成很多的事情。比如说数据的监控、心跳感应、分库分表、读写分离、拦截、注入。
Mycat 介绍:
- 基于阿里开源的 Cobar 产品研发,继承了 Cobar 的稳定性、可靠性、优秀的架构和性能。
- 一个彻底开源的,面向企业应用开发的大数据库集群。
- 结合传统数据库和新型分布式数据仓库的新一代企业级数据库产品。
- 一个新颖的数据库中间件产品。
- 官网:http://mycat.org.cn
Mycat 特性:
- 支持 SQL92 标准
- 支持 MySQL、Oracle、DB2、SQL Server、PostgreSQL 等 DB 的常见 SQL 语法(将来不直接连接 MysQL 服务器,直接连接中间件)
- 遵守 MySQL 原生协议、跨语言、跨平台、跨数据库通用中间件代理
- 基于心跳的自动故障切换、支持读写分离,支持 MySQL 主从等
5. 安装配置 Mycat;
- 安装 Java 环境:
# CentOs
yum list java*
yum -y install java-1.8.0-openjdk*
java -version

# Ubuntu
apt-get install openjdk-8-jre openjdk-8-jdk
- 下载 Mycat(安装在 192.168.2.216 机器):
cd /usr/local/src/
wget http://dl.mycat.io/1.6.7.3/20190927161129/Mycat-server-1.6.7.3-release-20190927161129-linux.tar.gz
- 解压
tar zxvf Mycat-server-1.6.7.3-release-20190927161129-linux.tar.gz -C /usr/local/etc/
- 进入配置目录
cd /usr/local/etc/mycat/conf/
- 配置 server.xml
<!-- 1. 修改 property name="schemas"
注意:
 <user name="root" defaultAccount="true">
     <property name="password">123456</property>
      <property name="schemas">test</property>
有一个 user 的概念,是一个 user 块
连接 MyCat,要用到 root 用户,密码是 123456,会用到 test 库
test 库不是真正的库,是对我们要用到的库的一个映射  -->
<property name="schemas">test</property>

<!-- 2. 注释掉 <user name="user"> 标签的内容 -->
<!--<user name="user">
        <property name="password">user</property>
        <property name="schemas">TESTDB</property>
        <property name="readOnly">true</property>
</user>-->
- 配置 schema.xml
<!-- schema.xml 配置相对复杂,之后读写分离、分库分表也在这个文件里配置
修改如下:-->

<?xml version="1.0"?>
<!DOCTYPE mycat:schema SYSTEM "schema.dtd">
<mycat:schema xmlns:mycat="http://io.mycat/">
	<!-- 和 server.xml 里配置的库名称一致 -->
	<schema name="test" checkSQLschema="true" sqlMaxLimit="100" dataNode="dn1"></schema>
	<!-- database 是实际的数据库名称 -->
	<dataNode name="dn1" dataHost="localhost1" database="test" />
	<dataHost name="localhost1" maxCon="1000" minCon="10" balance="0"
			  writeType="0" dbType="mysql" dbDriver="native" switchType="1"  slaveThreshold="100">
		<heartbeat>select user()</heartbeat>
		<!-- can have multi write hosts -->
		<!-- 需要在 214 那台机器授权一个用户,用户名和密码写在这里 -->
		<writeHost host="hostM1" url="192.168.2.214:3306" user="mycat"
				   password="123456">
		<!-- <writeHost host="hostM2" url="localhost:3316" user="root" password="123456"/> -->
		</writeHost>
	</dataHost>
</mycat:schema>
- 192.168.2.214 机器授权用户
# 切换到 214 机器的终端
mysql> grant insert,update,delete,select on *.* to [email protected] identified by '123456';
mysql> FLUSH PRIVILEGES;
- 启动
cd /usr/local/etc/mycat/bin/
# 查看 mycat 命令
./mycat
# 返回
# Usage: ./mycat { console | start | stop | restart | status | dump }

# 启动
./mycat start

# 查看 log
tail ../logs/wrapper.log
# 最后一行返回
MyCAT Server startup successfully. see logs in logs/mycat.log
# 说明启动成功

# 查看状态
./mycat status

# 查看端口
netstat -anp | grep 8066
- 任意服务器远程登录 192.168.2.216 Mycat 服务器操作
# 禁用防火墙(可选)
systemctl mask firewalld

# 远程登录
mysql -uroot -p123456 -h192.168.2.216 -P8066
6. 配置 Mycat 实现读写分离、心跳检测自动切换;
- Mycat 权威指南:http://www.mycat.io/document/mycat-definitive-guide.pdf
- 配置文件 schema.xml 分析与配置
<schema name="test" checkSQLschema="true" sqlMaxLimit="100" dataNode="dn1"></schema>
# schema name='test',代表 schema 要管理的库是 test,
# 之前在 server.xml 里也配置过 test

# checkSQLschema 设置为 true 时,
# 如果执行语句 **SELECT * FROM test.user;**
# 则 Mycat 会把语句修改为 **SELECT * FROM user**,避免可能的报错

# sqlMaxLimit 表示在 sql 语句后面自动加 limit 100

<dataNode name="dn1" dataHost="localhost1" database="test" />
# database 是真实的数据库名称

<dataHost name="localhost1" maxCon="1000" minCon="10" balance="0"
writeType="0" dbType="mysql" dbDriver="native" switchType="1" slaveThreshold="100">
# maxCon 最大连接
# minCon 初始化连接

# balance 负载均衡的类型
# *balance=0,不开启读写分离机制,所有读操作都发送到当前可用的 writeHost 上
# balance=1,全部的 readHost 与 stand by writeHost 参与 select 语句的负载均衡
# balance=2,所有读操作都随机在 writeHost、readHost 上分发
# *balance=3,所有读请求随机的分发到 writeHost 对应 readHost 执行,writeHost 不负担读压力(大于 1.4 版本)

# writeType 负载均衡类型
# *writeType=0 所有写操作发送到配置的第一个 writeHost,第一个挂掉了切换还生存的第二个 writeHost,
# 重新启动后已切换后的为准,切换记录在配置文件中:dnindex.properties
# writeType=1 所有的写操作都随机的发送到配置的 writeHost,1.5 版本后废弃不推荐

# switchType
# -1 表示不自动切换
# 1 默认值,自动切换
# *2 基于 MySQL 主从同步的状态决定是否切换,心跳语句为 show slave status
# 3 基于 MySQL galary cluster 的切换机制,适合集群(1.4.1),心跳语句为 show status like 'wsrep%'

# slaveThreshold
# 去检测从机当中的一些状态,如果从机的数据过旧,就把 slave 给下掉
# show slave status 会拿到一些值,如果大于数值(比如 100 秒),说明数据比较旧,下掉 slave

# 配置
<writeHost host="hostM1" url="192.168.2.214:3306" user="mycat" password="123456">
	<readHost host="hostS1" url="192.168.2.217:3306" user="mycat" password="123456">
	</readHost>
</writeHost>
<writeHost host="hostM2" url="192.168.2.215:3306" user="mycat" password="123456">
</writeHost>

# 切换到 217 机器的终端(214 的从机)
# 这样就给 216(Mycat 机器)进行了授权,之后 Mycat 就可以连接到 217 进行查询
mysql> grant select on *.* to [email protected] identified by '123456';
mysql> FLUSH PRIVILEGES;

# 切换到 215
mysql> grant insert,update,delete,select on *.* to [email protected] identified by '123456';
mysql> FLUSH PRIVILEGES;

# 重启 Mycat
../bin/mycat restart
../bin/mycat status

# 查看日志,观察 ip
tail ../logs/mycat.log
- 修改后的 schema.xml 文件如下
<?xml version="1.0"?>
<!DOCTYPE mycat:schema SYSTEM "schema.dtd">
<mycat:schema xmlns:mycat="http://io.mycat/">
	<!-- 和 server.xml 里配置的库名称一致 -->
	<schema name="test" checkSQLschema="false" sqlMaxLimit="100" dataNode="dn1"></schema>
	<!-- database 是实际的数据库名称 -->
	<dataNode name="dn1" dataHost="localhost1" database="test" />
	<!--
		!!注意:
		如果 balance=3,双主热备的机器下面都要有从机
		由于我的双主机器(214 和 215,只在 214 下面设置了从机 217,215 下面没有从机)
		所以如果 balance=3,在 214 挂掉后,215 下面没有机器,读请求回去找 <readHost>,找不到就会报错
		所以 balance 只能设置 0
	-->
	<dataHost name="localhost1" maxCon="1000" minCon="10" balance="0"
			  writeType="0" dbType="mysql" dbDriver="native" switchType="2"  slaveThreshold="100">
		<heartbeat>show slave status</heartbeat>
		<!-- can have multi write hosts -->
		<!-- 需要在 214 那台机器授权一个用户,用户名和密码写在这里 -->
		<writeHost host="hostM1" url="192.168.2.214:3306" user="mycat" password="123456">
			<!-- 同理 217 -->
			<readHost host="hostS1" url="192.168.2.217:3306" user="mycat" password="123456">
			</readHost>
		</writeHost>
		<writeHost host="hostM2" url="192.168.2.215:3306" user="mycat" password="123456">
		</writeHost>
	</dataHost>
</mycat:schema>
7. 配置 Mycat 对数据表进行水平分片分库处理。
- 如果数据达到的千万甚至亿级别的数据量,如果用单库进行管理那压力就会很大。为了解决这个问题,可以把库里的数据量比较大的表单独进行分散,分散到其它库中,做一个水平切割。这样的话单库承受的压力就会小很多
- 配置:
# 进入 214 数据库
mysql -uroot -pasdf
mysql> use test;
mysql> show create table student \G;
# 返回
*************************** 1. row ***************************
       Table: student
Create Table: CREATE TABLE `student` (
  `id` int(11) NOT NULL AUTO_INCREMENT,
  `name` varchar(255) NOT NULL DEFAULT '' COMMENT '姓名',
  `age` tinyint(3) unsigned NOT NULL DEFAULT '0' COMMENT '年龄',
  `gender` tinyint(3) unsigned NOT NULL DEFAULT '10' COMMENT '性别',
  `created_at` int(10) unsigned DEFAULT '0',
  `updated_at` int(10) unsigned DEFAULT '0',
  PRIMARY KEY (`id`)
) ENGINE=InnoDB AUTO_INCREMENT=10 DEFAULT CHARSET=utf8 COMMENT='学生表'
1 row in set (0.00 sec)

# 另外创建三个库
mysql> create database test1;
mysql> create database test2;
mysql> create database test3;

# 在这三个库中创建 student 表
mysql> use test1;
mysql> # 复制创建 `student` 表语句
mysql> use test2;
mysql> # 复制创建 `student` 表语句
mysql> use test3;
mysql> # 复制创建 `student` 表语句

# 现在这三个库中都有 student 表了
# 假设有一些数据,这个数据要向表里面写,可以去做一个哈希处理,做一个分配
# 比如要存第一个值,分配到第一个库
# 要存第二个值,分配到第二个库,依次类推
# 这样要存的数据就全部分散,单库压力就可以小很多
# 接下去就需要去配置 Mycat

# 进入 216 的 Mycat 机器
cd /usr/local/etc/mycat/conf

# 1. 修改 server.xml
vim server.xml
# 修改 sequnceHandlerType,0 表示使用本地文件进行配置
<property name="sequnceHandlerType">0</property>

# 2. 修改 sequence_conf.properties
vim sequence_conf.properties
# 添加一下差异化配置
# student 表配置
STUDENT.HISIDS=
STUDENT.MINID=10001
STUDENT.MAXID=20000
STUDENT.CURID=10000

# 3. 修改 schema.xml
vim schema.xml
# 首先在 <schema> 标签里加 <table> 标签
# 再添加三个 <dataNode>
# 修改后的 schema.xml 文件见下

# 重启 Mycat
../bin/mycat restart
../bin/mycat status
- 修改后的 schema.xml 文件如下
<?xml version="1.0"?>
<!DOCTYPE mycat:schema SYSTEM "schema.dtd">
<mycat:schema xmlns:mycat="http://io.mycat/">
	<!-- 和 server.xml 里配置的库名称一致 -->
	<schema name="test" checkSQLschema="false" sqlMaxLimit="100" dataNode="dn1">
		<!-- rule 可以参考 rule.xml -->
		<table name="student" primaryKey="id" dataNode="student$1-3" rule="sharding-by-murmur" />
	</schema>
	<!-- database 是实际的数据库名称 -->
	<dataNode name="student1" dataHost="localhost1" database="test1" />
	<dataNode name="student2" dataHost="localhost1" database="test2" />
	<dataNode name="student3" dataHost="localhost1" database="test3" />
	<dataNode name="dn1" dataHost="localhost1" database="test" />
	<dataHost name="localhost1" maxCon="1000" minCon="10" balance="0"
			  writeType="0" dbType="mysql" dbDriver="native" switchType="2"  slaveThreshold="100">
		<heartbeat>show slave status</heartbeat>
		<!-- can have multi write hosts -->
		<!-- 需要在 214 那台机器授权一个用户,用户名和密码写在这里 -->
		<writeHost host="hostM1" url="192.168.2.214:3306" user="mycat" password="123456">
			<readHost host="hostS1" url="192.168.2.217:3306" user="mycat" password="123456">
			</readHost>
		</writeHost>
		<writeHost host="hostM2" url="192.168.2.215:3306" user="mycat" password="123456">
		</writeHost>
	</dataHost>
</mycat:schema>
- 实际操作
# 远程登录 216 Mycat 服务器
mysql -uroot -p123456 -h192.168.2.216 -P8066
mysql> show databases;
+----------+
| DATABASE |
+----------+
| test     |
+----------+
mysql> use test;
mysql> show tables;
+-------------------+
| Tables_in_test    |
+-------------------+
| student           |
+-------------------+
# 分库分片后,表里原来的数据依然存在但是无法被查询
mysql> select * from student;
Empty set (0.01 sec)

# 插入数据
mysql> insert into student(id,name,age) values (next value for MYCATSEQ_STUDENT, 'hahahahaha', 22);
mysql> insert into student(id,name,age) values (next value for MYCATSEQ_STUDENT, 'hahahahaha1', 23);
mysql> insert into student(id,name,age) values (next value for MYCATSEQ_STUDENT, 'hahahahaha3', 24);
mysql> insert into student(id,name,age) values (next value for MYCATSEQ_STUDENT, 'hahahahaha4', 25);

# 查询数据
mysql> select * from student;
+-------+-------------+-----+--------+------------+------------+
| id    | name        | age | gender | created_at | updated_at |
+-------+-------------+-----+--------+------------+------------+
| 10002 | hahahahaha1 |  23 |     10 |          0 |          0 |
| 10003 | hahahahaha3 |  24 |     10 |          0 |          0 |
| 10004 | hahahahaha4 |  25 |     10 |          0 |          0 |
| 10001 | hahahahaha  |  22 |     10 |          0 |          0 |
+-------+-------------+-----+--------+------------+------------+
4 rows in set (0.00 sec)

# 其中 test1.student 有 3 条数据
# 其中 test2.student 有 1 条数据
# 其中 test3.student 有 0 条数据
# 会根据 Mycat 的哈希算法去判断往哪张表里插
# 查询的时候没有任何问题,是感知不到数据分布在三张表里
