1、CentOS下安装MySql8
wget https://dev.mysql.com/get/mysql80-community-release-el7-1.noarch.rpm
在无冲突的情况
rpm -ivh mysql80-community-release-el7-1.noarch.rpm
如果已经有mysql版本
rpm -ivh mysql80-community-release-el7-1.noarch.rpm --nodeps --force
yum -y install mysql-community-server
启动mysql:
systemctl start mysqld
或者
service mysqld start
查看启动状态
systemctl status mysqld
或者
service mysqld status
设置开机启动
systemctl enable mysqld
systemctl daemon-reload
设置密码:
# grep 'temporary password' /var/log/mysqld.log
2019-11-16T07:57:25.990409Z 5 [Note] [MY-010454] [Server] A temporary password is generated for root@localhost: w>*hr)jTG1IT
[root@ecs-1d4d mysql]# mysql -uroot -p
# 修改mysql的密码
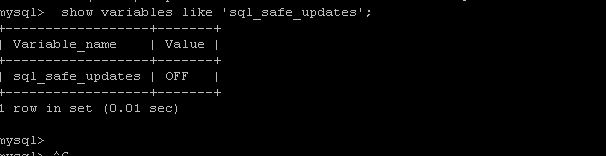
查看安全模式是否是打开的,如果是打开的直接修改
show variables like 'sql_safe_updates';
在/etc/my.cnf加上

service mysqld restart
mysql –uroot –p
use mysql;
将密码置为空:
update user set authentication_string='' where user='root';
注释:skip-grant-tables
重启mysql服务可以无密码登录
mysql –uroot –p 直接回车登录
ALTER USER 'root'@'%' IDENTIFIED BY 'Json@123';
# 允许mysql被任何其他的主机访问
use mysql;
update user set host='%' where user ='root';
flush privileges;
2、配置主服务器
- 创建访问账号,并且授权:
| [root@ecs-1d4d /]# mysql -uroot -p Enter password: Welcome to the MySQL monitor. Commands end with ; or \g. Your MySQL connection id is 492 Server version: 8.0.18 MySQL Community Server - GPL
Copyright (c) 2000, 2019, Oracle and/or its affiliates. All rights reserved.
Oracle is a registered trademark of Oracle Corporation and/or its affiliates. Other names may be trademarks of their respective owners.
Type 'help;' or '\h' for help. Type '\c' to clear the current input statement. mysql> mysql> create user 'masteruser'@'%' identified by 'Master@123'; Query OK, 0 rows affected (0.03 sec)
mysql> mysql> use mysql; Reading table information for completion of table and column names You can turn off this feature to get a quicker startup with -A
Database changed grant all privileges on db_test_shop1.* to 'masteruser'@'%'; Query OK, 0 rows affected (0.00 sec)
mysql> flush privileges; |
- 修改主服务的my.cnf,添加如下配置信息
vi /etc/my.cnf
| # 配置默认编码为utf8 character_set_server=utf8mb4 init_connect='SET NAMES utf8mb4'
# 主从配置,要给从机同步的数据库 binlog-do-db=db_test_shop1 # 不给从机同步的库 binlog-ignore-db=mysql binlog-ignore-db=information_schema binlog-ignore-db=performance_schema binlog-ignore-db=sys # 自动清理30天前的log文件 expire_logs_days=30 # 启用二进制日志 log-bin=mysql-bin # 服务器唯一ID server-id=1001 |
- 登录数据库,查看主服务器启动的情况

- 创建用于同步的用户,并且授权
| create user 'backup'@'%' IDENTIFIED BY 'Backup@123'; grant file on *.* to 'backup'@'%'; GRANT REPLICATION SLAVE, REPLICATION CLIENT ON *.* to 'backup'@'%'; flush privileges; |
3、配置备服务器
- 编辑my.cnf加入如下配置
| # 配置从服务器 server-id=2001 # 加上以下参数可以避免更新不及时,SLAVE 重启后导致的主从复制出错。 read_only = 1 master_info_repository=TABLE relay_log_info_repository=TABLE |
- 登录mysql,创建数据库并授权
| create database db_test_shop1 default character set utf8mb4 collate utf8mb4_general_ci;
create user 'backup'@'%' IDENTIFIED BY 'Backup@123';
grant all privileges on db_test_shop1.* to 'backup'@'%'; use mysql; ALTER USER 'backup'@'%' IDENTIFIED WITH mysql_native_password BY 'Backup@123'; flush privileges;
|
- 配置slave访问master相关参数
| change master to master_host='192.168.1.94',master_port=3306,master_user='backup',master_password='Backup@123',master_log_file='mysql-bin.000003',master_log_pos=155; |
- 查看是否成功
| mysql> show slave status \G *************************** 1. row *************************** Slave_IO_State: Waiting for master to send event Master_Host: 192.168.1.94 Master_User: backup Master_Port: 3306 Connect_Retry: 60 Master_Log_File: mysql-bin.000003 Read_Master_Log_Pos: 155 Relay_Log_File: ecs-9440-relay-bin.000002 Relay_Log_Pos: 322 Relay_Master_Log_File: mysql-bin.000003 Slave_IO_Running: Yes Slave_SQL_Running: Yes Replicate_Do_DB: Replicate_Ignore_DB: Replicate_Do_Table: Replicate_Ignore_Table: Replicate_Wild_Do_Table: Replicate_Wild_Ignore_Table: Last_Errno: 0 Last_Error: Skip_Counter: 0 Exec_Master_Log_Pos: 155 Relay_Log_Space: 533 Until_Condition: None Until_Log_File: Until_Log_Pos: 0 Master_SSL_Allowed: No Master_SSL_CA_File: Master_SSL_CA_Path: Master_SSL_Cert: Master_SSL_Cipher: Master_SSL_Key: Seconds_Behind_Master: 0 Master_SSL_Verify_Server_Cert: No Last_IO_Errno: 0 Last_IO_Error: Last_SQL_Errno: 0 Last_SQL_Error: Replicate_Ignore_Server_Ids: Master_Server_Id: 1001 Master_UUID: ba300ae0-0846-11ea-9502-fa163e76db50 Master_Info_File: mysql.slave_master_info SQL_Delay: 0 SQL_Remaining_Delay: NULL Slave_SQL_Running_State: Slave has read all relay log; waiting for more updates Master_Retry_Count: 86400 Master_Bind: Last_IO_Error_Timestamp: Last_SQL_Error_Timestamp: Master_SSL_Crl: Master_SSL_Crlpath: Retrieved_Gtid_Set: Executed_Gtid_Set: Auto_Position: 0 Replicate_Rewrite_DB: Channel_Name: Master_TLS_Version: Master_public_key_path: Get_master_public_key: 0 Network_Namespace: 1 row in set (0.00 sec) |
- 停止并删除主从服务
stop slave;
reset slave;
