#coding=gbk
'''
逻辑回归:
逻辑回归需要将输出控制在[0,1]之间,可以使用函数将值映射在[0,1]之间
Sigmod函数,
逻辑回归一般采用对数损失函数;
'''
from pylab import mpl
mpl.rcParams['font.sans-serif'] = ['SimHei'] #设置显示绘图显示中文
mpl.rcParams['axes.unicode_minus'] = False #防止中文乱码,有时候第一句不能完全避免显示错误
#导入tensorflow 模块
import tensorflow.compat.v1 as tf
import matplotlib.pyplot as plt
import numpy as np
import pandas as pd
from sklearn.datasets import load_boston
from sklearn.utils import shuffle
import tensorflow.examples.tutorials.mnist.input_data as input_data
mnist = input_data.read_data_sets("MNIST_data/", one_hot=True)
print("训练集:", mnist.train.num_examples,
"测试集:", mnist.test.num_examples,
"验证集", mnist.validation.num_examples)
print("Image shape:", mnist.train.images.shape,
"labels shape:",mnist.train.labels.shape)
'''运行结果:
训练集: 55000 测试集: 10000 验证集 5000
Image shape: (55000, 784) labels shape: (55000, 10)
分析:
图像数据,有55000条数据,每条特征有784个(28x28的灰度图,只有一个颜色通道)
标签图像数据:有55000条,每条长度为10(one_hot编码的数据)
'''
#显示图像函数定义
def plot_image(image):
plt.imshow(image.reshape(28, 28), cmap='binary')
plt.show()
plot_image(mnist.train.images[3])
print(mnist.train.labels[3])
'''
显示数字6;
[0. 0. 0. 0. 0. 0. 1. 0. 0. 0.],对应的标签,为1的代表数字6
这种编码方式是one_hot独热编码方式
'''
#取得独热编码的值,若one_hot设置为False,则标签中就直接为值
val = np.argmax(mnist.train.labels[3])#获取编码对应的值,
print(val) #值为数字6
#数据集的划分,可以将数据分为训练集,测试集,验证集,可以大幅度减低过拟合的发生几率
#数据的批量读取
mnist.train.images[0:10]#切片
batch_images_xs, batch_labels_ys = \
mnist.train.next_batch(batch_size=10) #自动移动
x = tf.placeholder(tf.float32, [None, 784], name='x')
y = tf.placeholder(tf.float32, [None, 10], name='y')
w = tf.Variable(tf.random_normal([784, 10], name='w'))#正态随机数初始化
b = tf.Variable(tf.zeros([10], name='b'))
#前向计算
f = tf.matmul(x, w) + b
#计算结果分类,表示为哪一类的概率值,将值控制在[0,1]之间
p = tf.nn.softmax(f)
#模型构建
train_c = 80
#批量数据大小
b_size = 100
#全部需要几个批次训练一次
total_b_size = int(mnist.train.num_examples / b_size)
step = 1
learning_rate = 0.01
#损失函数(交叉熵损失函数)
loss_Fun = tf.reduce_mean(-tf.reduce_sum(y * tf.log(p), reduction_indices=1))
#优化器
optimizer = tf.train.GradientDescentOptimizer(learning_rate).minimize(loss_Fun)
#检查预测类别tf.argmax(p,1)与实际类别tf.argmax(y,1)的匹配情况
correct_prediction = tf.equal(tf.argmax(p, 1), tf.argmax(y, 1))
#准确率,将bool转换为浮点数,计算平均值
ave = tf.reduce_mean(tf.cast(correct_prediction, tf.float32))
sess = tf.Session()
init = tf.global_variables_initializer()
sess.run(init)
for i in range(train_c):
for batch in range(total_b_size):
x_, y_ = mnist.train.next_batch(b_size)
sess.run(optimizer, feed_dict={x: x_, y: y_})
#使用验证数据集计算误差与准确率
loss, acc = sess.run([loss_Fun, ave], feed_dict={x: mnist.validation.images, y: mnist.validation.labels})
print("Train count:", i + 1, "Loss=", "{:.9f}".format(loss), "acc=", "{:.4f}".format(acc))
print("训练结束!")
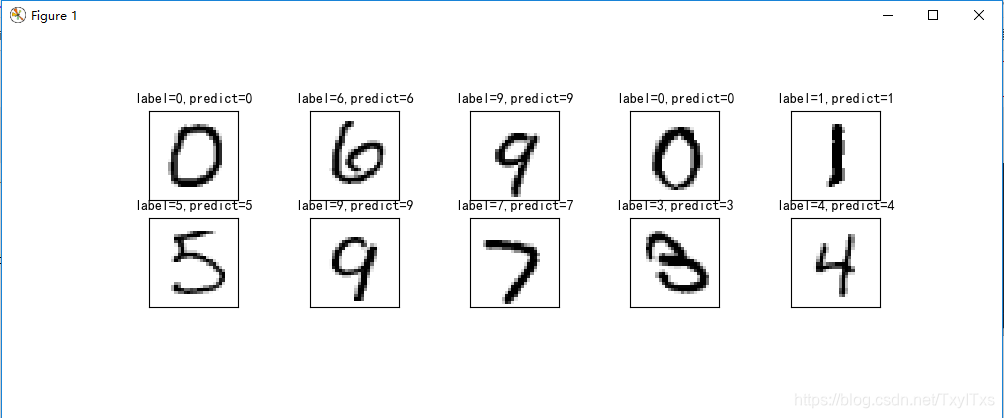
#模型运用
Predict_Result = sess.run(tf.argmax(p, 1), feed_dict={x: mnist.test.images})
print(Predict_Result[0:10])
def plot_Result(images, labels, prediction, index, num=10):
fig = plt.gcf()
fig.set_size_inches(10, 12)
if num > 25:
num = 25
for i in range(0, num):
ax = plt.subplot(5, 5, i + 1)
ax.imshow(np.reshape(images[index], (28, 28)), cmap='binary')
title = "label=" + str(np.argmax(labels[index]))
if len(prediction) > 0:
title += ",predict=" + str(prediction[index])
ax.set_title(title, fontsize=10)
#不显示坐标轴
ax.set_xticks([])
ax.set_yticks([])
index += 1
plt.show()
plot_Result(mnist.test.images,mnist.test.labels,Predict_Result,10,10)
附:
本文章学习自中国大学mooc-深度学习应用开发-Tensorflow实战
