Java EE 目录:https://blog.csdn.net/dkbnull/article/details/87932809
Spring Cloud 专栏:https://blog.csdn.net/dkbnull/column/info/36820
Spring Boot 专栏:https://blog.csdn.net/dkbnull/column/info/26341
0. 开发环境
-
IDE:IntelliJ IDEA 2017.1 x64
-
jdk:1.8.0_91
-
Spring Boot:2.0.9.RELEASE
-
Spring Cloud:Finchley.RELEASE
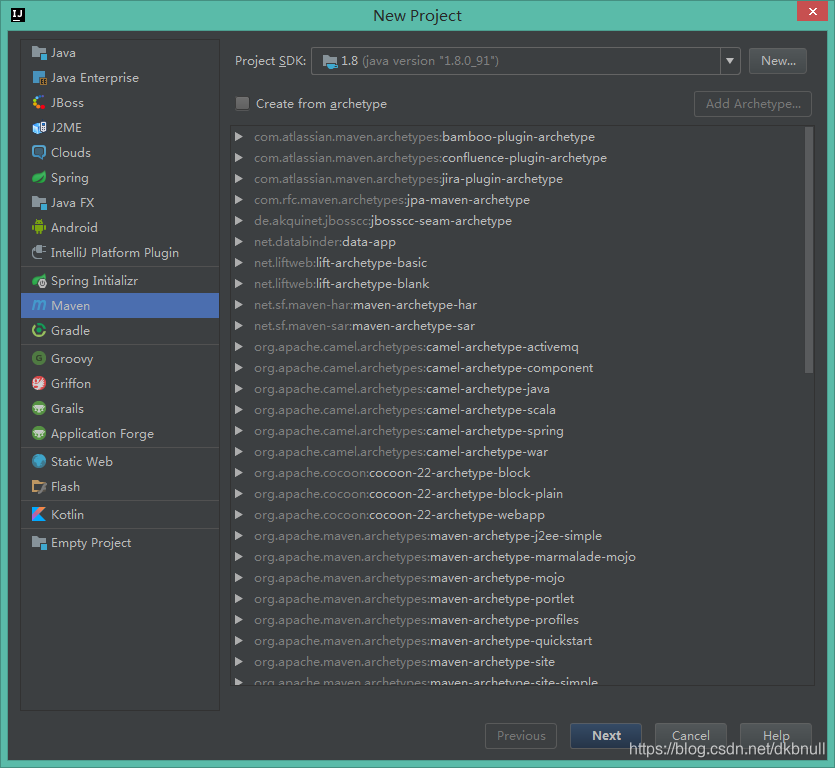
1. 新建父Maven工程
1.1 新建Maven工程

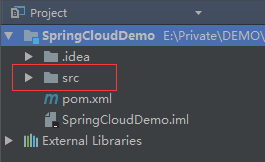
1.2 删除src文件夹
1.3 引入依赖
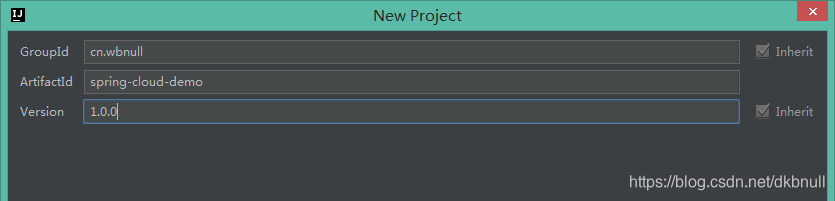
父Maven工程pom文件定义为父pom文件,并引入依赖
<?xml version="1.0" encoding="UTF-8"?>
<project xmlns="http://maven.apache.org/POM/4.0.0"
         xmlns:xsi="http://www.w3.org/2001/XMLSchema-instance"
         xsi:schemaLocation="http://maven.apache.org/POM/4.0.0 http://maven.apache.org/xsd/maven-4.0.0.xsd">
    <modelVersion>4.0.0</modelVersion>

    <groupId>cn.wbnull</groupId>
    <artifactId>spring-cloud-demo</artifactId>
    <version>1.0.0</version>
    <packaging>pom</packaging>

    <parent>
        <groupId>org.springframework.boot</groupId>
        <artifactId>spring-boot-starter-parent</artifactId>
        <version>2.0.9.RELEASE</version>
    </parent>

    <properties>
        <project.build.sourceEncoding>UTF-8</project.build.sourceEncoding>
        <project.reporting.outputEncoding>UTF-8</project.reporting.outputEncoding>
        <java.version>1.8</java.version>
        <spring-cloud.version>Finchley.RELEASE</spring-cloud.version>
    </properties>

    <dependencyManagement>
        <dependencies>
            <dependency>
                <groupId>org.springframework.cloud</groupId>
                <artifactId>spring-cloud-dependencies</artifactId>
                <version>${spring-cloud.version}</version>
                <type>pom</type>
                <scope>import</scope>
            </dependency>
        </dependencies>
    </dependencyManagement>

    <build>
        <plugins>
            <plugin>
                <groupId>org.springframework.boot</groupId>
                <artifactId>spring-boot-maven-plugin</artifactId>
            </plugin>
        </plugins>
    </build>
</project>
2. 新建Spring Boot服务提供者
2.1 新建Spring Boot服务
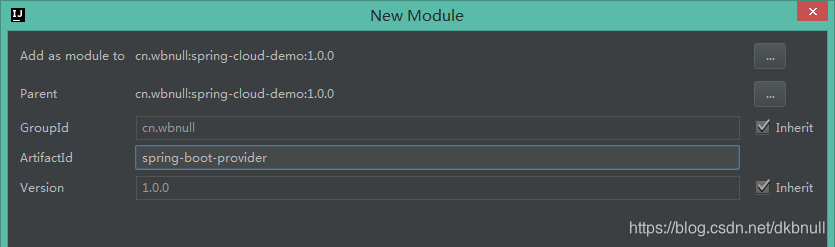
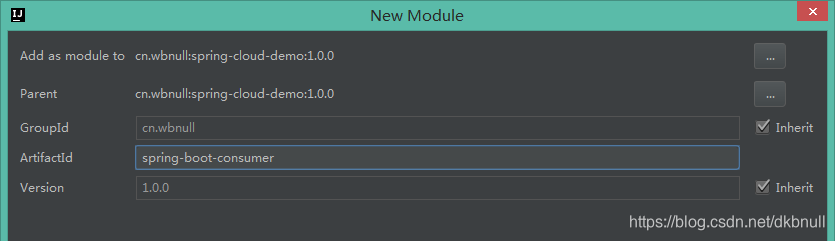
右键SpringCloudDemo–>New–>Module,选择Maven项目

2.2 引入依赖
<?xml version="1.0" encoding="UTF-8"?>
<project xmlns="http://maven.apache.org/POM/4.0.0"
         xmlns:xsi="http://www.w3.org/2001/XMLSchema-instance"
         xsi:schemaLocation="http://maven.apache.org/POM/4.0.0 http://maven.apache.org/xsd/maven-4.0.0.xsd">
    <modelVersion>4.0.0</modelVersion>

    <artifactId>spring-boot-provider</artifactId>
    <packaging>jar</packaging>

    <parent>
        <groupId>cn.wbnull</groupId>
        <artifactId>spring-cloud-demo</artifactId>
        <version>1.0.0</version>
    </parent>

    <dependencies>
        <dependency>
            <groupId>org.springframework.boot</groupId>
            <artifactId>spring-boot-starter-web</artifactId>
        </dependency>
    </dependencies>
</project>
2.3 新建Spring Boot入口类
package cn.wbnull.springbootprovider;

import org.springframework.boot.SpringApplication;
import org.springframework.boot.autoconfigure.SpringBootApplication;

@SpringBootApplication
public class SpringBootProviderApplication {

    public static void main(String[] args) {
        SpringApplication.run(SpringBootProviderApplication.class, args);
    }
}
2.4 新建application.yml
resources 文件夹下新建application.yml
server:
  port: 8081
  servlet:
    context-path: /springbootprovider

spring:
  application:
    name: spring-boot-provider
2.5 新建控制器类
package cn.wbnull.springbootprovider.controller;

import org.springframework.context.annotation.Scope;
import org.springframework.web.bind.annotation.GetMapping;
import org.springframework.web.bind.annotation.RestController;

@RestController
@Scope("prototype")
public class GatewayController {

    @GetMapping(value = "/gateway")
    public String gateway() throws Exception {
        return "hello world,this is spring-boot-provider";
    }
}
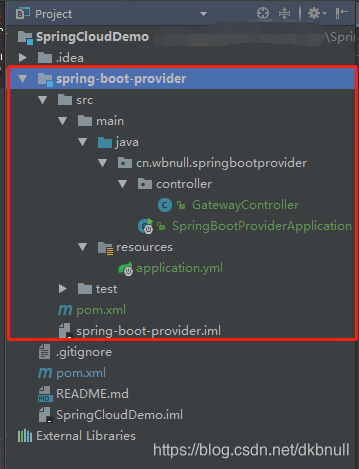
2.6 目录结构
Spring Boot 服务目录结构如下
3. 新建Spring Boot服务消费者
3.1 新建Spring Boot消费者
与创建Spring Boot服务提供者类似,新建Spring Boot服务消费者
3.2 引入依赖
与Spring Boot服务提供者依赖类似
<?xml version="1.0" encoding="UTF-8"?>
<project xmlns="http://maven.apache.org/POM/4.0.0"
         xmlns:xsi="http://www.w3.org/2001/XMLSchema-instance"
         xsi:schemaLocation="http://maven.apache.org/POM/4.0.0 http://maven.apache.org/xsd/maven-4.0.0.xsd">
    <modelVersion>4.0.0</modelVersion>

    <artifactId>spring-boot-consumer</artifactId>
    <packaging>jar</packaging>

    <parent>
        <groupId>cn.wbnull</groupId>
        <artifactId>spring-cloud-demo</artifactId>
        <version>1.0.0</version>
    </parent>

    <dependencies>
        <dependency>
            <groupId>org.springframework.boot</groupId>
            <artifactId>spring-boot-starter-web</artifactId>
        </dependency>
    </dependencies>
</project>
3.3 新建Spring Boot入口类
这里要注意,与Spring Boot服务提供者入口类不同,服务消费者入口类新增了一段代码。
RestTemplate是一个对HTTP请求进行了封装的类,借助RestTemplate,Spring应用能够方便地使用REST资源。
package cn.wbnull.springbootconsumer;

import org.springframework.boot.SpringApplication;
import org.springframework.boot.autoconfigure.SpringBootApplication;
import org.springframework.context.annotation.Bean;
import org.springframework.web.client.RestTemplate;

@SpringBootApplication
public class SpringBootConsumerApplication {

    @Bean
    public RestTemplate restTemplate() {
        return new RestTemplate();
    }

    public static void main(String[] args) {
        SpringApplication.run(SpringBootConsumerApplication.class, args);
    }
}
3.4 新建application.yml
server:
  port: 8082
  servlet:
    context-path: /springbootconsumer

spring:
  application:
    name: spring-boot-consumer
3.5 新建控制器类
这里的gateway()方法没有自己的实现,而是去调用了服务提供者的gateway()方法。
package cn.wbnull.springbootconsumer.controller;

import org.springframework.beans.factory.annotation.Autowired;
import org.springframework.context.annotation.Scope;
import org.springframework.web.bind.annotation.GetMapping;
import org.springframework.web.bind.annotation.RestController;
import org.springframework.web.client.RestTemplate;

@RestController
@Scope("prototype")
public class GatewayController {

    @Autowired
    private RestTemplate restTemplate;

    @GetMapping(value = "/gateway")
    public String gateway() throws Exception {
        return restTemplate.getForObject("http://localhost:8081/springbootprovider/gateway", String.class);
    }
}
4. 测试
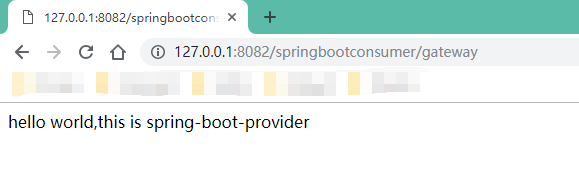
我们先启动服务提供者,再启动服务消费者,然后浏览器访问 http://127.0.0.1:8082/springbootconsumer/gateway ,获取到正确结果。到这,一个简单Spring Cloud 项目的服务提供者和服务消费者就完成了。
GitHub:https://github.com/dkbnull/SpringCloudDemo
微信:https://mp.weixin.qq.com/s/7ZrgoRyAcs7agzpVtsWe4w
微博:https://weibo.com/ttarticle/p/show?id=2309404365477253117454
知乎:https://zhuanlan.zhihu.com/p/63925470
