弹框(在这里使用了 Spring动画框架)
Spring动画可以参考我的这篇文章
https://blog.csdn.net/wa172126691/article/details/80335130
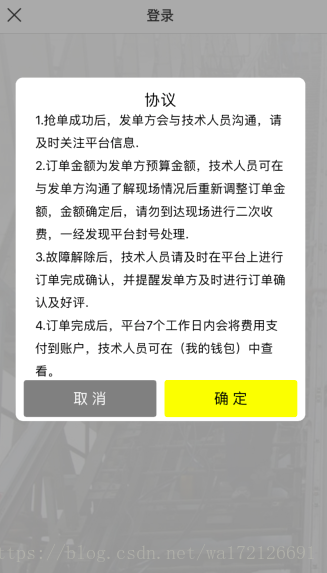
界面中间的弹框
//
//  SmileAlert.swift
//  H56580E2E
//
//

import UIKit
import Spring

class SmileAlert: UIView {
    /// 根据RGBA生成颜色(格式为:22,22,22,0.5)
    var SM_RGBAColor: (CGFloat, CGFloat, CGFloat, CGFloat) -> UIColor = {red, green, blue, alpha in
        return UIColor(red: red / 255, green: green / 255, blue: blue / 255, alpha: alpha);
    }

    typealias clickAlertClosure = (_ index: Int) -> Void //声明闭包,点击按钮传值
    //把申明的闭包设置成属性
    var clickClosure: clickAlertClosure?
    //为闭包设置调用函数
    func clickIndexClosure(_ closure:clickAlertClosure?){
        //将函数指针赋值给myClosure闭包
        clickClosure = closure
    }


    let Screen_width = UIScreen.main.bounds.size.width
    let Screen_height = UIScreen.main.bounds.size.height
    let bgView = SpringView() //白色框动画控件
    let titleLabel = UILabel() //标题按钮
    let contentLabel = UILabel() //显示内容
    var title = "" //标题
    var content = "" //内容
    let cancelBtn = UIButton() //取消按钮
    let sureBtn = UIButton() //确定按钮
    let Bgtap = UITapGestureRecognizer() //点击手势

    let scrollview = UIScrollView() //滚动视图层

    init(title: String?, message: String?, cancelButtonTitle: String?, sureButtonTitle: String?) {
        super.init(frame: CGRect(x: 0, y: 0, width: Screen_width, height: Screen_height))
        createAlertView()
        self.titleLabel.text = title

        /**设置 UILable的行间距 **/
        //通过富文本来设置行间距
        let paraph = NSMutableParagraphStyle()
        //将行间距设置为28
        paraph.lineSpacing = 10
        //样式属性集合
        let attributes = [kCTFontAttributeName:UIFont.systemFont(ofSize: 15),
                          kCTParagraphStyleAttributeName: paraph]
        self.contentLabel.attributedText = NSAttributedString(string: message!, attributes: attributes as [NSAttributedStringKey : Any])
        //self.contentLabel.text = message


        self.cancelBtn.setTitle(cancelButtonTitle, for: UIControlState())
        self.sureBtn.setTitle(sureButtonTitle, for: UIControlState())
    }

    //MARK:创建
    func createAlertView() {
        //布局
        self.frame = CGRect(x: 0, y: 0, width: Screen_width, height: Screen_height)
        self.backgroundColor = UIColor.darkGray.withAlphaComponent(0.5)
        Bgtap.addTarget(self, action: #selector(SmileAlert.dismiss))
        self.addGestureRecognizer(Bgtap)
        //spring动画白底(弹出主体)
        bgView.frame = CGRect(x: 30, y: Screen_height/2 - 250, width: Screen_width - 60, height: 420)//设置大小及其位置
        bgView.backgroundColor = UIColor.white//背景色
        bgView.layer.cornerRadius = 9
        bgView.clipsToBounds = true

        bgView.animation = "pop"
        bgView.curve = "Spring"
        bgView.duration = 1.0
        bgView.damping = 0.7
        bgView.velocity = 0.7
        bgView.force = 0.3
        bgView.animate()

        self.addSubview(bgView)
        let width = bgView.frame.size.width
        let height = bgView.frame.size.height
        //标题
        titleLabel.frame = CGRect(x: 0, y: 15, width: width, height: 25)
        titleLabel.textColor = UIColor.black
        titleLabel.font = UIFont.systemFont(ofSize: 19)
        titleLabel.textAlignment = .center
        bgView.addSubview(titleLabel)

        //滚动视图层
        scrollview.frame = CGRect(x: 24, y: 30, width: width, height: height - 70)
        bgView.addSubview(scrollview)

        //内容
        //contentLabel.frame = CGRect(x: 24, y: 56, width: width - 48, height: 68)
        let scrollHeight = scrollview.frame.size.height
        contentLabel.frame = CGRect(x: 0, y: 0, width:width - 48, height: scrollHeight)
        contentLabel.numberOfLines = 0
        contentLabel.textColor = UIColor.black
        contentLabel.font = UIFont.systemFont(ofSize: 17)
        scrollview.addSubview(contentLabel)
        //取消按钮
        let btnWith = (width - 30) / 2
        cancelBtn.frame = CGRect(x: 10, y: scrollHeight + 20, width: btnWith, height: 45)
        cancelBtn.backgroundColor = UIColor.gray
        cancelBtn.setTitleColor(UIColor.white, for: .normal)
        cancelBtn.titleLabel?.font = UIFont.systemFont(ofSize: 18)
        cancelBtn.layer.cornerRadius = 3
        cancelBtn.clipsToBounds = true
        cancelBtn.tag = 1
        cancelBtn.addTarget(self, action: #selector(clickBtnAction(_:)), for: .touchUpInside)
        bgView.addSubview(cancelBtn)
        //确认按钮
        sureBtn.frame = CGRect(x: btnWith + 20 , y: scrollHeight + 20, width: btnWith, height: 45)
        sureBtn.backgroundColor = UIColor.yellow
        sureBtn.setTitleColor(UIColor.black, for: UIControlState())
        sureBtn.titleLabel?.font = UIFont.systemFont(ofSize: 18)
        sureBtn.layer.cornerRadius = 3
        sureBtn.clipsToBounds = true
        sureBtn.tag = 2
        sureBtn.addTarget(self, action: #selector(clickBtnAction(_:)), for: .touchUpInside)
        bgView.addSubview(sureBtn)
    }

    //MARK:按键的对应的方法
    @objc func clickBtnAction(_ sender: UIButton) {
        if (clickClosure != nil) {
            clickClosure!(sender.tag)
        }
        dismiss()
    }
    //MARK:消失
    @objc func dismiss() {
        UIView.animate(withDuration: 0.25, animations: { () -> Void in
            self.bgView.alpha = 0
            self.alpha = 0
        }, completion: { (finish) -> Void in
            if finish {
                self.removeFromSuperview()
            }
        })
    }
    /** 指定视图实现方法 */
    func show() {
        let wind = UIApplication.shared.keyWindow
        self.alpha = 0

        wind?.addSubview(self)
        UIView.animate(withDuration: 0.25, animations: { () -> Void in
            self.alpha = 1
        })
    }

    required init?(coder aDecoder: NSCoder) {
        fatalError("init(coder:) has not been implemented")
    }
}
使用方法:
let alertView = SmileAlert(title: "协议", message: "1.抢单成功后,发单方会与技术人员沟通,请及时关注平台信息.\n2.订单金额为发单方预算金额,技术人员可在与发单方沟通了解现场情况后重新调整订单金额,金额确定后,请勿到达现场进行二次收费,一经发现平台封号处理.\n3.故障解除后,技术人员请及时在平台上进行订单完成确认,并提醒发单方及时进行订单确认及好评.\n4.订单完成后,平台7个工作日内会将费用支付到账户,技术人员可在(我的钱包)中查看。", cancelButtonTitle: "取 消", sureButtonTitle: "确 定")
        alertView.show()
        //获取点击事件
        alertView.clickIndexClosure { (index) in
            print("点击了第" + "\(index)" + "个按钮")
        }
底部弹框
//
//  SmileActionSheet.swift
//  H56580E2E
//
//  底部弹层
//

import UIKit
import Spring
class SmileActionSheet: UIView {

    //初始化
    let screen_width = UIScreen.main.bounds.size.width
    let screen_height = UIScreen.main.bounds.size.height
    let backGroundView = SpringView() //背景视图
    let tap = UITapGestureRecognizer() //手势

    //init 调用方法
    init(title: String?, cancelButtonTitle: String?, buttonTitles: [String]?) {
        super.init(frame: CGRect(x: 0, y: 0, width: screen_width, height: screen_height))
        if buttonTitles == nil || buttonTitles?.count == 0 {
            return
        }

        // 自定义一个actionsheet
        self.frame = CGRect(x: 0, y: 0, width: screen_width, height: screen_height)
        self.backgroundColor = UIColor.darkGray.withAlphaComponent(0.5)
        // 添加手势
        tap.addTarget(self, action: #selector(self.removeWindowsView(_:)))
        self.addGestureRecognizer(tap)

        backGroundView.frame = CGRect(x: 0, y: screen_height, width: screen_width , height: 300)
        backGroundView.backgroundColor = UIColor.white
        backGroundView.layer.shadowColor = UIColor.lightGray.cgColor
        backGroundView.layer.borderColor = UIColor.groupTableViewBackground.cgColor


        //        backGroundView.animation = "FadeInUp"
        //        backGroundView.curve = "aseInOutBack"
        //        backGroundView.duration = 1.0
        //        backGroundView.damping = 0.7
        //        backGroundView.velocity = 0.7
        //        backGroundView.force = 1
        //        backGroundView.opacity = 1
        //        backGroundView.animateFrom = true
        //        backGroundView.rotate = 0
        //        backGroundView.animate()


        self.addSubview(backGroundView)


    }

    @objc func removeWindowsView(_ thetap:UITapGestureRecognizer) {
        dismiss()
    }


    func show() {

        UIApplication.shared.windows[0].addSubview(self)

        SpringAnimation.spring(duration: 0.5, animations: {
            self.backGroundView.frame = CGRect(x: 0, y: self.screen_height -  self.backGroundView.frame.size.height+20, width: self.screen_width , height: self.backGroundView.frame.size.height)

        })

    }

    func dismiss() {
        UIView.animateKeyframes(withDuration: 0.5, delay: 0.0, options: UIViewKeyframeAnimationOptions(), animations: {
            UIView.addKeyframe(withRelativeStartTime: 0.0, relativeDuration: 1/2.0, animations: {
                self.backGroundView.frame = CGRect(x: self.backGroundView.frame.origin.x, y: self.screen_height, width: self.backGroundView.frame.size.width, height: self.backGroundView.frame.size.height)
            })
            UIView.addKeyframe(withRelativeStartTime: 1/2.0, relativeDuration: 1/2.0, animations: {
                self.backgroundColor = UIColor(white: 0, alpha: 0)
            })
        }) { (finished) in
            self.backGroundView.removeFromSuperview()
            self.removeFromSuperview()
            self.removeGestureRecognizer(self.tap)
            self.removeFromSuperview()
        }
    }

    required init?(coder aDecoder: NSCoder) {
        fatalError("init(coder:) has not been implemented")
    }
}
调用方法:
//调用方法
let sheetView = SmileActionSheet(title: "操作", cancelButtonTitle: "取消", buttonTitles: ["删除", "编辑"])
sheetView.show()
顶部通知层
//
//  SmileNotificationShow.swift
//  H56580E2E
//
//  Created by 陕西帮你电子科技有限公司 on 2018/5/15.
//  Copyright © 2018年 陕西帮你电子科技有限公司. All rights reserved.
//  顶部弹出通知层
//

import UIKit
import Spring

enum SmileNotificationShowType : Int {

    case SmileNotificationShowTop

    case SmileNotificationShowBottom

}

class SmileNotificationShow: UIView {

    let screen_width = UIScreen.main.bounds.size.width
    let screen_height = UIScreen.main.bounds.size.height
    var showType : SmileNotificationShowType?
    let tap = UITapGestureRecognizer() //手势
    let _showView = SpringView() //通知的弹框
    let showText = UILabel() //通知内容
    let iconImg  = UIImageView()


    //init 调用方法
    init(title: String?,showType:SmileNotificationShowType? ) {
        super.init(frame: CGRect(x: 0, y: 0, width: screen_width, height: screen_height))
        if title == nil   {
            return
        }
        self.showType = showType
        self.frame = CGRect(x: 0, y: 0, width: screen_width, height: screen_height)
        self.backgroundColor = UIColor(white: 0, alpha: 0)
        // 添加手势
        tap.addTarget(self, action: #selector(self.removeWindowsView(_:)))
        self.addGestureRecognizer(tap)

        _showView.backgroundColor = UIColor.white
        _showView.layer.shadowColor = UIColor.lightGray.cgColor
        _showView.layer.borderColor = UIColor.groupTableViewBackground.cgColor
        if (self.showType==SmileNotificationShowType(rawValue: 0)){
            _showView.frame = CGRect(x: 0, y: -64, width: screen_width , height: 64)
        }else{
            _showView.frame = CGRect(x: 0, y: screen_height, width: screen_width , height: 64)
        }


        //通知小图标
        iconImg.frame  =  CGRect(x: 2, y: 15, width: 50, height: 50)
        iconImg.center.x = _showView.frame.size.height/2;
        iconImg.image = UIImage(named: "news.png")
        _showView .addSubview(iconImg)

        //通知消息
        showText.frame = CGRect(x: 75, y: 15, width: screen_width-70, height: 60)
        showText.text = title;
        showText.textColor = UIColor.brown
        showText.textAlignment=NSTextAlignment.left
        _showView .addSubview(showText)

        self.addSubview(_showView)

    }


    @objc func removeWindowsView(_ thetap:UITapGestureRecognizer) {
        //        dismiss()
    }


    //通知条显示
    func show() {
        UIApplication.shared.windows[0].addSubview(self)

        //1.动画显示
        SpringAnimation.springWithCompletion(duration: 0.5, animations: {

            //从上面
            if (self.showType==SmileNotificationShowType(rawValue: 0)){
                self._showView.frame = CGRect(x: 0, y: -10, width: self.screen_width , height: 74)

            }else{
                //从下面
                self._showView.frame = CGRect(x: 0, y: self.screen_height-64, width: self.screen_width , height: 74)
            }

        }, completion: {
            (finished:Bool) -> Void in

            //结束后回到初始化的位置,然后调用移除

            SpringAnimation.springWithDelay(duration: 1, delay: 2, animations: {
                if (self.showType==SmileNotificationShowType(rawValue: 0)){
                    self._showView.frame = CGRect(x: 0, y: -64, width: self.screen_width , height: 64)

                }else{

                    self._showView.frame = CGRect(x: 0, y: self.screen_height, width: self.screen_width , height: 64)
                }


                //为了有抽屉的效果,延迟一下
                //延时1秒执行
                let time: TimeInterval = 2
                DispatchQueue.main.asyncAfter(deadline: DispatchTime.now() + time) {
                    //code
                    self.dismiss()
                }
            })


        })

    }

    //通知条消失
    func dismiss() {

        SpringAnimation.springWithCompletion(duration: 1, animations: {

            if (self.showType==SmileNotificationShowType(rawValue: 0)){

                self._showView.frame = CGRect(x: 0, y: -64, width: self.screen_width , height: 64)
            }else{

                self._showView.frame = CGRect(x: 0, y: self.screen_height, width: self.screen_width , height: 64)
            }

        }, completion: {
            (finished:Bool) -> Void in

            self._showView .removeFromSuperview()
            self.removeGestureRecognizer(self.tap)
            self.removeFromSuperview()


        })


    }


    required init?(coder aDecoder: NSCoder) {
        fatalError("init(coder:) has not been implemented")
    }

}
使用方法:
let  notionShow = SmileNotificationShow(title: "您有一条新的消息", showType:SmileNotificationShowType.SmileNotificationShowTop)
notionShow.show()