ResNet是ILSVRC 2015在图像分类,检测和定位方面的赢家,也是MS COCO 2015检测和分割的获胜者。
ResNet50是一个用于图像分类的简单、高度模块化的网络结构,它已经成为keras中的一个标准模块。
基于ResNet50可以构造很多个性化的应用,因此学习使用一下ResNet50很有必要。
关于keras.applications.resnet50.ResNet50()的说明如下:
该模型为50层残差网络模型,权重训练自ImageNet。该模型在Theano和TensorFlow后端均可使用,并接受channels_first和channels_last两种输入维度顺序,模型的默认输入尺寸是224x224。
参数
include_top:是否保留顶层的全连接网络
weights:None代表随机初始化,即不加载预训练权重;'imagenet’代表加载预训练权重。
input_tensor:可填入Keras tensor作为模型的图像输出tensor
input_shape:可选,仅当include_top=False有效,应为长为3的tuple,指明输入图片的shape,图片的宽高必须大于197,如(200,200,3)
pooling:当include_top=False时,该参数指定了池化方式。None代表不池化,最后一个卷积层的输出为4D张量。‘avg’代表全局平均池化,‘max’代表全局最大值池化。
classes:可选,图片分类的类别数,仅当include_top=True并且不加载预训练权重时可用。
我们从互联网上下载了一些狗狗的图片(100张),同时用StyleGAN生成了一些人脸图片(250张),分别把它们放到两个不同的目录下,用来训练我们的RestNet50网络;训练完毕后,我们把模型保存到文件;然后用训练后的模型对输入的图片进行分类。
用StyleGAN生成人脸图片的方法请参考:
https://blog.csdn.net/weixin_41943311/article/details/100539707
训练的epoch = 30,accuracy达到0.9629

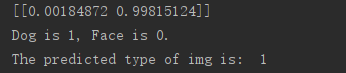
分类的结果如下:
源代码(带中文注释)如下:
# -*- coding: UTF-8 -*-

import os, sys
import numpy as np
import scipy
from scipy import ndimage
import tensorflow as tf
import matplotlib.pyplot as plt
from tensorflow.keras.preprocessing import image
import keras
import pickle
import PIL.Image
import random

# 准备用来训练网络和测试的数据集
def DataSet():
    # 训练数据集目录
    train_path_face = './dataset_0/train/face/'
    train_path_dog = './dataset_0/train//dog/'

    # 测试数据集目录
    test_path_face = './dataset_0/test/face/'
    test_path_dog = './dataset_0/test//dog/'

    # 获取文件列表
    imglist_train_face = os.listdir(train_path_face)
    imglist_train_dog = os.listdir(train_path_dog)

    imglist_test_face = os.listdir(test_path_face)
    imglist_test_dog = os.listdir(test_path_dog)

    # 准备训练数据集,虽然ResNet50的缺省输入为224x224,但也接受256x256的输入
    X_train = np.empty((len(imglist_train_face) + len(imglist_train_dog), 256, 256, 3))
    Y_train = np.empty((len(imglist_train_face) + len(imglist_train_dog), 2))
    count = 0
    for img_name in imglist_train_face:
        img_path = train_path_face + img_name
        img = image.load_img(img_path, target_size=(256, 256))
        img = image.img_to_array(img) / 255.0

        # 训练的输入为图像,输出为分类,(1,0)是人脸,(0,1)是狗狗
        X_train[count] = img
        Y_train[count] = np.array((1, 0))
        count += 1

    for img_name in imglist_train_dog:
        img_path = train_path_dog + img_name
        img = image.load_img(img_path, target_size=(256, 256))
        img = image.img_to_array(img) / 255.0

        X_train[count] = img
        Y_train[count] = np.array((0, 1))
        count += 1

    # 准备测试数据集,虽然ResNet50的缺省输入为224x224,但也接受256x256的输入
    X_test = np.empty((len(imglist_test_face) + len(imglist_test_dog), 256, 256, 3))
    Y_test = np.empty((len(imglist_test_face) + len(imglist_test_dog), 2))
    count = 0
    for img_name in imglist_test_face:
        img_path = test_path_face + img_name
        img = image.load_img(img_path, target_size=(256, 256))
        img = image.img_to_array(img) / 255.0

        X_test[count] = img
        Y_test[count] = np.array((1, 0))
        count += 1

    for img_name in imglist_test_dog:
        img_path = test_path_dog + img_name
        img = image.load_img(img_path, target_size=(256, 256))
        img = image.img_to_array(img) / 255.0

        X_test[count] = img
        Y_test[count] = np.array((0, 1))
        count += 1

    # 打乱顺序
    index = [i for i in range(len(X_train))]
    random.shuffle(index)
    X_train = X_train[index]
    Y_train = Y_train[index]

    index = [i for i in range(len(X_test))]
    random.shuffle(index)
    X_test = X_test[index]
    Y_test = Y_test[index]

    return X_train, Y_train, X_test, Y_test

# 主程序
def main():
    # 输入图片为256x256,2个分类
    shape, classes = (256, 256, 3), 2

    # 调用keras的ResNet50模型
    model = keras.applications.resnet50.ResNet50(input_shape = shape, weights=None, classes=classes)
    model.compile(optimizer="adam", loss="categorical_crossentropy", metrics=["accuracy"])

    # 给出训练和测试数据
    X_train, Y_train, X_test, Y_test = DataSet()
    print('X_train shape : ', X_train.shape)
    print('Y_train shape : ', Y_train.shape)
    print('X_test shape : ', X_test.shape)
    print('Y_test shape : ', Y_test.shape)

    # 训练模型
    training = model.fit(X_train, Y_train, epochs=30, batch_size=6)

    # 画图看一下训练的效果
    plt.plot(training.history['acc'])
    plt.plot(training.history['loss'])
    plt.title('model accuracy and loss')
    plt.xlabel('epoch')
    plt.ylabel('accuracy')
    plt.legend(['acc', 'loss'], loc='upper left')
    plt.show()

    # 评估模型
    model.evaluate(X_test, Y_test, batch_size=32)

    # 把训练好的模型保存到文件
    model.save('resnet_model_dog_n_face.h5')
    model = keras.models.load_model('resnet_model_dog_n_face.h5')

    # 准备用于分类的图片
    # img_path = "./dataset_0/test/face/Person_56.png"
    img_path = "./dataset_0/test/dog/dog004.jpg"
    img = image.load_img(img_path, target_size=(256, 256))
    plt.imshow(img)
    img = image.img_to_array(img) / 255.0
    img = np.expand_dims(img, axis=0)  # 为batch添加第四维

    # 测试分类的结果
    print(model.predict(img))
    print('Dog is 1, Face is 0.')
    print('The predicted type of img is: ', np.argmax(model.predict(img)))

if __name__ == "__main__":
    main()
(完)
