Tinker 的接入
本文是基于 Tinker1.7.11 版本接入
Tinker 项目地址:https://github.com/Tencent/tinker
Tinker 是微信团队开源的热修复框架,最近了解了一下,
参考例子:https://github.com/TinkerPatch/tinkerpatch-sample;
接入文档:http://tinkerpatch.com/Docs/SDK;
一、接入过程
1. 在 gradle.progerties 中添加版本信息
TINKER_VERSION=1.7.11
TINKERPATCH_VERSION=1.1.7
2. 在项目的 build.gradle 中添加远程依赖仓
  dependencies {
        classpath 'com.android.tools.build:gradle:2.3.3'

        //无需再单独引用tinker的其他库
        classpath "com.tinkerpatch.sdk:tinkerpatch-gradle-plugin:${TINKERPATCH_VERSION}"
    }
3. 在项目中添加依赖
dependencies {

    ...

    compile "com.android.support:multidex:1.0.1"

    //若使用annotation需要单独引用,对于tinker的其他库都无需再引用
    provided("com.tinkerpatch.tinker:tinker-android-anno:${TINKER_VERSION}") { changing = true }
    compile("com.tinkerpatch.sdk:tinkerpatch-android-sdk:${TINKERPATCH_VERSION}") { changing = true }
}
将 TinkerPatch 相关的配置引入,
//apply tinker插件
apply from: 'tinkerpatch.gradle'
4. 申请 key
登录 http://tinkerpatch.com/ ,添加应用,生成 key
4.配置 tinkerpatch.gradle 文件
将 tinkerpatch-sample 中的 tinkerpatch.gradlew 文件拷进
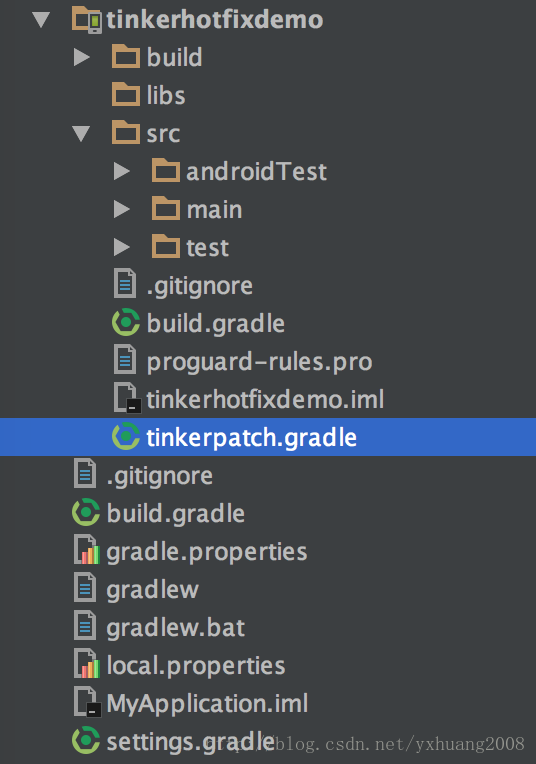
暂时需要修个的地方是要修改 key,将上面申请到的 Key 替换进去
apply plugin: 'tinkerpatch-support'
/**
* TODO: 请按自己的需求修改为适应自己工程的参数
*/
def bakPath = file("${buildDir}/bakApk/")
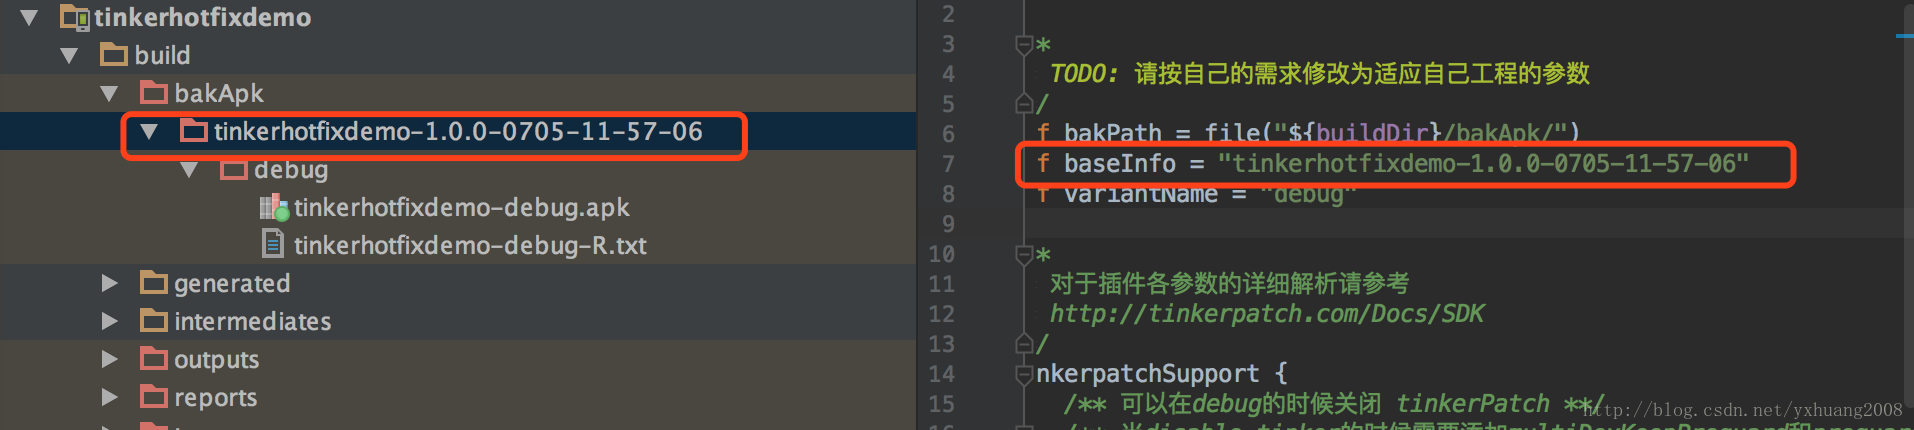
def baseInfo = "app-0115-23-11-20"
def variantName = "debug"
/**
* 对于插件各参数的详细解析请参考
* http://tinkerpatch.com/Docs/SDK
*/
tinkerpatchSupport {
/** 可以在debug的时候关闭 tinkerPatch **/
/** 当disable tinker的时候需要添加multiDexKeepProguard和proguardFiles,
这些配置文件本身由tinkerPatch的插件自动添加,当你disable后需要手动添加
你可以copy本示例中的proguardRules.pro和tinkerMultidexKeep.pro,
需要你手动修改'tinker.sample.android.app'本示例的包名为你自己的包名, com.xxx前缀的包名不用修改
**/
tinkerEnable = true
reflectApplication = false
autoBackupApkPath = "${bakPath}"
appKey = "这里填上面我们申请到的key"
/** 注意: 若发布新的全量包, appVersion一定要更新 **/
appVersion = "1.0.0"
def pathPrefix = "${bakPath}/${baseInfo}/${variantName}/"
def name = "${project.name}-${variantName}"
baseApkFile = "${pathPrefix}/${name}.apk"
baseProguardMappingFile = "${pathPrefix}/${name}-mapping.txt"
baseResourceRFile = "${pathPrefix}/${name}-R.txt"
/**
* 若有编译多flavors需求, 可以参照: https://github.com/TinkerPatch/tinkerpatch-flavors-sample
* 注意: 除非你不同的flavor代码是不一样的,不然建议采用zip comment或者文件方式生成渠道信息(相关工具:walle 或者 packer-ng)
**/
}
/**
* 用于用户在代码中判断tinkerPatch是否被使能
*/
android {
defaultConfig {
buildConfigField "boolean", "TINKER_ENABLE", "${tinkerpatchSupport.tinkerEnable}"
}
}
/**
* 一般来说,我们无需对下面的参数做任何的修改
* 对于各参数的详细介绍请参考:
* https://github.com/Tencent/tinker/wiki/Tinker-%E6%8E%A5%E5%85%A5%E6%8C%87%E5%8D%97
*/
tinkerPatch {
ignoreWarning = false
useSign = true
dex {
dexMode = "jar"
pattern = ["classes*.dex"]
loader = []
}
lib {
pattern = ["lib/*/*.so"]
}
res {
pattern = ["res/*", "r/*", "assets/*", "resources.arsc", "AndroidManifest.xml"]
ignoreChange = []
largeModSize = 100
}
packageConfig {
}
sevenZip {
zipArtifact = "com.tencent.mm:SevenZip:1.1.10"
// path = "/usr/local/bin/7za"
}
buildConfig {
keepDexApply = false
}
}5. 对应用进行设置
- 将 tinkerpatch-sample 中的 SampleApplicationLike.java 拷入到项目中;然后对 application 进行修改,改为当前包名;
@SuppressWarnings("unused")
@DefaultLifeCycle(application = "com.example.tinkerhotfixdemo.SampleApplication",
                  flags = ShareConstants.TINKER_ENABLE_ALL,
                  loadVerifyFlag = false)
public class SampleApplicationLike extends DefaultApplicationLike {

    ....
}
这里的 com.example.tinkerhotfixdemo 就是当前的包名
- 对 AndroidManifest.xml 文件进行配置
添加权限,同时指定 application, 这里的 application 不是 SampleApplicationLike, 而是 SampleApplication
<?xml version="1.0" encoding="utf-8"?>
<manifest xmlns:android="http://schemas.android.com/apk/res/android"
          package="com.example.tinkerhotfixdemo">

    <uses-permission android:name="android.permission.INTERNET"/>
    <uses-permission android:name="android.permission.WRITE_EXTERNAL_STORAGE"/>
    <uses-permission android:name="android.permission.READ_EXTERNAL_STORAGE"/>

    <application
        android:allowBackup="true"
        android:icon="@mipmap/ic_launcher"
        android:label="@string/app_name"
        android:roundIcon="@mipmap/ic_launcher_round"
        android:name=".SampleApplication"
        android:supportsRtl="true"
        android:theme="@style/AppTheme">
        <activity android:name=".MainActivity">
            <intent-filter>
                <action android:name="android.intent.action.MAIN"/>

                <category android:name="android.intent.category.LAUNCHER"/>
            </intent-filter>
        </activity>
    </application>

</manifest>
二.构建及打补丁
1. 生成 Apk
打开 Android Studio 右侧的 Gradle,选择相应的选项,双击生成 apk, 我这里没有配置签名信息,选择的是 assembleDebug;如果在 gradle 中配置了签名信息,想生成签名包,则选择 assembleRelease;

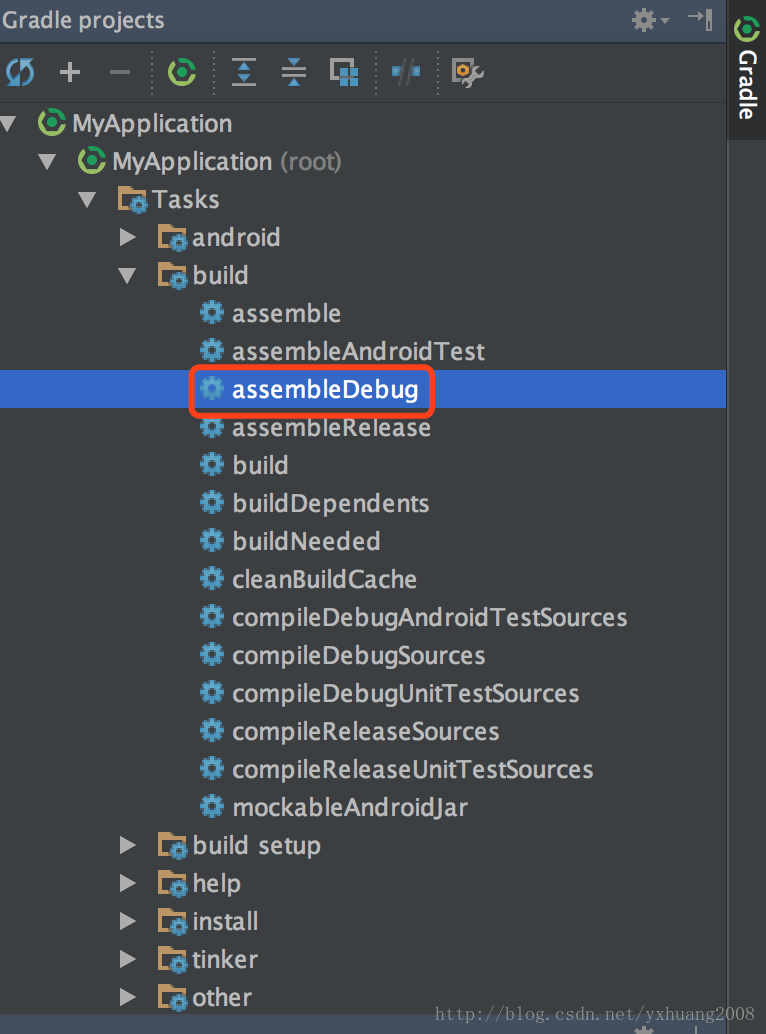
双击后在 build/bakApk/目录下,会生成已时间戳的 apk, 这个 apk 就是安装包。

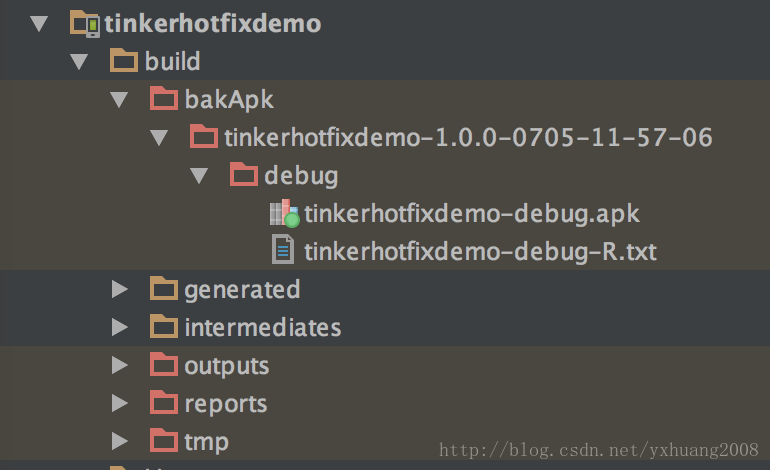
进入 apk 目录下,用命令行进行安装
adb install tinkerhotfixdemo-debug.apk

安装成功


2. 生成补丁
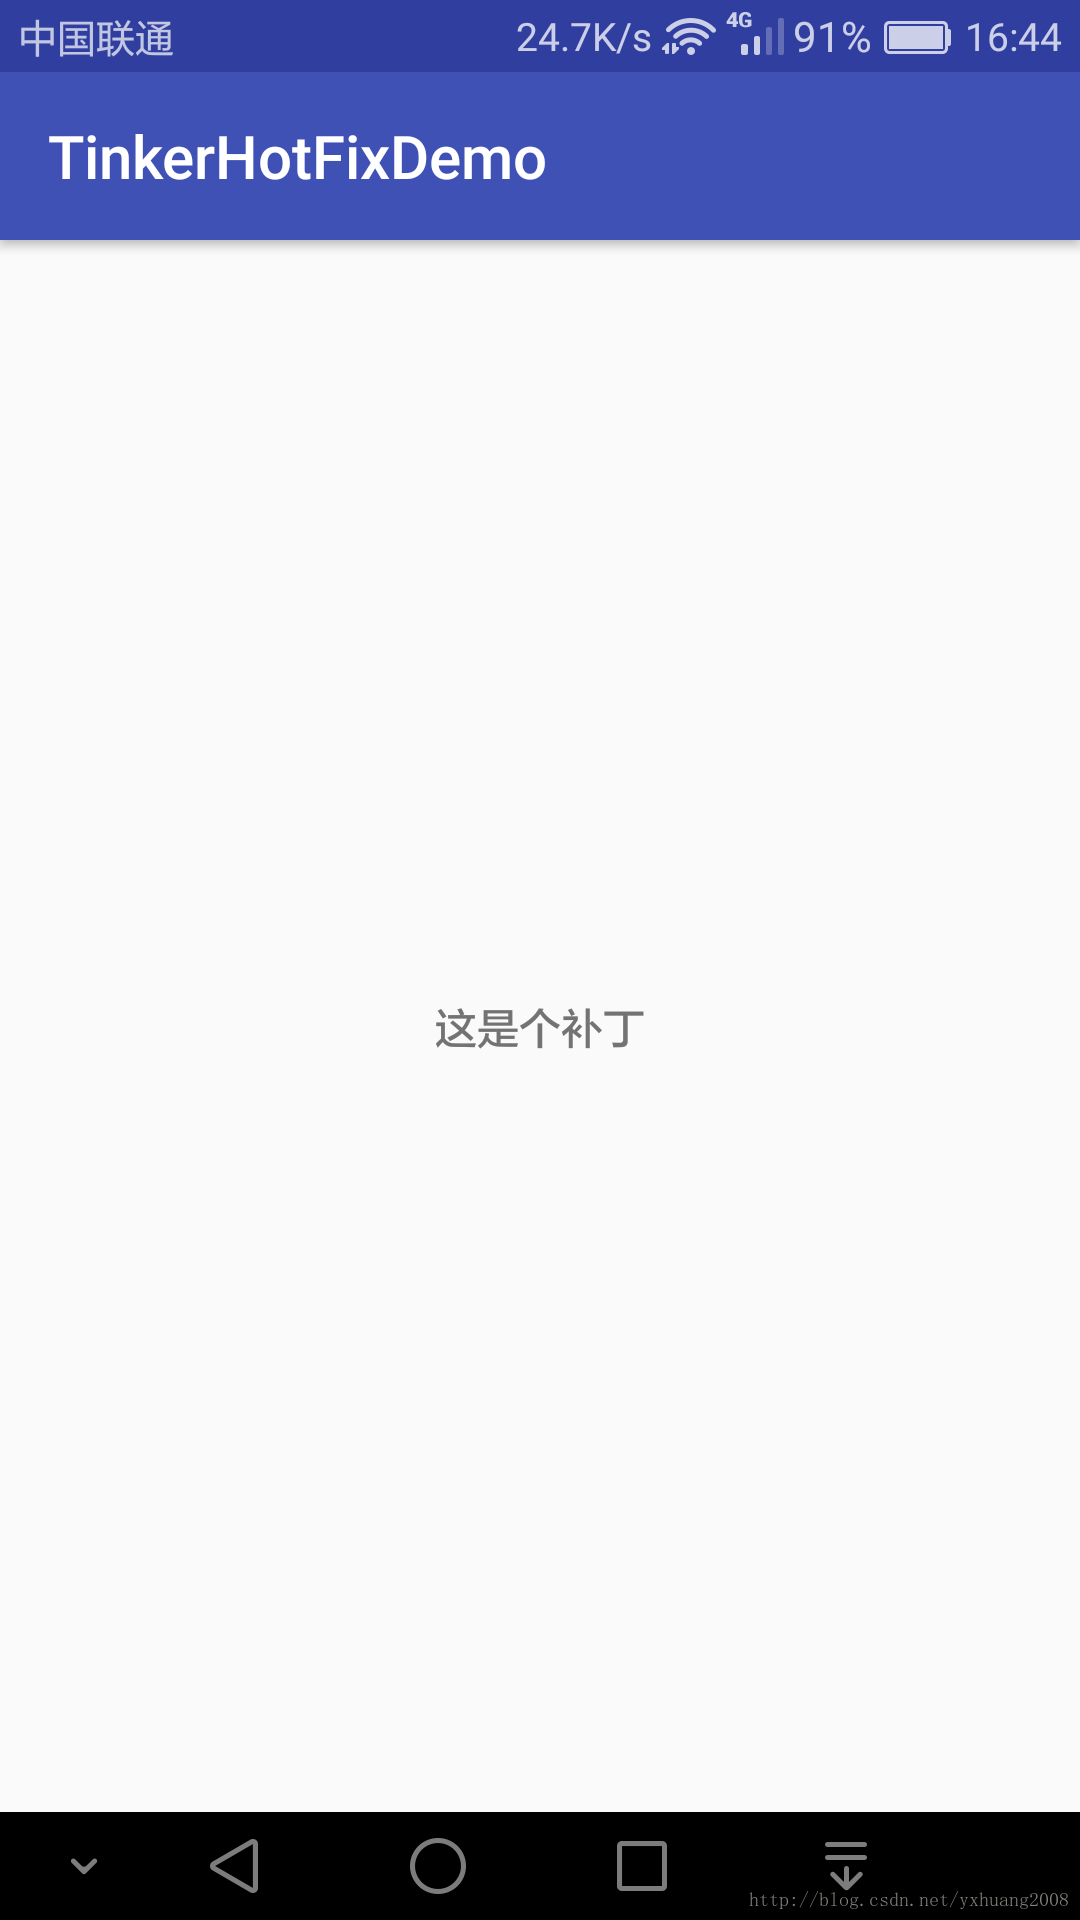
- 修改内容
我们将 TextView 里面的内容改成 “这是个补丁”
public class MainActivity extends AppCompatActivity {

    @Override
    protected void onCreate(Bundle savedInstanceState) {
        super.onCreate(savedInstanceState);
        setContentView(R.layout.activity_main);

        TextView textView = (TextView) findViewById(R.id.tv_text);
        textView.setText("这是个补丁");

    }
}
修改 tinkerpatch.gradle 中 baseInfo 中的信息
将 baseInfo 中的内容改成我们刚刚生成的 bakApk 目录下的文件名

生成补丁包
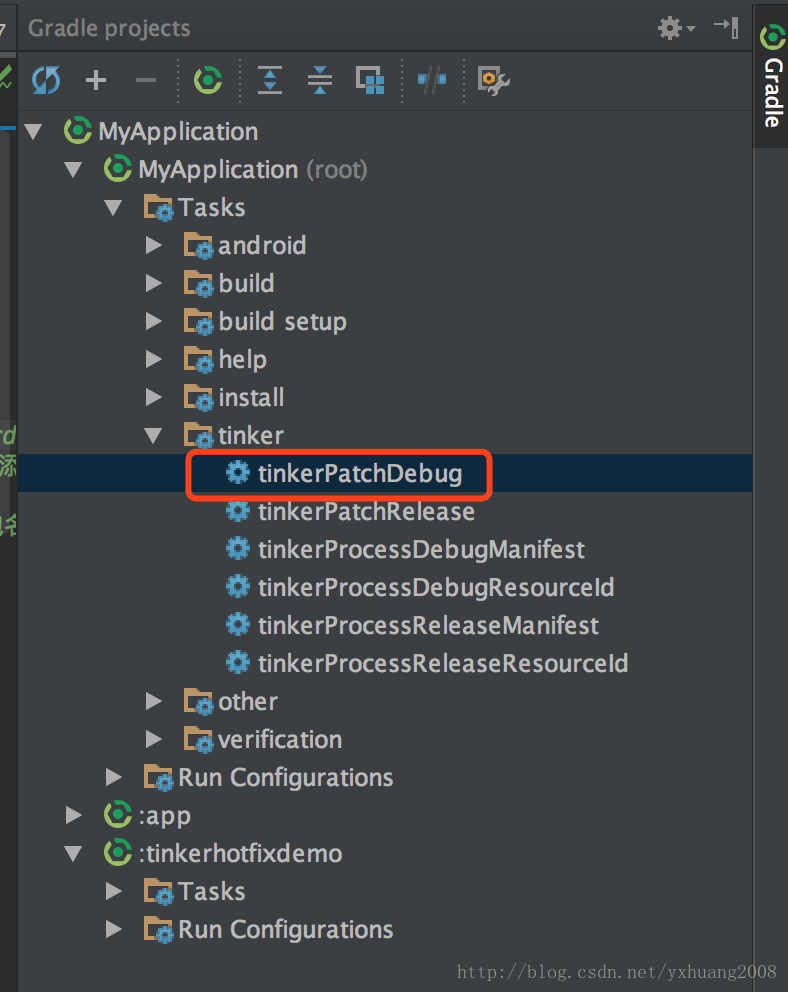
选择 Gradle 中的 tinker 目录下相应的选项,这样要和前面生成 apk 选项一致。如果是生成 apk 选项是 Release, 这里也要选择 tinkerPatchRelease.我们前面选择的是 debug, 所以这里选择应该是 tinkerPatchDebug.

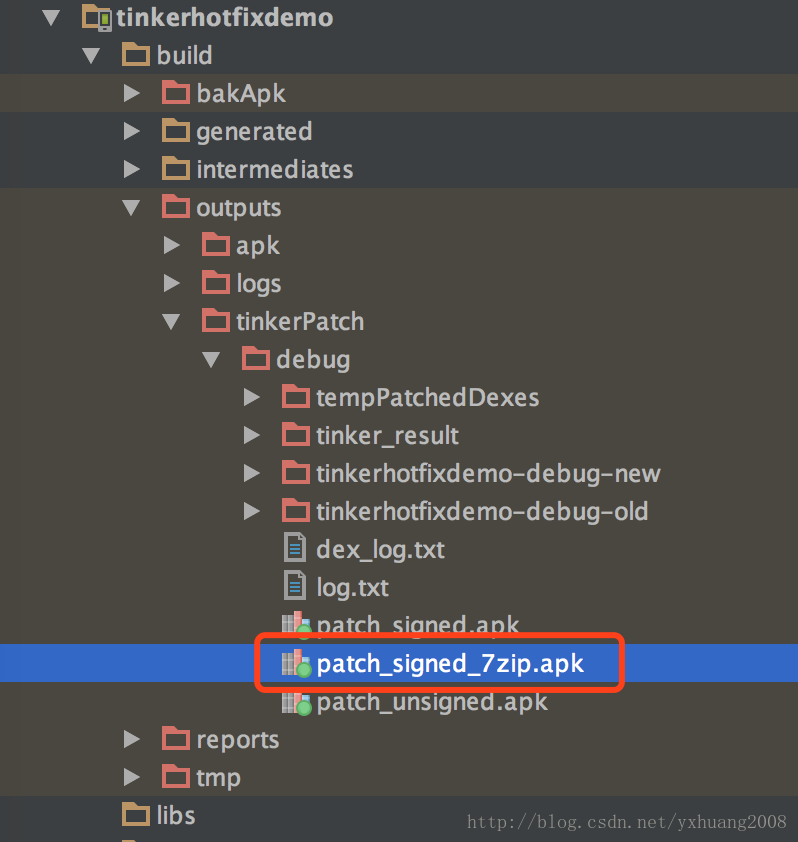
在 Module 的 build/outputs/tinkerPatch/ 目录下会生成一些文件,其中的 patch_signed_7zip.apk 就是我们的补丁。

3. 将补丁上传进行修复
登陆 http://tinkerpatch.com/ 上传补丁


打开应用,等更新,这个过程时候很快,有时候会等得比较久一些