使用Bert预训练模型进行文本分类
bert做文本分类,简单来说就是将每句话的第一个位置加入了特殊分类嵌入[CLS]。而该[CLS]包含了整个句子的信息,它的最终隐藏状态(即,Transformer的输出)被用作分类任务的聚合序列表示。
下载bert预训练模型
Google提供了多种预训练好的bert模型,有针对不同语言的和不同模型大小的。我们的任务是针对临床试验筛选标准进行分类,是中文模型,所以我们下载的是Bert-Base, Chinese这个模型Bert模型下载链接。
该模型解压后的目录包含bert_config.json(模型的超参数),bert_model.ckpt.data-00000-of-00001,bert_model.ckpt.index,bert_model_ckpt.meta(保存预训练模型与权重的 ckpt 文件)和vocab.txt(词表)五个文件。
在自己的数据集微调过程
任务介绍
根据预先给定的44个类别和一系列中文临床试验筛选标准的描述句子,判断该中文临床医学描述句子属于的类别。

评价指标
本任务的评价指标包括宏观准确率(Macro Precision)、宏观召回率(Macro Recall)、Average F1值。最终排名以Average F1值为基准。假设我们有n个类别,C1, … …, Ci, … …, Cn。
宏观准确率Pi=正确预测为类别Ci的样本个数/预测为Ci类样本的个数
召回率Ri=正确预测为类别Ci的样本个数/真实的Ci类样本的个数
平均F1=(1/n)求和[(2Pi*Ri)/(Pi+Ri)]
前期数据分析
训练集数据22962条
验证机数据7682条
测试集数据7697条
统计每个句子的长度,看大部分的句子长度为多少,则将最长的句子设为多少
句子最长为341个字,最短为2个字
前期数据准备
- 我的数据格式如下:
要先对数据进行一定的处理,初略观察数据集,数据集中包含无用的标点符号、数字,去除这些部分,同时对文本进行分词去除掉停用词。最后得到 label+句子的格式,中间用’\t’分隔

将数据集中的后两列提取出来,同时把句子中的停用词去除,得到的结果写入到train_data.csv中
#将训练集提取标签和句子
将训练集提取标签和句子,并过滤停用词
lines=open(train_path,encoding='utf-8').read().split('\n')
with open(new_train,'w',encoding='utf-8')as w:
    content=''
    for i in range(len(lines)-1):
        output=''
        item=lines[i].split('\t')
        content += str(item[1])
        content += '\t'
        seg=jieba.cut(str(item[2]),cut_all=False)
        for j in seg:
            if j not in stopwordset:
                output+=j
        content += str(output)
        content += '\n'
        # print(content)
    w.write(str(content))
w.close()
得到处理后的数据如下:

2. 我们需要在run_classifiler.py中定义自己任务的DataProcessor子类,根据我们数据集的格式重写获取训练集、开发集、测试集的样本数据的方法以及获取标签的方法

我们可以仿照Cola处理器来写我们自己文本分类的处理器

我自己文本分类的处理器,一共分为44个类别
class classification(DataProcessor):
    def get_train_examples(self, data_dir):
        return self._create_examples(
            self._read_tsv(os.path.join(data_dir, "train_data.csv")), "train")

    def get_dev_examples(self, data_dir):
        return self._create_examples(
                self._read_tsv(os.path.join(data_dir, "val_data.csv")), "dev")

    def get_test_examples(self, data_dir):
        return self._create_examples(
                self._read_tsv(os.path.join(data_dir, "test_data.csv")), "test")

    def get_labels(self):#一共有44个标签
        return ['Disease', 'Symptom','Sign','Pregnancy-related Activity','Neoplasm Status','Non-Neoplasm Disease Stage','Allergy Intolerance',
                 'Organ or Tissue Status','Life Expectancy', 'Oral related','Pharmaceutical Substance or Drug','Therapy or Surgery','Device',
                 'Nursing','Diagnostic', 'Laboratory Examinations','Risk Assessment','Receptor Status','Age','Special Patient Characteristic',
                 'Literacy','Gender','Education', 'Address','Ethnicity','Consent','Enrollment in other studies','Researcher Decision',
                 'Capacity','Ethical Audit','Compliance with Protocol','Addictive Behavior', 'Bedtime','Exercise',
                 'Diet','Alcohol Consumer','Sexual related', 'Smoking Status','Blood Donation','Encounter','Disabilities','Healthy',
                 'Data Accessible','Multiple']
    def _create_examples(self, lines, set_type):
        """Creates examples for the training and dev sets."""
        examples = []
        for (i, line) in enumerate(lines):
            guid = "%s-%s" % (set_type, i)
            if set_type=="test":
                text_a = tokenization.convert_to_unicode(line[0])
                label = "Disease"#当是测试集的时候,标签默认为disease
            else:
                text_a = tokenization.convert_to_unicode(line[1])
                label = tokenization.convert_to_unicode(line[0])
            examples.append(
                    InputExample(guid=guid, text_a=text_a, text_b=None, label=label))

        return examples
- 在run_classifiler.py中修改main函数,将自己写的文本分类处理器加入到processors中
  processors = {
      "cola": ColaProcessor,
      "mnli": MnliProcessor,
      "mrpc": MrpcProcessor,
      "xnli": XnliProcessor,
      "task":classification,
  }
- 执行run_classifiler.py

需要必填参数data_dir,task_name,vocab_file,bert_config_file,output_dir。参数do_train,do_eval和do_predict分别控制了是否进行训练,评估和预测,可以按需将其设置为True或者False - 参数的设置
python run_classifier.py
  --data_dir=data
  --task_name=classification
  --vocab_file=chinese_L-12_H-768_A-12R/vocab.txt
  --bert_config_file=chinese_L-12_H-768_A-12/bert_config.json
  --output_dir=output
  --do_train=true
  --do_eval=false
  --init_checkpoint=chinese_L-12_H-768_A-12/bert_model.ckpt
  --max_seq_length=200 (句子的最大长度,可以根据数据集大部分数据的长度来设计)
  --train_batch_size=16 (如果内存太小可以适当缩小,每轮喂入的多少条数据)
  --learning_rate=5e-5
  --num_train_epochs=2.0
- 可以增加验证集的指标在分类时,我们可能还需要看auc,recall,precision的值。
   def metric_fn(per_example_loss, label_ids, logits, is_real_example):
        predictions = tf.argmax(logits, axis=-1, output_type=tf.int32)
        #求loggits[batch size,num_labels]的行最大值的下标
        accuracy = tf.metrics.accuracy(
            labels=label_ids, predictions=predictions, weights=is_real_example)
        auc=tf.metrics.auc(labels=label_ids,predictions=predictions,weights=is_real_example)
        precision=tf.metrics.precision(labels=label_ids,predictions=predictions,weights=is_real_example)
        recall=tf.metrics.recall(labels=label_ids,predictions=predictions,weights=is_real_example)
        f1_score=tf.metrics.mean((2*precision*recall)/(precision+recall))
        loss = tf.metrics.mean(values=per_example_loss, weights=is_real_example) #求加权平均loss
        return {
            "eval_accuracy": accuracy,
            "eval_auc":auc,
            "eval_precision":precision,
            "eval_recall":recall,
            "eval_f1":f1_score,
            "eval_loss": loss,
        }
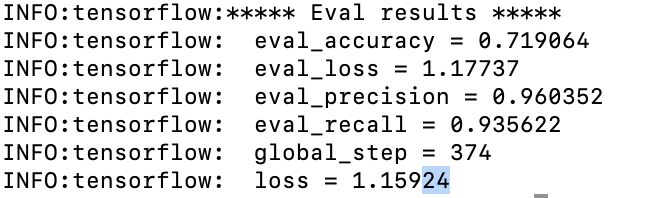
成功运行
python run_classifier.py -—bert_config_file=chinese_L-12_H-768_A-12/bert_config.json --vocab_file=chinese_L-12_H-768_A-12/vocab.txt --init_checkpoint=chinese_L-12_H-768_A-12/bert_model.ckpt

将输入转为特征

从init_checkpoint读取参数

因为自己电脑cpu跑的原因,所以选择了部分数据,训练的轮次也设得很小,效果不是很好。