线性布局
简单地说就是控件或者布局按照水平方向或者垂直方向依次排列!
垂直方向
<LinearLayout>标签内属性为
android:orientation="vertical"
水平方向
<LinearLayout>标签内属性为
android:orientation="horizontal"
其中LinearLayout的排列方向为水平时,内部控件的宽度不可以指定为match_parent,其中LinearLayout的排列方向为垂直时,内部控件的高度不可以指定为match_parent
在Button中添加android:layout_gravity属性
该属性指定控件在布局中的位置
此时当线性布局中属性android:orientation的属性值为"horizontal",android:layout_gravity只有在垂直方向上有效。
此时当线性布局中属性android:orientation的属性值为"vertical",android:layout_gravity只有在水平方向上有效。
例子
<LinearLayout xmlns:android="http://schemas.android.com/apk/res/android"
                  android:orientation="horizontal"
                  android:layout_width="match_parent"
                  android:layout_height="match_parent"
            >
        <Button
                android:id="@+id/button1"
                android:layout_height="wrap_content"
                android:layout_width="wrap_content"
                android:layout_gravity="top"
                android:text="Button1"
             />
        <Button
            android:id="@+id/button2"
            android:layout_height="wrap_content"
            android:layout_width="wrap_content"
            android:layout_gravity="center_vertical"
            android:text="Button2"

         />

        <Button
            android:id="@+id/button3"
            android:layout_height="wrap_content"
            android:layout_width="wrap_content"
            android:layout_gravity="bottom"
            android:text="Button3"

        />
    </LinearLayout>

布局中的android:layout_weight
该属性允许我们使用布局的方式指定控件的大小
想看代码和效果
 <EditText
        android:id="@+id/input_message"
        android:layout_width="0dp"
        android:layout_height="wrap_content"
        android:layout_weight="1"
        android:hint="Type something"
        />
        <Button
            android:id="@+id/send"
            android:layout_width="0dp"
            android:layout_height="wrap_content"
            android:layout_weight="1"
            android:text="Send"

        />
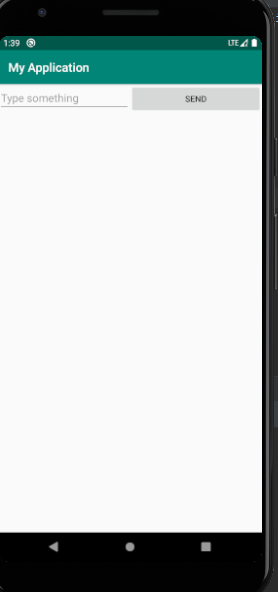
此时我们虽然将android:layout_width="0dp"设置成0dp,但是控件依然会显示出来,此时他们的的宽度由android:layout_weight决定
具体怎么分配呢
我们假设布局为sum,在水平方向上共有两个空间其中控件1的android:layout_weight为2,控件2的android:layout_weight的值为3.则控件1在水平方向上占sum2/5,控件1在水平方向上占sum3/5。
假如我们将Button的宽度设置为wrap_content结果会如何呢?
Button将会按照wrap_content计算而EditText会占满屏幕所有的剩余空间

相对布局
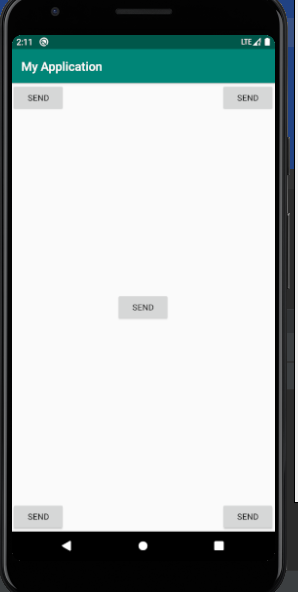
RelativeLayout可以通过定位的方式显示控件或者某个布局。
控件相对与布局进行定位
先看代码
    <RelativeLayout xmlns:android="http://schemas.android.com/apk/res/android"
    android:layout_width="match_parent"
    android:layout_height="match_parent">
        <Button
                android:id="@+id/send1"
                android:layout_width="wrap_content"
                android:layout_height="wrap_content"
                android:layout_alignParentLeft="true"
                android:layout_alignParentTop="true"

                android:text="Send"
        />
        <Button
                android:id="@+id/send2"
                android:layout_width="wrap_content"
                android:layout_height="wrap_content"
                android:layout_alignParentRight="true"
                android:layout_alignParentTop="true"
                android:text="Send"

        />
        <Button
                android:id="@+id/send3"
                android:layout_width="wrap_content"
                android:layout_height="wrap_content"
               android:layout_centerInParent="true"
                android:text="Send"

        />
        <Button
                android:id="@+id/send4"
                android:layout_width="wrap_content"
                android:layout_height="wrap_content"
                android:layout_alignParentBottom="true"
                android:layout_alignParentRight="true"
                android:text="Send"

        />
        <Button
                android:id="@+id/send5"
                android:layout_width="wrap_content"
                android:layout_height="wrap_content"
                android:layout_alignParentBottom="true"
                android:layout_alignParentLeft="true"
                android:text="Send"

        />
    </RelativeLayout>

控件相对于控件进行定位
   <RelativeLayout xmlns:android="http://schemas.android.com/apk/res/android"
                    android:layout_width="match_parent"
                    android:layout_height="match_parent">
        <Button
                android:id="@+id/send1"
                android:layout_width="wrap_content"
                android:layout_height="wrap_content"
                android:layout_above="@id/send3"
                android:layout_toLeftOf="@id/send3"
                android:text="Send"
        />
        <Button
                android:id="@+id/send2"
                android:layout_width="wrap_content"
                android:layout_height="wrap_content"
                android:layout_above="@id/send3"
                android:layout_toRightOf="@id/send3"
                android:text="Send"

        />
        <Button
                android:id="@+id/send3"
                android:layout_width="wrap_content"
                android:layout_height="wrap_content"
                android:layout_centerInParent="true"
                android:text="Send"

        />
        <Button
                android:id="@+id/send4"
                android:layout_width="wrap_content"
                android:layout_height="wrap_content"
                android:layout_below="@id/send3"
                android:layout_toLeftOf="@id/send3"
                android:text="Send"

        />
        <Button
                android:id="@+id/send5"
                android:layout_width="wrap_content"
                android:layout_height="wrap_content"
                android:layout_below="@id/send3"
                android:layout_toRightOf="@id/send3"
                android:text="Send"

        />
    </RelativeLayout>
android:layout_alignLeft表示一个控件的左边缘与另一个空间的左边缘对齐。
android:layout_alignRight表示一个控件的右边缘与另一个空间的右边缘对齐。
帧布局
  <FrameLayout xmlns:android="http://schemas.android.com/apk/res/android"
     android:layout_width="match_parent"
                 android:layout_height="match_parent"
    >
        <TextView
        android:id="@+id/text_view"
        android:layout_height="wrap_content"
        android:layout_width="wrap_content"
        android:text="This is TextView"
        />
        <ImageView
        android:id="@+id/image_view"
        android:layout_width="wrap_content"
        android:layout_height="wrap_content"
         android:src="@mipmap/ic_launcher"
        />
    </FrameLayout>

这种布局没有方便的定位方式,所有控件默认放在布局的左上角。因为ImageView写在TextView下面,所以图片放在文字上面。
除了默认的,我们也可以通过android:layout_gravity来改变其位置。
百分比布局
首先添加依赖
implementation 'com.android.support:percent:29'

其中这个以来的版本号怎末查看呢?

添加后界面将出现

点击Sync Now
编写activity_main.xml文件

在文件界面也点击这个
并且注意
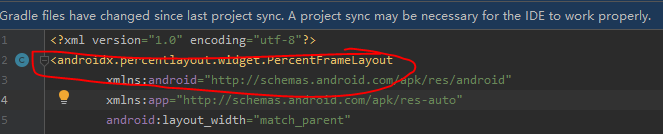
是否与引入依赖匹配
<?xml version="1.0" encoding="utf-8"?>
<androidx.percentlayout.widget.PercentFrameLayout
        xmlns:android="http://schemas.android.com/apk/res/android"
        xmlns:app="http://schemas.android.com/apk/res-auto"
        android:layout_width="match_parent"
        android:layout_height="match_parent">
    <TextView
            android:id="@+id/topText"
            android:layout_width="0dp"
            android:layout_height="0dp"
            android:text="我试试百分比"
            android:background="@android:color/holo_blue_bright"
            android:layout_alignParentTop="true"
            android:gravity="center"
            android:textSize="16dp"
            app:layout_heightPercent="30%"
            app:layout_widthPercent="70%"/>
</androidx.percentlayout.widget.PercentFrameLayout>

