文章目录
- 前言
- 一:Apache网页优化
- 二 :网页缓存
- 三. 具体实验验证
- 3.1 gzip压缩技术实验
- 3.1.1 编译安装httpd
- 3.1.2 修改HTTP相关配置文件
- 3.1.3 在配置文件末行,加入此些参数
- 3.1.4 检查语法
- 3.1.5 验证功能模块
- 3.1.6 修改首页配置文件,加入图片
- 3.1.7 WIN10虚拟机安装 fidder 软件
- 3.1.8使用WIN10虚拟机访问192.168.100.40
- 3.1.9 使用软件分析页面
- 3.2 配置缓存时间50秒实验
- 四.配置防盗链
- 五. 具体防盗链实验
前言
Apache是最棒的网站服务器,其在部署之后,针对不同的生产环境,我们需要作出不同的针对优化,使其页面运行的更加稳定,流畅,安全,提升客户体验度。
一:Apache网页优化
1.1:网页压缩
1.1.1:网页优化概述
在企业中,部署Apache后会有默认的配置参数,如果不及时进行优化配置,在当今互联网时代,会引发网站很多问题
为了适应企业需求,就需要考虑如何提升Apache的性能与稳定性,这就是Apache的优化内容
优化内容
配置网页压缩功能
工作模式的选择与参数优化
配置防盗链
配置隐藏版本号
…
1.1.2:网页gzip概述
配置Apache的网页压缩功能,是使用gzip压缩算法来对网页内容进行压缩后在传输到客户端浏览器
作用
降低了网络传输的字节数,加快网页加载的速度
节省流量,改善用户的浏览体验
gzip与搜索引擎的抓取工作有着更好的关系
1.1.3:Apache的压缩模块
Apache实现网页压缩的功能模块包括
mod_gzip模块
mod_deflate模块
Apache 1.x
没有内建网页压缩技术,但是可以使用第三方mod_gzip模块执行压缩
Apache 2.x
在开发的时候,内建了mod_deflate这个模块,取代mod_gzip
mod_gzip模块与mod_deflate模块
两者均使用gzip压缩算法,运作原理类似
mod_deflate压缩速度略快,而mod_gzip的压缩比略高
mod_gzip对服务器CPU占用要高一些
高流量的服务器,使用mod_deflate可能会比mod_gzip加载速度更快
1.1.4:配置网页压缩功能
启用网页压缩功能步骤
1,查看是否安装mod_deflate模块
2.修改配置文件,启用压缩功能
3,抓包测试
1,查看是否安装mod_deflate模块
执行apachectl -t -D DUMP_MODULES命令
如果输出中没有deflate_module(static),说明编译时没有安装mod_deflate模块
没有安装则需要从新编译安装
./configure --enable-deflate…
make && make install
2,在配置httpd.conf中配置开启gzip功能
AddOutputFilterByType DEFLATE text/html text/plain text/css text/xml text/javascript	'//代表对什么样的内容启用gzip压缩'
DeflateCompressionLevel	'//代表压缩级别'
SetOutputFilter DEFLATE	'//代表启用deflate模块对本站点的输出进行gzip压缩'
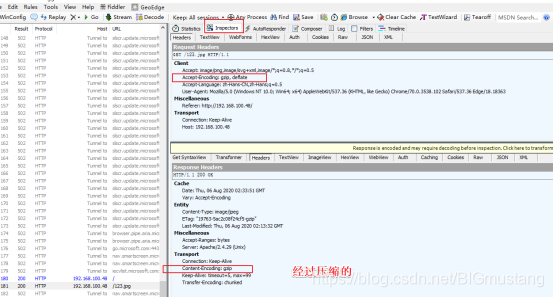
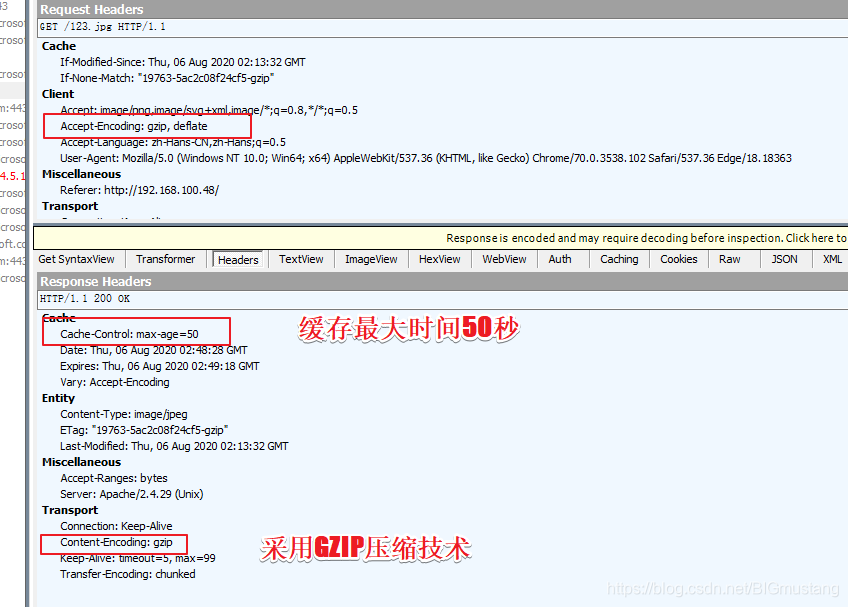
3.重启Apache服务,再用浏览器访问测试网站,并用Fiddler工具抓包,进行对比分析
二 :网页缓存
2.1:配置网页的缓存时间概述
通过mod_expire模块配置Apache,使网页能在客户端浏览器缓存一段时间,以避免重复请求
启用mod_expire模块后,会自动生成页面头部信息中的Expires标签和Cache-Control标签,从而降低客户端的访问频率和次数,达到减少不必要的流量和增加访问速度的目的
2.2:启用网页的缓存功能步骤
1.查看是否安装mod_expire模块
2、修改配置文件启用缓存功能
3.抓包测试
2.3:启用功能步骤详解
2.3.1查看是否安装mod_expire模块
/usr/local/apache/bin/apachectl -t -D DUMP_MODULES
如果输出中没有expires_module(static),则说明编译时没有安装mod_expires
若没有安装则需要重新编译安装
./configure --enable-expires…
make && make install
修改httpd.conf配置文件
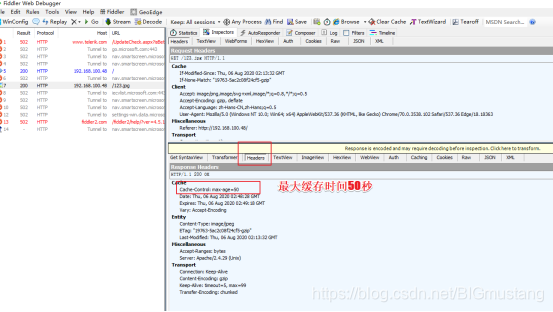
2.3.1启用mod_expires模块,并设置http协议下任意格式的文档均50秒后过期
<IfModule mod_expires.c>
  ExpiresActive On
  ExpiresDefault "access plus 50 seconds"
</IfModule>
重启httpd服务
再次访问测试网站,使用抓包工具Fiddler进行数据抓取分析
三. 具体实验验证
3.1 gzip压缩技术实验
安装环境软件
[root@shanan ~]# yum install -y  gcc  gcc-c++   make  pcre-devel  expat-devel  perl  bzip2  zlib-devel
[root@shanan opt]# tar -jxvf httpd-2.4.29.tar.bz2
[root@shanan opt]# tar -zxvf apr-1.6.2.tar.gz
[root@shanan opt]# tar -zxvf apr-util-1.6.0.tar.gz
[root@shanan opt]# mv apr-util-1.6.0 httpd-2.4.29/srclib/apr-util
[root@shanan opt]# mv apr-1.6.2 httpd-2.4.29/srclib/apr
3.1.1 编译安装httpd
./configure  --prefix=/usr/local/httpd  --enable-so          --enable-rewrite      --enable-charset-lite     --enable-cgi           --enable-deflate    --enable-expires

make && make install

3.1.2 修改HTTP相关配置文件
vi /usr/local/httpd/conf/httpd.conf
检查下面3条配置,都需要开启
LoadModule headers_module modules/mod_headers.so /默认开启
LoadModule deflate_module modules/mod_deflate.so
LoadModule filter_module modules/mod_filter.so / 默认开启
3.1.3 在配置文件末行,加入此些参数

 <IfModule mod_deflate.c>
      AddOutputFilterByType DEFLATE text/html text/plain text/css text/xml text/javascrip text/jpg text/png
      DeflateCompressionLevel 9
    SetOutputFilter DEFLATE
    </IfModule>

wq 保存退出
将httpd 交给 service管理
cp /usr/local/httpd/bin/apachectl /etc/init.d/httpd '//将启动脚本复制到/etc/init.d/初始化脚本文件中,并重命名为httpd'
 vi /etc/init.d/httpd
//在行首插入下两行内容,并保存退出'
#chkconfig: 35 70 20
#description: Activates/Deactivates Apache Web Server

chkconfig --add httpd       //将httpd加入到SERVICE管理器'
[root@shanan etc]# ln -s /usr/local/httpd/conf/httpd.conf /etc/
[root@shanan etc]# ln -s /usr/local/httpd/bin/* /usr/local/bin/
[root@shanan etc]# systemctl restart httpd
[root@shanan etc]# netstat -natp | grep httpd
tcp        0      0 192.168.100.48:80       0.0.0.0:*               LISTEN      41950/httpd
3.1.4 检查语法
[root@shanan bin]# ./apachectl -t
AH00558: httpd: Could not reliably determine the server's fully qualified domain name, using fe80::20c:29ff:fe63:2b8e. Set the 'ServerName' directive globally to suppress this message
Syntax OK
启动运行httpd服务
[root@shanan bin]# pwd
/usr/local/httpd/bin
[root@shanan bin]# ./httpd
AH00558: httpd: Could not reliably determine the server's fully qualified domain name, using fe80::20c:29ff:fe63:2b8e. Set the 'ServerName' directive globally to suppress this message
httpd (pid 41504) already running
3.1.5 验证功能模块
[root@shanan etc]# cd /usr/local/httpd/bin/
[root@shanan bin]# ls
ab         apr-1-config  apxs      dbmmanage  envvars-std  htcacheclean  htdi
apachectl  apu-1-config  checkgid  envvars    fcgistarter  htdbm         htpa
[root@shanan bin]# ./apachectl -t -D DUMP_MODULES |grep "deflate"
AH00558: httpd: Could not reliably determine the server's fully qualified domain name, using fe80::20c:29ff:fe63:2b8e. Set the 'ServerName' directive globally to suppress this message
 deflate_module (shared)
3.1.6 修改首页配置文件,加入图片
[root@shanan htdocs]# pwd
/usr/local/httpd/htdocs
[root@shanan htdocs]# vim index.html
<html><body><h1>It is a  buautiful girl !</h1></body></html>
<img src="123.jpg"/>


3.1.7 WIN10虚拟机安装 fidder 软件

3.1.8使用WIN10虚拟机访问192.168.100.40

3.1.9 使用软件分析页面
3.2 配置缓存时间50秒实验
3.2.1 修改 http 配置文件
vi /etc/httpd.conf

LoadModule expires_module modules/mod_expires.so

 </IfModule>
<IfModule mod_expires.c>
 ExpiresActive On
ExpiresDefault "access plus 50 seconds"
</IfModule>
3.2.2 测试配置文件是否正确’
[root@shanan htdocs]# cd /usr/local/httpd/bin/
[root@shanan bin]# ./apachectl -t
AH00558: httpd: Could not reliably determine the server's fully qualified domain name, using fe80::20c:29ff:fe63:2b8e. Set the 'ServerName' directive globally to suppress this message
Syntax OK
3.2.3 查看模块
[root@shanan bin]# ./apachectl -t -D DUMP_MODULES | grep "expires"   ''
AH00558: httpd: Could not reliably determine the server's fully qualified domain name, using fe80::20c:29ff:fe63:2b8e. Set the 'ServerName' directive globally to suppress this message
 expires_module (shared)

[root@shanan bin]# systemctl restart httpd
3.2.4 切到win10 访问查看

3.2.5 使用 fidder 软件分析
四.配置防盗链
1、防盗链概述
防盗链就是防止别人的网站代码里面盗用服务器的图片,文件,视频等相关资源
如果别人盗用网站的这些静态资源,明显的是会增大服务器的带宽压力
作为网站的维护人员,要杜绝我们服务器的静态资源被其他网站盗用
2、防盗链模拟步骤
两台主机配置测试页面
盗链网站的测试网页page盗用源主机目录page/image的一个logo.jpg文件
在Windows中访问测试网页,并使用Fiddler抓包工具的查看效果图
3、检查Apache是否安装了mod_rewrite模块
/usr/local/apache/bin/apachectl -t -D DUMP_MODULES
如果输出中没有rewrite_module(static),则说明编译时没有安装mod_resrite模块
若没有安装则需要重新编译安装
./configure --enable-rewrite…
make && make install
4、配置规则变量说明
%{HTTP_REFERER}:浏览header中的链接字段,存放一个链接的URL,代表是从哪个链接访问所需的网页
!^:不以后面的字符串开头
.*$:以任意字符结尾
NC:不区分大写
R:强制跳转
5、规则匹配说明
规则匹配
如果相应变量的值匹配所设置的规则,则逐条往下处理;如果不匹配,则往后的规则不再匹配
规则匹配说明
RewriteEngine On:打开网页重写功能

RewriteCond:设置匹配规则

RewriteRule:设置跳转动作
6、配置操作演示
修改配置文件,启用防盗链功能并设置规则
RewriteEngine On
RewriteCond %{HTTP_REFERER}!^http://test.com/.*$ [NC]
RewriteCond %{HTTP_REFERER}!^http://test.com$ [NC]
RewriteCond %{HTTP_REFERER}!^http://www.test.com/.*$ [NC]
RewriteCond %{HTTP_REFERER}!^http://www.test.com$ [NC]
RewriteRule .*\.(gif|jpg|swf)$ http://www.test.com/error.html [R,NC]
五. 具体防盗链实验
5.1. 实验环境
环境和之前一样,主要httpd 要开启 rewrite 功能模块,要多加一台LINUX主机,作为盗图的apache 服务器。两台LINUX服务器,一台win10作为客户访问端。
5.1 设置正版服务器 ,关闭防火墙, 安装bind, httpd
域名www.hello.com 解析域名地址 为192.168.100.48 ,具体步骤这里不再详述。
5.2 .设置盗图的服务器,安装httpd 服务器
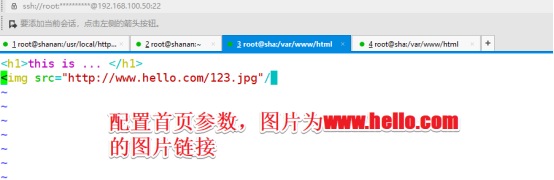
5.2.1修改httpd 的首页配置文件 index.html
修改如下图:
5.3 然后用win10 设备测试
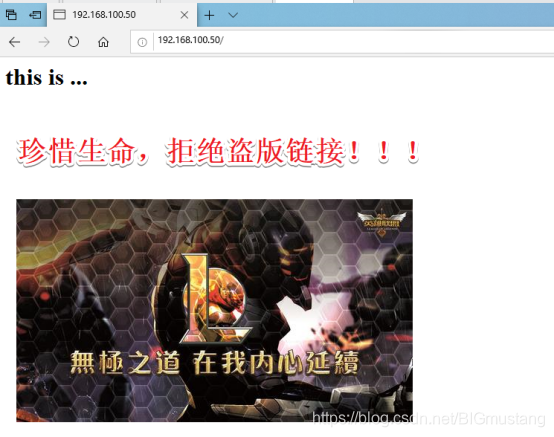
测试访问正版服务器和盗图服务器,显示都是一样的图片,盗图成功


5.4 正版服务器为了防止图片被盗,做了如下防护措施
5.4.1 配置正版服务器
配置HTTP主配置文件,开启防盗功能
[root@shanan htdocs]# vi /etc/httpd.conf
5.4.2 下面开启防盗链功能配置

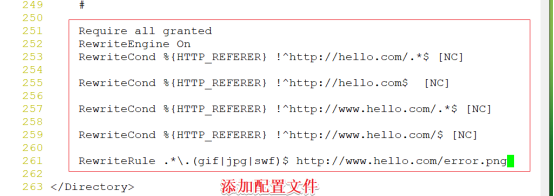
Require all granted
      RewriteEngine On
     RewriteCond %{HTTP_REFERER} !^http://hello.com/.*$ [NC]

     RewriteCond %{HTTP_REFERER} !^http://hello.com$  [NC]
     RewriteCond %{HTTP_REFERER} !^http://www.hello.com/.*$ [NC]

    RewriteCond %{HTTP_REFERER} !^http://www.hello.com/$ [NC]

RewriteRule .*\.(gif|jpg|swf)$ http://www.hello.com/error.png
5.4.3 然后在 HTTPD首页配置的文件夹新增error.png 图片,作为发现盗图自动启用图片
[root@shanan htdocs]# pwd
/usr/local/httpd/htdocs
[root@shanan htdocs]# ls
:  123.jpg  456.jpg  error.png  index.html
[root@shanan htdocs]

[root@shanan htdocs]# systemctl restart httpd
5.4.4 重启服务,开启win10测试服务器

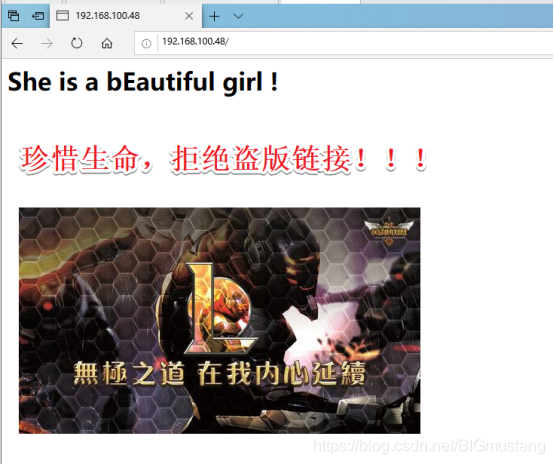
5.4.5 发现已经看不到原理的图片了… 防盗成功
只有www.hello.com ,才能正常访问原图片
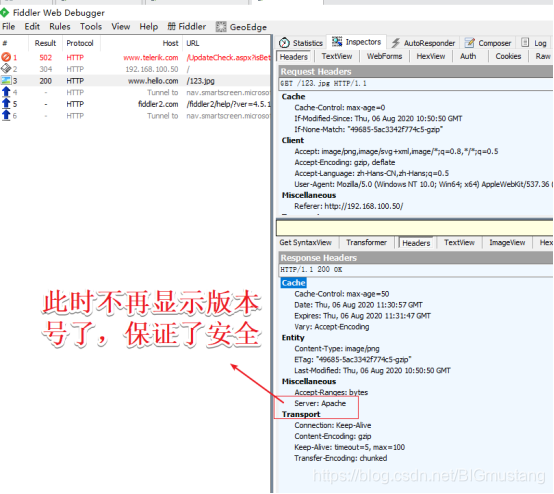
5.5 这时用抓包软件发现可以看到软件版本号,有隐患,我们来设置一下
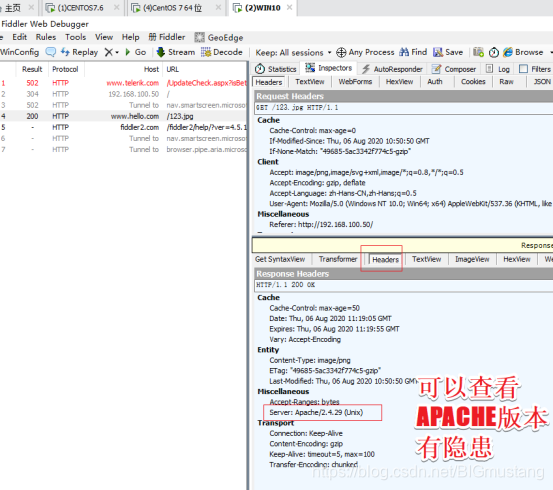
5.5.1 禁止显示软件版本号设置,在正版服务器上进行配置
[root@shanan htdocs]# vi /etc/httpd.conf

5.5.2通过上面的地址,我们找到下面的配置文件,进行修改
[root@shanan extra]# pwd
/usr/local/httpd/conf/extra
[root@shanan extra]# ls
httpd-autoindex.conf  httpd-languages.conf           httpd-ssl.conf
httpd-dav.conf        httpd-manual.conf              httpd-userdir.conf
httpd-default.conf    httpd-mpm.conf                 httpd-vhosts.conf
httpd-info.conf       httpd-multilang-errordoc.conf  proxy-html.conf
[root@shanan extra]# vim httpd-d
httpd-dav.conf      httpd-default.conf
[root@shanan extra]# vim httpd-default.conf

5.5.3重启服务,在WIN10 测试 ,发现禁止版本号成功