图像模糊处理的实现
包括有:均值模糊,高斯模糊,运动模糊
实质为使用滤波器算子对图像每个像素点进行卷积处理,改变像素值,实现图像的模糊化。
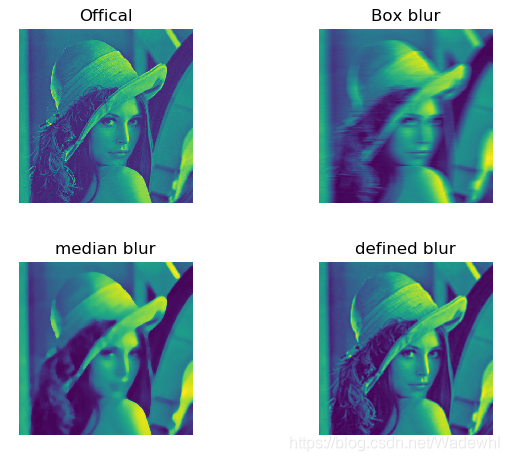
一.均值模糊
核心为使用均值滤波器。
# 图像模糊处理
# 均值模糊 box blur

import cv2
import numpy as np
import matplotlib.pyplot as plt

if __name__ == "__main__":
    image = cv2.imread('Lena.jpg')

    image = cv2.cvtColor(image, cv2.COLOR_BGR2GRAY)

    # 此为均值模糊
    # (30,1)为一维卷积核,指在x,y方向偏移多少位
    dst1 = cv2.blur(image, (30, 1))

    # 此为中值模糊,常用于去除椒盐噪声
    dst2 = cv2.medianBlur(image, 15)

    # 自定义卷积核,执行模糊操作,也可定义执行锐化操作
    kernel = np.ones([5, 5], np.float32)/25
    dst3 = cv2.filter2D(image, -1, kernel=kernel)

    plt.subplot(2, 2, 1)
    plt.imshow(image)
    plt.axis('off')
    plt.title('Offical')

    plt.subplot(2, 2, 2)
    plt.imshow(dst1)
    plt.axis('off')
    plt.title('Box blur')

    plt.subplot(2, 2, 3)
    plt.imshow(dst2)
    plt.axis('off')
    plt.title('median blur')

    plt.subplot(2, 2, 4)
    plt.imshow(dst3)
    plt.axis('off')
    plt.title('defined blur')

    plt.show()
效果展示:实际上这里使用了均值滤波器、中值滤波器和一个自定义卷积核的滤波器来比较效果。
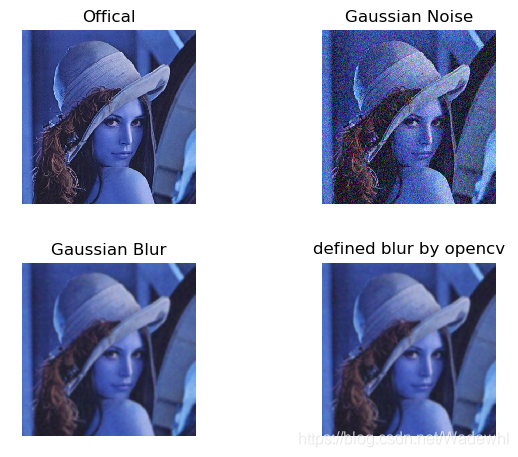
二.高斯模糊
# 图像模糊处理
# 高斯模糊 gaussian blur
# 使用自编写高斯噪声及自编写高斯模糊函数与自带高斯函数作效果对比

import cv2
import numpy as np
import matplotlib.pyplot as plt


def clamp(pv):
    if pv > 255:
        return 255
    if pv < 0:
        return 0
    else:
        return pv


def gaussian_noise(image):        # 加高斯噪声
    h, w, c = image.shape
    for row in range(h):
        for col in range(w):
            s = np.random.normal(0, 20, 3)
            b = image[row, col, 0]   # blue
            g = image[row, col, 1]   # green
            r = image[row, col, 2]   # red
            image[row, col, 0] = clamp(b + s[0])
            image[row, col, 1] = clamp(g + s[1])
            image[row, col, 2] = clamp(r + s[2])
    dst = cv2.GaussianBlur(image, (15, 15), 0)  # 高斯模糊
    return dst, image


if __name__ == "__main__":
     src = cv2.imread('Lena.jpg')

     plt.subplot(2, 2, 1)
     plt.imshow(src)
     plt.axis('off')
     plt.title('Offical')

     output, noise = gaussian_noise(src)
     cvdst = cv2.GaussianBlur(src, (15, 15), 0)   # 高斯模糊

     plt.subplot(2, 2, 2)
     plt.imshow(noise)
     plt.axis('off')
     plt.title('Gaussian Noise')

     plt.subplot(2, 2, 3)
     plt.imshow(output)
     plt.axis('off')
     plt.title('Gaussian Blur')

     plt.subplot(2, 2, 4)
     plt.imshow(cvdst)
     plt.axis('off')
     plt.title('defined blur by opencv')

     plt.show()
结果展示:这里使用了自编写的高斯滤波器和opencv的高斯滤波器来对比效果。
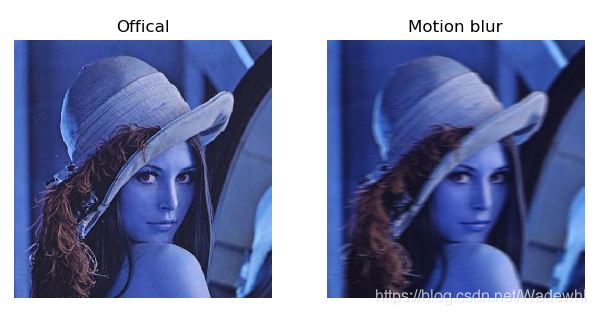
三.运动模糊
使用自定义的卷积核进行卷积计算,实现运动模糊效果。
# 图像模糊处理
# 运动模糊,亦称动态模糊,motion blur
# 运动模糊:由于相机和物体之间的相对运动造成的模糊

import numpy as np
import cv2
import matplotlib.pyplot as plt


def motion_blur(image, degree=12, angle=45):

    image = np.array(image)
    # 这里生成任意角度的运动模糊kernel的矩阵, degree越大,模糊程度越高
    M = cv2.getRotationMatrix2D((degree / 2, degree / 2), angle, 1)
    motion_blur_kernel = np.diag(np.ones(degree))
    motion_blur_kernel = cv2.warpAffine(motion_blur_kernel, M, (degree, degree))
    motion_blur_kernel = motion_blur_kernel / degree
    blurred = cv2.filter2D(image, -1, motion_blur_kernel)
    # convert to uint8
    cv2.normalize(blurred, blurred, 0, 255, cv2.NORM_MINMAX)
    blurred = np.array(blurred, dtype=np.uint8)
    return blurred


if __name__ == "__main__":

    img = cv2.imread('Lena.jpg')
    dst = motion_blur(img)

    plt.subplot(1, 2, 1)
    plt.imshow(img)
    plt.axis('off')
    plt.title('Offical')

    plt.subplot(1, 2, 2)
    plt.imshow(dst)
    plt.axis('off')
    plt.title('Motion blur')

    plt.show()
结果展示: