使用python变成实现了六种图像的特殊效果,为:
浮雕、底片、哈哈镜、油画、素描、泛黄
各程序的运行结果均用Lena图像来展示。
一.浮雕特效
大致过程:
使用opencv库的EMBOSS滤波,提取轮廓。
自编写的实现:使用EMBOSS滤波器对应的算子实现。
# 图像特效处理
# 浮雕处理
# 使用opencv函数与自编写函数作效果对比

from PIL import Image
from PIL import ImageFilter
import cv2
import argparse
import numpy as np
from scipy.signal import find_peaks


def image_filters_test():

    im = cv2.imread("Lena.jpg")
    # 预定义的图像增强滤波器
    im_blur = im.filter(ImageFilter.BLUR)  # 模糊滤波
    im_contour = im.filter(ImageFilter.CONTOUR)  # 轮廓滤波
    im_emboss = im.filter(ImageFilter.EMBOSS)  # 浮雕滤波
    im_min = im.filter(ImageFilter.MinFilter(3))  # 最小值滤波器
    im.show()
    im_blur.show()
    im_contour.show()
    im_emboss.show()
    im_min.show()


if __name__ == "__main__":
    # image_filters_test()

    # read in the image and convert to HSV to extract value channel
    img = cv2.imread("Lena.jpg")
    horiz = cv2.flip(img, 1)  # pressing through the pattern flips the image horizontally
    large = cv2.resize(horiz, (0, 0), fx=2, fy=2, interpolation=cv2.INTER_LANCZOS4)
    hsv = cv2.cvtColor(img, cv2.COLOR_BGR2HSV)
    h, s, v = cv2.split(hsv)
    blur = cv2.GaussianBlur(s, (3, 3), 0)
    edge = cv2.Canny(blur, 0, 50)  # perform edge detection with a low slope threshold to capture all edges
    kernel = np.ones((3, 3), np.uint8)
    mask = cv2.dilate(edge, kernel, iterations=1)
    filt = cv2.bitwise_and(cv2.bitwise_not(mask), s)  # filter the noisy edges out by masking off those regions

    # get counts of times each value occurs in the filtered parts of the image
    G = 3
    N = 256 // G + 1
    val_count = [0] * N
    rows, cols = filt.shape
    for i in range(rows):
        for j in range(cols):
            val_count[filt[i, j] // G] += 1
    val_count[0] = 0

    # detect peaks in the histogram, indicating discrete layers
    val_log = np.array([0 if not vc else np.log(vc) for vc in val_count])
    val_norm = [0] * N
    k = 2 * G
    for i in range(N):  # use a windowed z-score to find prominent local maxima
        lo = max(0, i - k)
        hi = min(N, i + k)
        window = val_log[lo:hi]
        val_norm[i] = (val_log[i] - np.mean(window)) / np.std(window)
    val_norm = np.array(val_norm)
    colors, _ = find_peaks(val_norm, height=1, distance=15 // G)

    # separate into layers by color and apply an edge gradient
    # black -> clear to imitate shadows in regions of neg vertical slope
    # white -> clear to imitate highlights in regions of pos vert slope
    result = np.full_like(v, 128)
    upper = np.zeros_like(v)
    for i in range(len(colors) - 1, 0, -1):
        lowc = np.array([0, G * colors[i] - 15, 0])
        highc = np.array([255, G * colors[i] + 15, 255])
        layer = cv2.inRange(hsv, lowc, highc)

        # don't allow lower layers to overlap upper layers
        composite = cv2.bitwise_or(layer, upper)
        if i != len(colors) - 1:
            composite = cv2.morphologyEx(composite, cv2.MORPH_CLOSE, kernel)
        upper = composite

        # find the gradient in the y direction
        # ypos is positive dY and represents highlights
        # yneg is negative dY and represents shadows
        sobel_ypos = cv2.Sobel(composite, cv2.CV_8U, 0, 1, ksize=1)
        sobel_yneg = cv2.Sobel(cv2.bitwise_not(composite), cv2.CV_8U, 0, 1, ksize=1)

        # iteratively add shadows that get lighter and lighter as they shift up
        # and add highlights that get darker and darker as thy shift down
        S = 5
        highlight = np.uint8(sobel_ypos)
        shadow = np.uint8(sobel_yneg)
        for j in range(1, S):
            txlate_down = np.float32([[1, 0, 0], [0, 1, j]])
            txlate_up = np.float32([[1, 0, 0], [0, 1, -j]])
            hlj = np.uint8(cv2.warpAffine(sobel_ypos, txlate_down, (cols, rows)) / (2 ** j))
            sdj = np.uint8(cv2.warpAffine(sobel_yneg, txlate_up, (cols, rows)) / (2 ** j))
            highlight = hlj + cv2.bitwise_and(cv2.bitwise_not(hlj), highlight)
            shadow = sdj + cv2.bitwise_and(cv2.bitwise_not(sdj), shadow)

        mask = cv2.bitwise_not(cv2.threshold(cv2.bitwise_not(result), 128, 256, cv2.THRESH_BINARY)[1])
        mask = cv2.bitwise_and(mask, cv2.bitwise_not(cv2.threshold(result, 128, 256, cv2.THRESH_BINARY)[1]))
        result += cv2.bitwise_and(highlight, highlight, mask=mask) // 2
        result -= cv2.bitwise_and(shadow, shadow, mask=mask) // 2

    # set the hue and saturation to look like paper
    # then construct a colored version and display it
    h = np.full_like(v, 20)
    s = np.full_like(v, 40)
    v = cv2.add(result, 100)
    hsv = cv2.merge((h, s, v))
    bgr = cv2.cvtColor(hsv, cv2.COLOR_HSV2BGR)
    cv2.namedWindow("output", cv2.WINDOW_AUTOSIZE)
    cv2.imshow("output", bgr)  # cv2.resize(bgr, (0,0), fx=.5, fy=.5, interpolation=cv2.INTER_LANCZOS4))

    # handle exiting out of the window via the ESC / ENTER key or the X in the corner of the window
    while cv2.getWindowProperty("output", cv2.WND_PROP_VISIBLE):
        k = cv2.waitKey(30) & 0xFF
        if k == 27 or k == 13:  # wait for ESC / ENTER key to exit
            cv2.destroyAllWindows()
        if k == ord('s'):  # wait for 's' key to save and exit
            cv2.imwrite("output.png", bgr)
            cv2.destroyAllWindows()
结果展示:

二.底片处理
实际效果为图像的反转,即将RGB三值与255作差得到。
# 图像特效处理
# 底片效果

import cv2
import numpy as np
import matplotlib.pyplot as plt


def films(image):
    h, w, d = image.shape[:3]
    size = (h, w, d)
    iTmp = np.zeros(size, np.uint8)
    for i in range(h):
        for j in range(w):
            iTmp[i, j, 0] = 255 - image[i, j, 0]
            iTmp[i, j, 1] = 255 - image[i, j, 1]
            iTmp[i, j, 2] = 255 - image[i, j, 2]
    return iTmp


if __name__ == "__main__":
    img = cv2.imread('Lena.jpg')
    cv2.imshow("Offical", img)
    output = films(img)
    plt.imshow(output)
    plt.show()
    cv2.imshow("output", output)
    cv2.waitKey()
    cv2.destroyAllWindows()
结果展示:

三.哈哈镜
有局部放大和局部缩小并拉伸或压缩其余部分两种效果。
# 图像特效处理
# 哈哈镜效果

import cv2
import math
import matplotlib.pyplot as plt


def maxframe(frame):
    height, width, n = frame.shape
    center_x = int(width / 2)
    center_y = int(height / 2)

    randius = 400  # 直径
    real_randius = int(randius / 2)  # 半径
    new_data = frame.copy()
    for i in range(width):
        for j in range(height):
            tx = i - center_x
            ty = j - center_y
            distance = tx ** 2 + tx ** 2
            # 为了保证选择的像素是图片上的像素
            if distance < randius ** 2:
                new_x = tx / 2
                new_y = ty / 2
                # 图片的每个像素的坐标按照原来distance,之后的distance(real_randius**2)占比放大即可
                new_x = int(new_x * math.sqrt(distance) / real_randius + center_x)
                new_y = int(new_y * math.sqrt(distance) / real_randius + center_y)
                # 当不超过new_data 的边界时候就可赋值
                if new_x < width and new_y < height:
                    new_data[j][i][0] = frame[new_y][new_x][0]
                    new_data[j][i][1] = frame[new_y][new_x][1]
                    new_data[j][i][2] = frame[new_y][new_x][2]
    return new_data


def MinFrame(frame):

    height, width, n = frame.shape[:3]
    center_x = int(width/2)
    center_y = int(height/2)
    new_data = frame.copy()
    for i in range(width):
        for j in range(height):
            tx = i-center_x
            ty = j-center_y
            theta = math.atan2(ty, tx)
            radius = math.sqrt(tx**2+ty**2)
            new_x = int(center_x+math.sqrt(radius)*12*math.cos(theta))
            new_y = int(center_y+math.sqrt(radius)*12*math.sin(theta))
            if new_x < 0 or new_x > width:
                new_x = 0
            elif new_y < 0 or new_y > height:
                new_y = 0
            else:
                new_data[j][i][0] = frame[new_y][new_x][0]
                new_data[j][i][1] = frame[new_y][new_x][1]
                new_data[j][i][2] = frame[new_y][new_x][2]
    return new_data


if __name__ == '__main__':
    image1 = cv2.imread("Lena.jpg")
    image2 = cv2.imread("Lena.jpg")

    frame1 = maxframe(image1)
    frame2 = MinFrame(image2)

    cv2.imshow("offical", frame1)
    cv2.imshow("max", frame1)
    cv2.imshow("min", frame2)

    plt.subplot(121), plt.imshow(frame1, 'gray'), plt.title('max')
    plt.subplot(122), plt.imshow(frame2, 'gray'), plt.title('min')

    plt.show()

    cv2.waitKey(0)
    cv2.destroyAllWindows()
结果展示:

四.油画
类似滑动平均滤波和灰度直方图。
# 图像特效处理
# 油画效果

import cv2
import numpy as np
import matplotlib.pyplot as plt


def oilPainting(img, templateSize, bucketSize, step):  # templateSize模板大小,bucketSize桶阵列,step模板滑动步长

    gray = cv2.cvtColor(img, cv2.COLOR_RGB2GRAY)
    gray = ((gray / 256) * bucketSize).astype(int)  # 灰度图在桶中的所属分区
    h, w = img.shape[:2]

    oilImg = np.zeros(img.shape, np.uint8)  # 用来存放过滤图像

    for i in range(0, h, step):

        top = i - templateSize
        bottom = i + templateSize + 1
        if top < 0:
            top = 0
        if bottom >= h:
            bottom = h - 1

        for j in range(0, w, step):

            left = j - templateSize
            right = j + templateSize + 1
            if left < 0:
                left = 0
            if right >= w:
                right = w - 1

            # 灰度等级统计
            buckets = np.zeros(bucketSize, np.uint8)  # 桶阵列,统计在各个桶中的灰度个数
            bucketsMean = [0, 0, 0]  # 对像素最多的桶,求其桶中所有像素的三通道颜色均值
            # 对模板进行遍历
            for c in range(top, bottom):
                for r in range(left, right):
                    buckets[gray[c, r]] += 1  # 模板内的像素依次投入到相应的桶中,有点像灰度直方图

            maxBucket = np.max(buckets)  # 找出像素最多的桶以及它的索引
            maxBucketIndex = np.argmax(buckets)

            for c in range(top, bottom):
                for r in range(left, right):
                    if gray[c, r] == maxBucketIndex:
                        bucketsMean += img[c, r]
            bucketsMean = (bucketsMean / maxBucket).astype(int)  # 三通道颜色均值

            # 油画图
            for m in range(step):
                for n in range(step):
                    oilImg[m + i, n + j] = (bucketsMean[0], bucketsMean[1], bucketsMean[2])
    return oilImg


if __name__ == "__main__":
    img = cv2.imread('Lena.jpg', cv2.IMREAD_ANYCOLOR)
    oil = oilPainting(img, 4, 8, 2)
    cv2.imshow('oil_paintings', oil)
    plt.imshow(oil, 'gray'), plt.title('oil_painting')
    plt.show()
    cv2.waitKey(0)
    cv2.destroyAllWindows()
结果展示:

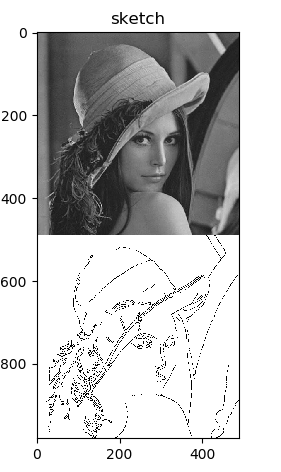
五.素描
基于opencv的轮廓提取实现黑白的效果形成素描,为灰度图像。
# 图像特效处理
# 素描效果

import cv2 as cv
import numpy as np
import matplotlib.pyplot as plt

# 读取原始图像
img = cv.imread('Lena.jpg')

# 图像灰度处理
gray = cv.cvtColor(img, cv.COLOR_BGR2GRAY)

# 高斯滤波降噪
gaussian = cv.GaussianBlur(gray, (5, 5), 0)

# Canny算子
canny = cv.Canny(gaussian, 50, 150)

# 阈值化处理
ret, result = cv.threshold(canny, 0, 255, cv.THRESH_BINARY_INV + cv.THRESH_OTSU)

# 显示图像
# cv.imshow('src', img)
# cv.imshow('result', result)
cv.imshow('result', np.vstack((gray, result)))
plt.imshow(np.vstack((gray, result)), 'gray'), plt.title('sketch')
plt.show()
cv.waitKey()
cv.destroyAllWindows()
结果展示:
扫描二维码关注公众号,回复:
12405255 查看本文章

六.泛黄
改变RGB的值,使三通道均偏黄。
# 图像特效处理
# 泛黄怀旧效果

import cv2 as cv
import numpy as np
import matplotlib.pyplot as plt

# 读取原始图像
img = cv.imread('Lena.jpg')

# 获取图像行和列
rows, cols = img.shape[:2]

# 新建目标图像
dst = np.zeros((rows, cols, 3), dtype="uint8")

# 图像怀旧特效
for i in range(rows):
    for j in range(cols):
        B = 0.272 * img[i, j][2] + 0.534 * img[i, j][1] + 0.131 * img[i, j][0]
        G = 0.349 * img[i, j][2] + 0.686 * img[i, j][1] + 0.168 * img[i, j][0]
        R = 0.393 * img[i, j][2] + 0.769 * img[i, j][1] + 0.189 * img[i, j][0]
        if B > 255:
            B = 255
        if G > 255:
            G = 255
        if R > 255:
            R = 255
        dst[i, j] = np.uint8((B, G, R))

# 显示图像
cv.imshow('result', np.vstack((img, dst)))
plt.imshow(np.vstack((img, dst)), 'gray'), plt.title('yellow')
plt.show()
cv.waitKey()
cv.destroyAllWindows()
结果展示:
