Pygame(十四)图像变换
前情提要

本节提要
前言
上一节我们学习了如何从文件加载图像到pygame中以便我们将游戏做的更加精致,更加受人喜欢.
但是有些时候,我们可能需要对文件加载进来的图片进行一些处理,以达到更好的效果.
比如,我们在制作人物运动的时候,朝左走的人和朝右走的人是左右镜像的.如果我们还是用两个文件的图片的话,就会造成资源的浪费.
不仅浪费有限的存储空间,还浪费人力,物力去准备这双重的资源.如果我们能够实现这样的镜象效果,就可以达成以上的节省目标.
内容详情
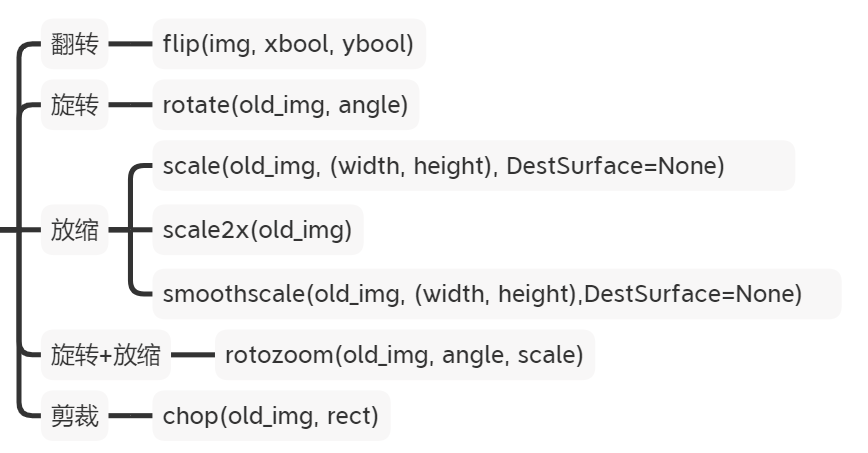
翻转
翻转分左右翻转与上下翻转
两两组合可以实现以下几种:
- 不翻转
- 左右翻转
- 上下翻转
- 上下左右都翻转
new_img = pygame.transform.flip(old_img, xbool, ybool)
参数说明:
- old_img:待翻转的surfcae对象
- xbool:是否左右(水平)翻转, True:翻转, False:不翻转
- ybool:是否上下(垂直)翻转,True:翻转, False:不翻转
–>产生一个新的surface对象
示例:
- 不翻转
def flip():
    '''翻转'''
    pygame.init()
    screen = pygame.display.set_mode((800, 600))
    pygame.display.set_caption("图像变换")

    img = pygame.image.load("img.jpg").convert()  # 原图
    none_flip_img = pygame.transform.flip(img, False, False)  # 不翻转的图
    width = img.get_width()  # 获取img的宽        height = img.get_height() # 获取img的高

    screen.blit(img, (0, 0))  # 绘制原图
    screen.blit(none_flip_img, (width, 0))  # 绘制新图
    pygame.display.update()

    while 1:
        for event in pygame.event.get():
            if event.type == pygame.QUIT:
                sys.exit()
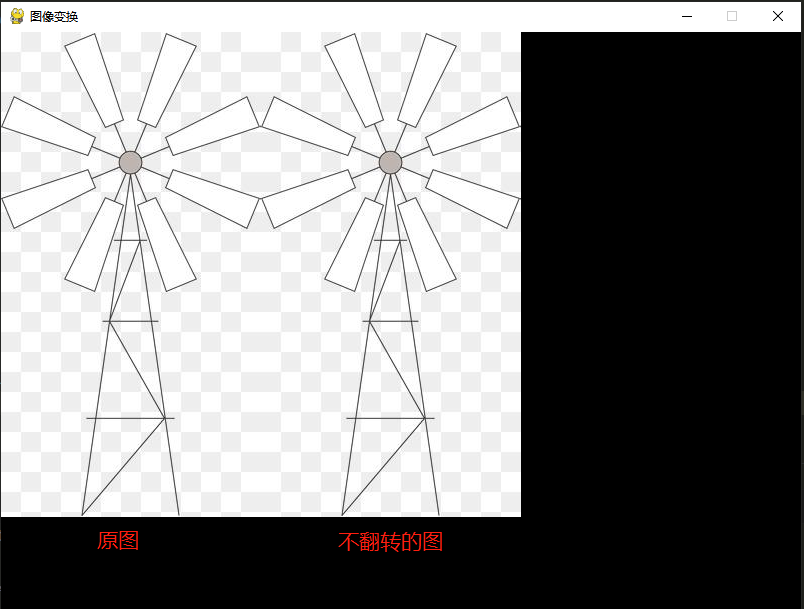
- 左右翻转
def flip():
    '''翻转'''
    pygame.init()
    screen = pygame.display.set_mode((800, 600))
    pygame.display.set_caption("图像变换")

    img = pygame.image.load("img.jpg").convert()  # 原图
    none_flip_img = pygame.transform.flip(img, False, False)  # 不翻转的图
    x_flip_img = pygame.transform.flip(img, True, False)  # 左右翻
    width = img.get_width()  # 获取img的宽度

    screen.blit(img, (0, 0))
    screen.blit(none_flip_img, (width, 0))
    screen.blit(x_flip_img, (width * 2, 0))
    pygame.display.update()
    while 1:
        for event in pygame.event.get():
            if event.type == pygame.QUIT:
                sys.exit()
效果图:
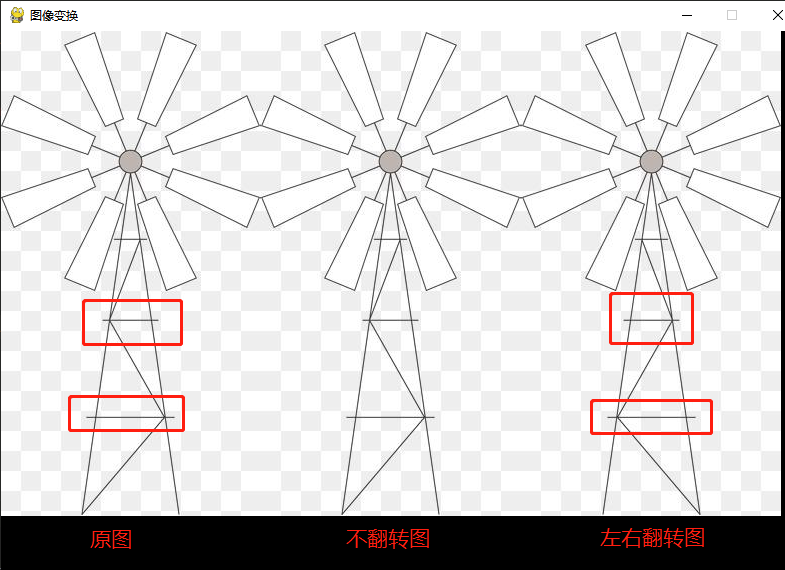
- 上下翻转
def flip():
    '''翻转'''
    pygame.init()
    screen = pygame.display.set_mode((800, 600))
    pygame.display.set_caption("图像变换")

    img = pygame.image.load("img.jpg").convert()  # 原图
   # none_flip_img = pygame.transform.flip(img, False, False)  # 不翻转的图
    x_flip_img = pygame.transform.flip(img, True, False)  # 左右翻
    y_flip_img = pygame.transform.flip(img, False, True)  # 左右翻
    width = img.get_width()  # 获取img的宽度


    screen.blit(img, (0, 0))
    screen.blit(x_flip_img, (width, 0))
    screen.blit(y_flip_img, (width * 2, 0))

    pygame.display.update()
    while 1:
        for event in pygame.event.get():
            if event.type == pygame.QUIT:
                sys.exit()
效果图:
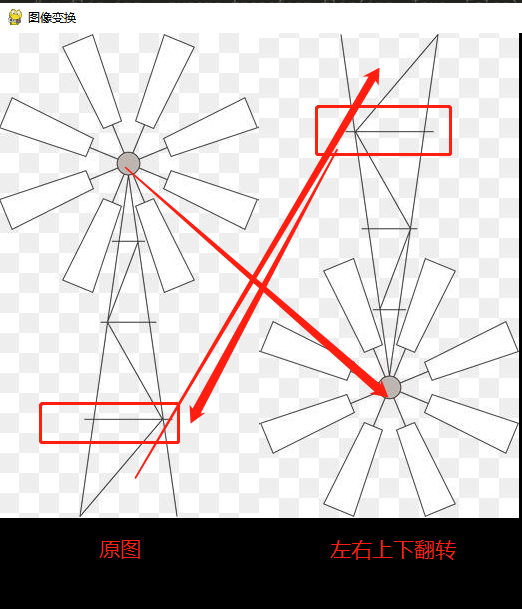
- 左右上下翻转
def flip():
    '''翻转'''
    pygame.init()
    screen = pygame.display.set_mode((800, 600))
    pygame.display.set_caption("图像变换")

    img = pygame.image.load("img.jpg").convert()  # 原图
    # none_flip_img = pygame.transform.flip(img, False, False)
    # x_flip_img = pygame.transform.flip(img, True, False)  # 左右翻
    # y_flip_img = pygame.transform.flip(img, False, True)  # 左右翻
    both_flip_img = pygame.transform.flip(img, True, True)  # 左右翻
    width = img.get_width()  # 获取img的宽度


    screen.blit(img, (0, 0))
    # screen.blit(x_flip_img, (width, 0))
    # screen.blit(y_flip_img, (width * 2, 0))
    screen.blit(both_flip_img, (width, 0))

    pygame.display.update()

    while 1:
        for event in pygame.event.get():
            if event.type == pygame.QUIT:
                sys.exit()
效果图:
旋转
new_img = pygame.transform.rotate(old_img, angle)
参数说明:
- old_image: 待旋转的surface对象
- angle: 旋转角度,单位:度, 正的时候 是逆时针方向旋转, 负的时候顺时针方向旋转
–>返回一个新的surface对象
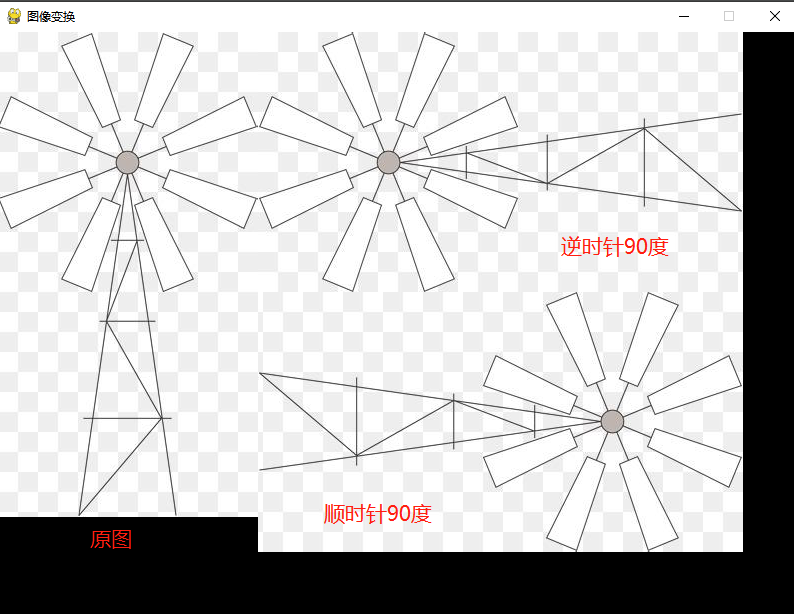
示例:
def rotate():
    '''旋转'''
    pygame.init()
    screen = pygame.display.set_mode((800, 600))
    pygame.display.set_caption("图像变换")

    img = pygame.image.load("img.jpg").convert()  # 原图
    new_img1 = pygame.transform.rotate(img, 90) # 逆时针90度
    new_img2 = pygame.transform.rotate(img, -90) # 顺时针90度
    width = img.get_width()  # 获取img的宽度
    screen.blit(img, (0, 0))
    screen.blit(new_img1, (width, 0))
    screen.blit(new_img2, (width, width))

    pygame.display.update()

    while 1:
        for event in pygame.event.get():
            if event.type == pygame.QUIT:
                sys.exit()
效果图:
放缩
new_img = pygame.transform.scale(old_img, (width, height), DestSurface=None)
参数说明:
- old_img:待放缩的surface对象
- (width, height): 放缩后的宽和高组成的二元tuple
- DestSurface: 默认None,当指定了一个surface对象时,将返回的内容直接放到DestSurface中指定的值(不建义如此使用),虽然这样会加快程序速度
在没有desSurface时返回一个surface对象,如果有destSurface,会将放缩后的内容直接放在DestSurface指定的surface对象上
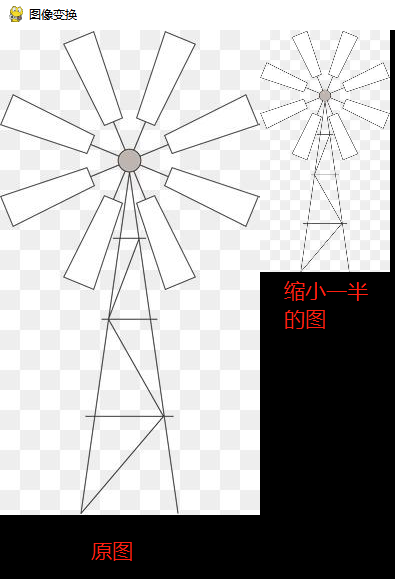
示例
def scale():
    '''放缩'''
    pygame.init()
    screen = pygame.display.set_mode((800, 600))
    pygame.display.set_caption("图像变换")

    img = pygame.image.load("img.jpg").convert()  # 原图

    width = img.get_width()  # 获取img的宽度
    height = img.get_height() # 获取img的高度
    new_img = pygame.transform.scale(img,(width // 2, height // 2))  # 缩小到一半的大小


    screen.blit(img, (0, 0))
    screen.blit(new_img, (width, 0))

    pygame.display.update()

    while 1:
        for event in pygame.event.get():
            if event.type == pygame.QUIT:
                sys.exit()
效果图:
特别的:
- 如果想放大2倍,可以直接写成:
new_img= pygame.transform.scale2x(old_img)
- 如果放大的位数比较大的时候为了避免图像出现的锯齿太过明显.可以用平滑模式
new_img = pygame.transform.smoothscale(old_img, (width, height), DestSurface = None)
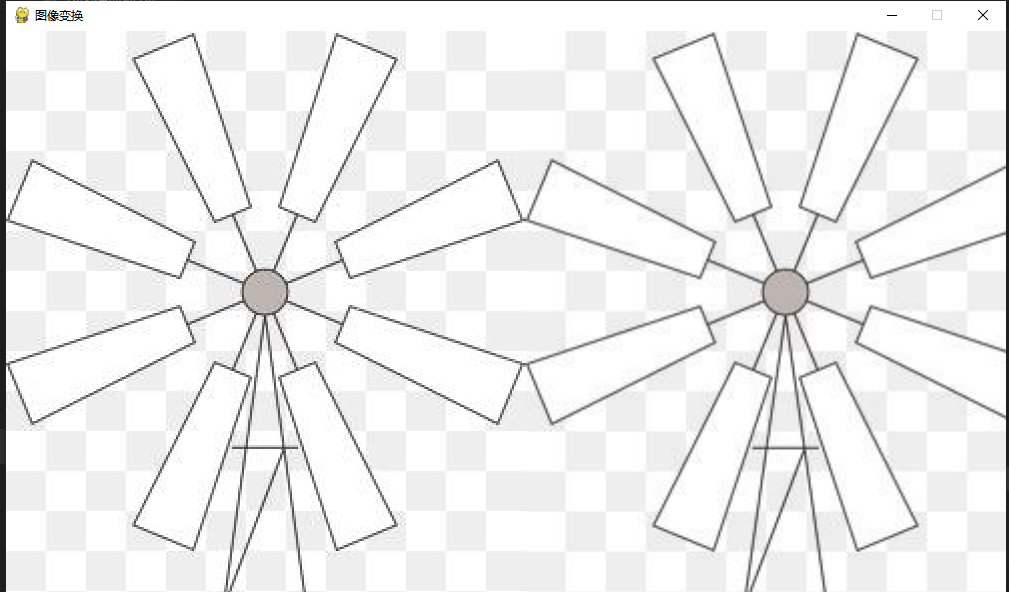
看一下普通两倍与平滑两倍的效果
旋转时放缩
new_img = pygame.transform.rotozoom(old_img, angle, scale)
参数说明:
- old_img:待变换的surface对象
- angle: 旋转角度,单位: 度, 正值逆时针 ,负值顺时针
- scale: 放缩倍数(正浮点数)
–>返回一个变换后的surface对象
示例:
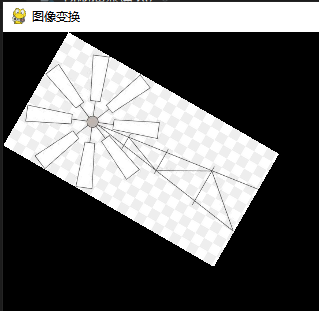
def rotate_scale():
    '''旋转同时放缩'''
    pygame.init()
    screen = pygame.display.set_mode((1000, 800))
    pygame.display.set_caption("图像变换")
    img = pygame.image.load("img.jpg").convert()  # 原图
    new_img = pygame.transform.rotozoom(img, 60, 0.5)  # 逆时针转60度,缩小到原来的一半
    screen.blit(new_img, (0, 0))
    pygame.display.update()
    while 1:
        for event in pygame.event.get():
            if event.type == pygame.QUIT:
                sys.exit()
效果图:
裁剪
有时候我们只需要目标图片的一部分,我们就要用到裁剪了
new_img = pygame.transform.chop(old_img, rect)
参数说明:
- old_img:待变换的surface对象
- rect 相对待变换的surface对象的矩形区域
注意,这个函数用到的rect不是说从图像中将我们要的那个部分的图像框进来
实际情况是这样的:
rect = (left, top , widht, height)
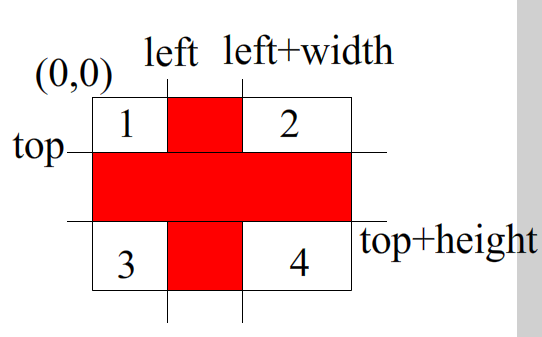
黑色大矩形表示原图
红色十字部分是裁剪掉的部分
剩下的1,2,3,4四个部分的图往里面挤到一起,才是我们能裁剪到的图形
示例
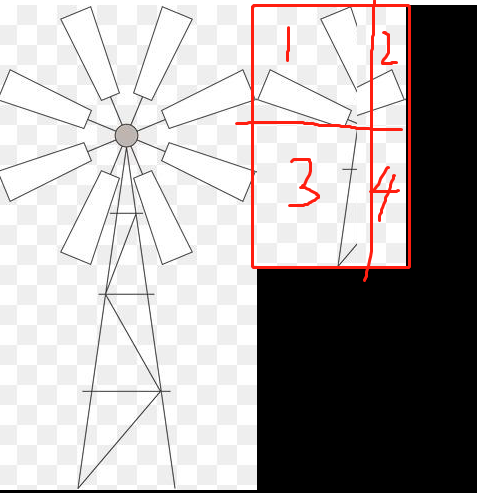
def chop():
    '''裁剪'''
    pygame.init()
    screen = pygame.display.set_mode((1000, 800))
    pygame.display.set_caption("图像变换")
    img = pygame.image.load("img.jpg").convert()  # 原图
    width = img.get_width()//2
    height = img.get_height()//2
    left = width
    top = height
    new_img = pygame.transform.chop(img, (100,121, 111, 222))
    screen.blit(img, (0, 0))
    screen.blit(new_img, (260, 0))
    pygame.display.update()

    while 1:
        for event in pygame.event.get():
            if event.type == pygame.QUIT:
                sys.exit()
效果图
后记
图像处理是一个比较有用的能力.与前面的知识可以形成很比较有意思的作品.
下节课,不见不散