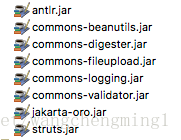
1.首先我们要将Struts1所需要的jar包导入到工程里。所需的jar包如下图:
2.新建Login.jsp,放在WebContent目录下。
<%@ page language="java" contentType="text/html; charset=UTF-8"
    pageEncoding="UTF-8"%>
<!DOCTYPE html PUBLIC "-//W3C//DTD HTML 4.01 Transitional//EN" "http://www.w3.org/TR/html4/loose.dtd">
<html>
<head>
<%
    String basePath = request.getContextPath();
%>
<meta http-equiv="Content-Type" content="text/html; charset=UTF-8">
<title>Insert title here</title>

</head>
<body>
    <h1>登陆页面</h1>
    <hr>
    <form action="<%=basePath %>/Login.do" method="post" >
        userName:<input id="name" name="name" type="text" /><br>
        passWord:<input id="password" name="password" type="password" /><br>
        <input type="submit" id="submit" name="submit" value="submit" />
    </form>
</body>
</html>
3.新建LoginSuccess.jsp,同样放在WebContent目录下。
<%@ page language="java" contentType="text/html; charset=UTF-8"
    pageEncoding="UTF-8"%>
<!DOCTYPE html PUBLIC "-//W3C//DTD HTML 4.01 Transitional//EN" "http://www.w3.org/TR/html4/loose.dtd">
<html>
<head>
<meta http-equiv="Content-Type" content="text/html; charset=UTF-8">
<title>登录成功</title>
</head>
<body>
    <h1>登录成功页面!</h1>
    <h3>欢迎[<%=request.getAttribute("name") %>]</h3>
</body>
</html>
4.新建LoginFailed.jsp,同样放在WebContent目录下。
<%@ page language="java" contentType="text/html; charset=UTF-8"
    pageEncoding="UTF-8"%>
<!DOCTYPE html PUBLIC "-//W3C//DTD HTML 4.01 Transitional//EN" "http://www.w3.org/TR/html4/loose.dtd">
<html>
<head>
<meta http-equiv="Content-Type" content="text/html; charset=UTF-8">
<title>登录失败</title>
</head>
<body>
    <h1>登录失败!</h1>
    请返回<a href="/StrutsDemo/Login.jsp">登录页面。</a>
</body>
</html>5.编写AactionForm,用来存储登录用户的名字和密码,注意这里必须要继承org.apache.struts.action.ActionForm。主要是对应Login.jsp的表单。
但是有一点必须要注意,这个Form里的字段名字必要和前台Login.jsp里表单的名字保持一致!
代码如下:
package com.lanp.webapp.form;

import org.apache.struts.action.ActionForm;

public class LoginActionForm extends ActionForm{

    private String name;
    private String password;

    public String getName() {
        return name;
    }
    public void setName(String name) {
        this.name = name;
    }
    public String getPassword() {
        return password;
    }
    public void setPassword(String password) {
        this.password = password;
    }
}
6.编写Action,取名为LoginAction,是用户登录的Action,必须要继承Action类。这个LoginAction里我们重写一下execute()方法,这个execute()方法其实有点类似Servlet里的Service()方法,或者是DoPost(),DoGet()方法。
代码如下:
package com.lanp.webapp.action;

import javax.servlet.http.HttpServletRequest;
import javax.servlet.http.HttpServletResponse;

import org.apache.struts.action.Action;
import org.apache.struts.action.ActionForm;
import org.apache.struts.action.ActionForward;
import org.apache.struts.action.ActionMapping;

import com.lanp.webapp.form.LoginActionForm;

public class LoginAction extends Action{

    @Override
    public ActionForward execute(ActionMapping mapping, ActionForm form,
            HttpServletRequest request, HttpServletResponse response)
            throws Exception {
        String path = "error";
        LoginActionForm loginActionForm = (LoginActionForm)form;
        String userName = loginActionForm.getName();
        String passWord = loginActionForm.getPassword();

        if("admin".equals(userName) && "admin".equals(passWord)) {
            path = "success";
            request.setAttribute("name", userName);
        } else {
            path = "error";
        }
        return mapping.findForward(path);
    }
}
7.接下来就是配置web.xml和struts-config.xml这两个文件,是整个Struts的核心。
- 配置struts-config.xml。在WEB-INF目录地下新建一个conf的文件件,将struts-config.xml放在里面。struts-config.xml主要配置Action和ActionForm的对应关系。所有的配置参数都要放在
<struts-config>这个根标签下才可以。
<?xml version="1.0" encoding="UTF-8"?>
<!DOCTYPE struts-config PUBLIC "-//Apache Software Foundation//DTD Struts Configuration 1.2//EN" "http://struts.apache.org/dtds/struts-config_1_2.dtd">
<struts-config>
    <form-beans>
        <!-- name是ActionForm的名字,是唯一标示。在action中会用到,是关联action的唯一标示。 -->
        <!-- type是ActionForm所在路径,是由包名+类名组成。 -->
        <form-bean name="LoginActionForm" type="com.lanp.webapp.form.LoginActionForm">
        </form-bean>
    </form-beans>

    <action-mappings>
        <!-- path是Login.jsp中表单action提交的地址,也就是将要访问的action资源。
        name是action的名字,用来关联某个表单,是唯一标示。
        type是action的路径,由包名+类名组成。
        scope表示ActionForm存在的范围,有session和request两种,默认是session。
        forward是路径跳转 -->
        <action path="/Login"
        name="LoginActionForm"
        type="com.lanp.webapp.action.LoginAction"
        scope="request">
        <forward name="login" path="/Login.jsp"></forward>
        <forward name="success" path="/LoginSuccess.jsp"></forward>
        <forward name="error" path="/LoginFailed.jsp"></forward>
        </action>
    </action-mappings>

</struts-config>- 配置web.xml,这个文件主要是配置ActionServlet。ActionServlet本质也是一个Servlet,但这里的ActionServlet是Struts1的总控制器,是Struts1自带的,不用我们手动去写。ActionServlet也是整个Struts的入口,在第一次访问Struts的时候创建,并调用ActionServlet里的init方法来初始化一些参数。其实这个过程就是读取struts-config.xml配置好的参数来进行初始化资源。
<?xml version="1.0" encoding="UTF-8"?>
<web-app xmlns:xsi="http://www.w3.org/2001/XMLSchema-instance" xmlns="http://java.sun.com/xml/ns/javaee" xsi:schemaLocation="http://java.sun.com/xml/ns/javaee http://java.sun.com/xml/ns/javaee/web-app_3_0.xsd" id="WebApp_ID" version="3.0">
<display-name>StrutsDemo</display-name>
<welcome-file-list>
<welcome-file>index.jsp</welcome-file>
</welcome-file-list>
<servlet>
<servlet-name>action</servlet-name>
<servlet-class>org.apache.struts.action.ActionServlet</servlet-class>
<init-param>
<param-name>config</param-name>
<param-value>/WEB-INF/conf/struts-config.xml</param-value>
</init-param>
<load-on-startup>0</load-on-startup>
</servlet>
<servlet-mapping>
<servlet-name>action</servlet-name>
<url-pattern>*.do</url-pattern>
</servlet-mapping>
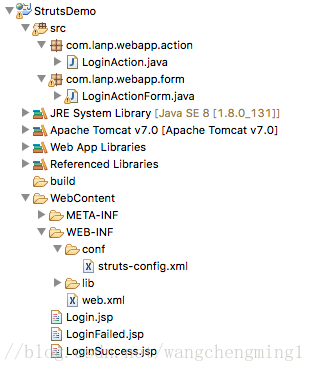
</web-app>8.最后贴上整个工程的截图: