腾讯位置服务使用
前言
在日常开发中,很多时候需要活动当前位置,比如周末你打算去看电影,想知道最近的电影院在哪,那么首先得知道你当前的位置,然后搜索附近范围内最近的几家电影院,而当你点击其中任何一家时,则会出现详细的导航路线。
上述的场景只是生活中的一个场景之一,而这个功能的应用还有很大的空间,快速开发的时代的,你还在自己一行代码的来实现功能吗?为什么不试试一些成熟的第三方SDK、API服务呢?
主角马上就要登场了,那就是腾讯位置服务,可能你并不是很熟悉,那么你来着了,看完这篇文章,并且跟着文章操作一遍,你就是一个腾讯位置服务开发者了。
正文
从上面的介绍中,得知了腾讯位置服务属于第三方SDK、API,因此需要先到相应的开发平台上去注册账号。
一、注册腾讯位置服务账号
点击腾讯位置服务,进入主页面然后进行注册

注意看右上角是有注册和登录,那么我也没有账号,就注册一个。
默认使用手机注册,当然你也可以选择其他的注册方式:微信扫码、QQ、微信公众号。

这里我通过微信扫码来注册,扫码后。

如果你的微信之前有注册使用其他的腾讯服务而没有使用腾讯位置服务,则可以点击 绑定已有账号 按钮,输入手机号获取验证码来绑定。没有的话点击注册新账号的链接。
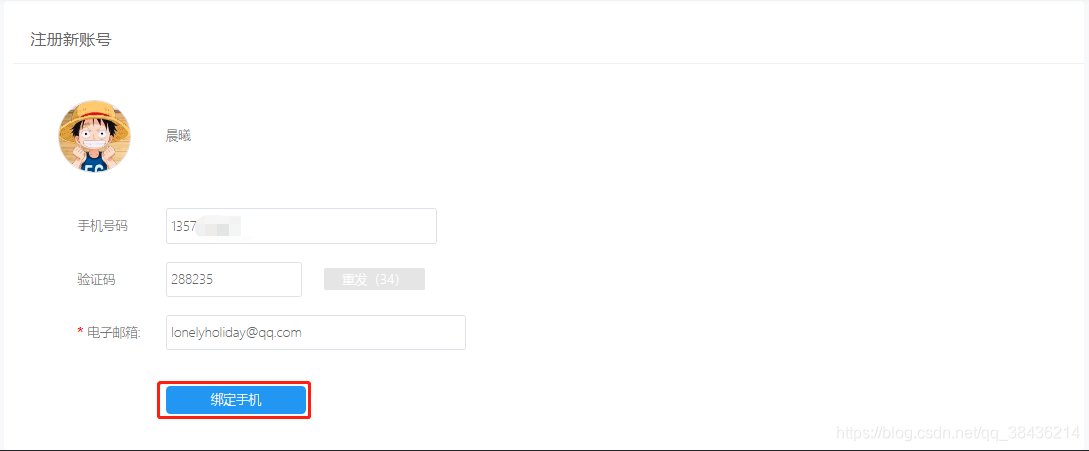
然后输入相关的手机号、验证码、邮箱,点击绑定手机按钮。

注册成功的同时会给你刚才填写的邮箱发送一个邮件,你可以打开这个邮件,点击里面的链接完成对邮箱的绑定。

点击可以通过验证,5秒后跳转如下页面,在里面填写个人信息。

至此,注册步骤就完成了,下面登录账号以及创建应用。
二、创建平台应用Appkey
在腾讯位置服务平台上登录刚才注册的账号

然后可以看到顶部导航栏这里有一个开发文档,这里注意到移动端开发有两个与Android开发相关的SDK,定位和地图。
下面我先使用这个定位SDK,在使用之前呢?首先需要创建AppKey,我们将在自己的应用中配置这个Key来使用SDK中的服务。
下面点击控制台,选择Key管理,点击创建新秘钥。

填写相关信息,Key名称、和验证码。描述无关紧要,填不填都行,点击提交。

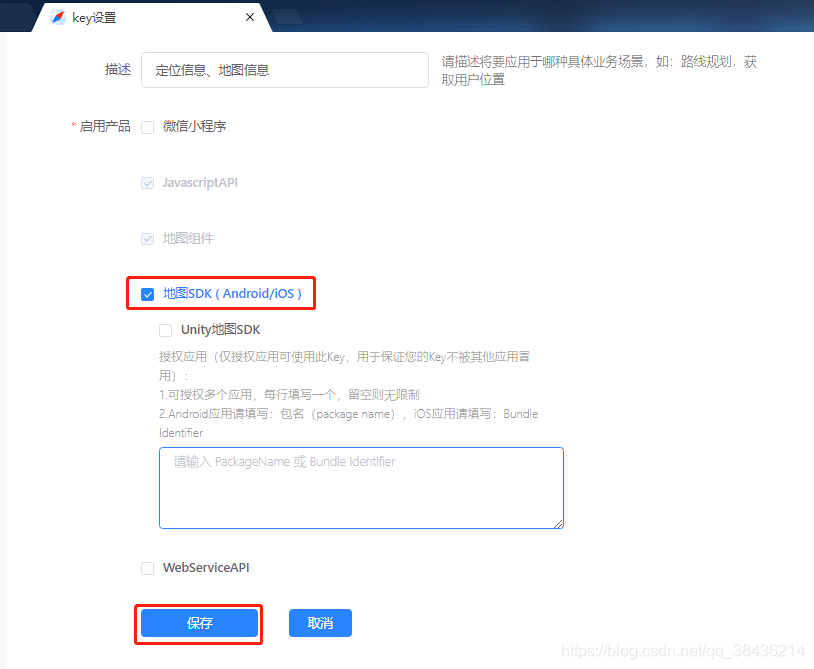
然后会出现一个弹窗,告诉AppKey创建成功,以及这个Key的使用场景,下面点击进入:key设置。

这里选择地图SDK,正常开发中你是要指定包名的,你也可以指定多个应用的包名,不过要换行,如果你不指定,则这个Key无限制应用。这里我不指定。点击保存,完成这个AppKey的配置。
配置完成之后,就要下载相应的定位SDK了。
三、创建并配置AS工程
在配置之前,需要先下载定位的SDK文件。点击开发文档中的Android定位SDK,然后左侧导航栏滑动到最下方,点击下载,就可以看到如下图所示的资源下载,点击下载到电脑本地,然后解压。

这里我是放在D盘的根目录下,解压后的文件夹如下图所示:

OK,现在该来创建AS项目。这里我的这个项目名字有些长,不过是符合命名规范的,并且意思也很清晰。点击Finish完成工程的创建。

创建好了,下面该来配置了。
打开AndroidManifest.xml
在application标签下,增加如下配置
		<!--AppKey-->
        <meta-data
            android:name="TencentMapSDK"
            android:value="JFOBZ-PV3RD-ZNH42-P7G5M-D2CTH-KAFQ2" />
这个value的值JFOBZ-PV3RD-ZNH42-P7G5M-D2CTH-KAFQ2
对应你平台上Key的值。
然后再配置一些需要的权限
<!-- 通过GPS得到精确位置 -->
<uses-permission android:name="android.permission.ACCESS_FINE_LOCATION" />
<!-- 通过网络得到粗略位置 -->
<uses-permission android:name="android.permission.ACCESS_COARSE_LOCATION" />
<!-- 访问网络. 某些位置信息需要从网络服务器获取 -->
<uses-permission android:name="android.permission.INTERNET" />
<!-- 访问WiFi状态. 需要WiFi信息用于网络定位 -->
<uses-permission android:name="android.permission.ACCESS_WIFI_STATE" />
<!-- 修改WiFi状态. 发起WiFi扫描, 需要WiFi信息用于网络定位 -->
<uses-permission android:name="android.permission.CHANGE_WIFI_STATE" />
<!-- 访问网络状态, 检测网络的可用性. 需要网络运营商相关信息用于网络定位 -->
<uses-permission android:name="android.permission.ACCESS_NETWORK_STATE" />
<!-- 访问网络的变化, 需要某些信息用于网络定位 -->
<uses-permission android:name="android.permission.CHANGE_NETWORK_STATE" />
<!-- 访问手机当前状态, 需要device id用于网络定位 -->
<uses-permission android:name="android.permission.READ_PHONE_STATE" />
<!-- 支持A-GPS辅助定位 -->
<uses-permission android:name="android.permission.ACCESS_LOCATION_EXTRA_COMMANDS" />
<!-- 用于 log 日志 -->
<uses-permission android:name="android.permission.WRITE_EXTERNAL_STORAGE" />
配置好之后,AndroidManifest.xml如下:
<?xml version="1.0" encoding="utf-8"?>
<manifest xmlns:android="http://schemas.android.com/apk/res/android"
    package="com.llw.demo">

    <!-- 通过GPS得到精确位置 -->
    <uses-permission android:name="android.permission.ACCESS_FINE_LOCATION" />
    <!-- 通过网络得到粗略位置 -->
    <uses-permission android:name="android.permission.ACCESS_COARSE_LOCATION" />
    <!-- 访问网络. 某些位置信息需要从网络服务器获取 -->
    <uses-permission android:name="android.permission.INTERNET" />
    <!-- 访问WiFi状态. 需要WiFi信息用于网络定位 -->
    <uses-permission android:name="android.permission.ACCESS_WIFI_STATE" />
    <!-- 修改WiFi状态. 发起WiFi扫描, 需要WiFi信息用于网络定位 -->
    <uses-permission android:name="android.permission.CHANGE_WIFI_STATE" />
    <!-- 访问网络状态, 检测网络的可用性. 需要网络运营商相关信息用于网络定位 -->
    <uses-permission android:name="android.permission.ACCESS_NETWORK_STATE" />
    <!-- 访问网络的变化, 需要某些信息用于网络定位 -->
    <uses-permission android:name="android.permission.CHANGE_NETWORK_STATE" />
    <!-- 访问手机当前状态, 需要device id用于网络定位 -->
    <uses-permission android:name="android.permission.READ_PHONE_STATE" />
    <!-- 支持A-GPS辅助定位 -->
    <uses-permission android:name="android.permission.ACCESS_LOCATION_EXTRA_COMMANDS" />
    <!-- 用于 log 日志 -->
    <uses-permission android:name="android.permission.WRITE_EXTERNAL_STORAGE" />

    <application
        android:allowBackup="true"
        android:icon="@mipmap/ic_launcher"
        android:label="@string/app_name"
        android:roundIcon="@mipmap/ic_launcher_round"
        android:supportsRtl="true"
        android:theme="@style/AppTheme">
        <activity android:name=".MainActivity">
            <intent-filter>
                <action android:name="android.intent.action.MAIN" />

                <category android:name="android.intent.category.LAUNCHER" />
            </intent-filter>
        </activity>
        <!--AppKey-->
        <meta-data
            android:name="TencentMapSDK"
            android:value="JFOBZ-PV3RD-ZNH42-P7G5M-D2CTH-KAFQ2" />
    </application>

</manifest>
然后是添加SDK,将解压SDK文件中的定位Jar包放入工程的libs下。

再右键点击main,新建一个jniLibs包。将解压文件中lib目录下的五个文件夹复制到这个jniLibs包下。

下面在app的build.gralde中的android闭包下增加如下jdk1.8的使用代码:
	compileOptions {


        sourceCompatibility = 1.8
        targetCompatibility = 1.8
    }
然后在dependencies闭包下增加如下依赖
	//动态权限请求
    implementation 'com.tbruyelle.rxpermissions2:rxpermissions:0.9.4@aar'
    implementation 'io.reactivex.rxjava2:rxandroid:2.0.2'
    implementation "io.reactivex.rxjava2:rxjava:2.0.0"
然后点击AS顶部导航工具栏右侧的那个小象图标,进行工程同步配置。

会把你的资源文件加到工程中,同步之后你刚才放入libs下的jar包就可以展开了。

你可以以此来作为判定标准,是否能使用SDK。
四、定位
定位其实也分为多种:连续定位、单次定位、后台定位。下面一个一个来说明演示一下。
① 连续定位
现在项目的配置都已经弄好了,那么下面就要进行具体的功能编写了,首先修改一下布局activity_main.xml,如下:
<?xml version="1.0" encoding="utf-8"?>
<LinearLayout xmlns:android="http://schemas.android.com/apk/res/android"
    xmlns:app="http://schemas.android.com/apk/res-auto"
    xmlns:tools="http://schemas.android.com/tools"
    android:layout_width="match_parent"
    android:layout_height="match_parent"
    android:orientation="vertical"
    tools:context=".MainActivity">

    <!--连续定位-->
    <Button
        android:id="@+id/btn_continuous_positioning"
        android:layout_width="match_parent"
        android:layout_height="wrap_content"
        android:text="连续定位" />
	<!--停止定位-->
    <Button
        android:id="@+id/btn_stop_positioning"
        android:layout_width="match_parent"
        android:layout_height="wrap_content"
        android:text="停止定位" />

    <LinearLayout
        android:layout_width="match_parent"
        android:layout_height="0dp"
        android:layout_weight="1"
        android:gravity="center"
        android:orientation="vertical">
        <!--位置信息-->
        <TextView
            android:padding="12dp"
            android:id="@+id/tv_location_info"
            android:layout_width="wrap_content"
            android:layout_height="wrap_content"
            android:text="位置信息"
            android:textColor="#000"
            android:textSize="18sp" />
    </LinearLayout>

</LinearLayout>
然后回到MainActivity中先初始化页面的控件。
	//定位信息显示
    private TextView tvLocationInfo;
    //连续定位按钮
    private Button btnContinuousPositioning;
    //停止定位按钮
    private Button btnStopPositioning;
然后写一个initView方法,代码如下:
	/**
     * 页面初始化
     */
    private void initView() {


        tvLocationInfo = findViewById(R.id.tv_location_info);
        btnContinuousPositioning = findViewById(R.id.btn_continuous_positioning);
        btnStopPositioning = findViewById(R.id.btn_stop_positioning);

        btnContinuousPositioning.setOnClickListener(this);
        btnStopPositioning.setOnClickListener(this);
    }
在onCreate方法中调用它。
然后当前的MainActivity实现控件的点击监听。

之后重写onClick方法。根据不同的控件id来触发点击。
	/**
     * 页面控件点击事件
     */
    @Override
    public void onClick(View v) {


        switch (v.getId()) {


            case R.id.btn_continuous_positioning:
                //连续定位

                break;
            case R.id.btn_stop_positioning:
                //停止定位

                break;
            default:
                break;
        }
    }
如果想要定位肯定要使用定位SDK中的方法。
首先创建成员变量
	//定位管理
    private TencentLocationManager mLocationManager;
    //定位请求
    private TencentLocationRequest locationRequest;
然后新建一个initLocation方法,对里面的变量进行配置。
	/**
     * 初始化定位信息
     */
    private void initLocation() {


    	//获取TencentLocationManager实例
        mLocationManager = TencentLocationManager.getInstance(this);
        //获取定位请求TencentLocationRequest 实例
        locationRequest = TencentLocationRequest.create();
        //设置定位时间间隔,10s
        locationRequest.setInterval(10000);
        //位置信息的详细程度 REQUEST_LEVEL_ADMIN_AREA表示获取经纬度,位置所处的中国大陆行政区划
        locationRequest.setRequestLevel(TencentLocationRequest.REQUEST_LEVEL_ADMIN_AREA);
        //是否允许使用GPS
        locationRequest.setAllowGPS(true);
        //是否需要获取传感器方向,提高室内定位的精确度
        locationRequest.setAllowDirection(true);
        //是否需要开启室内定位
        locationRequest.setIndoorLocationMode(true);
    }
同样的要在onCreate方法中调用,顺序在initView之后。
然后MainActivity要实现对定位的监听,

一个类实现多个方法要用逗号隔开。
然后重写onLocationChanged和onStatusUpdate方法,如下所示
	/**
     * 接收定位结果
     */
    @Override
    public void onLocationChanged(TencentLocation location, int error, String reason) {


        //显示定位信息
        showLocationInfo(location);
    }

    /**
     * 用于接收GPS、WiFi、Cell状态码
     */
    @Override
    public void onStatusUpdate(String name, int status, String desc) {


    }
这里调用了一个显示位置信息的showLocationInfo方法。
	/**
     * 显示定位信息
     *
     * @param location
     */
    private void showLocationInfo(TencentLocation location) {


        //经度
        double longitude = location.getLongitude();
        //纬度
        double latitude = location.getLatitude();
        //准确性
        float accuracy = location.getAccuracy();
        //地址信息
        String address = location.getAddress();
        //海拔高度
        double altitude = location.getAltitude();
        //面积统计
        Integer areaStat = location.getAreaStat();
        //方向
        float bearing = location.getBearing();
        double direction = location.getDirection();
        //城市
        String city = location.getCity();
        //城市代码
        String cityCode = location.getCityCode();
        //城市电话代码
        String cityPhoneCode = location.getCityPhoneCode();
        //坐标类型
        int coordinateType = location.getCoordinateType();
        //区
        String district = location.getDistrict();
        //经过时间
        long elapsedRealtime = location.getElapsedRealtime();
        //Gps信息
        int gpsRssi = location.getGPSRssi();
        //室内建筑
        String indoorBuildingFloor = location.getIndoorBuildingFloor();
        //室内建筑编码
        String indoorBuildingId = location.getIndoorBuildingId();
        //室内位置类型
        int indoorLocationType = location.getIndoorLocationType();
        //名称
        String name = location.getName();
        //国家
        String nation = location.getNation();
        //周边poi信息列表
        List<TencentPoi> poiList = location.getPoiList();
        //提供者
        String provider = location.getProvider();
        //省
        String province = location.getProvince();
        //速度
        float speed = location.getSpeed();
        //街道
        String street = location.getStreet();
        //街道编号
        String streetNo = location.getStreetNo();
        //时间
        long time = location.getTime();
        //镇
        String town = location.getTown();
        //村
        String village = location.getVillage();

        StringBuffer buffer = new StringBuffer();
        buffer.append("经度:" + longitude + "\n");
        buffer.append("纬度:" + latitude + "\n");
        buffer.append("国家:" + nation + "\n");
        buffer.append("省:" + province + "\n");
        buffer.append("市:" + city + "\n");
        buffer.append("县/区:" + district + "\n");
        buffer.append("街道:" + street + "\n");
        buffer.append("名称:" + name + "\n");
        buffer.append("提供者:" + provider + "\n");
        buffer.append("详细地址:" + address + "\n");
        tvLocationInfo.setText(buffer.toString());
    }
这里我获取常用的数据拼接起来,然后显示在TextView上。
然后进行下一步,定位是需要定位权限的,而这个权限属于危险权限,要在AndroidManifest.xml中静态配置,而在Android6.0之后还要在使用之前动态申请,用户同意之后才能使用。
下面先创建一个变量。
	//权限
    private RxPermissions rxPermissions;
然后在initView方法中增加实例化的代码,在页面创建的时候就进行实例化。
	//实例化
    rxPermissions = new RxPermissions(this);
之后就是对当前Android版本的判断了。
	/**
     * 检查Android版本
     */
    private void checkVersion() {


        if (Build.VERSION.SDK_INT >= Build.VERSION_CODES.M) {


            //6.0或6.0以上
            //动态权限申请
            permissionsRequest();
        } else {


            showMsg("您不需要动态获得权限,可以直接定位");
        }
    }
Toast提示
	/**
     * Toast提示
     *
     * @param msg 内容
     */
    private void showMsg(String msg) {


        Toast.makeText(this, msg, Toast.LENGTH_SHORT).show();
    }
动态权限申请,新增permissionsRequest方法。
	/**
     * 动态权限申请
     */
    private void permissionsRequest() {

    //使用这个框架使用了Lambda表达式,设置JDK版本为 1.8或者更高
        rxPermissions.request(Manifest.permission.ACCESS_COARSE_LOCATION,
                Manifest.permission.ACCESS_FINE_LOCATION,
                Manifest.permission.READ_PHONE_STATE,
                Manifest.permission.WRITE_EXTERNAL_STORAGE)
                .subscribe(granted -> {


                    if (granted) {

    //申请成功
                        //发起连续定位请求
                        showMsg("您已获得权限,可以定位了");
                    } else {

    //申请失败
                        showMsg("权限未开启");
                    }
                });
    }
获取权限之后告知用户。
下面万事具备,点击按钮就可以了,修改onClick方法。
	/**
     * 页面控件点击事件
     */
    @Override
    public void onClick(View v) {


        switch (v.getId()) {


            case R.id.btn_continuous_positioning:
                //连续定位
                tvLocationInfo.setText("定位中");
                mLocationManager.requestLocationUpdates(locationRequest, this);
                break;
            case R.id.btn_stop_positioning:
                //停止定位
                mLocationManager.removeUpdates(this);
                showMsg("定位已停止");
                break;
            default:
                break;
        }
    }
点击连续定位按钮时,显示定位中,给用户一个好的感知,然后请求定位。
停止定位则就是移除这个定位监听。
下面我简要的说明一下刚才的逻辑,当页面创建时,你初始化页面控件、权限、定位相关配置。然后进行版本判断,Android6.0及以上则动态请求权限,6.0一下和权限通过之后都给一个Toast提示一下。之后通过点击连续定位按钮,开始请求定位,定位的信息则会通过定位回调返回到onLocationChanged方法中,通过传递来的TencentLocation对象拿到定位的具体信息,然后再选取常用的显示在TextView上。
下面运行一下,请运行在自己的手机上,不要使用虚拟机或者模拟器,看是否能够获取到定位信息。

OK,很明显这里已经显示出来了,当然刚才说是连续定位,只不过是10s定位一次,这个周期有点长了,看的效果并不是很好,下面改成1s一次。
locationRequest.setInterval(1000);
然后再运行一下,这一次我录制一个GIF图,来看看。

这个GIF是我在回家路上定位的,仔细的看你就会发现经纬度的变化。
当你点击停止定位时,这个经纬度就不会再发生变化了。
那么连续定位的演示就结束了。
② 单次定位
顾名思义,就是只定位一次,其实很简单,一行代码解决问题,不过首先还是在activity_main.xml中增加一个单次定位的按钮吧。
	<!--单次定位-->
    <Button
        android:id="@+id/btn_single_positioning"
        android:layout_width="match_parent"
        android:layout_height="wrap_content"
        android:text="单次定位" />
就放在连续定位下面。
然后进入MainActivity
	//单次定位
    private Button btnSinglePositioning;
initView中

onClick中

注意看这一行代码:
mLocationManager.requestSingleFreshLocation(null,this, Looper.getMainLooper());
它与连续定位是不同的方法,它还多了一个Looper的参数,其余的两个参数与连续定位一致,而我在定位请求里面传的是null,也就是说不进行配置,下面来演示一下,看会怎么样。

很明显,你会发现有一些数据是null,这就是单次定位的默认配置,如果你只是需要经纬度或者一个粗略的地址,你就可以采用这种方式,第一配置少,第二效率要高一些,时间快一点。
那么如果你想单次定位也获取详细的定位信息呢?也很简单,那就是把这个null改成之前配置的locationRequest既可
mLocationManager.requestSingleFreshLocation(locationRequest,this, Looper.getMainLooper());
下面再运行一下:

这样一来,它与连续定位的区别只是次数上的,其他都一样,在实际开发中可以按照不同的业务需求来进行使用。
还记得之前实现TencentLocationListener时重写的两个方法吗?刚才我一直在使用onLocationChanged,却对这个onStatusUpdate不闻不问,那么它就没有用吗?
当然不是,存在即合理,所以下面来看看这个方法能给我们什么样的惊喜。
定义一个成员变量作为日志的标识
public static final String TAG = "MainActivity";
然后在onStatusUpdate返回中进行打印
	@Override
    public void onStatusUpdate(String name, int status, String desc) {


        Log.d(TAG, "name:" + name + " status:" + status + " desc:" + desc);
    }
下面再运行一下APP,点击连续定位,然后看看日志。

再点击单次定位和停止定位,你会发现都不会有日志打印,这说明了一个问题,这个状态的改变回调只有在连续定位时才适用,下面来分析一下这个日志给我们什么样的信息。
首先是name,就表示定位所采用的装置,比如wifi、gps、cell(定位硬件模块),状态需要用一个表格来说明,
| Name |
|
||
|---|---|---|---|
| 状态 | 状态码 | 说明 | |
| cell | STATUS_DISABLED | 0 | 模块关闭 |
| STATUS_EABLED | 1 | 模块开启 | |
| STATUS_DENIED | 2 | 定位权限被禁止,位置权限被拒绝通常发生在禁用当前应用的 ACCESS_COARSE_LOCATION 等定位权限 | |
| wifi | STATUS_DISABLED | 0 | Wi-Fi开关关闭 |
| STATUS_EABLED | 1 | Wi-Fi开关打开 | |
| STATUS_DENIED | 2 | 权限被禁止,禁用当前应用的 ACCESS_COARSE_LOCATION 等定位权限 | |
| STATUS_LOCATION_SWITCH_OFF | 5 | 位置信息开关关闭,在android M系统中,此时禁止进行Wi-Fi扫描 | |
| GPS | STATUS_DISABLED | 0 | GPS开关关闭 |
| STATUS_EABLED | 1 | GPS开关打开 | |
| STATUS_GPS_AVAILABEL | 3 | GPS可用,代表GPS开关打开,且搜星定位成功 | |
| STATUS_GPS_UNAVAILABLE | 4 | GPS不可用,不可用有多种可能,比如: GPS开关被关闭,GPS开关开着但是没办法搜星或者在室内等定位不成功的情况 |
|
这也是官方文档上提供的图片,根据这个就可以在返回中做相应的处理了,从而知道当前的状态或者问题所在。
于是可以写一个这样的方法。
	/**
     * 定位状态判断
     *
     * @param name   GPS、WiFi、Cell
     * @param status 状态码
     * @return
     */
    private String statusUpdate(String name, int status) {


        if ("gps".equals(name)) {


            switch (status) {


                case 0:
                    return "GPS开关关闭";
                case 1:
                    return "GPS开关打开";
                case 3:
                    return "GPS可用,代表GPS开关打开,且搜星定位成功";
                case 4:
                    return "GPS不可用";
                default:
                    return "";
            }
        } else if ("wifi".equals(name)) {


            switch (status) {


                case 0:
                    return "Wi-Fi开关关闭";
                case 1:
                    return "Wi-Fi开关打开";
                case 2:
                    return "权限被禁止,禁用当前应用的 ACCESS_COARSE_LOCATION 等定位权限";
                case 5:
                    return "位置信息开关关闭,在android M系统中,此时禁止进行Wi-Fi扫描";
                default:
                    return "";
            }
        } else if ("cell".equals(name)) {


            switch (status) {


                case 0:
                    return "cell 模块关闭";
                case 1:
                    return "cell 模块开启";
                case 2:
                    return "定位权限被禁止,位置权限被拒绝通常发生在禁用当前应用的 ACCESS_COARSE_LOCATION 等定位权限";
                default:
                    return "";
            }
        }
        return "";
    }
然后改变一下打印中信息
Log.d(TAG, "name:" + name + " desc:" + statusUpdate(name, status));
再运行一下。

现在就知道详细的信息了,开发者可以根据这些信息来查找问题,好了这个方法就介绍到这里,下面进行后台定位。
③ 后台定位
实际使用过程中,后台定位是用的比较多的,你可能无法感知,但是它就是存在,属于一种服务,定位服务,运行在后台Service中,下面来尝试一下。
首先还是来添加一个后台定位的按钮吧。因为是写文章,那么肯定要有一个立体的感受,因此给后台定位放置一个启动按钮。
在activity_main.xml中增加
	<!--后台定位-->
    <Button
        android:id="@+id/btn_background_positioning"
        android:layout_width="match_parent"
        android:layout_height="wrap_content"
        android:text="后台定位" />
放在单次定位按钮的下面。
然后回到MainActivity中。
	//后台定位
    private Button btnBackgroundPositioning;
    //定位模式
    private String positioningMode = null;
然后initView中

因为现在已经有三种定位的模式了,为了方便区别所以定义了一个成员变量positioningMode 。下面来看onClick方法。

然后在showLocationInfo中,

这样在显示定位信息的时候就知道当前的定位是什么模式了,下面就该专心的来写这个后台定位了。
首先在AndroidManifest.xml中配置定位服务
		<!--定位服务-->
        <service
            android:name="com.tencent.map.geolocation.s"
            android:foregroundServiceType="location" />

同时为了适配Android9.0和10.0还需要增加两个权限
	<!--适配9.0  需要启动后台定位则必须声明这个权限-->
    <uses-permission android:name="android.permission.FOREGROUND_SERVICE" />

    <!--适配10.0 Android Q新增权限,允许应用在后台发起定位-->
    <uses-permission android:name="android.permission.ACCESS_BACKGROUND_LOCATION" />
其中这个ACCESS_BACKGROUND_LOCATION还需要动态申请,因此,在MainActivity中的permissionsRequest方法中,增加这个权限。

实际上,这里应该还需要再判断一下,如果是Android10.0及以上增请求ACCESS_BACKGROUND_LOCATION,不是则和原来一样。不过这个可以自行更改,因为我本身就是Android10.0所以就不改了。
下面定义一些成员变量
	//通知管理
    private NotificationManager notificationManager;
    //通知ID
    private static final int LOC_NOTIFICATIONID = 20;
    //通知渠道名
    private static final String NOTIFICATION_CHANNEL_NAME = "后台定位";
    //是否创建了通知渠道
    private boolean isCreateChannel = false;
增加创建通知的方法
	/**
     * 创建通知
     *
     * @return
     */
    private Notification buildNotification() {


        Notification.Builder builder = null;
        Notification notification = null;
        if (Build.VERSION.SDK_INT >= Build.VERSION_CODES.O) {


            //Android 8.0及以后对Notification进行了修改 需要创建通知渠道
            if (notificationManager == null) {


                notificationManager = (NotificationManager) getSystemService(Context.NOTIFICATION_SERVICE);
            }
            String channelId = getPackageName();
            if (!isCreateChannel) {


                NotificationChannel notificationChannel = new NotificationChannel(channelId,
                        NOTIFICATION_CHANNEL_NAME, NotificationManager.IMPORTANCE_DEFAULT);
                //是否在桌面icon右上角展示小圆点
                notificationChannel.enableLights(true);
                //小圆点颜色
                notificationChannel.setLightColor(Color.BLUE);
                //是否在久按桌面图标时显示此渠道的通知
                notificationChannel.setShowBadge(true);
                notificationManager.createNotificationChannel(notificationChannel);
                isCreateChannel = true;
            }
            builder = new Notification.Builder(getApplicationContext(), channelId);
        } else {


            builder = new Notification.Builder(getApplicationContext());
        }
        builder.setSmallIcon(R.mipmap.ic_launcher)
                .setContentTitle("PositionServiceDemo")
                .setContentText("正在后台运行")
                .setLargeIcon(BitmapFactory.decodeResource(getResources(), R.mipmap.ic_launcher))
                .setWhen(System.currentTimeMillis());

        if (android.os.Build.VERSION.SDK_INT >= 16) {


            notification = builder.build();
        } else {


            notification = builder.getNotification();
        }
        return notification;
    }
然后看onClick,通过前台定位创建通知,然后开始定位。

可以看到我在图中图停止定位做了更改,增加了一个stopPositioning方法
	/**
     * 停止定位
     */
    private void stopPositioning() {


        if (positioningMode == null) {


            showMsg("您还没有开始定位呢?");
            return;
        }
        if ("单次定位".equals(positioningMode)) {


            showMsg("单次定位会自动停止,但您想点一下我也没办法!╮(╯▽╰)╭");
            return;
        }
        mLocationManager.removeUpdates(this);
        if ("后台定位".equals(positioningMode)) {


            //关闭后台定位
            mLocationManager.disableForegroundLocation(true);
        }
        showMsg("定位已停止");
    }
下面来说明一下,当点击后台定位时,启用前台定位,通过定义好的通知id和通知创建通知,将服务由后台转到前台,此时通知会显示,然后开始定位获取定位信息,当
点击停止定位按钮时,如果当前是后台定位则先停止定位,再关闭前台定位,此时通知会消失。
下面来看看实际的运行效果。

可以看状态栏,我相信你能发现这个细节,OK,后台定位就写好了。
④ 地理围栏
地理围栏是通过划定一个区域范围,如果用户进出这片区域,会通过广播的形式通知上层。用户可以创建多个地理围栏,但是一旦不再使用对应围栏,应当尽快将围栏移除。目前腾讯定位SDK只支持划定圆形区域,不支持多边形和不规则形状。
下面来看我的解释,你工作之后用过钉钉吗?钉钉有一个上下班打卡的功能,是要你在规定的打卡时间和空间范围内,打开钉钉会自动打卡,那么这里就是一个地理围栏,你把它当成是一个圆,你的公司处于圆心位置,那么公司会设置打卡的最远距离,由公司向周围辐射,形成一个圆。那么只要上下班时在这个范围内都会自动打卡,现在也有很多的打开软件会模仿这一个业务功能。

OK,通过上面的讲述你对地理围栏有了一个大概的认知了,那么下面进入实操环节,首先修改一下activity_main.xml中的布局代码
	<TextView
        android:text="地理围栏"
        android:padding="8dp"
        android:textSize="18sp"
        android:layout_width="wrap_content"
        android:layout_height="wrap_content"/>
    <!--添加围栏-->
    <Button
        android:id="@+id/btn_add_fence"
        android:layout_width="match_parent"
        android:layout_height="wrap_content"
        android:text="添加围栏" />

    <!--移除围栏-->
    <Button
        android:id="@+id/btn_remove_fence"
        android:layout_width="match_parent"
        android:layout_height="wrap_content"
        android:text="移除围栏" />
放在停止定位按钮的下面,然后进入到MainActivity
	//添加围栏
    private Button btnAddFence;
    //移除围栏
    private Button btnRemoveFence;
然后在initView中

onClick中增加

在使用地理围栏时会用到广播,这里在com.llw.demo下右键创建一个receiver包,然后新建一个GeofenceEventReceiver继承BroadcastReceiver,然后重写onReceive方法,代码如下:
package com.llw.demo.receiver;

import android.content.BroadcastReceiver;
import android.content.Context;
import android.content.Intent;
import android.location.LocationManager;
import android.widget.Toast;

public class GeofenceEventReceiver extends BroadcastReceiver {


    private static final String ACTION_TRIGGER_GEOFENCE = "com.llw.demo.receiver.GeofenceEventReceiver";

    @Override
    public void onReceive(Context context, Intent intent) {


        if (intent == null
                || !GeofenceEventReceiver.ACTION_TRIGGER_GEOFENCE.equals(intent
                .getAction())) {


            return;
        }

        String tag = intent.getStringExtra("tag");
        double lng = intent.getDoubleExtra("longitude", 0);
        double lat = intent.getDoubleExtra("latitude", 0);

        // 进入围栏还是退出围栏
        boolean enter = intent.getBooleanExtra(
                LocationManager.KEY_PROXIMITY_ENTERING, true);
        Toast.makeText(context,"是否进入围栏范围:"+ enter,Toast.LENGTH_SHORT).show();

    }
}
然后广播有两种注册方式,静态和动态的,下面先来看静态的注册,打开AndroidManifest.xml
添加如下配置
		<!--静态注册广播-->
        <receiver android:name=".receiver.GeofenceEventReceiver">
            <intent-filter>
                <action android:name="com.llw.demo.receiver.GeofenceEventReceiver"/>
            </intent-filter>
        </receiver>

然后还需要配置一个权限,这个权限不需要动态申请。
	<!--地理围栏,屏幕唤醒-->
    <uses-permission android:name="android.permission.WAKE_LOCK"/>
下面回到MainActivity,去定义一些变量,并且完成地理围栏的初始化配置。
	//地理围栏管理
    private TencentGeofenceManager mTencentGeofenceManager;
    //围栏别名
    private String geofenceName = "测试范围";
    //围栏
    private TencentGeofence geofence;
    //设置动作
    private static final String ACTION_TRIGGER_GEOFENCE = "com.llw.demo.receiver.GeofenceEventReceiver";
    //PendingIntent
    private PendingIntent pi;
然后新建一个初始化地理围栏的方法。
	/**
     * 初始化地理围栏
     */
    private void initGeofence() {


        //实例化
        mTencentGeofenceManager = new TencentGeofenceManager(this);
        //地理围栏构建
        TencentGeofence.Builder builder = new TencentGeofence.Builder();
        geofence = builder.setTag(geofenceName)
                //设置圆心和半径,v 是 纬度,v1 是经度,v2 是半径 500米
                .setCircularRegion(22.5, 113.9, 500)
                //设置地理围栏有效期
                .setExpirationDuration(3 * 3600 * 1000)
                //完成构建
                .build();

        //构建Action和传递信息
        Intent receiverIntent = new Intent(ACTION_TRIGGER_GEOFENCE);
        receiverIntent.putExtra("tag", geofence.getTag());
        receiverIntent.putExtra("longitude", geofence.getLongitude());
        receiverIntent.putExtra("latitude", geofence.getLatitude());


        // 随机产生的 requestCode, 避免冲突
        int requestCode = (int) (Math.random() * 1E7);
        //构建PendingIntent
        pi = PendingIntent.getBroadcast(this, requestCode,
                receiverIntent, PendingIntent.FLAG_UPDATE_CURRENT);

    }
上述方法完成了对地理围栏的配置,并且对拦截器的配置和参数的传递,该方法在onCreate中调用。

然后就是在添加围栏和移除围栏中触发
			case R.id.btn_add_fence:
                //添加围栏
                mTencentGeofenceManager.addFence(geofence,pi);
                showMsg("地理围栏已添加,请在附近溜达一下");
                break;
            case R.id.btn_remove_fence:
                //移除围栏
                //指定围栏对象移除
                mTencentGeofenceManager.removeFence(geofence);
                //通过tag移除
                //mTencentGeofenceManager.removeFence(geofenceName);
                showMsg("地理围栏已移除,撒有那拉!");
                break;
最后就是在页面销毁的时候,移除所有围栏并且销毁围栏管理。
	@Override
    protected void onDestroy() {


        super.onDestroy();
        //移除所有围栏
        mTencentGeofenceManager.removeAllFences();
        //销毁围栏管理
        mTencentGeofenceManager.destroy();
    }
下面来看看动态广播
	//广播接收器
    private GeofenceEventReceiver geofenceEventReceiver;
然后在initGeofence方法中完成动态广播的配置和注册。同时记得去掉AndroidManifest.xml的静态广播配置
		//实例化
        geofenceEventReceiver = new GeofenceEventReceiver();
        //添加动作拦截
        IntentFilter intentFilter = new IntentFilter();
        intentFilter.addAction(ACTION_TRIGGER_GEOFENCE);
        //注册动态广播  记得去掉AndroidManifest.xml的静态广播配置
        registerReceiver(geofenceEventReceiver,intentFilter);

OK,代码写完了,自行去测试吧,这里我就不放效果图了。那么到这里腾讯的定位SDK就大概讲述完毕,下面进入地图SDK环节。
五、地图
说到地图SDK,分为3D地图SDK、2D地图SDK。这里我使用3D的地图SDK,这个看起来技术含量就高一点。在文档中选择Android地图SDK,然后点击下载,下载3D版地图SDK。


下载后解压依然放在D盘的根目录,注意需要的东西都在libs里面。

打开libs,然后先复制jar包到lib下

右键点击这个jar包,然后选择Add As Library…

然后会出现这样一个弹窗

就是把这个依赖添加到当前的app模块中,点击OK。然后会进行同步,同步完你就会发现你的这个jar包可以打开了,这也是一种添加jar包的方式。

下面添加需要的so文件。打开解压文件的jniLibs文件夹,将里面的6个文件夹全选,然后复制,之后粘贴到你项目的jniLibs文件夹中,会自行合并的,你不用担心。

现在我们就已经将地图SDK也添加到了项目中,下面就该来使用了,在此之前,重新编译一下项目,点击Build → Rebuild Project,编译通过之后,重新运行在手机上,为什么要这么做呢?为了排错,每次当你对项目中的依赖库或者SDK有更改时,最好都去重新编译一下你的项目,之后运行一次,如果这个时候报错你是不是一下就能知道错误的原因呢?千万不要等到你把所有代码写完然后最后来运行,到时候报错的话,你排错就要花很多时间,得不偿失,当然这只是我的一个小建议,你开心你就想怎样就怎样。
OK,很显然这个地图SDK和与定位SDK没有起冲突,可以一起使用。
① 基础地图
既然要显示基础地图,那么先修改一下activity_main.xml,保险起见我这里贴一下完整的布局代码:
<?xml version="1.0" encoding="utf-8"?>
<LinearLayout xmlns:android="http://schemas.android.com/apk/res/android"
    xmlns:app="http://schemas.android.com/apk/res-auto"
    xmlns:tools="http://schemas.android.com/tools"
    android:layout_width="match_parent"
    android:layout_height="match_parent"
    android:orientation="vertical"
    tools:context=".MainActivity">

    <androidx.core.widget.NestedScrollView
        android:layout_width="match_parent"
        android:layout_height="match_parent">
        <LinearLayout
            android:orientation="vertical"
            android:layout_width="match_parent"
            android:layout_height="match_parent">

            <TextView
                android:layout_width="wrap_content"
                android:layout_height="wrap_content"
                android:padding="8dp"
                android:text="定位"
                android:textSize="18sp" />

            <!--连续定位-->
            <Button
                android:id="@+id/btn_continuous_positioning"
                android:layout_width="match_parent"
                android:layout_height="wrap_content"
                android:text="连续定位" />

            <!--单次定位-->
            <Button
                android:id="@+id/btn_single_positioning"
                android:layout_width="match_parent"
                android:layout_height="wrap_content"
                android:text="单次定位" />

            <!--后台定位-->
            <Button
                android:id="@+id/btn_background_positioning"
                android:layout_width="match_parent"
                android:layout_height="wrap_content"
                android:text="后台定位" />

            <!--停止定位-->
            <Button
                android:id="@+id/btn_stop_positioning"
                android:layout_width="match_parent"
                android:layout_height="wrap_content"
                android:text="停止定位" />

            <TextView
                android:layout_width="wrap_content"
                android:layout_height="wrap_content"
                android:padding="8dp"
                android:text="地理围栏"
                android:textSize="18sp" />
            <!--添加围栏-->
            <Button
                android:id="@+id/btn_add_fence"
                android:layout_width="match_parent"
                android:layout_height="wrap_content"
                android:text="添加围栏" />

            <!--移除围栏-->
            <Button
                android:id="@+id/btn_remove_fence"
                android:layout_width="match_parent"
                android:layout_height="wrap_content"
                android:text="移除围栏" />

            <!--位置信息-->
            <TextView
                android:id="@+id/tv_location_info"
                android:layout_width="wrap_content"
                android:layout_height="wrap_content"
                android:layout_gravity="center_horizontal"
                android:padding="8dp"
                android:text="位置信息"
                android:textColor="#000"
                android:textSize="18sp" />
            <TextView
                android:layout_width="wrap_content"
                android:layout_height="wrap_content"
                android:padding="8dp"
                android:text="地图"
                android:textSize="18sp" />
            <!--基础地图-->
            <Button
                android:id="@+id/btn_base_map"
                android:layout_width="match_parent"
                android:layout_height="wrap_content"
                android:text="基础地图" />
        </LinearLayout>
    </androidx.core.widget.NestedScrollView>

</LinearLayout>
根布局中加了一个滚动布局,滚动布局中增加一个线性布局,线性布局中放置之前的控件,并且增加一个按钮,用于跳转到新的Activity,在com.llw.demo下新建一个map包,右键点击,选择New →Activity→Empty Activity,命名为BaseMapActivity,布局为activity_base_map.xml。
然后修改MainActivity中的代码,
	//基础地图
    private Button btnBaseMap;
initView中

点击事件中

下面在activity_base_map.xml中增加一个地图控件。
<?xml version="1.0" encoding="utf-8"?>
<androidx.constraintlayout.widget.ConstraintLayout xmlns:android="http://schemas.android.com/apk/res/android"
    xmlns:app="http://schemas.android.com/apk/res-auto"
    xmlns:tools="http://schemas.android.com/tools"
    android:layout_width="match_parent"
    android:layout_height="match_parent"
    tools:context=".map.BaseMapActivity">
    <!--基础地图-->
    <com.tencent.tencentmap.mapsdk.maps.MapView
        android:id="@+id/mapView"
        android:layout_width="match_parent"
        android:layout_height="match_parent" />

</androidx.constraintlayout.widget.ConstraintLayout>
然后进入BaseMapActivity。
	//基础地图
    private MapView mapView;
    //腾讯地图
    private TencentMap tencentMap;
onCreate中,
	@Override
    protected void onCreate(Bundle savedInstanceState) {


        super.onCreate(savedInstanceState);
        setContentView(R.layout.activity_base_map);

        //地图
        mapView = findViewById(R.id.mapView);
        //创建tencentMap地图对象
        tencentMap = mapView.getMap();
    }
同时还要管理map的生命周期,
	/**
     * mapview的生命周期管理
     */
    @Override
    protected void onStart() {


        super.onStart();
        mapView.onStart();
    }

    @Override
    protected void onResume() {


        super.onResume();
        mapView.onResume();
    }

    @Override
    protected void onPause() {


        super.onPause();
        mapView.onPause();
    }

    @Override
    protected void onStop() {


        super.onStop();
        mapView.onStop();
    }

    @Override
    protected void onDestroy() {


        super.onDestroy();
        mapView.onDestroy();
    }

    @Override
    protected void onRestart() {


        super.onRestart();
        mapView.onRestart();
    }
下面来运行一下:

这样地图就显示出来了,其实刚才页面的代码还可以简化一下,因为map的声明周期与Activity的生命周期有关,这里就很适合使用LifeCycle来单独管理这个Activity的生命周期,同时对map进行管理。
下面在map包下新建一个MapLifecycle类,里面代码如下
package com.llw.demo.map;

import android.util.Log;

import androidx.lifecycle.Lifecycle;
import androidx.lifecycle.LifecycleObserver;
import androidx.lifecycle.OnLifecycleEvent;

import com.tencent.tencentmap.mapsdk.maps.MapView;

/**
 * 地图生命周期
 * @author llw
 */
public class MapLifecycle implements LifecycleObserver {


    public static final String TAG = "MapLifecycle";

    private MapView mapView;

    public MapLifecycle(MapView mapView) {


        this.mapView = mapView;
    }


    @OnLifecycleEvent(Lifecycle.Event.ON_CREATE)
    private void create(){


        Log.d(TAG,"onCreate");
    }

    @OnLifecycleEvent(Lifecycle.Event.ON_START)
    private void start(){


        Log.d(TAG,"onStart");
        mapView.onStart();
    }

    @OnLifecycleEvent(Lifecycle.Event.ON_RESUME)
    private void resume(){


        Log.d(TAG,"onResume");
        mapView.onResume();
    }

    @OnLifecycleEvent(Lifecycle.Event.ON_PAUSE)
    private void pause(){


        Log.d(TAG,"onPause");
        mapView.onPause();
    }

    @OnLifecycleEvent(Lifecycle.Event.ON_STOP)
    private void stop(){


        Log.d(TAG,"onStop");
        mapView.onStop();
    }

    @OnLifecycleEvent(Lifecycle.Event.ON_DESTROY)
    private void destroy(){


        Log.d(TAG,"onDestroy");
        mapView.onDestroy();
    }
}
然后再来看看BaseMapActivity。
	//地图生命周期
    private MapLifecycle mapLifecycle;
然后新写一个initView方法,初始化页面并且将MapLifecycle与BaseMapActivity绑定起来。
	/**
     * 页面初始化
     */
    private void initView() {


        //地图
        mapView = findViewById(R.id.mapView);
        //创建tencentMap地图对象
        tencentMap = mapView.getMap();

        mapLifecycle = new MapLifecycle(mapView);
        //将观察者与被观察者绑定起来
        getLifecycle().addObserver(mapLifecycle);
    }
然后在onCreate中调用initView。
	@Override
    protected void onCreate(Bundle savedInstanceState) {


        super.onCreate(savedInstanceState);
        setContentView(R.layout.activity_base_map);
        //页面初始化
        initView();
    }
下面你重新运行一下,然后在主页面点击基础地图进入,再点击返回键。
然后你看一下日志是否会打印。

很明显,这里打印了,说明可以通过这样一种方式将Activity的声明周期单独进行管理,从而减少它里面的一些业务逻辑的处理,最重要的是降低耦合。
刚才可以看到基础地图的确是显示出来了,而且可以通过手势放大、缩小、旋转。但是有一个最重要的问题,那就是显示的位置不对,我人在深圳,你显示在北京,这肯定不对呀。
所以还需要进一步配置才行,现在不配置则是显示默认的地址,因此是北京,当然其他的第三方SDK地图也是这样的,你不配置就是默认显示在北京。
下面来配置一下,既然是要定位到当前,那肯定少不了定位SDK了,那么在前面我已经详细的讲了定位SDK的使用,下面它只是给地图SDK进行辅助了,我就不详细讲了。
BaseMapActivity中增加
	//定位管理
    private TencentLocationManager locationManager;
    //定位请求
    private TencentLocationRequest locationRequest;
    //定位数据源监听
    private LocationSource.OnLocationChangedListener locationChangedListener;
然后实现LocationSource和TencentLocationListener。分别是定位数据源和定位监听。

然后重写下卖弄四个方法。
	/**
     * 接收定位结果
     */
    @Override
    public void onLocationChanged(TencentLocation tencentLocation, int code, String reason) {


    }

	/**
     * 用于接收GPS、WiFi、Cell状态码
     */
    @Override
    public void onStatusUpdate(String name, int status, String desc) {


    }

	/**
     * 启用
     * @param onLocationChangedListener  数据源更改监听
     */
    @Override
    public void activate(OnLocationChangedListener onLocationChangedListener) {


    }


    /**
     * 停用
     */
    @Override
    public void deactivate() {


    }
暂时不管它们,先进行定位的一些配置,新增方法initLocation
	/**
     * 初始化定位
     */
    private void initLocation() {


        //用于访问腾讯定位服务的类, 周期性向客户端提供位置更新
        locationManager = TencentLocationManager.getInstance(this);
        //设置坐标系
        locationManager.setCoordinateType(TencentLocationManager.COORDINATE_TYPE_GCJ02);
        //创建定位请求
        locationRequest = TencentLocationRequest.create();
        //设置定位周期(位置监听器回调周期)为3s
        locationRequest.setInterval(3000);

        //地图上设置定位数据源
        tencentMap.setLocationSource(this);
        //设置当前位置可见
        tencentMap.setMyLocationEnabled(true);
    }
在这个方法中,重点在于给地图设置定位数据源,这样地图才能在你当前定位数据源改变时定位过去,并且重新绘制地图。
下面就把注意力方法这四个重写的方法中,其中最重要的是onLocationChanged和activate这两个方法。下面先来看activate方法
	/**
     * 启用
     * @param onLocationChangedListener  数据源更改监听
     */
    @Override
    public void activate(OnLocationChangedListener onLocationChangedListener) {


        locationChangedListener = onLocationChangedListener;

        int error = locationManager.requestLocationUpdates(locationRequest, this, Looper.myLooper());
        switch (error) {


            case 1:
                showMsg("设备缺少使用腾讯定位服务需要的基本条件");
                break;
            case 2:
                showMsg("AndroidManifest 中配置的 key 不正确");
                break;
            case 3:
                showMsg("自动加载libtencentloc.so失败");
                break;
            default:
                break;
        }
    }
在这里进行了locationChangedListener 的实例化,并且启用了连续定位,获得一个发起连续定位的请求结果码,并根据这个结果码判断异常原因,这里的showMsg你应该不会陌生吧。
	/**
     * Toast提示
     * @param msg
     */
    private void showMsg(String msg) {


        Toast.makeText(this, msg, Toast.LENGTH_SHORT).show();
    }
下面来看onLocationChanged方法。
	/**
     * 接收定位结果
     */
    @Override
    public void onLocationChanged(TencentLocation tencentLocation, int code, String reason) {


        if (code == TencentLocation.ERROR_OK && locationChangedListener != null) {


        	//重新构建一个定位对象
            Location location = new Location(tencentLocation.getProvider());
            //设置经纬度以及精度
            location.setLatitude(tencentLocation.getLatitude());
            location.setLongitude(tencentLocation.getLongitude());
            location.setAccuracy(tencentLocation.getAccuracy());
            //更改位置定位,此时地图上就会显示当前定位到位置
            locationChangedListener.onLocationChanged(location);
        }
    }
在上面的activate方法中发起了定位,在这里判断定位是否成功并且locationChangedListener 不为空,因为在上面已经实例化了没所以不会空,下面则通过返回的tencentLocation.getProvider()重新构建一个Location对象,并且设置经纬度和精度信息,之后将这个Location放到locationChangedListener.onLocationChanged中,更改数据源,而数据源一更改,地图自然就会跟着更改。此时,你的地图就会定位到你当前的位置。索德斯呢!当然还有一些事情没有办完,还剩下两个方法没有进行处理呢。
	/**
     * 用于接收GPS、WiFi、Cell状态码
     */
    @Override
    public void onStatusUpdate(String name, int status, String desc) {


        //GPS, WiFi, Radio 等状态发生变化
        Log.v("State changed", name + "===" + desc);
    }

	/**
     * 停用
     */
    @Override
    public void deactivate() {


        locationManager.removeUpdates(this);
        locationManager = null;
        locationRequest = null;
        locationChangedListener = null;
    }
OK,这两个方法我就不解释了,相信你能明白。现在所有的方法都写好了,但是你要调用initLocation才行啊。

OK,运行一下吧。

这个定位没有毛病,是我当前的位置。
② 地图类型
腾讯地图SDK可以根据不同的业务需要切换不同的地图类型,下面来看看吧。新建一个MapTypeActivity,布局为activity_map_type.xml,下面修改布局。
<?xml version="1.0" encoding="utf-8"?>
<RelativeLayout xmlns:android="http://schemas.android.com/apk/res/android"
    xmlns:app="http://schemas.android.com/apk/res-auto"
    xmlns:tools="http://schemas.android.com/tools"
    android:layout_width="match_parent"
    android:layout_height="match_parent"
    tools:context=".map.MapTypeActivity">
    <!--地图类型选择-->
    <RadioGroup
        android:id="@+id/rp_map_type"
        android:layout_width="match_parent"
        android:layout_height="wrap_content"
        android:orientation="horizontal">

        <RadioButton
            android:id="@+id/rb_normal"
            android:layout_width="wrap_content"
            android:layout_height="wrap_content"
            android:buttonTint="#1296db"
            android:buttonTintMode="src_atop"
            android:checked="true"
            android:text="普通图" />

        <RadioButton
            android:id="@+id/rb_satellite"
            android:buttonTint="#1296db"
            android:buttonTintMode="src_atop"
            android:layout_width="wrap_content"
            android:layout_height="wrap_content"
            android:text="卫星图" />

        <RadioButton
            android:id="@+id/rb_dark"
            android:buttonTint="#1296db"
            android:buttonTintMode="src_atop"
            android:layout_width="wrap_content"
            android:layout_height="wrap_content"
            android:text="暗色图" />

        <RadioButton
            android:id="@+id/rb_traffic"
            android:buttonTint="#1296db"
            android:buttonTintMode="src_atop"
            android:layout_width="wrap_content"
            android:layout_height="wrap_content"
            android:text="路况" />

        <RadioButton
            android:visibility="gone"
            android:id="@+id/rb_style_map"
            android:buttonTint="#1296db"
            android:buttonTintMode="src_atop"
            android:layout_width="wrap_content"
            android:layout_height="wrap_content"
            android:text="个性化" />
    </RadioGroup>
    <!--基础地图-->
    <com.tencent.tencentmap.mapsdk.maps.MapView
        android:layout_below="@+id/rp_map_type"
        android:id="@+id/mapView"
        android:layout_width="match_parent"
        android:layout_height="match_parent" />
</RelativeLayout>
进入MapTypeActivity,实现RadioGroup.OnCheckedChangeListener。

	private MapView mapView;
    private RadioGroup radioGroup;
    private TencentMap tencentMap;
    //地图生命周期
    private MapLifecycle mapLifecycle;
onCreate中,进行初始化控件,并且绑定生命周期,MapLifecycle可以与多个Activity进行绑定。
	@Override
    protected void onCreate(Bundle savedInstanceState) {


        super.onCreate(savedInstanceState);
        setContentView(R.layout.activity_map_type);

        mapView = findViewById(R.id.mapView);
        radioGroup = findViewById(R.id.rp_map_type);
        radioGroup.setOnCheckedChangeListener(this);
        tencentMap = mapView.getMap();

        mapLifecycle = new MapLifecycle(mapView);
        getLifecycle().addObserver(mapLifecycle);

    }
最后重写onCheckedChanged方法,对不同的RadioButton进行处理。
	/**
     * 类型选中监听
     *
     * @param group
     * @param checkedId
     */
    @Override
    public void onCheckedChanged(RadioGroup group, int checkedId) {


        switch (checkedId) {


            case R.id.rb_normal: //普通地图-默认地图类型
                tencentMap.setTrafficEnabled(false);
                tencentMap.setMapType(TencentMap.MAP_TYPE_NORMAL);
                break;
            case R.id.rb_satellite: //卫星地图
                tencentMap.setTrafficEnabled(false);
                tencentMap.setMapType(TencentMap.MAP_TYPE_SATELLITE);
                break;
            case R.id.rb_dark: //暗色地图
                tencentMap.setTrafficEnabled(false);
                tencentMap.setMapType(TencentMap.MAP_TYPE_DARK);
                break;
            case R.id.rb_traffic://路况图
                tencentMap.setTrafficEnabled(true);
                break;
            default:
                break;
        }
    }
地图类型的切换就写好了,比较的简单。然后在activity_main.xml中增加一个按钮,用于点击进入MapTypeActivity。
			<!--地图类型-->
            <Button
                android:id="@+id/btn_map_type"
                android:layout_width="match_parent"
                android:layout_height="wrap_content"
                android:text="地图类型" />
然后在MainActivity中。
	//地图类型
    private Button btnMapType;
initView中

onClick中
				case R.id.btn_map_type:
                //地图类型
                startActivity(new Intent(this, MapTypeActivity.class));
                break;
下面运行一下看看效果:

实际上,这个卫星图的效果是不对的,不过我已经和腾讯的技术服务人员反映了,等待结果,其他的都正常。
③ 个性化地图
个性化地图需要先选择地图的样式,点击样式选择

注意,右上角有皇冠的是企业客户级别专享使用,需要完成企业认证才行。
这里我选择翠烟样式,然后点击直接使用。

选择要使用该样式的AppKey,然后设置应用类型,最后提交。

设置成功会给你一个弹窗的提示。

点击确定之后,进入到我的样式里面,然后可以看到刚才选择的样式。
在项目中,创建一个新的PersonalizedMapActivity布局为activity_personalized_map.xml。布局代码如下:
<?xml version="1.0" encoding="utf-8"?>
<RelativeLayout xmlns:android="http://schemas.android.com/apk/res/android"
    xmlns:app="http://schemas.android.com/apk/res-auto"
    xmlns:tools="http://schemas.android.com/tools"
    android:layout_width="match_parent"
    android:layout_height="match_parent"
    tools:context=".map.PersonalizedMapActivity">
    <!--个性化地图-->
    <com.tencent.tencentmap.mapsdk.maps.MapView
        android:id="@+id/mapView"
        android:layout_width="match_parent"
        android:layout_height="match_parent" />
</RelativeLayout>
然后在进入PersonalizedMapActivity。
	private MapView mapView;
    private TencentMap tencentMap;
    private MapLifecycle mapLifecycle;
onCreate中
	@Override
    protected void onCreate(Bundle savedInstanceState) {


        super.onCreate(savedInstanceState);
        setContentView(R.layout.activity_personalized_map);

        mapView = findViewById(R.id.mapView);
        tencentMap = mapView.getMap();

        mapLifecycle = new MapLifecycle(mapView);
        getLifecycle().addObserver(mapLifecycle);
    }
然后同样要在activity_main.xml中增加一个按钮。
			<!--个性化地图-->
            <Button
                android:id="@+id/btn_personalized_map"
                android:layout_width="match_parent"
                android:layout_height="wrap_content"
                android:text="个性化地图" />
别忘了在MainActivity中增加相应的绑定id和增加点击,跳转代码:
				//个性化地图
                startActivity(new Intent(this, PersonalizedMapActivity.class));
运行一下

嗯,样式的确是改变了,而此时你返回到主页面,然后你点击基础地图或者地图类型按钮进入相应的页面你会发现一个问题,那就是都变成了这个个性化的样式了,不设置了就是默认的经典样式,而设置之后就是使用设置的样式。而一个Key可以关联三个样式,也就是说我还可以添加两个样式。

这里我添加两个新的样式,然后提交。

这里这里的样式序号,1是烟翠、2是经典、3是墨渊
下面进入BaseMapActivity,在initView中将地图样式设置为经典样式。

同样也在MapTypeActivity的initView这样设置。
之后再来运行一下:

可以看到这样改了之后就符合我之前的想法了,那么个性化地图只有一个样式明显不合适,下面来简单的切换一下吧,先修改activity_personalized_map.xml
<?xml version="1.0" encoding="utf-8"?>
<RelativeLayout xmlns:android="http://schemas.android.com/apk/res/android"
    xmlns:app="http://schemas.android.com/apk/res-auto"
    xmlns:tools="http://schemas.android.com/tools"
    android:layout_width="match_parent"
    android:layout_height="match_parent"
    tools:context=".map.PersonalizedMapActivity">
    <!--地图样式选择-->
    <RadioGroup
        android:id="@+id/rp_style"
        android:layout_width="match_parent"
        android:layout_height="wrap_content"
        android:orientation="horizontal">

        <RadioButton
            android:id="@+id/rb_normal"
            android:layout_width="wrap_content"
            android:layout_height="wrap_content"
            android:buttonTint="#1296db"
            android:buttonTintMode="src_atop"
            android:text="经典" />

        <RadioButton
            android:id="@+id/rb_style_one"
            android:buttonTint="#1296db"
            android:checked="true"
            android:buttonTintMode="src_atop"
            android:layout_width="wrap_content"
            android:layout_height="wrap_content"
            android:text="烟翠" />

        <RadioButton
            android:id="@+id/rb_style_two"
            android:buttonTint="#1296db"
            android:buttonTintMode="src_atop"
            android:layout_width="wrap_content"
            android:layout_height="wrap_content"
            android:text="墨渊" />
    </RadioGroup>
    <!--个性化地图-->
    <com.tencent.tencentmap.mapsdk.maps.MapView
        android:layout_below="@+id/rp_style"
        android:id="@+id/mapView"
        android:layout_width="match_parent"
        android:layout_height="match_parent" />
</RelativeLayout>
修改PersonalizedMapActivity
private RadioGroup radioGroup;
继承RadioGroup.OnCheckedChangeListener

onCreate方法中增加
		radioGroup = findViewById(R.id.rp_style);
        radioGroup.setOnCheckedChangeListener(this);
然后重写onCheckedChanged方法
	@Override
    public void onCheckedChanged(RadioGroup group, int checkedId) {


        switch (checkedId) {


            case R.id.rb_normal://经典
                tencentMap.setMapStyle(2);
                break;
            case R.id.rb_style_one://烟翠
                tencentMap.setMapStyle(1);
                break;
            case R.id.rb_style_two://墨渊
                tencentMap.setMapStyle(3);
                break;
            default:
                break;
        }
    }
下面重新运行

OK,个性化地图就到这里了。
④ 地图覆盖物
下面还是单独新建一个MarkerActivity,布局为activity_marker.xml来演示这个覆盖物的内容,
1. 绘制点标记
点标记,是在地图上用来标记一个经纬度坐标的覆盖物。
右键点击res→ New → Android Resource File

然后在drawable下新建一个ic_add.xml
<?xml version="1.0" encoding="UTF-8" standalone="no"?>
<vector xmlns:android="http://schemas.android.com/apk/res/android"
    android:width="24dp"
    android:height="24dp"
    android:tint="#FFFFFF"
    android:viewportWidth="24.0"
    android:viewportHeight="24.0">
    <path
        android:fillColor="@android:color/white"
        android:pathData="M18,13h-5v5c0,0.55 -0.45,1 -1,1s-1,-0.45 -1,-1v-5H6c-0.55,0 -1,-0.45 -1,-1s0.45,-1 1,-1h5V6c0,-0.55 0.45,-1 1,-1s1,0.45 1,1v5h5c0.55,0 1,0.45 1,1s-0.45,1 -1,1z" />
</vector>
这是一个图标。
下面来看marker_menu.xml
<?xml version="1.0" encoding="utf-8"?>
<menu xmlns:android="http://schemas.android.com/apk/res/android"
    xmlns:app="http://schemas.android.com/apk/res-auto">
    <item
        android:icon="@drawable/ic_add"
        android:title="添加"
        app:showAsAction="always">
        <menu>
            <item
                android:id="@+id/menu_add_default_marker"
                android:title="添加默认标注"
                app:showAsAction="always" />
            <item
                android:id="@+id/menu_remove_marker"
                android:title="移除标注"
                app:showAsAction="always" />
        </menu>
    </item>
</menu>

当点击这个菜单时会出现两个选项,添加默认标注和移除标注,下面先在activity_marker.xml中放置一个地图。
<?xml version="1.0" encoding="utf-8"?>
<androidx.constraintlayout.widget.ConstraintLayout xmlns:android="http://schemas.android.com/apk/res/android"
    xmlns:app="http://schemas.android.com/apk/res-auto"
    xmlns:tools="http://schemas.android.com/tools"
    android:layout_width="match_parent"
    android:layout_height="match_parent"
    tools:context=".map.MarkerActivity">

    <com.tencent.tencentmap.mapsdk.maps.MapView
        android:id="@+id/mapView"
        android:layout_width="match_parent"
        android:layout_height="match_parent"/>

</androidx.constraintlayout.widget.ConstraintLayout>
然后进入MarkerActivity。
	private MapView mapView;
    private TencentMap tencentMap;
    private MapLifecycle mapLifecycle;

    //默认标注
    private Marker defaultMarker;
onCreate中
	@Override
    protected void onCreate(Bundle savedInstanceState) {


        super.onCreate(savedInstanceState);
        setContentView(R.layout.activity_marker);

        mapView = findViewById(R.id.mapView);
        tencentMap = mapView.getMap();
        mapLifecycle = new MapLifecycle(mapView);
        getLifecycle().addObserver(mapLifecycle);
    }
然后设置菜单
	/**
     * 创建选项菜单
     *
     * @param menu
     * @return
     */
    @Override
    public boolean onCreateOptionsMenu(Menu menu) {


        getMenuInflater().inflate(R.menu.marker_menu, menu);
        return super.onCreateOptionsMenu(menu);
    }
菜单的选中
	/**
     * 菜单选择
     *
     * @param item
     * @return
     */
    @Override
    public boolean onOptionsItemSelected(@NonNull MenuItem item) {


        switch (item.getItemId()) {


            case R.id.menu_add_default_marker:
                //添加默认标注点
                addDefaultMarker();
                break;
            case R.id.menu_remove_marker:
                //移除标注
                removeMarker();
                break;
            default:
                break;
        }
        return super.onOptionsItemSelected(item);
    }
添加默认标注点
	/**
     * 添加默认标注
     */
    private void addDefaultMarker() {


        LatLng latLng = new LatLng(22.540893, 113.949082);
        defaultMarker = tencentMap.addMarker(new MarkerOptions(latLng));
        //移动地图
        tencentMap.moveCamera(CameraUpdateFactory.newLatLng(latLng));
    }
移除标注
	/**
     * 移除标注
     */
    private void removeMarker() {


        if (defaultMarker != null) {


            defaultMarker.remove();
            defaultMarker = null;
        }
    }
然后修改一下Activity的顶部栏文字,打开AndroidManifest.xml。
每个Activity我都修改了它的label值

下面运行

可以看到默认的标注点也是灰不溜秋的。下面来使用自定义的标注看看。

看这个棒棒糖。放到drawable下,命名为marker.png,然后打开marker_menu.xml,增加一个item。
	 		<item
                android:id="@+id/menu_add_custom_marker"
                android:title="添加自定义标注"
                app:showAsAction="always" />
然后回到MarkerActivity中
	//自定义标注
    private Marker customMarker;
在onOptionsItemSelected方法,添加一个case
			case R.id.menu_add_custom_marker:
                //添加自定义标注
                addCustomMarker();
                break;
添加自定义标注
	/**
     * 添加自定义标注
     */
    private void addCustomMarker() {


        //创建Marker对象之前,设置属性
        LatLng latLng = new LatLng(40.011313,116.391907);
        BitmapDescriptor custom = BitmapDescriptorFactory.fromResource(R.drawable.marker);
        customMarker = tencentMap.addMarker(new MarkerOptions(latLng)
                //设置图标
                .icon(custom)
                //设置图标透明度
                .alpha(0.8f));
        //移动地图
        tencentMap.moveCamera(CameraUpdateFactory.newLatLng(latLng));
    }
在removeMarker中
		if (customMarker != null) {


            customMarker.remove();
            customMarker = null;
        }
下面运行

2. 绘制信息窗口
信息窗口,是依附于Marker之上的展现元素,用于对Marker进行详细描述,腾讯地图SDK默认提供的InfoWindow分标题和简述两部分,开发者也可以自定义InfoWindow,满足个性化场景的要求。
在marker_menu.xml中增加
			<item
                android:id="@+id/menu_add_default_info_window"
                android:title="添加默认信息窗口"
                app:showAsAction="always" />
MarkerActivity中
	//自定义标注 显示默认信息窗口
    private Marker customMarkerDefaultInfoWindow;
onOptionsItemSelected中增加case
			case R.id.menu_add_default_info_window:
                //添加默认信息窗口
                addDefaultInfoWindow();
                break;
添加默认信息窗口
	/**
     * 添加默认信息窗口
     */
    private void addDefaultInfoWindow(){


        //通过MarkerOptions配置
        LatLng latLng = new LatLng(39.908710,116.397499);
        MarkerOptions options = new MarkerOptions(latLng);
        options.title("天安门")//标注的InfoWindow的标题
                .snippet("地址: 北京市东城区东长安街")//标注的InfoWindow的内容
                .icon(BitmapDescriptorFactory.fromResource(R.drawable.marker));//设置自定义Marker图标
        customMarkerDefaultInfoWindow = tencentMap.addMarker(options);
        //开启信息窗口
        customMarkerDefaultInfoWindow.setInfoWindowEnable(true);
        //移动地图
        tencentMap.moveCamera(CameraUpdateFactory.newLatLng(latLng));
    }
removeMarker中
		if (customMarkerDefaultInfoWindow != null) {


            customMarkerDefaultInfoWindow.remove();
            customMarkerDefaultInfoWindow = null;
        }
运行

可以看到,当我点击标注时,会弹出一个小信息窗口,再点击则会关闭窗口。
当然这个窗口也是可以自定义的,下面来演示一下,首先在marker_menu.xml中添加item
			<item
                android:id="@+id/menu_add_custom_info_window"
                android:title="添加自定义信息窗口"
                app:showAsAction="always" />
然后在layout下新建一个custom_infowindow.xml
<?xml version="1.0" encoding="utf-8"?>
<LinearLayout xmlns:android="http://schemas.android.com/apk/res/android"
    android:orientation="vertical"
    android:layout_width="match_parent"
    android:background="@color/colorPrimary"
    android:layout_height="match_parent">
    <!--用于展示自定义信息窗的内容-->
    <TextView
        android:padding="12dp"
        android:id="@+id/tv_content"
        android:layout_width="wrap_content"
        android:layout_height="wrap_content"
        android:layout_gravity="center_horizontal"
        android:textColor="#ffffff"
        android:textSize="14sp"/>
</LinearLayout>
下面进入MarkerActivity中
	//自定义标注 显示自定义信息窗口
    private Marker customMarkerCustomInfoWindow;
在onOptionsItemSelected中增加case
			case R.id.menu_add_custom_info_window:
                //添加自定义信息窗口
                addCustomInfoWindow();
                break;
添加自定义信息窗口,以及窗口的点击事件
	/**
     * 添加自定义信息窗口
     */
    private void addCustomInfoWindow() {


        //上海虹桥机场经纬度
        LatLng latLng = new LatLng(31.19590, 121.34113);
        MarkerOptions options = new MarkerOptions(latLng);
        options.title("上海市")//标注的InfoWindow的标题
                .snippet("地址: 虹桥机场")//标注的InfoWindow的内容
                .icon(BitmapDescriptorFactory.fromResource(R.drawable.marker));
        customMarkerCustomInfoWindow = tencentMap.addMarker(options);
        //移动地图
        tencentMap.moveCamera(CameraUpdateFactory.newLatLng(latLng));
        //设置自定义信息窗口
        tencentMap.setInfoWindowAdapter(new TencentMap.InfoWindowAdapter() {


            @Override
            public View getInfoWindow(Marker marker) {


                return createCustomInfoView(marker);
            }

            @Override
            public View getInfoContents(Marker marker) {


                return createCustomInfoView(marker);
            }

            private View createCustomInfoView(Marker marker) {


                LinearLayout mCustomInfoWindowView = (LinearLayout) View.inflate(
                        getApplicationContext(), R.layout.custom_infowindow, null);
                TextView tvContent = mCustomInfoWindowView.findViewById(R.id.tv_content);
                //设置自定义信息窗的内容
                tvContent.setText("自定义信息窗口:");
                tvContent.append("\n" + marker.getTitle());
                tvContent.append("\n" + marker.getSnippet());
                return mCustomInfoWindowView;
            }
        });
        //窗口点击事件
        tencentMap.setOnInfoWindowClickListener(new TencentMap.OnInfoWindowClickListener() {


            @Override
            public void onInfoWindowClick(Marker marker) {


                Toast.makeText(getApplicationContext(), "信息窗被点击\n" + marker.getTitle(), Toast.LENGTH_SHORT).show();
            }

            @Override
            public void onInfoWindowClickLocation(int i, int i1, int i2, int i3) {


                Toast.makeText(getApplicationContext(),
                        "尺寸:" + i + "x" + i1 + " 位置:" + i2 + "," + i3, Toast.LENGTH_SHORT).show();
            }
        });
    }
removeMarker中
		//移除自定义标注  显示自定义信息窗口
        if (customMarkerCustomInfoWindow != null) {


            customMarkerCustomInfoWindow.remove();
            customMarkerCustomInfoWindow = null;
        }
运行一下:

OK,运行效果很明显了。
⑤ 地图设置
下面来说明一些地图设置
1. 设置地图缩放等级
腾讯地图的文档在这方面的讲述还是不够详细。地图的设置,就用BaseMapActivity来演示。在initView中
		//设置最大缩放等级 最大值 20 最小值 1
        tencentMap.setMaxZoomLevel(20);
        //设置最小缩放等级 最大值 20 最小值 1
        tencentMap.setMinZoomLevel(20);

这里设置最大和最小的缩放等级一致,此时的地图再进行放大和缩小的,运行一下,看看是什么样子。

20已经是最大的缩放了,最小是1
下面来改变一下最小缩放等级为12
tencentMap.setMinZoomLevel(12);
运行一下

你会发现这和你不设置最大和最小时的缩放是一样说的,这说明了12就是默认的缩放等级,而这个地图在设置了最小缩放等级之后以最小的为准,下面改成16看看
tencentMap.setMinZoomLevel(16);

从这个图就可以验证我上面说的。
地图的缩放就说到这里了,更多的自行尝试。
2. 设置3D地图
之前我下载的是3D的地图SDK,下面就来设置3D效果。
		//设置最小缩放等级 最大值 20 最小值 1
        tencentMap.setMinZoomLevel(18);
		//启用3D视图
        tencentMap.setBuilding3dEffectEnable(true);
运行一下:

设置为最小缩放为18看到的3D效果会比较好。
3. 地图logo设置
在使用地图 SDK 时,按照腾讯地图开放API服务协议要求始终保持logo 是可见的,不允许对腾讯地图的 logo 进行遮盖、修改等弱化地图品牌的行为。虽然无法隐藏但是可以放大和缩小,比例范围(0.7~1.3)。
		//获取地图UI设置对象
        UiSettings uiSettings = tencentMap.getUiSettings();
        //设置logo的大小   比例范围(0.7~1.3)
        uiSettings.setLogoScale(0.7f);
通过tencentMap.getUiSettings()获取UiSettings 对象实例,然后设置logg的缩放,先看看最小的。

然后看看最大的
uiSettings.setLogoScale(1.3f);

最好自己设置看一下实际的效果。
设置地图logo的显示位置。
		//设置logo底部底部居中
        uiSettings.setLogoPosition(TencentMapOptions.LOGO_POSITION_BOTTOM_CENTER);

当然它还有别的属性

还有更加精细的设置,就是控制logo的显示距离
		//设置logo左下角显示同时设置与MapView的左边距和下边距为100
        uiSettings.setLogoPosition(TencentMapOptions.LOGO_POSITION_BOTTOM_LEFT, new int[]{

    100, 100});
效果图如下:

刚才演示了左下角logo,还有右下、左上、右上的可以自行去测试。
4. 比例尺设置
比例尺是表示图上一条线段的长度与地面相应线段的实际长度之比,是地图使用过程中帮助用户了解实际距离不可缺少的工具。在地图 SDK 中,比例尺只有在地图缩放时才会淡入展示,当地图停止缩放会淡出消失,所以虽然比例尺是默认打开的,但在地图静止时用户可能看不到比例尺。
比例尺是允许关闭不显示出来的。
		//设置比例尺不显示
        uiSettings.setScaleViewEnabled(false);
设置之后你现在缩放地图,比例尺不会再出现了。同时你还可以设置比例尺的显示位置,
		//设置比例尺显示在右下角
        uiSettings.setScaleViewPosition(TencentMapOptions.SCALEVIEW_POSITION_BOTTOM_RIGHT);
改为true显示之后,运行一下,由于比例尺是不缩放就隐藏的,所以不好截图说明,这里用GIF来说明。

可以看到已经在右下角了。这个也是可以设置边距的,不过稍微和logo有一些不同,通过setScaleViewPositionWithMargin进行设置,参数如下:
setScaleViewPositionWithMargin(int position, int top, int bottom, int left, int right)
5. 指南针设置
可以指示地图的南北方向,默认是关闭的状态,并且该控件的默认点击事件会将地图视图的俯仰角和偏航角动画到0的位置。
这个也是可以控制是否显示的,默认是不显示。
		//设置指南针是否显示 true显示, false不显示,不设置则为默认值,默认为false
        uiSettings.setCompassEnabled(true);

默认显示时显示在左上角,它的位置在左上角,没有直接的API可供你显示在其他的位置,不是你可以可以改变它与mapView的距离。
		//设置指南针的填充值。设置指南针上边缘距离 MapView 上边缘的距离为100px
        uiSettings.setCompassExtraPadding(100);

你还可以再设置一个参数,就可以改变左边的距离了。
//设置指南针距离 MapView 左边缘和上边缘的距离
setCompassExtraPadding(int xPadding, int yPadding)
如果你还想让这个指南针显示在屏幕的其他配置,可以通过计算屏幕的宽高来进行处理。
6. 缩放按钮设置
其实腾讯的地图SDK中是有缩放控件的,只不过文档中好像没有提高了,以为API中已经弃用了,不过还是有效果的。
		//设置缩放控件是否显示,true显示,false不显示,不设置则为默认值,默认为false
        uiSettings.setZoomControlsEnabled(true);
然后运行。

emmm…有一说一,这个控件挺丑的,难怪弃用了。虽然弃用了,但是它也是可以改变显示的位置的。
		//设置缩放控件显示在左下角
        uiSettings.setZoomPosition(TencentMapOptions.ZOOM_POSITION_BOTTOM_LEFT);

不知道你有没有注意到,它显示在左下角时的高度比右下角要低,于是可以想到一个问题,那就是右下角的比例尺实际上还是占据了高度的,只不过是控件隐藏了,就如同android:visibility="invisible"一样,占据了高度,但是不显示。
六、源码
源码地址:TencentPositionServiceDemo
总结
这篇博客花了我挺多时间和精力的,希望能对您有所帮助,山高水长,后会有期~