

之前利用sobel算子得到的边缘检测结果,物体的阴影、纹理等位置也会被描上黑边,这不是我们想要的结果,本节将在深度和法线纹理上进行边缘检测,这些图像吐会收到纹理和光照的影响,而仅仅保存了当前渲染物体的模型信息。
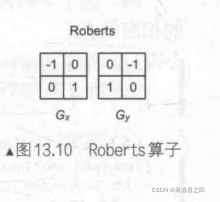
Robert算子:Roberts算子的本质就是计算左上角和右下角的差值,乘以右上角和左下角的差值,作为评估边缘的依据。在下面的实现中,我们也会按这样的方式,取对角方向的深度或法线值,比较它们之间的差值,如果超过某个阈值(可由参数控制),就认为它们之间存在一条边。
后处理代码:
using UnityEngine;
using System.Collections;

public class EdgeDetectNormalsAndDepth : PostEffectsBase {

	public Shader edgeDetectShader;
	private Material edgeDetectMaterial = null;
	public Material material {
		get {
			edgeDetectMaterial = CheckShaderAndCreateMaterial(edgeDetectShader, edgeDetectMaterial);
			return edgeDetectMaterial;
		}
	}

	[Range(0.0f, 1.0f)]
	public float edgesOnly = 0.0f;    //调整边缘强度

	public Color edgeColor = Color.black;    //描边颜色

	public Color backgroundColor = Color.white;    //背景色

	public float sampleDistance = 1.0f;    //控制采样距离,值越大,描边越宽

	public float sensitivityDepth = 1.0f;    //深度灵敏度参数

	public float sensitivityNormals = 1.0f;    //法线灵敏度参数
    //当灵敏度参数大时,即使深度或法线上很小的变化也会形成一条边

    //由于需要调用摄像机的深度+法线纹理,所以要设置摄像机的相应状态
	void OnEnable() {
		GetComponent<Camera>().depthTextureMode |= DepthTextureMode.DepthNormals;
	}

	[ImageEffectOpaque]
	void OnRenderImage (RenderTexture src, RenderTexture dest) {
		if (material != null) {
			material.SetFloat("_EdgeOnly", edgesOnly);
			material.SetColor("_EdgeColor", edgeColor);
			material.SetColor("_BackgroundColor", backgroundColor);
			material.SetFloat("_SampleDistance", sampleDistance);
			material.SetVector("_Sensitivity", new Vector4(sensitivityNormals, sensitivityDepth, 0.0f, 0.0f));

			Graphics.Blit(src, dest, material);
		} else {
			Graphics.Blit(src, dest);
		}
	}
}
[ImageEffectOpaque]属性:
在默认情况下,OnRenderlmage函数会在所有的不透明和透明的Pass执行完毕后被调用,以便对场景中所有游戏对象都产生影响。但有时,我们希望在不透明的Pass (即渲染队列小于等于2500的Pass,内置的Background、Geometry 和AlphaTest渲染队列均在此范围内)执行完毕后立即调用该函数,而不对透明物体(渲染队列为Transparent的Pass)产生影响,此时,我们可以在OnRenderImage函数前添加ImageffectOpaque属性来实现这样的目的。
在本例中,我们只希望对不透明物体进行描边,而不希望透明物体也被描边,因此需要添加该属性。
Shader代码:
Shader "Unity Shaders Book/Chapter 13/Edge Detection Normals And Depth" {
	Properties {
		_MainTex ("Base (RGB)", 2D) = "white" {}
		_EdgeOnly ("Edge Only", Float) = 1.0
		_EdgeColor ("Edge Color", Color) = (0, 0, 0, 1)
		_BackgroundColor ("Background Color", Color) = (1, 1, 1, 1)
		_SampleDistance ("Sample Distance", Float) = 1.0
		_Sensitivity ("Sensitivity", Vector) = (1, 1, 1, 1)    //xy分量分别对应法线和深度的检测灵敏度,zw分量没有实际用途
	}
	SubShader {
		CGINCLUDE

		#include "UnityCG.cginc"

		sampler2D _MainTex;
		half4 _MainTex_TexelSize;    //由于需要对邻域像素进行采样,所以声明存储纹素大小的变量
		fixed _EdgeOnly;
		fixed4 _EdgeColor;
		fixed4 _BackgroundColor;
		float _SampleDistance;
		half4 _Sensitivity;

		sampler2D _CameraDepthNormalsTexture;    //深度+法线纹理

		struct v2f {
			float4 pos : SV_POSITION;
			half2 uv[5]: TEXCOORD0;
		};

		v2f vert(appdata_img v) {
			v2f o;
			o.pos = UnityObjectToClipPos(v.vertex);

			half2 uv = v.texcoord;
			o.uv[0] = uv;

			#if UNITY_UV_STARTS_AT_TOP
			if (_MainTex_TexelSize.y < 0)
				uv.y = 1 - uv.y;
			#endif

			o.uv[1] = uv + _MainTex_TexelSize.xy * half2(1,1) * _SampleDistance;
			o.uv[2] = uv + _MainTex_TexelSize.xy * half2(-1,-1) * _SampleDistance;
			o.uv[3] = uv + _MainTex_TexelSize.xy * half2(-1,1) * _SampleDistance;
			o.uv[4] = uv + _MainTex_TexelSize.xy * half2(1,-1) * _SampleDistance;

			return o;
		}

		half CheckSame(half4 center, half4 sample) {
			half2 centerNormal = center.xy;
			float centerDepth = DecodeFloatRG(center.zw);
			half2 sampleNormal = sample.xy;
			float sampleDepth = DecodeFloatRG(sample.zw);

			// difference in normals
			// do not bother decoding normals - there's no need here
			half2 diffNormal = abs(centerNormal - sampleNormal) * _Sensitivity.x;
			int isSameNormal = (diffNormal.x + diffNormal.y) < 0.1;
			// difference in depth
			float diffDepth = abs(centerDepth - sampleDepth) * _Sensitivity.y;
			// scale the required threshold by the distance
			int isSameDepth = diffDepth < 0.1 * centerDepth;

			// return:
			// 1 - if normals and depth are similar enough
			// 0 - otherwise
			return isSameNormal * isSameDepth ? 1.0 : 0.0;
		}

		fixed4 fragRobertsCrossDepthAndNormal(v2f i) : SV_Target {
			half4 sample1 = tex2D(_CameraDepthNormalsTexture, i.uv[1]);
			half4 sample2 = tex2D(_CameraDepthNormalsTexture, i.uv[2]);
			half4 sample3 = tex2D(_CameraDepthNormalsTexture, i.uv[3]);
			half4 sample4 = tex2D(_CameraDepthNormalsTexture, i.uv[4]);

			half edge = 1.0;

			edge *= CheckSame(sample1, sample2);
			edge *= CheckSame(sample3, sample4);

			fixed4 withEdgeColor = lerp(_EdgeColor, tex2D(_MainTex, i.uv[0]), edge);
			fixed4 onlyEdgeColor = lerp(_EdgeColor, _BackgroundColor, edge);

			return lerp(withEdgeColor, onlyEdgeColor, _EdgeOnly);
		}

		ENDCG

		Pass {
			ZTest Always Cull Off ZWrite Off

			CGPROGRAM

			#pragma vertex vert
			#pragma fragment fragRobertsCrossDepthAndNormal

			ENDCG
		}
	}
	FallBack Off
}
顶点着色器:在v2f结构体中定义了一个维数为5的纹理坐标数组。这个数组的第一个坐标存储了屏幕颜色图像的采样纹理。我们对深度纹理的采样坐标进行了平台差异化处理,在必要情况下对它的竖直方向进行了翻转。数组中剩余的4个坐标则存储了使用Roberts算子时需要采样的纹理坐标,我们还使用了_SampleDistance 来控制采样距离。通过把计算采样纹理坐标的代码从片元着色器中转移到顶点着色器中,可以减少运算,提高性能。由于从项点着色器到片元着色器的插值是线性的,因此这样的转移并不会影响纹理坐标的计算结果。

片元着色器:我们首先使用4个纹理坐标对深度+法线纹理进行采样,再调用CheckSame函数来分别计算对角线上两个纹理值的差值。CheckSame 函数的返回值要么是0,要么是1,返回0时表明这两点之间存在一条边界,反之则返回1。
CheckSame首先对输入参数进行处理,得到两个采样点的法线和深度值。值得注意的是,这里我们并没有解码得到真正的法线值,而是直接使用了xy分量。这是因为我们只需要比较两个采样值之间的差异度,而并不需要知道它们真正的法线值。然后,我们把两个采样点的对应值相减并取绝对值,再乘以灵敏度参数,把差异值的每个分量相加再和一个阈值比较,如果它们的和小于阈值,则返回1,说明差异不明显,不存在一条边界;否则返回0。最后,我们把法线和深度的检查结果相乘,作为组合后的返回值。
本节实现的描边效果是基于整个屏幕空间进行的,也就是说,场景内的所有物体都会被添加描边效果。但有时,我们希望只对特定的物体进行描边,例如当玩家选中场景中的某个物体后,我们想要在该物体周围添加一层描边效果。这时,我们可以使用Unity 提供的Graphics.DrawMesh 或Graphics.DrawMeshNow函数把需要描边的物体再次渲染一遍(在所有不透明物体渲染完毕之后),然后再使用本节提到的边缘检测算法计算深度或法线纹理中每个像素的梯度值,判断它们是否小于某个阈值,如果是,就在Shader中使用clip()函数将该像素剔除掉,从而显示出原来的物体颜色。