如果我们把 led 按键 的代码都放在一起,那就太乱了,也不方便管理,也不容易移植,所以对于驱动代码而言,我们一般都会把它封装起来 ,单独放在另外的.c 和 .h文件里——这就是 模块化编程
我们新建一个 Hardware 用于驱动

然后在Keil5里也新建一个Hardware组
![]()
然后再Keil5里的Hardware里添加新的文件
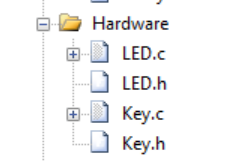
一样的.c用于放主体代码,而.h用于存放驱动程序的函数或变量声明
#ifndef __LED_H ——防止头文件重复包含的代码
#endif 这个是和上面的这个组成的括号,函数和变量声明就放在这个括号里面(文件要以空行结尾)
下面是led.c的文件,初始化,开关灯
#include "stm32f10x.h"                  // Device header
//我们只要调用LED_Init函数就可以直接初始化完成了
void LED_Init(void)
{
	//开启时钟,使能
	RCC_APB2PeriphClockCmd(RCC_APB2Periph_GPIOB, ENABLE);

	//配置端口模式,配置一个结构体,并引出结构体成员
	GPIO_InitTypeDef GPIO_InitStructure;
	GPIO_InitStructure.GPIO_Mode = GPIO_Mode_Out_PP;
	GPIO_InitStructure.GPIO_Pin = GPIO_Pin_0 | GPIO_Pin_1;
	GPIO_InitStructure.GPIO_Speed = GPIO_Speed_50MHz;

	//最后调用GPIOINIT函数,初始化GPIOB外设,使用地址传递
	GPIO_Init(GPIOB, &GPIO_InitStructure);

	//这样不操作一开始就是亮的
	GPIO_ResetBits(GPIOB, GPIO_Pin_0| GPIO_Pin_1);
}

//熄灭LED1
void LED1_ON(void)
{
	GPIO_ResetBits(GPIOB, GPIO_Pin_0);
}

//点亮
void LED1_OFF(void)
{
	GPIO_SetBits(GPIOB, GPIO_Pin_0);
}


void LED2_ON(void)
{
	GPIO_ResetBits(GPIOB, GPIO_Pin_1);
}

void LED2_OFF(void)
{
	GPIO_SetBits(GPIOB, GPIO_Pin_1);
}
然后在led.h文件里声明一下,再在主函数里调用
#ifndef __LED_H
#define __LED_H
//这样就是声明可以使用了
void LED_Init(void);

void LED1_ON(void);
void LED1_OFF(void);

void LED2_ON(void);
void LED2_OFF(void);


#endif
接下来就来写按键的代码了(Key)
同样先写上基本框架
#ifndef __KEY_H
#define __KEY_H


#endif
然后再key.c文件里写上按键初始化函数,从STM32(一)上看到,我们的按键是在A上的,所以我们在里面是使A使能(PA0 PA8)
在然后再来看一个四个 uint 读取函数
1. GPIO_ReadinputDataBit : 读取输入数据寄存器某一个端口的输入值
2.GPIO_ReadInputData : 读取整个寄存器
下面的是输出
3.GPIO_ReadOutPutDataBit:读取输出寄存器一个输出值
4.意思一样
下面就是key.c的代码
#include "stm32f10x.h"                  // Device header
#include "Delay.h"

//初始化
void Key_Init(void)
{
	RCC_APB2PeriphClockCmd(RCC_APB2Periph_GPIOA, ENABLE);

	GPIO_InitTypeDef GPIO_InitStructure;
	GPIO_InitStructure.GPIO_Mode = GPIO_Mode_IPU;
	GPIO_InitStructure.GPIO_Pin = GPIO_Pin_1 | GPIO_Pin_11;
	GPIO_InitStructure.GPIO_Speed = GPIO_Speed_50MHz;
	GPIO_Init(GPIOA, &GPIO_InitStructure);
}

//读取按键值的函数
uint8_t Key_GetNum(void)
{
	uint8_t KeyNum = 0;
	//中间就需要读取GPIO口的功能了,我们读取一个端口(某一位)就可
	if (GPIO_ReadInputDataBit(GPIOA, GPIO_Pin_0) == 0)
	{
		//去除机械抖动
		Delay_ms(20);

		//只有松手才有用,如果按键一直按下,就没用
		while (GPIO_ReadInputDataBit(GPIOA, GPIO_Pin_0) == 0);
		Delay_ms(20);

		//改变值
		KeyNum = 1;
	}
	if (GPIO_ReadInputDataBit(GPIOA, GPIO_Pin_8) == 0)
	{
		Delay_ms(20);
		while (GPIO_ReadInputDataBit(GPIOA, GPIO_Pin_8) == 0);
		Delay_ms(20);
		KeyNum = 2;
	}

	//作为返回值
	return KeyNum;
}
下面是key.h的声明
#ifndef __KEY_H
#define __KEY_H

void Key_Init(void);
uint8_t Key_GetNum(void);

#endif
接下来,我们再在led.c里补充一个函数,让我们按钮按下后状态取反
void LED1_Turn(void)
{
	if (GPIO_ReadOutputDataBit(GPIOB, GPIO_Pin_0) == 0)
	{
		GPIO_SetBits(GPIOB, GPIO_Pin_0);
	}
	else
	{
		GPIO_ResetBits(GPIOB, GPIO_Pin_0);
	}
}
这就是调用这个函数,读取当前端口的输出状态
最后就是我们的主函数效果
如下
#include "stm32f10x.h"                  // Device header
#include "Delay.h"
#include "LED.h"
#include "Key.h"

uint8_t KeyNum;

int main(void)
{
	//led初始化
	LED_Init();
	Key_Init();

	while (1)
	{
		//不断读取按键值,放在KeyNum里
		KeyNum = Key_GetNum();
		//按键1 按下
		if (KeyNum == 1)
		{
			//就是一个翻转
			LED1_Turn();
		}
		if (KeyNum == 2)
		{
			LED2_Turn();
		}
	}
}