首先写一个简单的猜大小的智能合约 名字叫Game
定义了两个事件 一个是NewPlayer 一个是 PlayGame
在remix将这个合约编译,拿到ABI,在本地保存为json文件。然后部署合约,拿到地址。然后自己去交互下,触发一些事件。
和合约集成的要点是:合约ABI, 部署地址,event参数和类型。有了这些就可以监测合约里所有的设定事件。
// SPDX-License-Identifier: MIT
pragma solidity ^0.8.7;

contract Game {


    address Owner;
    uint public bet;
    address[] public  players;
    mapping(address=>bool) public haswon;
    event NewPlayer(address player);
    event PlayGame(address player,uint256 value, bool hasWon);
    constructor() {


        Owner = msg.sender;
    }
    modifier onlyOwner {


        require(msg.sender == Owner,"only owner can set a bet");
        _;
    }
    function setbet(uint betnum)public onlyOwner{


        bet  = betnum;
    }
    function play(uint guess) public  returns (bool){


        if (isnewgamer()){


            emit NewPlayer(msg.sender);
        }

        if (bet == guess){


            haswon[msg.sender]= true;
            emit PlayGame(msg.sender,guess,haswon[msg.sender]);
            return true;
        }else{


            haswon[msg.sender]=false;
            emit PlayGame(msg.sender,guess,haswon[msg.sender]);
            return false;
        }
    }
    function isnewgamer() public   returns (bool){


           for(uint i = 0;i<players.length;i++){


            if(players[i]==msg.sender){


                return false;
            }
        }
        players.push(msg.sender);
        return true;

    }
}
然后在thegraph官网创建一个坑位。

install这一步我已经做过了
npm install -g @graphprotocol/graph-cli
就从init开始
graph init --product hosted-service metaverseman/game
cd game
graph codegen && graph build
graph init --product hosted-service metaverseman/game
✔ Protocol · ethereum
✔ Subgraph name · metaverseman/game
✔ Directory to create the subgraph in · game
? Ethereum network …
? Ethereum network …
? Ethereum network …
? Ethereum network …
✔ Ethereum network · rinkeby
✔ Contract address · 0xe5dad21DFb2566784803816fDe4C615b6fb75e95
✖ Failed to fetch ABI from Etherscan: ABI not found, try loading it from a local file
✔ ABI file (path) · /Users/hanpeng/Documents/subgraph/gamejson/gameabi.json
✔ Contract Name · Game
———
  Generate subgraph
  Write subgraph to directory
✔ Create subgraph scaffold
✔ Initialize networks config
✔ Initialize subgraph repository
✔ Install dependencies with yarn
✔ Generate ABI and schema types with yarn codegen
✔ Add another contract? (y/N) · false

Subgraph metaverseman/game created in game

Next steps:

  1. Run `graph auth` to authenticate with your deploy key.

  2. Type `cd game` to enter the subgraph.

  3. Run `yarn deploy` to deploy the subgraph.

Make sure to visit the documentation on https://thegraph.com/docs/ for further information.
hanpeng@hanpeng ~ % cd game
hanpeng@hanpeng game % ls
abis		node_modules	src		tsconfig.json
generated	package.json	subgraph.yaml	yarn.lock
networks.json	schema.graphql	tests
hanpeng@hanpeng game % vim subgraph.yaml
hanpeng@hanpeng game % vim subgraph.yaml
hanpeng@hanpeng game % cd src
hanpeng@hanpeng src % ls
game.ts
hanpeng@hanpeng src % vim game.ts
此时查看
subgraph.yaml
schema.graphql
src/game.ts
game/generated/schema.ts
主要看schema.graphql 和 game.ts
这个时候chema.graphql 应该只有一个ExampleEntity
type ExampleEntity @entity {


  id: ID!
  count: BigInt!
  player: Bytes! # address
}
而对应的game/generated/schema.ts也只有一个
export class ExampleEntity extends Entity {

    ...}
现在看清楚了初始配置。就可以去按着自己的业务需求修改以上提到的文档了。
在schema.graphql新增NewPlayer和PlayGame
type ExampleEntity @entity {


  id: ID!
  count: BigInt!
  player: Bytes! # address
}
type NewPlayer @entity {


  id: ID!
  address: String
}
type PlayGame @entity {


  id: ID!
  address: String
  value: Int
  haswon: Boolean
}
然后重新graph codegen && graph build
这个时候对应的game/generated/schema.ts也会生成对应的
export class NewPlayer extends Entity{

    ...}
export class PlayGame extends Entity{

    ...}
然后开始编写src/game.ts。
在编写game.ts的时候 虽然在schema.graphql那里添加了对应的实体,但是这里的import { ExampleEntity } from “…/generated/schema” 不会自动引入你编写的实体(试了好多次都不行)最后只能自己加上。
如果不改,那么你引用 NewPlayer, PlayGame 引用的不是实体而是event
所以是无法引用load函数的。

将上边的import手动修改。
将:
import {

     BigInt } from "@graphprotocol/graph-ts"
import {

     Game, NewPlayer, PlayGame } from "../generated/Game/Game"
import {

     ExampleEntity } from "../generated/schema"
改为:
import {

     BigInt } from "@graphprotocol/graph-ts"
import {

     Game,NewPlayer as NewPlayerEvent,PlayGame as PlayGameEvent } from "../generated/Game/Game"
import {

     ExampleEntity,NewPlayer,PlayGame } from "../generated/schema"
这个时候在下边的代码部分去引用实体的字段值的时候就可以引用到了。
src/game.ts代码非常重要,它关系到你能否正确记录event数据到subgraph,编写不合适的话,那么你记录的数据就是缺少字段的。(比如我调试的时候address的字段就一直是NULL,真的拴Q)来看下整体的game.ts的代码。
import {

     BigInt } from "@graphprotocol/graph-ts"
import {

     Game,NewPlayer as NewPlayerEvent,PlayGame as PlayGameEvent } from "../generated/Game/Game"
import {

     ExampleEntity,NewPlayer,PlayGame } from "../generated/schema"

export function handleNewPlayer(event: NewPlayerEvent): void {


  // Entities can be loaded from the store using a string ID; this ID
  // needs to be unique across all entities of the same type
  let id = event.transaction.hash.toHex()
  // let id = event.params.id
  // let entity = ExampleEntity.load(event.transaction.from.toHex())
  let entity = NewPlayer.load(id)
  // Entities only exist after they have been saved to the store;
  // `null` checks allow to create entities on demand
  if (!entity) {


    entity = new NewPlayer(id)
  }

  // BigInt and BigDecimal math are supported
  // entity.address = event.params.player.at.toString()
  entity.address = event.params.player.toString()
  // Entities can be written to the store with `.save()`
  entity.save()

  // Note: If a handler doesn't require existing field values, it is faster
  // _not_ to load the entity from the store. Instead, create it fresh with
  // `new Entity(...)`, set the fields that should be updated and save the
  // entity back to the store. Fields that were not set or unset remain
  // unchanged, allowing for partial updates to be applied.

  // It is also possible to access smart contracts from mappings. For
  // example, the contract that has emitted the event can be connected to
  // with:
  //
  // let contract = Contract.bind(event.address)
  //
  // The following functions can then be called on this contract to access
  // state variables and other data:
  //
  // - contract.isnewgamer(...)
  // - contract.play(...)
  // - contract.bet(...)
  // - contract.haswon(...)
  // - contract.players(...)
}

export function handlePlayGame(event: PlayGameEvent): void {


  let id = event.transaction.hash.toHex()
  let entity = PlayGame.load(id)
  if (!entity) {


    entity = new PlayGame(id)
  }
   // BigInt and BigDecimal math are supported
  //  entity.address = event.params.player.toString()
   entity.address = event.params.player.toHexString()

   // Entity fields can be set based on event parameters
   entity.value = event.params.value.toI32()
   entity.haswon = event.params.hasWon

   // Entities can be written to the store with `.save()`
   entity.save()
}
game.ts是使用assemblyscript编写的。不熟练的话可以自己找资料学习一下。我是比较不熟练的。。。写好后,只要vscode不报错就可以部署了。
graph codegen && graph build
graph auth --product hosted-service xxxxxxxxxx(在你的subgraph网页上复制)
graph deploy --product hosted-service metaverseman/game
然后
hanpeng@hanpeng game % graph deploy --product hosted-service metaverseman/game
⠋ Apply migrations(node:76651) ExperimentalWarning: The Fetch API is an experimental feature. This feature could change at any time
(Use `node --trace-warnings ...` to show where the warning was created)
  Skip migration: Bump mapping apiVersion from 0.0.1 to 0.0.2
  Skip migration: Bump mapping apiVersion from 0.0.2 to 0.0.3
  Skip migration: Bump mapping apiVersion from 0.0.3 to 0.0.4
  Skip migration: Bump mapping apiVersion from 0.0.4 to 0.0.5
  Skip migration: Bump mapping apiVersion from 0.0.5 to 0.0.6
  Skip migration: Bump manifest specVersion from 0.0.1 to 0.0.2
  Skip migration: Bump manifest specVersion from 0.0.2 to 0.0.4
✔ Apply migrations
✔ Load subgraph from subgraph.yaml
  Compile data source: Game => build/Game/Game.wasm
✔ Compile subgraph
  Copy schema file build/schema.graphql
  Write subgraph file build/Game/abis/Game.json
  Write subgraph manifest build/subgraph.yaml
✔ Write compiled subgraph to build/
  Add file to IPFS build/schema.graphql
                .. Qmc8mBqzRArjzreqnyBF4PEargATRKuaLesmGm7vbXALQ8
  Add file to IPFS build/Game/abis/Game.json
                .. QmapPy7RyHEGVX7Fpp8ZgjdeeDXGN3JA2xnvJzbV78R2rP
  Add file to IPFS build/Game/Game.wasm
                .. QmdW8vg7vvPJBXnPxx3dQURBdi3Peq3yiKCJSdbYsjdddG
✔ Upload subgraph to IPFS

Build completed: QmZVKfWzp8Z1gZsaF5AxtgYVg7SVCTDftPRebVDQ2Y4Yc4

Deployed to https://thegraph.com/explorer/subgraph/metaverseman/game

Subgraph endpoints:
Queries (HTTP):     https://api.thegraph.com/subgraphs/name/metaverseman/game
然后就可以在他给你的
Subgraph endpoints:
Queries (HTTP): https://api.thegraph.com/subgraphs/name/metaverseman/game
去查询了。这个时候你的subgraph的网页也会变为
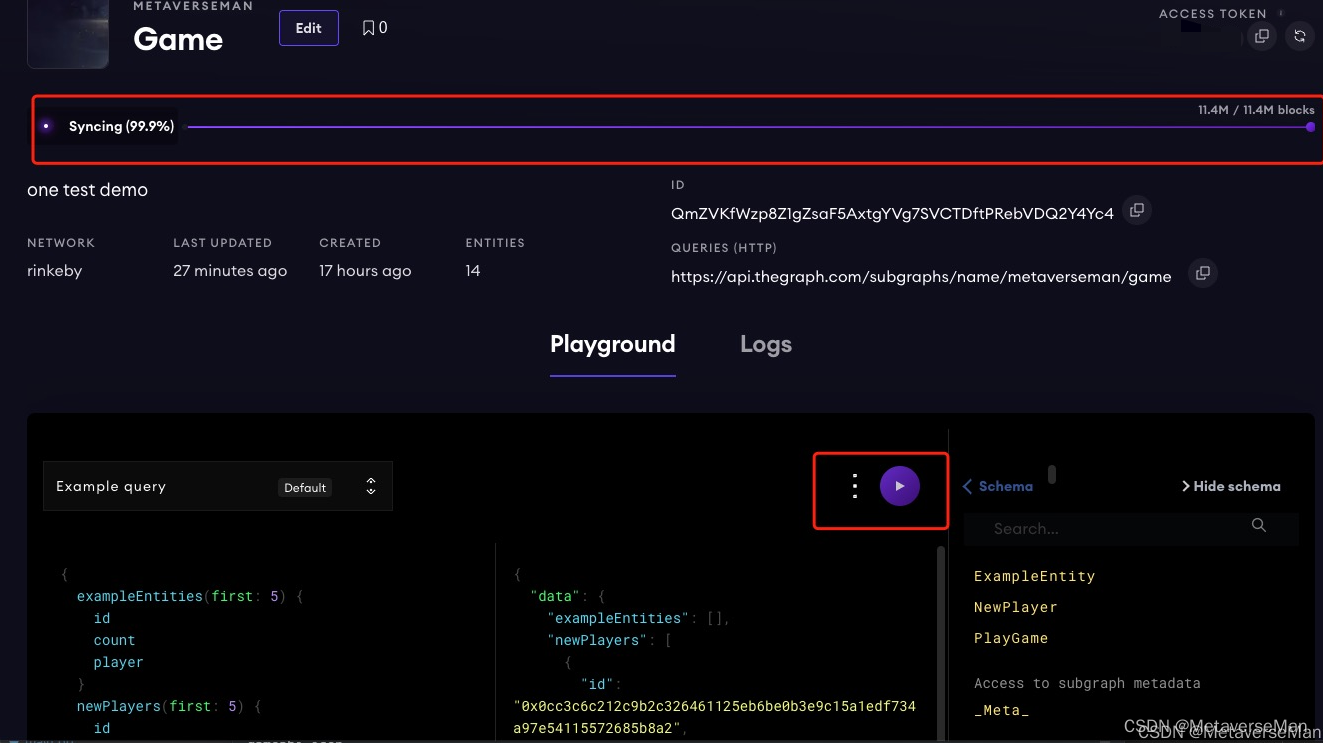
这个时候刚开始块同步是需要时间的(10-20min)
同步完了

此时就可以进行查询了。
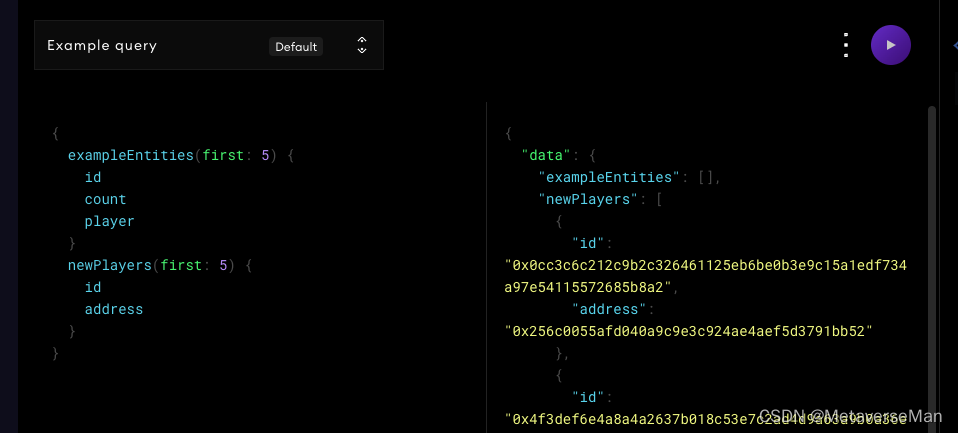
注意关于地址的记录 在编写game.ts的时候要用toHexString()
最简单查询的时候仿照给出的例子,将字段列出就可以了.
GraphQL API 提供了多个查询后缀:
_not
_gt
_lt
_gte
_lte
_in
_not_in
_contains
_not_contains
_starts_with
_ends_with
_not_starts_with
_not_ends_with
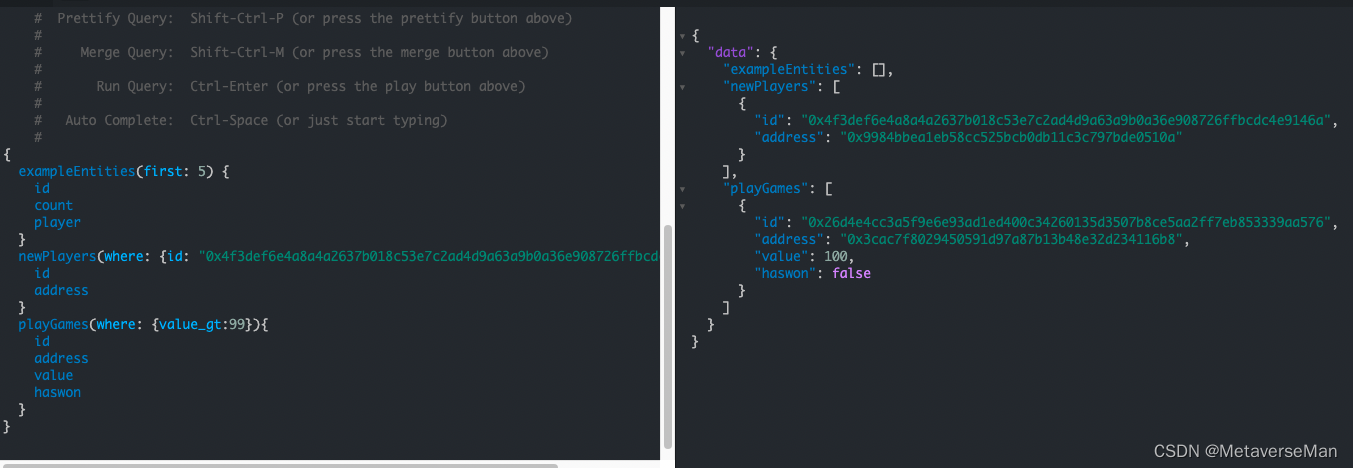
使用示例:如果想要查询 newPlayers ID 为“0x4f3def6e4a8a4a2637b018c53e7c2ad4d9a63a9b0a36e908726ffbcdc4e9146a”,playGames value 大于 99 的,则是这么写:
{


  newPlayers(where: {

    id: "0x4f3def6e4a8a4a2637b018c53e7c2ad4d9a63a9b0a36e908726ffbcdc4e9146a"}){


    id
    address
  }
  playGames(where: {

    value_gt:99}){


    id
    address
    value
    haswon
  }
}
除了 where 参数,GraphQL API 还提供了其他参数,包括:
id:指定 id 查询
orderBy:指定排序的字段
orderDirection:排序方向,asc | desc
first:查询条数,比如设为 10,则最多只查出 10 条记录
skip:跳过不查询的条数
block:指定区块查询,可以指定区块 number 或 hash
text:全文检索
更细致的查询可以学习官方文档
官方文档
可以反复部署,也就是当你需要修改game.ts或者其他那几个文件的时候,修改后就可以重新用graph codegen && graph build
graph deploy --product hosted-service metaverseman/game 去更新部署了
觉得本文有帮助,可以给个赞鼓励一下~栓Q~