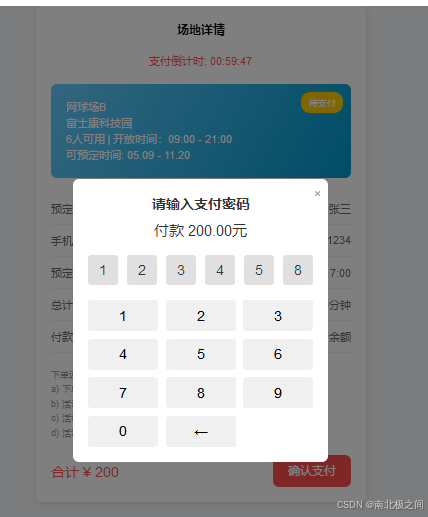
效果图
新手友好的 Vue 支付页面实现教程
目录:
教程概述
本教程将带您实现一个 Vue 支付页面,其中包括显示场地信息、倒计时以及输入支付密码的弹框。适合前端新手学习 Vue 的基本用法、布局技巧和用户交互逻辑。
项目设置与基本结构
步骤1:创建 HTML 和 CSS 结构
- 创建
HTML基本结构,并引入Vue库。 - 为页面设定基础样式,并确保内容居中。
<!DOCTYPE html>
<html lang="zh">
<head>
  <meta charset="UTF-8">
  <meta name="viewport" content="width=device-width, initial-scale=1.0">
  <title>场地详情 - Vue 示例</title>
  <script src="https://cdn.staticfile.net/vue/2.7.0/vue.min.js"></script>
  <style>
    /* 基本样式 */
    body {


      font-family: Arial, sans-serif;
      background-color: #f7f8fa;
      margin: 0;
      padding: 0;
    }
    #app {


      max-width: 400px;
      margin: 0 auto;
      padding: 20px;
      background-color: #fff;
      border-radius: 8px;
      box-shadow: 0 2px 8px rgba(0, 0, 0, 0.1);
    }
  </style>
</head>
<body>
<div id="app">
  <!-- 这里将展示 Vue 组件内容 -->
</div>

<script>
  new Vue({


    el: '#app',
    data: {


      // 在这里定义页面数据
    }
  });
</script>
</body>
</html>
设计主要组件
场地信息卡片
步骤2:设计场地信息卡片
- 使用
<div>元素作为卡片容器,设置background渐变、圆角和阴影效果。
<div class="card">
  <div>网球场B</div>
  <div>富士康科技园</div>
  <div>6人可用 | 开放时间:09:00 - 21:00</div>
  <div>可预定时间: 05.09 - 11.20</div>
  <div class="status">待支付</div>
</div>
支付倒计时
步骤3:倒计时功能
- 在 Vue
data中初始化倒计时。 - 使用
mounted钩子启动倒计时函数,并动态更新显示时间。
<div class="timer">支付倒计时: {

   { countdown }}</div>
new Vue({


  data: {


    countdown: '01:00:00'
  },
  mounted() {


    this.startCountdown();
  },
  methods: {


    startCountdown() {


      let seconds = 60 * 60; // 1小时倒计时
      setInterval(() => {


        if (seconds > 0) {


          seconds--;
          let hrs = Math.floor(seconds / 3600);
          let mins = Math.floor((seconds % 3600) / 60);
          let secs = seconds % 60;
          this.countdown = `${

      hrs.toString().padStart(2, '0')}:${

      mins.toString().padStart(2, '0')}:${

      secs.toString().padStart(2, '0')}`;
        }
      }, 1000);
    }
  }
});
实现支付密码输入弹框
弹框布局与样式
步骤4:创建支付密码弹框
- 设计包含标题、价格、6个密码输入框和数字键盘的弹框。
- 添加基本样式,并在
Vue中控制弹框显示。
<div class="modal" v-if="showModal">
<div class="modal-content">
<span class="modal-close" @click="showModal = false">×</span>
<div class="modal-title">请输入支付密码</div>
<div class="modal-price">付款 200.00元</div>
<div class="password-input">
<div class="input-box" v-for="(digit, index) in password" :key="index">{
{ digit }}</div>
</div>
<div class="keyboard">
<div class="key" v-for="num in 9" @click="addDigit(num)">{
{ num }}</div>
<div class="key" @click="addDigit(0)">0</div>
<div class="key" @click="deleteDigit">←</div>
</div>
</div>
</div>
密码输入框与虚拟键盘
步骤5:设计密码输入框和虚拟键盘
- 为输入框设计灰色方块样式。
- 使用循环生成数字键盘按钮,通过 Vue 方法更新密码输入框的内容。
.password-input {


  display: flex;
  justify-content: space-between;
  margin-bottom: 20px;
}
.input-box {


  width: 40px;
  height: 40px;
  background-color: #e0e0e0;
  border-radius: 4px;
  text-align: center;
  line-height: 40px;
  font-size: 18px;
  color: #333;
}
.keyboard {


  display: grid;
  grid-template-columns: repeat(3, 1fr);
  gap: 10px;
}
.key {


  padding: 10px;
  background-color: #f0f0f0;
  text-align: center;
  border-radius: 4px;
  font-size: 18px;
  cursor: pointer;
}
实现密码输入逻辑
步骤6:实现密码输入和删除功能
- 使用 Vue 方法
addDigit和deleteDigit控制输入和退格操作,确保只有六位数密码输入。
data: {


  showModal: false,
  password: ['', '', '', '', '', ''],
  passwordIndex: 0 // 当前输入密码的位置
},
methods: {


  addDigit(num) {


    if (this.passwordIndex < 6) {


      this.$set(this.password, this.passwordIndex, num);
      this.passwordIndex++;
    }
  },
  deleteDigit() {


    if (this.passwordIndex > 0) {


      this.passwordIndex--;
      this.$set(this.password, this.passwordIndex, '');
    }
  }
}
结语
通过本教程,您学习了如何使用 Vue 实现支付页面,包括展示场地信息、倒计时、支付密码弹框以及模拟密码输入。此页面结构简洁,适合新手练习 Vue 数据绑定、事件处理等基础知识。希望您从本教程中有所收获,并对 Vue 有更深入的理解!
完整代码
<!DOCTYPE html>
<html lang="zh">
<head>
<meta charset="UTF-8">
<meta name="viewport" content="width=device-width, initial-scale=1.0">
<title>场地详情 - Vue 示例</title>
<script src="https://cdn.staticfile.net/vue/2.7.0/vue.min.js"></script>
<style>
body {
font-family: Arial, sans-serif;
background-color: #f7f8fa;
margin: 0;
padding: 0;
}
#app {
max-width: 400px;
margin: 0 auto;
padding: 20px;
background-color: #fff;
border-radius: 8px;
box-shadow: 0 2px 8px rgba(0, 0, 0, 0.1);
font-size: 14px;
position: relative;
}
.header {
text-align: center;
font-size: 16px;
font-weight: bold;
margin-bottom: 20px;
}
.timer {
color: #ff4d4f;
font-size: 14px;
text-align: center;
margin-bottom: 20px;
}
.card {
background: linear-gradient(120deg, #66ccff, #0099cc);
color: #fff;
padding: 20px;
border-radius: 8px;
position: relative;
margin-bottom: 20px;
}
.card .status {
position: absolute;
top: 10px;
right: 10px;
background-color: #ffcc00;
color: #fff;
padding: 5px 10px;
border-radius: 12px;
font-size: 12px;
}
.info-section {
padding: 10px 0;
border-bottom: 1px solid #f0f0f0;
display: flex;
justify-content: space-between;
color: #666;
font-size: 14px;
}
.info-section:last-child {
border-bottom: none;
}
.explanation {
color: #999;
font-size: 12px;
margin-top: 20px;
line-height: 1.6;
}
.footer {
display: flex;
justify-content: space-between;
align-items: center;
margin-top: 20px;
}
.total-price {
font-size: 18px;
color: #ff4d4f;
}
.confirm-btn {
padding: 10px 20px;
background-color: #ff4d4f;
color: #fff;
border: none;
border-radius: 8px;
cursor: pointer;
font-size: 16px;
}
.confirm-btn:hover {
background-color: #ff7875;
}
/* Modal styles */
.modal {
position: fixed;
top: 0;
left: 0;
width: 100%;
height: 100%;
background-color: rgba(0, 0, 0, 0.5);
display: flex;
align-items: center;
justify-content: center;
z-index: 1000;
}
.modal-content {
width: 300px;
background-color: #fff;
border-radius: 8px;
padding: 20px;
position: relative;
text-align: center;
}
.modal-close {
position: absolute;
top: 10px;
right: 10px;
font-size: 16px;
color: #999;
cursor: pointer;
}
.modal-title {
font-size: 18px;
font-weight: bold;
color: #333;
margin-bottom: 10px;
}
.modal-price {
font-size: 20px;
color: #333;
margin-bottom: 20px;
}
.password-input {
display: flex;
justify-content: space-between;
margin-bottom: 20px;
}
.input-box {
width: 40px;
height: 40px;
background-color: #e0e0e0;
border-radius: 4px;
text-align: center;
line-height: 40px;
font-size: 18px;
color: #333;
}
.keyboard {
display: grid;
grid-template-columns: repeat(3, 1fr);
gap: 10px;
}
.key {
padding: 10px;
background-color: #f0f0f0;
text-align: center;
border-radius: 4px;
font-size: 18px;
cursor: pointer;
}
.key:hover {
background-color: #d0d0d0;
}
</style>
</head>
<body>
<div id="app">
<!-- Header -->
<div class="header">场地详情</div>
<!-- Countdown Timer -->
<div class="timer">支付倒计时: {
{ countdown }}</div>
<!-- Venue Card -->
<div class="card">
<div>网球场B</div>
<div>富士康科技园</div>
<div>6人可用 | 开放时间:09:00 - 21:00</div>
<div>可预定时间: 05.09 - 11.20</div>
<div class="status">待支付</div>
</div>
<!-- Reservation Information -->
<div class="info-section" v-for="(value, label) in reservationInfo" :key="label">
<span>{
{ label }}</span>
<span>{
{ value }}</span>
</div>
<!-- Order Explanation -->
<div class="explanation">
下单说明:<br>
a) 下单当天不允许申请退款。<br>
b) 活动开始前8小时以上申请退款,扣除40%手续费。<br>
c) 活动开始前4-8小时申请退款,扣除70%手续费。<br>
d) 活动开始前不足4小时以上申请退款,不予退款。
</div>
<!-- Footer with Total Price and Confirm Button -->
<div class="footer">
<div class="total-price">合计 ¥ 200</div>
<button class="confirm-btn" @click="showModal = true">确认支付</button>
</div>
<!-- Payment Modal -->
<div class="modal" v-if="showModal">
<div class="modal-content">
<span class="modal-close" @click="showModal = false">×</span>
<div class="modal-title">请输入支付密码</div>
<div class="modal-price">付款 200.00元</div>
<div class="password-input">
<div class="input-box" v-for="(digit, index) in password" :key="index">{
{ digit }}</div>
</div>
<div class="keyboard">
<div class="key" v-for="num in 9" @click="addDigit(num)">{
{ num }}</div>
<div class="key" @click="addDigit(0)">0</div>
<div class="key" @click="deleteDigit">←</div>
</div>
</div>
</div>
</div>
<script>
new Vue({
el: '#app',
data: {
countdown: '01:00:00', // 初始倒计时时间
reservationInfo: {
"预定人": "张三",
"手机号码": "13912341234",
"预定时间": "07/21 星期日 15:00-17:00",
"总计时段": "120分钟",
"付款方式": "账户余额"
},
showModal: false, // 控制模态框的显示
password: ['', '', '', '', '', ''], // 用于存储输入密码
passwordIndex: 0 // 当前输入密码的位置
},
mounted() {
this.startCountdown();
},
methods: {
startCountdown() {
let seconds = 60 * 60; // 1小时倒计时
setInterval(() => {
if (seconds > 0) {
seconds--;
let hrs = Math.floor(seconds / 3600);
let mins = Math.floor((seconds % 3600) / 60);
let secs = seconds % 60;
this.countdown = `${
hrs.toString().padStart(2, '0')}:${
mins.toString().padStart(2, '0')}:${
secs.toString().padStart(2, '0')}`;
}
}, 1000);
},
addDigit(num) {
if (this.passwordIndex < 6) {
this.$set(this.password, this.passwordIndex, num);
this.passwordIndex++;
}
},
deleteDigit() {
if (this.passwordIndex > 0) {
this.passwordIndex--;
this.$set(this.password, this.passwordIndex, '');
}
},
confirmPayment() {
alert("支付已确认,感谢您的预定!");
this.showModal = false;
}
}
});
</script>
</body>
</html>