上一篇我使用maven创建一个web项目Maven项目的搭建 。今天将在那个的基础上进行完善,做成SSM模式的web框架.
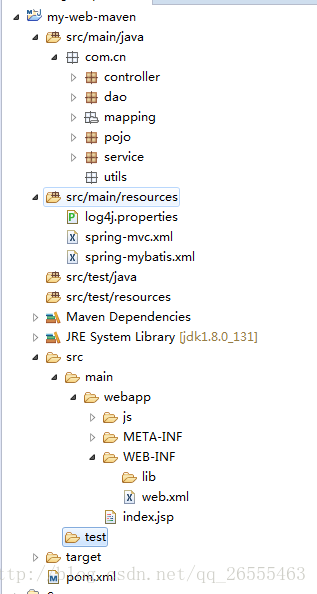
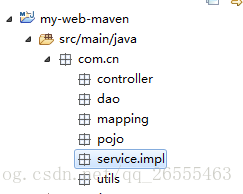
1. 在src/mian/java/下面创建Package,格式如下:
2. 在src/main/resources下创建配置文件
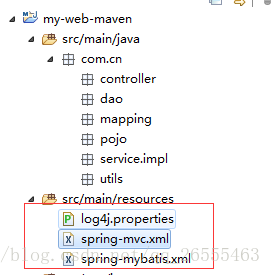
其中log4j.properties为日志文件;
spring-mvc.xml为springMVC的配置文件;
spring-mybatis.xml为spring和mybatis的整合文件.
3.修改web.xml文件
<?xml version="1.0" encoding="UTF-8"?>
<web-app xmlns:xsi="http://www.w3.org/2001/XMLSchema-instance"
    xmlns="http://java.sun.com/xml/ns/javaee"
    xsi:schemaLocation="http://java.sun.com/xml/ns/javaee http://java.sun.com/xml/ns/javaee/web-app_3_0.xsd"
    id="WebApp_ID" version="3.0">
    <display-name>test-maven-web</display-name>
    <welcome-file-list>
        <welcome-file>index.html</welcome-file>
        <welcome-file>index.htm</welcome-file>
        <welcome-file>index.jsp</welcome-file>
        <welcome-file>default.html</welcome-file>
        <welcome-file>default.htm</welcome-file>
        <welcome-file>default.jsp</welcome-file>
    </welcome-file-list>

    <!-- Spring和mybatis的配置文件 -->
    <context-param>
        <param-name>contextConfigLocation</param-name>
        <param-value>classpath:spring-mybatis.xml</param-value>
    </context-param>
    <!-- Spring监听器 -->
    <listener>
        <listener-class>org.springframework.web.context.ContextLoaderListener</listener-class>
    </listener>
    <!-- 防止Spring内存溢出监听器 -->
    <listener>
        <listener-class>org.springframework.web.util.IntrospectorCleanupListener</listener-class>
    </listener>

    <!-- Spring MVC -->
    <servlet>
        <servlet-name>SpringMVC</servlet-name>
        <servlet-class>org.springframework.web.servlet.DispatcherServlet</servlet-class>
        <init-param>
            <param-name>contextConfigLocation</param-name>
            <param-value>classpath:spring-mvc.xml</param-value>
        </init-param>
        <load-on-startup>1</load-on-startup>
        <async-supported>true</async-supported>
    </servlet>
    <servlet-mapping>
        <servlet-name>SpringMVC</servlet-name>
        <url-pattern>/</url-pattern>
    </servlet-mapping>


    <context-param>
        <param-name>log4jConfigLocation</param-name>
        <param-value>classpath:log4j.properties</param-value>
    </context-param>

    <!-- 字符编码过滤器 -->
    <filter>
        <filter-name>characterEncoding</filter-name>
        <filter-class>org.springframework.web.filter.CharacterEncodingFilter</filter-class>
        <init-param>
            <param-name>forceEncoding</param-name>
            <param-value>true</param-value>
        </init-param>
        <init-param>
            <param-name>encoding</param-name>
            <param-value>UTF-8</param-value>
        </init-param>
    </filter>
    <filter-mapping>
        <filter-name>characterEncoding</filter-name>
        <url-pattern>/*</url-pattern>
    </filter-mapping>

</web-app>
加载Spring和mybatis的配置文件
Spring监听器
防止Spring内溢出监听器
Spring MVC
字符编码过滤器
4. 配置spring-mybatis.xml文件
<?xml version="1.0" encoding="UTF-8"?>
<beans xmlns="http://www.springframework.org/schema/beans"
    xmlns:xsi="http://www.w3.org/2001/XMLSchema-instance" xmlns:p="http://www.springframework.org/schema/p"
    xmlns:context="http://www.springframework.org/schema/context"
    xmlns:mvc="http://www.springframework.org/schema/mvc"
    xsi:schemaLocation="http://www.springframework.org/schema/beans
                        http://www.springframework.org/schema/beans/spring-beans-3.2.xsd
                        http://www.springframework.org/schema/context
                        http://www.springframework.org/schema/context/spring-context-3.2.xsd
                        http://www.springframework.org/schema/mvc
                        http://www.springframework.org/schema/mvc/spring-mvc-4.0.xsd"
    default-autowire="byName">
    <!-- 自动扫描 -->
    <context:component-scan base-package="com.cn.service" />
    <!-- 未使用org.apache.commons.dbcp.BasicDataSource -->
    <bean id="dataSource" class="com.alibaba.druid.pool.DruidDataSource">
        <property name="driverClassName" value="com.mysql.jdbc.Driver" />
        <property name="url" value="jdbc:mysql://127.0.0.1:3306/testsql?characterEncoding=utf-8" />
        <property name="username" value="root" />
        <property name="password" value="123456" />
<!--    初始化连接大小
        <property name="initialSize" value="${initialSize}"></property>
        连接池最大数量
        <property name="maxActive" value="${maxActive}"></property>
        连接池最大空闲
        <property name="maxIdle" value="${maxIdle}"></property>
        连接池最小空闲
        <property name="minIdle" value="${minIdle}"></property>
        获取连接最大等待时间
        <property name="maxWait" value="${maxWait}"></property> -->
    </bean>

    <!-- spring和MyBatis完美整合,不需要mybatis的配置映射文件 -->
    <bean id="sqlSessionFactory" class="org.mybatis.spring.SqlSessionFactoryBean">
        <property name="dataSource" ref="dataSource" />
        <!-- 自动扫描mapping.xml文件 -->
        <property name="mapperLocations" value="classpath:com/cn/mapping/*.xml"></property>
    </bean>

    <!-- DAO接口所在包名,Spring会自动查找其下的类 -->
    <bean class="org.mybatis.spring.mapper.MapperScannerConfigurer">
        <property name="basePackage" value="com.cn.dao" />
        <property name="sqlSessionFactoryBeanName" value="sqlSessionFactory"></property>
    </bean>

    <!-- (事务管理)transaction manager, use JtaTransactionManager for global tx -->
    <bean id="transactionManager" class="org.springframework.jdbc.datasource.DataSourceTransactionManager">
        <property name="dataSource" ref="dataSource" />
    </bean>

</beans>
5. spring-mvc.xml文件
<?xml version="1.0" encoding="UTF-8"?>
<beans xmlns="http://www.springframework.org/schema/beans"
    xmlns:xsi="http://www.w3.org/2001/XMLSchema-instance" xmlns:p="http://www.springframework.org/schema/p"
    xmlns:context="http://www.springframework.org/schema/context"
    xmlns:mvc="http://www.springframework.org/schema/mvc"
    xsi:schemaLocation="http://www.springframework.org/schema/beans
                        http://www.springframework.org/schema/beans/spring-beans-3.2.xsd
                        http://www.springframework.org/schema/context
                        http://www.springframework.org/schema/context/spring-context-3.2.xsd
                        http://www.springframework.org/schema/mvc
                        http://www.springframework.org/schema/mvc/spring-mvc-4.0.xsd">
    <!-- 自动扫描该包,使SpringMVC认为包下用了@controller注解的类是控制器 -->
    <context:component-scan base-package="com.cn.controller" />
    <!--避免IE执行AJAX时,返回JSON出现下载文件 -->
     <bean id="mappingJacksonHttpMessageConverter"
        class="org.springframework.http.converter.json.MappingJacksonHttpMessageConverter">
        <property name="supportedMediaTypes">
            <list>
                <value>text/html;charset=UTF-8</value>
            </list>
        </property>
    </bean>
    <!-- 定义跳转的文件的前后缀 ,视图模式配置-->
    <bean class="org.springframework.web.servlet.view.InternalResourceViewResolver">
        <!-- 自动给后面action的方法return的字符串加上前缀和后缀,变成一个 可用的url地址 -->
        <property name="prefix" value="/jsp" />
        <property name="suffix" value=".jsp" />
    </bean>

    <!-- 配置文件上传,如果没有使用文件上传可以不用配置,当然如果不配,那么配置文件中也不必引入上传组件包 -->
     <bean id="multipartResolver"
        class="org.springframework.web.multipart.commons.CommonsMultipartResolver">
        <!-- 默认编码 -->
        <property name="defaultEncoding" value="utf-8" />
        <!-- 文件大小最大值 -->
        <property name="maxUploadSize" value="10485760000" />
        <!-- 内存中的最大值 -->
        <property name="maxInMemorySize" value="40960" />
    </bean>
    <!-- 解除servlet对静态资源文件访问的限制 -->
    <mvc:default-servlet-handler/>
    <!-- 不然访问不到@RequestMapping的路径 -->
    <mvc:annotation-driven/>
</beans>
至此,SSM框架已经搭载完成了,
现在写功能进行测试吧
6. 完成查询功能
在此先说一下mybatis的Generator代码生成工具,可以通过数据库表,直接生成实体类,dao接口,以及mapper的增删改查,不清楚的可以查看我写的博文,使用Generator自动生成代码 。
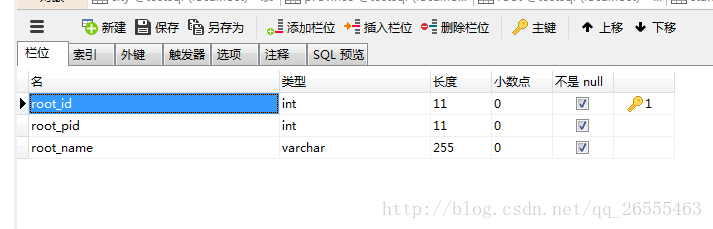
数据库中有一张表,结构如下:
先在Service声明一个接口一个实现类:
接口代码如下:
package com.cn.service;

import com.cn.pojo.Root;

public interface RootService {

    /**
     * 通过id主键查询数据
     * @return
     */
    public Root selectByPrimaryKey(Integer id);
}
实现类通过@Autowired调用dao层接口进行数据查询
package com.cn.service.impl;

import org.springframework.beans.factory.annotation.Autowired;
import org.springframework.stereotype.Service;

import com.cn.dao.RootMapper;
import com.cn.pojo.Root;
import com.cn.service.RootService;

@Service("rootService")
public class RootServiceImpl implements RootService {

    @Autowired
    private RootMapper rootMapper;


    @Override
    public Root selectByPrimaryKey(Integer id) {
        // TODO Auto-generated method stub
        return this.rootMapper.selectByPrimaryKey(id);
    }
}
Controller层代码:
package com.cn.controller;

import javax.servlet.http.HttpServletRequest;

import org.apache.log4j.Logger;
import org.springframework.beans.factory.annotation.Autowired;
import org.springframework.stereotype.Controller;
import org.springframework.web.bind.annotation.RequestMapping;
import org.springframework.web.bind.annotation.ResponseBody;

import com.cn.pojo.Root;
import com.cn.service.RootService;

@Controller
public class RootController {

    private static Logger logger = Logger.getLogger(RootController.class);

    @Autowired
    private RootService rootservice = null;

    @RequestMapping(value = "/manage/rootId")
    @ResponseBody
    public String rootById(HttpServletRequest request) {
        String id = request.getParameter("id");
        logger.info("通过id进行Root查询,id是:" + id);
        Root root = rootservice.selectByPrimaryKey(1);
        if (root == null) {
            return "no data!";
        } else {
            return root.getRootName();
        }
    }
}
index.jsp页面代码:
扫描二维码关注公众号,回复:
1923828 查看本文章

<%@ page language="java" contentType="text/html; charset=utf-8"
    pageEncoding="utf-8"%>
<!DOCTYPE html PUBLIC "-//W3C//DTD HTML 4.01 Transitional//EN"
    "http://www.w3.org/TR/html4/loose.dtd">
<html>
<head>

<meta http-equiv="Content-Type" content="text/html; charset=utf-8">
<script type="text/javascript" src="${pageContext.request.contextPath}/js/jquery-3.2.1.js"></script>
<title>index页面</title>
</head>
<body>
    <h1>七夕节</h1>
    id:<input type="text" id="txtId"><span id="contentSpan"></span><br/>
    <input type="button" value="查询" id="searchBtn">


    <script type="text/javascript">
        $(function() {
            $("#searchBtn").click(function() {
                var id = $("#txtId").val();
                $.post("${pageContext.request.contextPath}/manage/rootId",{"id":id}, function (data) {
                    $("#contentSpan").text(data);
                })
            })
        });
    </script>
</body>
</html>
页面使用jquery异步加载,所以项目中要添加jquery支持,最终整个目录结构如下图: