# 原创作品,转载请注明出处,谢谢!@杨福星 (http://blog.csdn.net/luckystar92/article/details/51273720)
#系统:centos6.5
一、Master节点配置
1、rpm -qa | grep ssh #检测是否安装过ssh client与ssh server(有如下信息就无需安装ssh了)
2、显示如下类似信息,表示已安装:

3、若需要安装,则(此教程是centos的):
sudo yum install openssh-clients
sudo yum install openssh-server
4、ssh localhost #查看是否安装成功
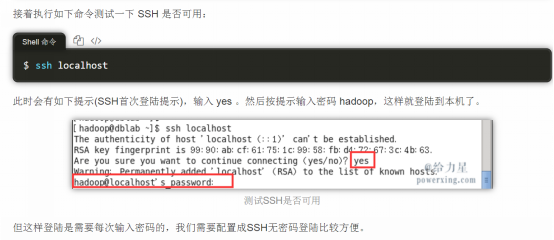
5、exit # 退出刚才的 ssh localhost
6、配置本机免密码登录
- cd ~/.ssh # 如果没有该目录,先执行一次ssh localhost
- rm ./id_rsa* # 删除之前生成的公匙(如果有)
- ssh-keygen -t rsa # 一直按回车就可以,该命令将在.ssh文件夹下面产生一对密钥id_rsa和id_rsa.pub。
- cat ./id_rsa.pub >> ./authorized_keys #加入授权
- chmod 600 ./authorized_keys #必须修改文件权限(否则还需密码)
7、ssh localhost #验证是否不需输入密码了,是则执行9,否则执行:下面三、问题
8、exit # 退出刚才的 ssh localhost
9、scp ~/.ssh/id_rsa.pub hadoop@node2:/home/hadoop/ #将公钥传送到集群各个slave节点
- 备注:scp 是 secure copy 的简写,用于在 Linux 下进行远程拷贝文件,类似于 cp 命令,不过 cp 只能在本机中拷贝。执行 scp 时会要求输入 Slave1 上 hadoop 用户的密码(hadoop),输入完成后会提示传输完毕,如下图所示:

二、Slave节点配置
[原创地址](http://blog.csdn.net/luckystar92)
注意:各个分节点配置(本教程是(Master机上操作)ssh node1(分节点名称)登录各个分节点进行配置,当然可以直接在分节点上配置):
- ssh node1 #登录分节点进行配置(此时是需要输入密码的),必须确保登录到了分节点,否则下述操作就会在Master节点本身系统上操作了
- rm -rf ~/.ssh #删除以前ssh localhost生成的文件夹
- mkdir ~/.ssh # 重新生成文件夹.ssh
- cat ~/id_rsa.pub >> ~/.ssh/authorized_keys
- chmod 600 ~/.ssh/authorized_keys
- chmod 700 ~/.ssh
- rm ~/id_rsa.pub # 用完就可以删掉了
- exit #退出分节点
- ssh node1(节点名称) #实验Master是否免登录分节点node1,是则成功
- exit #退出分节点
三、问题(ssh无密码登录本机失败参考下述3.*):
1. ssh免登录的思想是:A将公钥发给B,B将收到的公钥加入授权,则A就可以免密码登录B了
2. 当出现 时,即ssh B 会出现还需输入密码的问题时,解决方案:可输入ssh-add
3.当按照上述方案还是无法免密码登陆时(此步骤建立在上述”一.6、配置本机免密码登录”中操作已完成,但不可无密码登录本机的基础上),可按照以下操作:
背景:
(1)
按照上述方案操作还是需要密码登录ssh
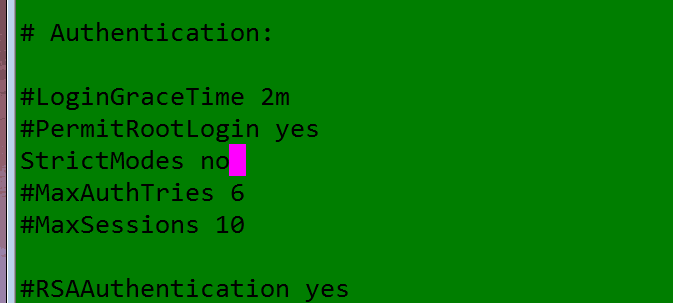
修改sshd_config文件内的StrictMode(将StrictMode默认的yes或者已被注释掉了都需要设置为no),修改后保存如下所示:
sudo vi /etc/ssh/sshd_confighadoop
- 重启ssh
- 成功免密码登录
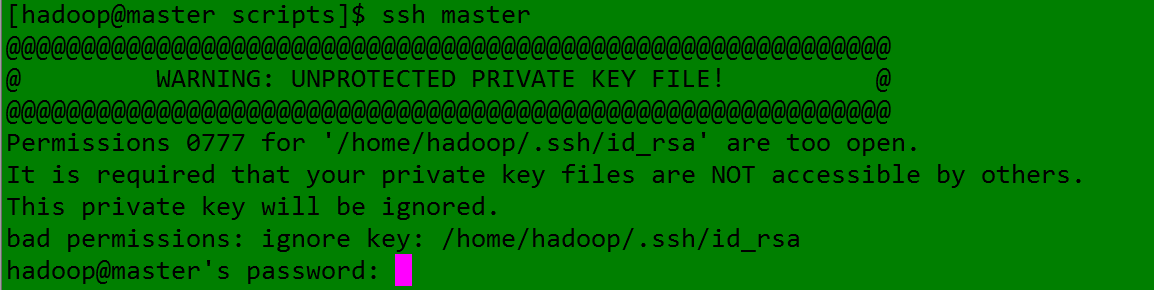
(2)当出现下面情景时:(是因为密钥文件的权限问题)
1、将密钥文件的权限降低即可(密钥文件权限过高,易被操作,就不是密钥了,就不安全了)
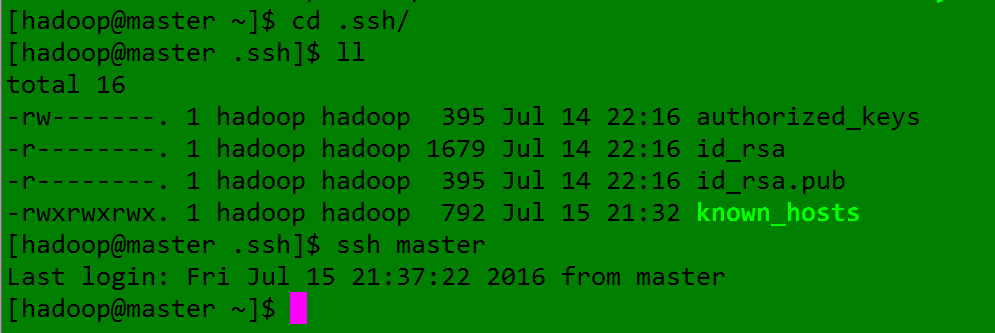
2、进入.ssh文件夹发现密钥文件的权限果然很高(777),如下:
3、降低密钥文件权限:
sudo chmod 400 ~/.ssh/id_rsa id_rsa.pub


**Tips
- StrictModes no #修改为no,默认为yes.如果不修改用key登陆是出现server refused our key(如果StrictModes为yes必需保证存放公钥的文件夹的拥有与登陆用户名是相同的.“StrictModes”设置ssh在接收登录请求之前是否检查用户家目录和rhosts文件的权限和所有权。这通常是必要的,因为新手经常会把自己的目录和文件设成任何人都有写权限。)(来源http://matt-u.iteye.com/blog/851158)*:
- 3.14 - I copied my public key to authorized_keys but public-key authentication still doesn’t work.
Typically this is caused by the file permissions on $HOME, $HOME/.ssh or $HOME/.ssh/authorized_keys being more permissive than sshd allows by default.
In this case, it can be solved by executing the following on the server.
$ chmod go-w $HOME $HOME/.ssh
$ chmod 600 $HOME/.ssh/authorized_keys
$ chownwhoami$HOME/.ssh/authorized_keys
If this is not possible for some reason, an alternative is to set StrictModes no in sshd_config, however this is not recommended.
(来自http://www.openssh.com/faq.html) - ~/.ssh/authorized_keysLists the public keys (DSA, ECDSA, Ed25519, RSA) that can be used for logging in as this user. The format of this file is described above. The content of the file is not highly sensitive, but the recommended permissions are read/write for the user, and not accessible by others.
If this file, the ~/.ssh directory, or the user’s home directory are writable by other users, then the file could be modified or replaced by unauthorized users. In this case, sshd will not allow it to be used unless the StrictModes option has been set to “no”.
(来自http://www.openbsd.org/cgi-bin/man.cgi/OpenBSD-current/man8/sshd.8?query=sshd&sec=8) - StrictModes Specifies whether sshd(8) should check file modes and ownership of the user’s files and home directory before accepting login. This is normally desirable because novices sometimes accidentally leave their directory or files world-writable. The default is “yes”. Note that this does not apply to ChrootDirectory, whose permissions and ownership are checked unconditionally.
(来自http://www.openbsd.org/cgi-bin/man.cgi/OpenBSD-current/man5/sshd_config.5?query=sshd_config&sec=5)