· 介绍
今天我们来学习一下如何自定义一个自己ImageView,当然也是从最基础开始,我们只需要可以显示图片就好了。目的是基于此例子来熟悉我们自定义View的一些操作流程,这项能力是在我们今后开发中是尤为重要的,也是开发者必备的能力。
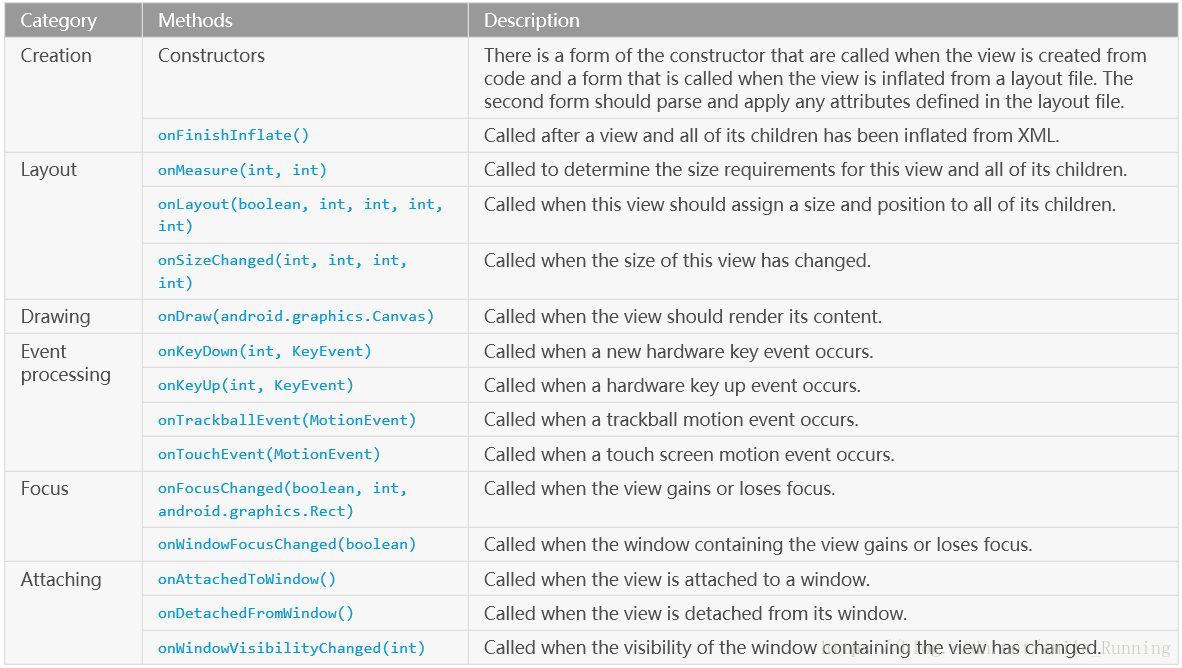
那么,要实现自定义View,到底要有哪些流程呢?在此,我们看一下google官方给出的建议。
Implementing a Custom View
To implement a custom view, you will usually begin by providing overrides for some of the standard methods that the framework calls on all views. You do not need to override all of these methods. In fact, you can start by just overriding
onDraw(android.graphics.Canvas).大致意思:要想实现自定义View,需要覆盖一下表格里的一些方法。事实上,你只需要覆盖onDraw()方法即可。
· 代码演示
既然,google都这么说了,那我们就这么做吧。我们新建一个继承View的类:SimpleImageView,覆盖onDraw()方法。
/**
 * @Created by xww.
 * @Creation time 2018/8/10.
 */

public class SimpleImageView extends View {
    public SimpleImageView(Context context) {
        super(context);
    }

    public SimpleImageView(Context context, @Nullable AttributeSet attrs) {
        super(context, attrs);
    }

    @Override
    protected void onDraw(Canvas canvas) {
        super.onDraw(canvas);
    }
}
这样操作以后,其实这个SimpleImageView类已经可以被我们写进XML文件里了,只是这样运行起来没有一点效果。因为我们没有对这个View进行任何绘制,所以它其实就是一张空白的画布(Canvas)。说到画布(Canvas),我们可以发现onDraw()方法中就有这个参数了,那么我们就可以利用canvas来绘制各种各样的元素了。那有画布还是不够,因为我们还缺少画笔(Paint)。这就和我们吃饭时用的一双筷子一样,是一对配套的工具,它们相互配合。
既然我们要用到画笔(Paint),那就要定义一个它的实例以及需要用到的属性设置。下面我们来丰富我们的SimpleImageView类。首先,我们在res/value下新建attr.xml资源文件,我们在xml布局中需要用到它的src属性来设置我们的图片资源文件。
<resources>
    <declare-styleable name="SimpleImageView">
        <attr name="src" format="integer" />
    </declare-styleable>
</resources>
其次,我们给SimpleImageView类添加了一些重要代码,用了显示图片。这里我们先说一个特别注意的地方,TypeArray的使用。
TypedArray
public class TypedArrayextends Object
java.lang.Object ↳ android.content.res.TypedArray
Container for an array of values that were retrieved with
obtainStyledAttributes(AttributeSet, int[], int, int)orobtainAttributes(AttributeSet, int[]). Be sure to callrecycle()when done with them. The indices used to retrieve values from this structure correspond to the positions of the attributes given to obtainStyledAttributes.注意点:google特别说明,在调用obtainStyledAttributes()或obtainAttributes()之后,一定要调用array.recyle()
/**
* @Created by xww.
* @Creation time 2018/8/10.
*/
public class SimpleImageView extends View {
private Paint mPaint;
private Drawable mDrawable;
private int mWidth;
private int mHeight;
@SuppressLint("Recycle")
private void initAttrs(AttributeSet attrs) {
if (attrs != null) {
TypedArray array = null;
try {
//检索此上下文主题中的样式属性信息
array = getContext().obtainStyledAttributes(attrs, R.styleable.SimpleImageView);
//根据图片id获取到drawable对象
mDrawable = array.getDrawable(R.styleable.SimpleImageView_src);
if (mDrawable == null) {
throw new NullPointerException("drawable is not null");
}
//获得drawable固定的宽和高
mWidth = mDrawable.getIntrinsicWidth();
mHeight = mDrawable.getIntrinsicHeight();
} finally {
//使用obtainStyledAttributes()或obtainAttributes()检索的值数组的容器,一定要调用recycle()。
if (array != null) {
array.recycle();
}
}
}
}
public SimpleImageView(Context context) {
super(context);
}
public SimpleImageView(Context context, @Nullable AttributeSet attrs) {
super(context, attrs);
mPaint = new Paint();
//设置画笔抗锯齿
mPaint.setAntiAlias(true);
initAttrs(attrs);
}
@Override
protected void onDraw(Canvas canvas) {
super.onDraw(canvas);
if (mDrawable == null) {
return;
}
canvas.drawBitmap(drawableToBitmap(mDrawable), getLeft(), getTop(), mPaint);
}
/**
* 将drawable转成bitmap
*/
private Bitmap drawableToBitmap(Drawable drawable) {
//根据获得的drawable的透明度/不透明度,来设置Bitmap配置
Bitmap.Config config = drawable.getOpacity() != PixelFormat.OPAQUE ? Bitmap.Config.ARGB_8888 : Bitmap.Config.RGB_565;
Bitmap bitmap = Bitmap.createBitmap(mWidth, mHeight, config);
/**
* 在onDraw方法中调用canvas.drawBitmap()时需要构造一个绘制位图的画布,否则canvas绘制的位图将不显示,变成黑色
*/
Canvas canvas = new Canvas(bitmap);
//为可绘制的图形指定一个边框,大小为图片大固定宽和高
drawable.setBounds(0, 0, mWidth, mHeight);
//调用此方法绘制,绘制setBounds()方法指定大小的边界
drawable.draw(canvas);
return bitmap;
}
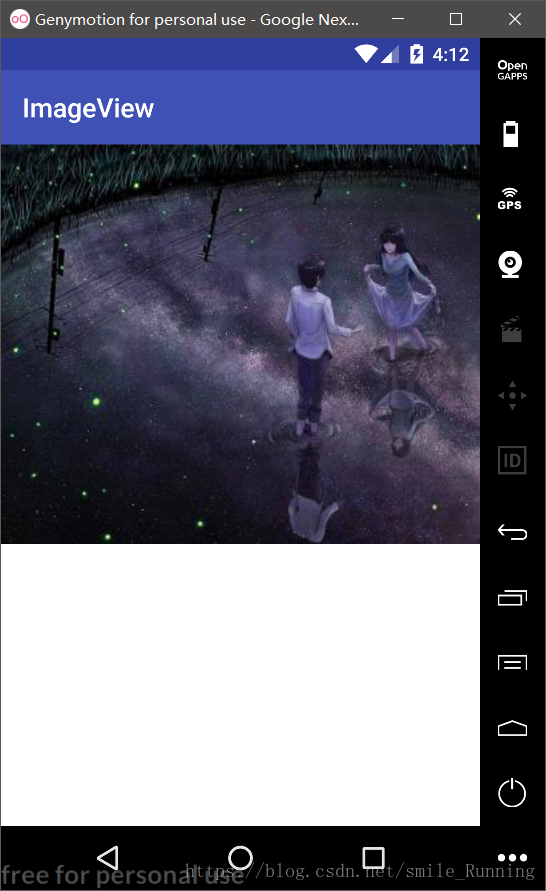
}经过一番处理之后呢,我们的SimpleImageView类已经可以显示图片啦,不信我们试试看效果图。我们给布局文件设置了我们刚刚写的一个SimpleImageView控件。
<android.support.constraint.ConstraintLayout xmlns:android="http://schemas.android.com/apk/res/android"
    xmlns:custom="http://schemas.android.com/apk/res/com.example.x.mycustomviews"
    xmlns:tools="http://schemas.android.com/tools"
    android:layout_width="match_parent"
    android:layout_height="match_parent"
    android:background="@android:color/white"
    tools:ignore="ResAuto">

    <com.example.x.mycustomviews.main.SimpleImageView
        android:layout_width="match_parent"
        android:layout_height="match_parent"
        custom:src="@drawable/bg_loop_ad_3" />
</android.support.constraint.ConstraintLayout>
那么它显示的效果呢?是这样的!
· 分析
细心的你也许会发现SimpleImageView我们在xml文件中的宽、高都是match_parent,而它怎么不会填充整个屏幕啊。其实呢,google只叫我们覆盖onDraw()方法,但是它给出了上面表格一系列方法来配合我们自定义View,我们可以看到Category(分类)中有一个Layout(布局)一栏,这就是我们在xml中添加View时缺少了一个重要步骤:onMeasure(测量)。
onMeasure
Measure the view and its content to determine the measured width and the measured height. This method is invoked by
measure(int, int)and should be overridden by subclasses to provide accurate and efficient measurement of their contents.CONTRACT: When overriding this method, you must call
setMeasuredDimension(int, int)to store the measured width and height of this view. Failure to do so will trigger anIllegalStateException, thrown bymeasure(int, int). Calling the superclass'onMeasure(int, int)is a valid use.
onMeasure(测量),顾名思义,测量控件的宽、高。通过google给出的说明,我们也知道它的主要用途。CONTRACT(契约):从说明中不难看出,google的意思指明只要你覆盖onMeasure()方法,就一定要调用setMeasureDimension()来重新设置尺寸。否则它将抛出IlleagelStateException。
那么我们就覆盖它的onMeasure()方法,重新设置View尺寸吧,修改我们之前的代码,我们增加了两个测量宽、高的方法。这也是我们最终的SimpleImageView类。
/**
 * @Created by xww.
 * @Creation time 2018/8/10.
 */

public class SimpleImageView extends View {

    private Paint mPaint;
    private Drawable mDrawable;
    private int mWidth;
    private int mHeight;

    @SuppressLint("Recycle")
    private void initAttrs(AttributeSet attrs) {
        if (attrs != null) {
            TypedArray array = null;
            try {
                //检索此上下文主题中的样式属性信息
                array = getContext().obtainStyledAttributes(attrs, R.styleable.SimpleImageView);
                //根据图片id获取到drawable对象
                mDrawable = array.getDrawable(R.styleable.SimpleImageView_src);
                if (mDrawable == null) {
                    throw new NullPointerException("drawable is not null");
                }
                //获得drawable固定的宽和高
                mWidth = mDrawable.getIntrinsicWidth();
                mHeight = mDrawable.getIntrinsicHeight();
            } finally {
                //使用obtainStyledAttributes()或obtainAttributes()检索的值数组的容器,一定要调用recycle()。
                if (array != null) {
                    array.recycle();
                }
            }
        }
    }

    public SimpleImageView(Context context) {
        super(context);
    }

    public SimpleImageView(Context context, @Nullable AttributeSet attrs) {
        super(context, attrs);
        mPaint = new Paint();
        //设置画笔抗锯齿
        mPaint.setAntiAlias(true);
        initAttrs(attrs);
    }

    @Override
    protected void onMeasure(int widthMeasureSpec, int heightMeasureSpec) {
        super.onMeasure(widthMeasureSpec, heightMeasureSpec);
        //测量View尺寸,将View的宽和高设置为图片的宽和高
        setMeasuredDimension(measureWidth(widthMeasureSpec), measureHeight(heightMeasureSpec));
    }

    @Override
    protected void onDraw(Canvas canvas) {
        super.onDraw(canvas);
        if (mDrawable == null) {
            return;
        }
        canvas.drawBitmap(drawableToBitmap(mDrawable), getLeft(), getTop(), mPaint);
    }

    private int measureWidth(int widthMeasureSpec) {
        // 获取宽度的模式和大小
        int widthSize = MeasureSpec.getSize(widthMeasureSpec);
        int widthMode = MeasureSpec.getMode(widthMeasureSpec);
        switch (widthMode) {
            case MeasureSpec.UNSPECIFIED: //表示可以将视图设置成任意大小,无限制。一般不常用,也很少见。
            case MeasureSpec.AT_MOST: //wrap_content 模式
                break;
            case MeasureSpec.EXACTLY: //matchParent 模式、或者具体数值(200dp)
                mWidth = widthSize;
                break;
        }
        return mWidth;
    }

    private int measureHeight(int heightMeasureSpec) {
        int heightSize = MeasureSpec.getSize(heightMeasureSpec);
        int heightMode = MeasureSpec.getMode(heightMeasureSpec);
        switch (heightMode) {
            case MeasureSpec.UNSPECIFIED:
            case MeasureSpec.AT_MOST:
                break;
            case MeasureSpec.EXACTLY:
                mHeight = heightSize;
                break;
        }
        return mHeight;
    }

    /**
     * 将drawable转成bitmap
     */
    private Bitmap drawableToBitmap(Drawable drawable) {
        //根据获得的drawable的透明度/不透明度,来设置Bitmap配置
        Bitmap.Config config = drawable.getOpacity() != PixelFormat.OPAQUE ? Bitmap.Config.ARGB_8888 : Bitmap.Config.RGB_565;
        Bitmap bitmap = Bitmap.createBitmap(mWidth, mHeight, config);
        /**
         * 在onDraw方法中调用canvas.drawBitmap()时需要构造一个绘制位图的画布,否则canvas绘制的位图将不显示,变成黑色
         */
        Canvas canvas = new Canvas(bitmap);
        //为可绘制的图形指定一个边框,大小为图片大固定宽和高
        drawable.setBounds(0, 0, mWidth, mHeight);
        //调用此方法绘制,绘制setBounds()方法指定大小的边界
        drawable.draw(canvas);
        return bitmap;
    }
}
我们不用修改xml,按之前的match_parent模式重新运行一下我们的demo,看看效果会发生我们变化呢?

可以看到,我们SimpleImageView已经如约而至的全屏了。当然,你也可以设置成任何尺寸,它的宽、高都会做出相应的改变,不信你可以试试。这便是我们最简单的一个自定义View的例子了,通过这个例子,我们可以了解自定义View的一些流程,以便于往后我们更加深入的学习自定义View。
<声明>如有转载请附加原文链接:https://blog.csdn.net/smile_Running/article/details/81507191