转自:https://blog.csdn.net/c2a2o2/article/details/79248254感谢原创作者!
Image Inpainting
Goal
- In this chapter,
-
- We will learn how to remove small noises, strokes etc in old photographs by a method called inpainting
- We will see inpainting functionalities in OpenCV.
Basics
Most of you will have some old degraded photos at your home with some black spots, some strokes etc on it. Have you ever thought of restoring it back? We can’t simply erase them in a paint tool because it is will simply replace black structures with white structures which is of no use. In these cases, a technique called image inpainting is used. The basic idea is simple: Replace those bad marks with its neighbouring pixels so that it looks like the neigbourhood. Consider the image shown below (taken from Wikipedia):

Several algorithms were designed for this purpose and OpenCV provides two of them. Both can be accessed by the same function, cv2.inpaint()
First algorithm is based on the paper “An Image Inpainting Technique Based on the Fast Marching Method” by Alexandru Telea in 2004. It is based on Fast Marching Method. Consider a region in the image to be inpainted. Algorithm starts from the boundary of this region and goes inside the region gradually filling everything in the boundary first. It takes a small neighbourhood around the pixel on the neigbourhood to be inpainted. This pixel is replaced by normalized weighted sum of all the known pixels in the neigbourhood. Selection of the weights is an important matter. More weightage is given to those pixels lying near to the point, near to the normal of the boundary and those lying on the boundary contours. Once a pixel is inpainted, it moves to next nearest pixel using Fast Marching Method. FMM ensures those pixels near the known pixels are inpainted first, so that it just works like a manual heuristic operation. This algorithm is enabled by using the flag, cv2.INPAINT_TELEA.
Second algorithm is based on the paper “Navier-Stokes, Fluid Dynamics, and Image and Video Inpainting” by Bertalmio, Marcelo, Andrea L. Bertozzi, and Guillermo Sapiro in 2001. This algorithm is based on fluid dynamics and utilizes partial differential equations. Basic principle is heurisitic. It first travels along the edges from known regions to unknown regions (because edges are meant to be continuous). It continues isophotes (lines joining points with same intensity, just like contours joins points with same elevation) while matching gradient vectors at the boundary of the inpainting region. For this, some methods from fluid dynamics are used. Once they are obtained, color is filled to reduce minimum variance in that area. This algorithm is enabled by using the flag, cv2.INPAINT_NS.
Code
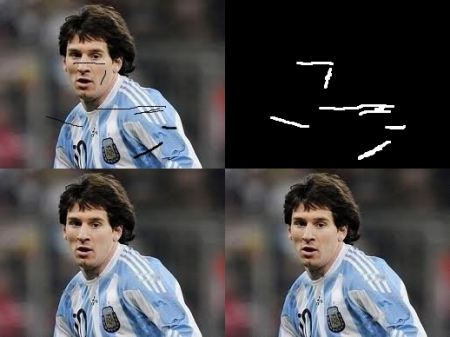
We need to create a mask of same size as that of input image, where non-zero pixels corresponds to the area which is to be inpainted. Everything else is simple. My image is degraded with some black strokes (I added manually). I created a corresponding strokes with Paint tool.
import numpy as np
import cv2

img = cv2.imread('messi_2.jpg')
mask = cv2.imread('mask2.png',0)

dst = cv2.inpaint(img,mask,3,cv2.INPAINT_TELEA)

cv2.imshow('dst',dst)
cv2.waitKey(0)
cv2.destroyAllWindows()
See the result below. First image shows degraded input. Second image is the mask. Third image is the result of first algorithm and last image is the result of second algorithm.

Additional Resources
- Bertalmio, Marcelo, Andrea L. Bertozzi, and Guillermo Sapiro. “Navier-stokes, fluid dynamics, and image and video inpainting.” In Computer Vision and Pattern Recognition, 2001. CVPR 2001. Proceedings of the 2001 IEEE Computer Society Conference on, vol. 1, pp. I-355. IEEE, 2001.
- Telea, Alexandru. “An image inpainting technique based on the fast marching method.” Journal of graphics tools 9.1 (2004): 23-34.
Exercises
- OpenCV comes with an interactive sample on inpainting,
samples/python2/inpaint.py, try it. - A few months ago, I watched a video on Content-Aware Fill, an advanced inpainting technique used in Adobe Photoshop. On further search, I was able to find that same technique is already there in GIMP with different name, “Resynthesizer” (You need to install separate plugin). I am sure you will enjoy the technique.
图像修补就是使用坏点周围的像素取代坏点,这样它看起来和周围像素就比较像了。
OpenCV 使用函数 cv2.inpaint() 来实施。
第一个算法是根据 Alexandru_Telea 在 2004 发表的文章实现的。它是基于快速行进算法的。以图像中一个要修补的区域为例。算法从这个区域的边界开始向区域内部慢慢前进,首先填充区域边界像素。它要选取待修补像素周围的一个小的邻域,使用这个邻域内的归一化加权和更新待修复的像素值。权重的选择是非常重要的。对于靠近带修复点的像素点,靠近正常边界像素点和在轮廓上的像素点给予更高的权重。当一个像素被修复之后,使用快速行进算法(FMM)移动到下一个最近的像素。FMM 保证了靠近已知(没有退化的)像素点的坏点先被修复,这与手工启发式操作比较类似。可以通过设置标签参数为 cv2.INPAINT_ TELEA 来使用此算法。
第二个算法是根据 Bertalmio,Marcelo,Andrea_L.Bertozzi, 和 Guillermo_Sapiro在 2001 年发表的文章实现的。这个算法是基于流体动力学并使用了偏微分方程。基本原理是启发式的。它首先沿着正常区域的边界向退化区域的前进(因为边界是连续的,所以退化区域非边界与正常区域的边界应该也是连续的)。它通过匹配待修复区域中的梯度向量来延伸等光强线(isophotes,由灰度值相等的点练成的线)。为了实现这个目的,作者是用来流体动力学中的一些方法。完成这一步之后,通过填充颜色来使这个区域内的灰度值变化最小。可以通过设置标签参数为 cv2.INPAINT_NS 来使用此算法。
第一幅图是退化的输入图像,第二幅是掩模图像。第三幅是使用第一个算法的结果,最后一副是使用第二个算法的结果。
一、图像修复简介
图像修复是图像复原中的一个重要内容,其目的是利用图像现有的信息来恢复丢失的信息。可用于旧照片中丢失信息的恢复,视频文字去除以及视频错误隐藏等。简言之,图像修复就是对图像上信息缺损区域进行信息填充的过程,其目的就是为了对有信息缺损的图像进行复原,并且使得观察者无法察觉到图像曾经缺损或者已经修复
图像修复技术简单来说,就是利用那些被破坏区域的边缘,即是边缘的颜色和结构,繁殖和混合到损坏的图像中,来进行修复图像
目前存在两大类图像修复技术:一类是用于修复小尺度缺损的数字图像修补(inpainting)技术。即,利用待修补区域的边缘信息,同时采用一种由粗到精的方法来估计等照度线的方向,并采用传播机制将信息传播到待修补的区域内,以便达到较好的修补效果;另外一类是用于填充图像大块丢失信息的图像补全技术。目前,这一技术分为以下两种方法:一种是基于图像分解的修复方法,其主要思想是将图像分解为结构部分和纹理部分。其中,结构部分用inpainting的技术来修复,而纹理部分则采用纹理合成的方法来填充。另一种方法是用基于块的纹理合成技术来填充丢失的信息,其主要思想是:首先从待修补区域的边界上选取一个像素点,同时以该点为中心,根据图像的纹理特征,选择大小合适的纹理块,然后在待修补区域的周围寻找与之最相近的纹理匹配块来替代该纹理块。近几年来,利用纹理合成来修复大块丢失信息的图像合成技术得到了相当的研究,也取得了一定的成果。需要提醒的是,图像修复技术是一种对视觉感知过程的学习和理解。它是一个不确定问题,没有唯一解的存在,解的合理性取决于视觉系统的接受程度。换言之,为了达到较好的视觉效果,我们必须让修复效果更加符合视觉感知的特性,使得图像看起来浑然一体,没有修改过的痕迹。
二、原理介绍opencv提供了2中方法,这里主要说的是INPAINT_TELEA
参考文献为Alexandru Telea于2004年发表于Journal of GraphicTools上An ImageInpainting Technique Based On the Fast Marching Method”也称为FMM算法
如何修复一个像素点的?
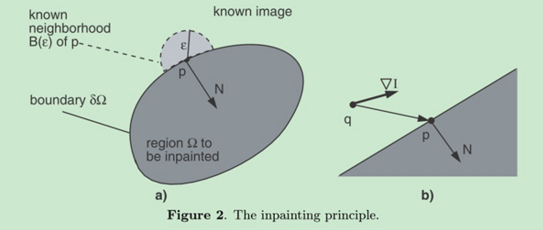
参考上图,Ω区域是待修复的区域;δΩ指Ω的边界);要修复Ω中的像素,就需要计算出新的像素值来代替原值。
现在假设p点是我们要修复的像素。以p为中心选取一个小邻域B(ε),该邻域中的点像素值都是已知的(只要已知的)。(这个ε就是opencv函数中参数 inpaintRadius)
现在假设p点是我们要修复的像素。以p为中心选取一个小邻域B(ε),该邻域中的点像素值都是已知的(只要已知的)。(这个ε就是opencv函数中参数 inpaintRadius)
q为 Bε(p)中的一点,由q点计算P的灰度值公式如下

显然,我们需要的是用邻域Bε(p)中的所有点计算p点的新灰度值。显然,各个像素点所起的作用应该是不同的,也就引入了权值函数来决定哪些像素的值对新像素值影响更大,哪些比较小。采用下面的公式(公式2):

这里的w(p, q)就是权值函数,是用来限定邻域中各像素的贡献大小的。
w(p, q) = dir(p, q) ·dst(p, q) · lev(p, q)
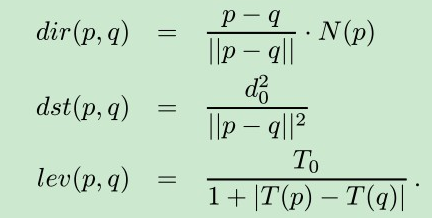
其中,d0和 T0分别为距离参数和水平集参数,一般都取为 1。方向因子 dir(p,q)保证了越靠近法线方向 N = ?T的像素点对 p点的贡献最大;几何距离因子 dst(p,q)保证了离 p点越近的像素点对p点贡献越大;水平集距离因子lev(p,q)保证了离经过点 p的待修复区域的轮廓线越近的已知像素点对点 p的贡献越大。

三、图像修复应用
基于OpenCV的两种去水印方案
1. 基于 inpaint 方法(网上的方法,处理质量较低)
- 算法理论:基于Telea在2004年提出的基于快速行进的修复算法(FMM算法),先处理待修复区域边缘上的像素点,然后层层向内推进,直到修复完所有的像素点
- 处理方式:由ui人员制作出黑底白色水印且相同位置的水印蒙版图(必须单通道灰度图),然后使用inpaint方法处理原始图像,具体使用时可把水印区放粗,这样处理效果会好点
需要带水印的图,和该图一样大小的的黑底白色水印且位置相同的水印图

    test_dir = 'xxx'
    mask_dir = 'xxx'
    save_dir ='xxx'
    src = cv2.imread(rental_dir)
    mask = cv2.imread(wm_dir, cv2.IMREAD_GRAYSCALE)
    dst = cv2.inpaint(src, mask, 3, cv2.INPAINT_TELEA)
    cv2.imwrite(save_dir, dst)
2. 基于像素的反色中和(处理质量较高)
参考自ps去水印原理,通过一张白底的反色水印图来中和原图水印
需要到水印的图,和该图一样大小的白底棕色(128,128,128)的水印且位置相同的水印图,128的效果比较好
    test_dir = 'xxx'
    mask_dir = 'xxx'
    save_dir ='xxx'
    src = cv2.imread(test_dir)
    mask = cv2.imread(mask_dir)
    save = numpy.zeros(src.shape, numpy.uint8)
    for row in range(src.shape[0]):
        for col in range(src.shape[1]):
            for channel in range(src.shape[2]):
                if mask[row, col, channel] == 0:
                    val = 0
                else:
                    reverse_val = 255 - src[row, col, channel]
                    val = 255 - reverse_val * 256 / mask[row, col, channel]
                    if val < 0:
                        val = 0
                save[row, col, channel] = val
    cv2.imwrite(save_dir, save)
第二种方面明显比第一种要好,但是水印的边角处理不好,可以先用二在用一,效果会更好
参考自https://my.oschina.net/u/2400083/blog/732321