工作上遇到了,所以自己琢磨了一下,在这里来一个详细总结,那些关于WebService和CXF什么的我这里就不多说了,那些网上一搜一大把,就直接上干货。
这里有两种方式,一种是引入依赖,另一种是下载apache-cxf的二进制文件解压缩,在eclipse里配置好,这样就不要引入依赖了,在apache-cxf/lib目录下有所有关于CXF的jar包和Spring相关的jar包,可以自己下载以后去看,如果还需引入其他jar包,另外在pom中添加依赖,下载后记得配置环境变量,先说第一种。
一、服务端
第一种
1、建立项目,引入依赖
<dependency>
    <groupId>org.apache.cxf</groupId>
    <artifactId>cxf-core</artifactId>
    <version>3.1.4</version>
</dependency>
<dependency>
    <groupId>org.apache.cxf</groupId>
    <artifactId>cxf-rt-transports-http</artifactId>
    <version>3.1.4</version>
</dependency>
<dependency>
    <groupId>org.apache.cxf</groupId>
    <artifactId>cxf-rt-frontend-jaxws</artifactId>
    <version>3.1.4</version>
</dependency>
CXF只需添加这三个jar包的依赖,Maven会自动引入帮我们引入其他jar包。在pom文件里添加完成后保存,就会触发Maven自动去下载你添加的依赖jar包(如果你本地仓库有就直接是取的本地仓库的) ,然后项目目录下就会有Maven Dependencies,如下图,是添加完成后的。
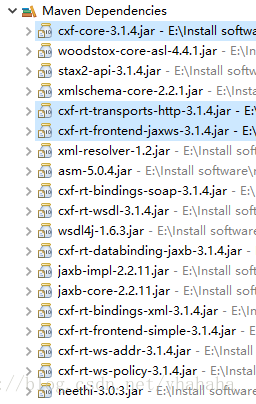
在pom文件中我只添加了三个依赖jar包,其他这么多jar包就是Maven自动为我添加的。和spring整合发布webservice还要加入spring的依赖jar包,这个就自己去添加了,第一种就说完了。
第二种
把下载的二进制文件解压缩到一个目录,然后配置环境变量:
1、变量名:CXF_HOME 值:apache-cxf的解压缩路径,示例:E:\Install software\apache-cxf-3.2.5
2、在path后面加上 %CXF_HOME%/bin;
在cmd命令中输入wsdl2java,如果有提示usage,就表明配置成功。
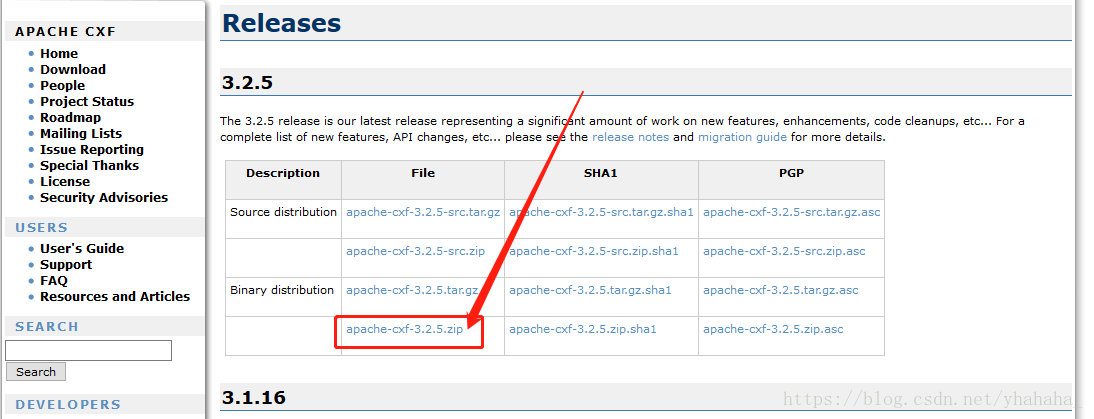
apache-cxf二进制文件下载地址:http://cxf.apache.org/download.html
下载箭头所指的那个:

再就是建立项目,不过不需要引入依赖了,只要在eclipse里配置了,如图:
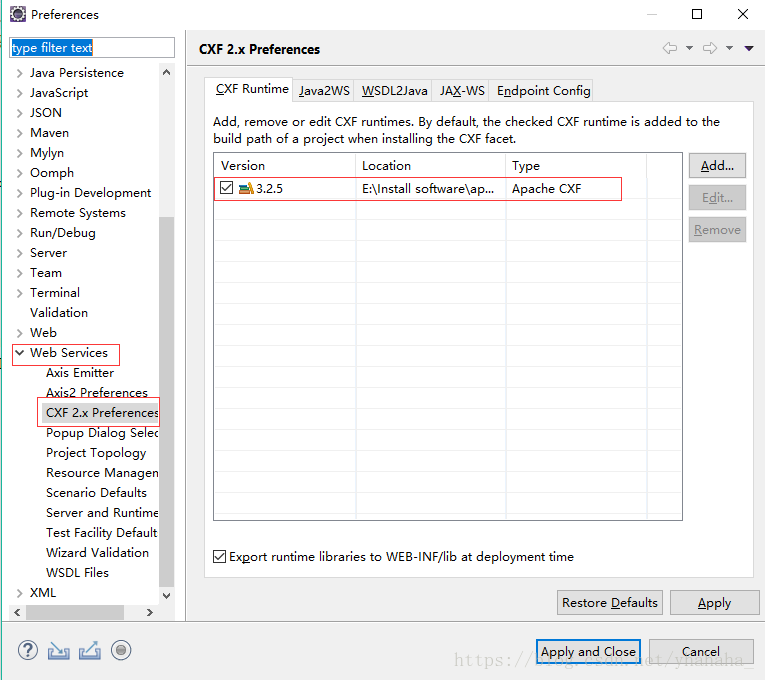
在项目上右键,Build Path / Configure Build Path / Add library / CXF Runtime,然后选择apache-cxf,点击Finish就好了,你的项目目录下就会多出一个Apache CXF Library,其他的就跟下面一样了。
不过这种方法在运行的时候可能会隔段时间就会报错,但是服务还是能正常运行,下面是报错信息:
DefaultValidationEventHandler: [ERROR]: prefix wsdp is not bound to a namespace
Location:  node: [wsd:Types: null]javax.xml.bind.UnmarshalException: prefix wsdp is not bound to a namespace- with linked exception:
[java.lang.IllegalArgumentException: prefix wsdp is not bound to a namespace]
at 到网上搜索报错原因,是因为lib目录下有多余jar包导致的,解决方案是把多余的jar包删除。
- cxf-services-ws-discovery-api-3.1.4.jar
- services-ws-discovery-service-3.1.4.jar
- services-wsn-api-3.1.4.jar
- services-wsn-core-3.1.4.jar
- manifest.jar
其中,MANIFEST.MF文件在这个目录下..\apache-cxf-3.2.5\samples\jax_rs\minimal_osgi\src\main\resources\META-INF。
2、代码
创建一个接口,记得加上@WebService注解,表示你要“暴露”的接口(服务类)。
@WebService
public interface HelloService {

	public String sayHello(String name) ;

}
实现类:
//实现类上可以不添加@Webservice注解
public class HelloServiceImp implements HelloService {

	@Override
	public String sayHello(String name) {
		return "大家好,我是"+name;
	}
}
3、配置文件
配置方式的话也有两种,先来看下第一种方式。
第一种配置方式
3.1 spring.xml
<?xml version="1.0" encoding="UTF-8"?>
<beans xmlns="http://www.springframework.org/schema/beans"
   xmlns:xsi="http://www.w3.org/2001/XMLSchema-instance"
xmlns:context="http://www.springframework.org/schema/context"
xsi:schemaLocation="http://www.springframework.org/schema/beans
                    http://www.springframework.org/schema/beans/spring-beans-3.0.xsd
                    http://www.springframework.org/schema/context
                    http://www.springframework.org/schema/context/spring-context-3.0.xsd">

    <import resource="spring-cxf.xml" />

</beans>
3.2 spring-cxf.xml
<?xml version="1.0" encoding="UTF-8"?>
<beans xmlns="http://www.springframework.org/schema/beans"
   xmlns:xsi="http://www.w3.org/2001/XMLSchema-instance"
xmlns:context="http://www.springframework.org/schema/context"
  xmlns:jaxws="http://cxf.apache.org/jaxws" <!-- 别忘记添加命名空间 -->
xsi:schemaLocation="http://www.springframework.org/schema/beans
                    http://www.springframework.org/schema/beans/spring-beans-3.0.xsd
                    http://www.springframework.org/schema/context
                    http://www.springframework.org/schema/context/spring-context-3.0.xsd
                    http://cxf.apache.org/jaxws
                    http://cxf.apache.org/schemas/jaxws.xsd">

     <!--其中id是自己定义的,implementor是接口实现类,address就是访问的地址 -->
     <!-- 相当于Endpoint.publish("http://localhost:8080/service", newHelloServiceImp()); -->
     <jaxws:endpoint id="helloService" implementor="com.eastcom.ws.impl.HelloServiceImp" address="/hello"/>

</beans>
第二种配置方式
spring.xml
<?xml version="1.0" encoding="UTF-8"?>
<beans xmlns="http://www.springframework.org/schema/beans"
   xmlns:xsi="http://www.w3.org/2001/XMLSchema-instance"
xmlns:context="http://www.springframework.org/schema/context"
xsi:schemaLocation="http://www.springframework.org/schema/beans
                    http://www.springframework.org/schema/beans/spring-beans-3.0.xsd
                    http://www.springframework.org/schema/context
                    http://www.springframework.org/schema/context/spring-context-3.0.xsd">

    <bean id="HelloService" class="com.eastcom.ws.impl.HelloServiceImp">
    <import resource="spring-cxf.xml" />
</beans>
spring-cxf.xml
<?xml version="1.0" encoding="UTF-8"?>
<beans xmlns="http://www.springframework.org/schema/beans"
   xmlns:xsi="http://www.w3.org/2001/XMLSchema-instance"
xmlns:context="http://www.springframework.org/schema/context"
  xmlns:jaxws="http://cxf.apache.org/jaxws" <!-- 别忘记添加命名空间 -->
xsi:schemaLocation="http://www.springframework.org/schema/beans
                    http://www.springframework.org/schema/beans/spring-beans-3.0.xsd
                    http://www.springframework.org/schema/context
                    http://www.springframework.org/schema/context/spring-context-3.0.xsd
                    http://cxf.apache.org/jaxws
                    http://cxf.apache.org/schemas/jaxws.xsd">

    <!-- implementor属性里写的是bean的id,但是要以#开头,特定写法 -->
     <jaxws:endpoint implementor="#HelloService" address="/hello"/>

</beans>
补充:
1、至于以前还需引入的 cxf.xml 和 cxf-servlet.xml,网上说是cxf3.0以后就不需要了,至于为什么,原因在这里。
<import resource="classpath:META-INF/cxf/cxf.xml" />
<import resource="classpath:META-INF/cxf/cxf-servlet.xml" />
2、关于spring-cxf.xml中另一种配置方式。
<!--相当于:JaxWsServerFactoryBean factory = new JaxWsServerFactoryBean();   -->
<jaxws:server address="/hello" serviceClass="com.eastcom.ws.impl.HelloServiceImp">
    <!-- 配置消息拦截器 -->
    <jaxws:inInterceptors>
        <bean class="org.apache.cxf.interceptor.LoggingInInterceptor"></bean>
    </jaxws:inInterceptors>
    <jaxws:outInterceptors>
        <bean class="org.apache.cxf.interceptor.LoggingOutInterceptor"></bean>
    </jaxws:outInterceptors>
</jaxws:server>
上面配置完了,该到web.xml文件里配置了。
<context-param>
    <param-name>contextConfigLocation</param-name>
    <param-value>classpath:spring.xml</param-value>
</context-param>
<listener>
    <listener-class>org.springframework.web.context.ContextLoaderListener</listener-class>
</listener>
<servlet>
    <servlet-name>cxf</servlet-name>
    <servlet-class>org.apache.cxf.transport.servlet.CXFServlet</servlet-class>
    <load-on-startup>1</load-on-startup>
</servlet>
<servlet-mapping>
    <servlet-name>cxf</servlet-name>
    <url-pattern>/service/*</url-pattern>
</servlet-mapping>
4、运行
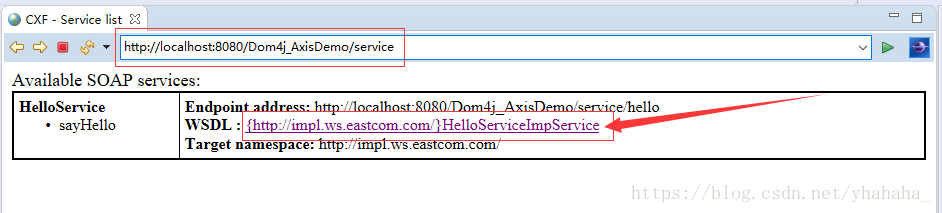
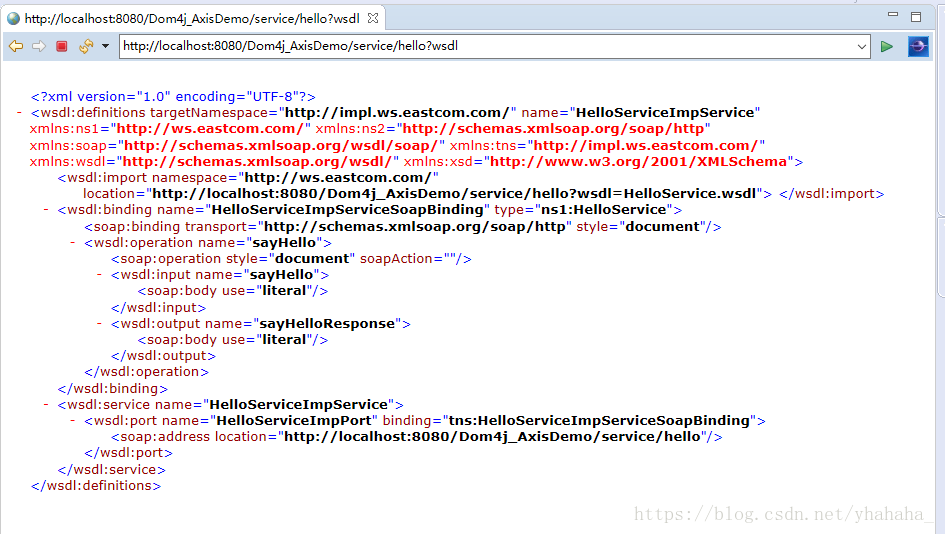
配置完了以后,部署到Tomcat上运行,右键run as/run on server/Finish,Eclipse弹出下图所示界面表示服务已经成功发布,如果弹出404或者报错,就是发布失败。当然也可以到浏览器里面看运行效果,地址是:http://localhost:8080/项目名/service 。点击箭头所指的地方就能看到wsdl文件。(不要在意我这里的项目名)
二、生成客户端
第一种方式
CXF提供的根据wsdl生成客户端代码的命令。
在cmd命令中输入:wsdl2java -d 指定代码生成目录 -client webservice的访问地址url
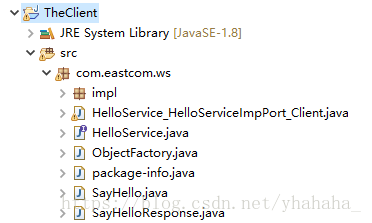
示例:wsdl2java -d E:\\AllWorkSpace\\MyWork\\TheClient\\src -client http://localhost:8080/Dom4j_AxisDemo/service/hello?wsdl
注意中间的空格!!!
具体用法自行百度,这里只对上面的用法做解释:
-d 指定要产生代码所在目录
-client 生成客户端测试web service的代码
代码生成后如图:
第二种方式
JDK提供的生成客户端的命令。
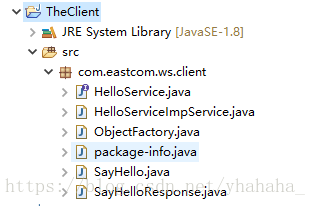
在cmd命令中输入:wsimport -s 指定代码生成目录 -p 包名 -keep webservice访问地址url
示例:wsimport -s E:\\AllWorkSpace\\MyWork\\TheClient\\src -p com.eastcom.ws.client -keep http://localhost:8080/Dom4j_AxisDemo/service/hello?wsdl
同样注意中间的空格!!!
目录地址中不能含有空格,发布地址不要忘了?wsdl
三、测试
代码
public class TestService {
	public static void main(String[] args) {
		HelloService service=new HelloServiceImpService().getHelloServiceImpPort();
		System.out.println(service.sayHello("CXF"));
	}
}
结果

第一次写,也当做一次学习经历,以上就是我自己总结的内容,中间有我遇到的问题,以及解决方案,有引用到别人的经验。