**
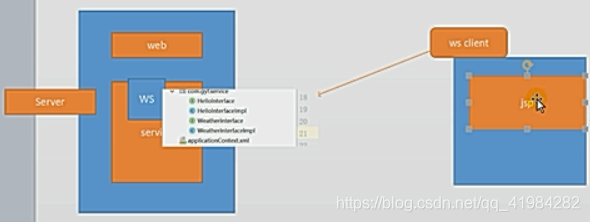
一、原理
**
**
二、开发步骤
**
第一步:创建一个javaweb项目
第二步:然后导入cxf的jar包,(内部已经有spring的jar包了)
第三步:利用wsdl2java命令生成客户端代码,命令如下:
wsdl2java -d . http://127.0.0.1:8080/ws/weather?wsdl

第四步:配置applicationContext.xml
<?xml version="1.0" encoding="UTF-8"?>
<beans xmlns="http://www.springframework.org/schema/beans"
       xmlns:xsi="http://www.w3.org/2001/XMLSchema-instance"
       xmlns:jaxws="http://cxf.apache.org/jaxws"
       xmlns:jaxrs="http://cxf.apache.org/jaxrs"
       xmlns:cxf="http://cxf.apache.org/core"
       xsi:schemaLocation="http://www.springframework.org/schema/beans
				           http://www.springframework.org/schema/beans/spring-beans.xsd
				           http://cxf.apache.org/jaxrs
				           http://cxf.apache.org/schemas/jaxrs.xsd
				           http://cxf.apache.org/jaxws
				           http://cxf.apache.org/schemas/jaxws.xsd
				           http://cxf.apache.org/core
				           http://cxf.apache.org/schemas/core.xsd">
    <!-- 配置调用服务端的service -->
    <jaxws:client id="weatherService" address=" http://127.0.0.1:8080/ws/weather?wsdl" serviceClass="com.ykd.service.WeatherInterface"></jaxws:client>
</beans>
第五步:进行调用
public static void main(String[] args) {
		ApplicationContext context = new ClassPathXmlApplicationContext("classpath:applicationContext.xml");
		WeatherInterface weatherService = (WeatherInterface) context.getBean("weatherService");

		System.out.println(weatherService.queryWeather("广州"));
	}