1.前言:
首先我需要了解 invalidate与postInvalidate 的区别,然后网上找了些资料,大多都是一个版本,负责点的排版整齐,不负责的排版直接很乱,一堆代码集中在一起,也没有解释清楚。无奈直接选择看源码,然后源码直接给出了区别
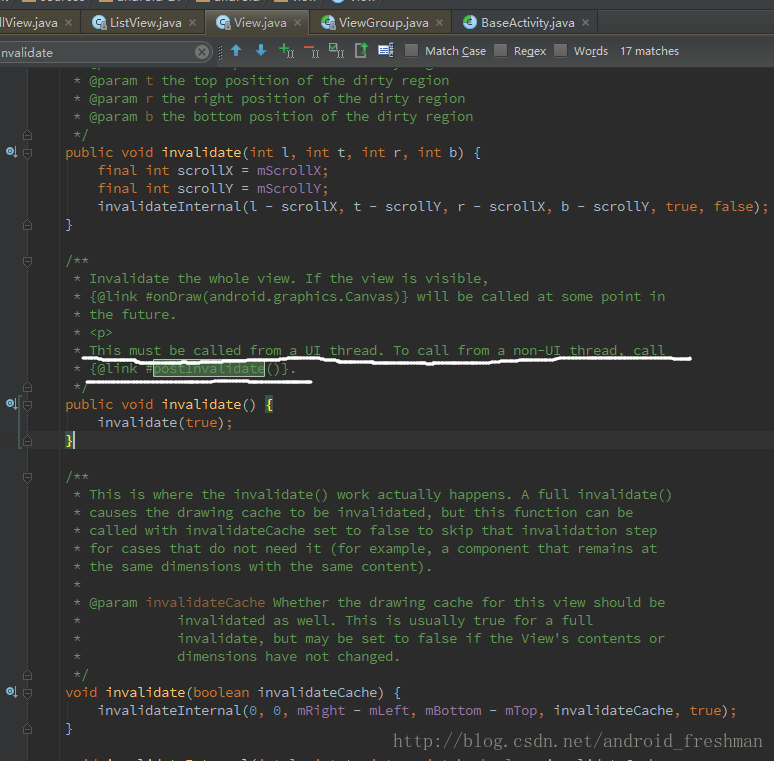
invalidate 该方法的调用会引起View树的重绘,常用于内部调用(比如 setVisiblity())或者需要刷新界面的时候,需要在主线程(即UI线程)中调用该方法。
postInvalidate 这个方法与invalidate方法的作用是一样的,都是使View树重绘,但两者的使用条件不同,postInvalidate是在非UI线程中调用
自然而然的就想了解它是如何实现的,然后看到一篇关于requestLayout、invalidate与postInvalidate 的相关解析,出自简书Android View 深度分析requestLayout、invalidate与postInvalidate,转载下加深了解,因为我在看源码的时候有很多地方不明白,这篇文章我觉得将的挺好的。
2.requestLayout:
当我们动态移动一个View的位置,或者View的大小、形状发生了变化的时候,我们可以在view中调用这个方法,即:
view.requestLayout();
那么该方法的作用是什么呢?
从方法名字可以知道,“请求布局”,那就是说,如果调用了这个方法,那么对于一个子View来说,应该会重新进行布局流程。但是,真实情况略有不同,如果子View调用了这个方法,其实会从View树重新进行一次测量、布局、绘制这三个流程,最终就会显示子View的最终情况。那么,这个方法是怎么实现的呢?我们从源码角度进行解析。
首先,我们看 View#requestLayout方法:
/**
 * Call this when something has changed which has invalidated the
 * layout of this view. This will schedule a layout pass of the view
 * tree. This should not be called while the view hierarchy is currently in a layout
 * pass ({@link #isInLayout()}. If layout is happening, the request may be honored at the
 * end of the current layout pass (and then layout will run again) or after the current
 * frame is drawn and the next layout occurs.
 *
 * <p>Subclasses which override this method should call the superclass method to
 * handle possible request-during-layout errors correctly.</p>
 */
//从源码注释可以看出,如果当前View在请求布局的时候,View树正在进行布局流程的话,
//该请求会延迟到布局流程完成后或者绘制流程完成且下一次布局发现的时候再执行。
@CallSuper
public void requestLayout() {
    if (mMeasureCache != null) mMeasureCache.clear();

    if (mAttachInfo != null && mAttachInfo.mViewRequestingLayout == null) {
        // Only trigger request-during-layout logic if this is the view requesting it,
        // not the views in its parent hierarchy
        ViewRootImpl viewRoot = getViewRootImpl();
        if (viewRoot != null && viewRoot.isInLayout()) {
            if (!viewRoot.requestLayoutDuringLayout(this)) {
                return;
            }
        }
        mAttachInfo.mViewRequestingLayout = this;
    }

    //为当前view设置标记位 PFLAG_FORCE_LAYOUT
    mPrivateFlags |= PFLAG_FORCE_LAYOUT;
    mPrivateFlags |= PFLAG_INVALIDATED;

    if (mParent != null && !mParent.isLayoutRequested()) {
        //向父容器请求布局
        mParent.requestLayout();
    }
    if (mAttachInfo != null && mAttachInfo.mViewRequestingLayout == this) {
        mAttachInfo.mViewRequestingLayout = null;
    }
}
在requestLayout方法中,首先先判断当前View树是否正在布局流程,接着为当前子View设置标记位,该标记位的作用就是标记了当前的View是需要进行重新布局的,接着调用mParent.requestLayout方法,这个十分重要,因为这里是向父容器请求布局,即调用父容器的requestLayout方法,为父容器添加PFLAG_FORCE_LAYOUT标记位,而父容器又会调用它的父容器的requestLayout方法,即requestLayout事件层层向上传递,直到DecorView,即根View,而根View又会传递给ViewRootImpl,也即是说子View的requestLayout事件,最终会被ViewRootImpl接收并得到处理。纵观这个向上传递的流程,其实是采用了责任链模式,即不断向上传递该事件,直到找到能处理该事件的上级,在这里,只有ViewRootImpl能够处理requestLayout事件。
在ViewRootImpl中,重写了requestLayout方法,我们看看这个方法,ViewRootImpl#requestLayout:
@Override
public void requestLayout() {
    if (!mHandlingLayoutInLayoutRequest) {
        checkThread();
        mLayoutRequested = true;
        scheduleTraversals();
    }
}在这里,调用了scheduleTraversals方法,这个方法是一个异步方法,最终会调用到ViewRootImpl#performTraversals方法,这也是View工作流程的核心方法,在这个方法内部,分别调用measure、layout、draw方法来进行View的三大工作流程,对于三大工作流程,前几篇文章已经详细讲述了,这里再做一点补充说明。
先看View#measure方法:
public final void measure(int widthMeasureSpec, int heightMeasureSpec) {
     ...

    if ((mPrivateFlags & PFLAG_FORCE_LAYOUT) == PFLAG_FORCE_LAYOUT ||
            widthMeasureSpec != mOldWidthMeasureSpec ||
            heightMeasureSpec != mOldHeightMeasureSpec) {
        ...
        if (cacheIndex < 0 || sIgnoreMeasureCache) {
            // measure ourselves, this should set the measured dimension flag back
            onMeasure(widthMeasureSpec, heightMeasureSpec);
            mPrivateFlags3 &= ~PFLAG3_MEASURE_NEEDED_BEFORE_LAYOUT;
        }
        ...
        mPrivateFlags |= PFLAG_LAYOUT_REQUIRED;
    }
}首先是判断一下标记位,如果当前View的标记位为PFLAG_FORCE_LAYOUT,那么就会进行测量流程,调用onMeasure,对该View进行测量,接着最后为标记位设置为PFLAG_LAYOUT_REQUIRED,这个标记位的作用就是在View的layout流程中,如果当前View设置了该标记位,则会进行布局流程。具体可以看如下View#layout源码:
public void layout(int l, int t, int r, int b) {
    ...
    //判断标记位是否为PFLAG_LAYOUT_REQUIRED,如果有,则对该View进行布局
    if (changed || (mPrivateFlags & PFLAG_LAYOUT_REQUIRED) == PFLAG_LAYOUT_REQUIRED) {
        onLayout(changed, l, t, r, b);
        //onLayout方法完成后,清除PFLAG_LAYOUT_REQUIRED标记位
        mPrivateFlags &= ~PFLAG_LAYOUT_REQUIRED;
        ListenerInfo li = mListenerInfo;
        if (li != null && li.mOnLayoutChangeListeners != null) {
            ArrayList<OnLayoutChangeListener> listenersCopy =
                    (ArrayList<OnLayoutChangeListener>)li.mOnLayoutChangeListeners.clone();
            int numListeners = listenersCopy.size();
            for (int i = 0; i < numListeners; ++i) {
                listenersCopy.get(i).onLayoutChange(this, l, t, r, b, oldL, oldT, oldR, oldB);
            }
        }
    }

    //最后清除PFLAG_FORCE_LAYOUT标记位
    mPrivateFlags &= ~PFLAG_FORCE_LAYOUT;
    mPrivateFlags3 |= PFLAG3_IS_LAID_OUT;
}
那么到目前为止,requestLayout的流程便完成了。
小结:子View调用requestLayout方法,会标记当前View及父容器,同时逐层向上提交,直到ViewRootImpl处理该事件,ViewRootImpl会调用三大流程,从measure开始,对于每一个含有标记位的view及其子View都会进行测量、布局、绘制。
3.invalidate:
该方法的调用会引起View树的重绘,常用于内部调用(比如 setVisiblity())或者需要刷新界面的时候,需要在主线程(即UI线程)中调用该方法。那么我们来分析一下它的实现。
首先,一个子View调用该方法,那么我们直接看View#invalidate方法:
public void invalidate() {
    invalidate(true);
}
void invalidate(boolean invalidateCache) {
    invalidateInternal(0, 0, mRight - mLeft, mBottom - mTop, invalidateCache, true);
}
void invalidateInternal(int l, int t, int r, int b, boolean invalidateCache,
        boolean fullInvalidate) {
    if (mGhostView != null) {
        mGhostView.invalidate(true);
        return;
    }

    //这里判断该子View是否可见或者是否处于动画中
    if (skipInvalidate()) {
        return;
    }

    //根据View的标记位来判断该子View是否需要重绘,假如View没有任何变化,那么就不需要重绘
    if ((mPrivateFlags & (PFLAG_DRAWN | PFLAG_HAS_BOUNDS)) == (PFLAG_DRAWN | PFLAG_HAS_BOUNDS)
            || (invalidateCache && (mPrivateFlags & PFLAG_DRAWING_CACHE_VALID) == PFLAG_DRAWING_CACHE_VALID)
            || (mPrivateFlags & PFLAG_INVALIDATED) != PFLAG_INVALIDATED
            || (fullInvalidate && isOpaque() != mLastIsOpaque)) {
        if (fullInvalidate) {
            mLastIsOpaque = isOpaque();
            mPrivateFlags &= ~PFLAG_DRAWN;
        }

        //设置PFLAG_DIRTY标记位
        mPrivateFlags |= PFLAG_DIRTY;

        if (invalidateCache) {
            mPrivateFlags |= PFLAG_INVALIDATED;
            mPrivateFlags &= ~PFLAG_DRAWING_CACHE_VALID;
        }

        // Propagate the damage rectangle to the parent view.
        //把需要重绘的区域传递给父容器
        final AttachInfo ai = mAttachInfo;
        final ViewParent p = mParent;
        if (p != null && ai != null && l < r && t < b) {
            final Rect damage = ai.mTmpInvalRect;
            damage.set(l, t, r, b);
            //调用父容器的方法,向上传递事件
            p.invalidateChild(this, damage);
        }
        ...
    }
}可以看出,invalidate有多个重载方法,但最终都会调用invalidateInternal方法,在这个方法内部,进行了一系列的判断,判断View是否需要重绘,接着为该View设置标记位,然后把需要重绘的区域传递给父容器,即调用父容器的invalidateChild方法。
接着我们看ViewGroup#invalidateChild:
/**
 * Don't call or override this method. It is used for the implementation of
 * the view hierarchy.
 */
public final void invalidateChild(View child, final Rect dirty) {

    //设置 parent 等于自身
    ViewParent parent = this;

    final AttachInfo attachInfo = mAttachInfo;
    if (attachInfo != null) {
        // If the child is drawing an animation, we want to copy this flag onto
        // ourselves and the parent to make sure the invalidate request goes
        // through
        final boolean drawAnimation = (child.mPrivateFlags & PFLAG_DRAW_ANIMATION)
                == PFLAG_DRAW_ANIMATION;

        // Check whether the child that requests the invalidate is fully opaque
        // Views being animated or transformed are not considered opaque because we may
        // be invalidating their old position and need the parent to paint behind them.
        Matrix childMatrix = child.getMatrix();
        final boolean isOpaque = child.isOpaque() && !drawAnimation &&
                child.getAnimation() == null && childMatrix.isIdentity();
        // Mark the child as dirty, using the appropriate flag
        // Make sure we do not set both flags at the same time
        int opaqueFlag = isOpaque ? PFLAG_DIRTY_OPAQUE : PFLAG_DIRTY;

        if (child.mLayerType != LAYER_TYPE_NONE) {
            mPrivateFlags |= PFLAG_INVALIDATED;
            mPrivateFlags &= ~PFLAG_DRAWING_CACHE_VALID;
        }

        //储存子View的mLeft和mTop值
        final int[] location = attachInfo.mInvalidateChildLocation;
        location[CHILD_LEFT_INDEX] = child.mLeft;
        location[CHILD_TOP_INDEX] = child.mTop;

        ...

        do {
            View view = null;
            if (parent instanceof View) {
                view = (View) parent;
            }

            if (drawAnimation) {
                if (view != null) {
                    view.mPrivateFlags |= PFLAG_DRAW_ANIMATION;
                } else if (parent instanceof ViewRootImpl) {
                    ((ViewRootImpl) parent).mIsAnimating = true;
                }
            }

            // If the parent is dirty opaque or not dirty, mark it dirty with the opaque
            // flag coming from the child that initiated the invalidate
            if (view != null) {
                if ((view.mViewFlags & FADING_EDGE_MASK) != 0 &&
                        view.getSolidColor() == 0) {
                    opaqueFlag = PFLAG_DIRTY;
                }
                if ((view.mPrivateFlags & PFLAG_DIRTY_MASK) != PFLAG_DIRTY) {
                    //对当前View的标记位进行设置
                    view.mPrivateFlags = (view.mPrivateFlags & ~PFLAG_DIRTY_MASK) | opaqueFlag;
                }
            }

            //调用ViewGrup的invalidateChildInParent,如果已经达到最顶层view,则调用ViewRootImpl
            //的invalidateChildInParent。
            parent = parent.invalidateChildInParent(location, dirty);

            if (view != null) {
                // Account for transform on current parent
                Matrix m = view.getMatrix();
                if (!m.isIdentity()) {
                    RectF boundingRect = attachInfo.mTmpTransformRect;
                    boundingRect.set(dirty);
                    m.mapRect(boundingRect);
                    dirty.set((int) (boundingRect.left - 0.5f),
                            (int) (boundingRect.top - 0.5f),
                            (int) (boundingRect.right + 0.5f),
                            (int) (boundingRect.bottom + 0.5f));
                }
            }
        } while (parent != null);
    }
}可以看到,在该方法内部,先设置当前视图的标记位,接着有一个do…while…循环,该循环的作用主要是不断向上回溯父容器,求得父容器和子View需要重绘的区域的并集(dirty)。当父容器不是ViewRootImpl的时候,调用的是ViewGroup的invalidateChildInParent方法,我们来看看这个方法,ViewGroup#invalidateChildInParent:
public ViewParent invalidateChildInParent(final int[] location, final Rect dirty) {
    if ((mPrivateFlags & PFLAG_DRAWN) == PFLAG_DRAWN ||
            (mPrivateFlags & PFLAG_DRAWING_CACHE_VALID) == PFLAG_DRAWING_CACHE_VALID) {
        if ((mGroupFlags & (FLAG_OPTIMIZE_INVALIDATE | FLAG_ANIMATION_DONE)) !=
                    FLAG_OPTIMIZE_INVALIDATE) {

            //将dirty中的坐标转化为父容器中的坐标,考虑mScrollX和mScrollY的影响
            dirty.offset(location[CHILD_LEFT_INDEX] - mScrollX,
                    location[CHILD_TOP_INDEX] - mScrollY);

            if ((mGroupFlags & FLAG_CLIP_CHILDREN) == 0) {
                //求并集,结果是把子视图的dirty区域转化为父容器的dirty区域
                dirty.union(0, 0, mRight - mLeft, mBottom - mTop);
            }

            final int left = mLeft;
            final int top = mTop;

            if ((mGroupFlags & FLAG_CLIP_CHILDREN) == FLAG_CLIP_CHILDREN) {
                if (!dirty.intersect(0, 0, mRight - left, mBottom - top)) {
                    dirty.setEmpty();
                }
            }
            mPrivateFlags &= ~PFLAG_DRAWING_CACHE_VALID;

            //记录当前视图的mLeft和mTop值,在下一次循环中会把当前值再向父容器的坐标转化
            location[CHILD_LEFT_INDEX] = left;
            location[CHILD_TOP_INDEX] = top;

            if (mLayerType != LAYER_TYPE_NONE) {
                mPrivateFlags |= PFLAG_INVALIDATED;
            }
            //返回当前视图的父容器
            return mParent;

        }
        ...
    }
    return null;
}
可以看出,这个方法做的工作主要有:调用offset方法,把当前dirty区域的坐标转化为父容器中的坐标,接着调用union方法,把子dirty区域与父容器的区域求并集,换句话说,dirty区域变成父容器区域。最后返回当前视图的父容器,以便进行下一次循环。
回到上面所说的do…while…循环,由于不断向上调用父容器的方法,到最后会调用到ViewRootImpl的invalidateChildInParent方法,我们来看看它的源码,ViewRootImpl#invalidateChildInParent:
@Override
public ViewParent invalidateChildInParent(int[] location, Rect dirty) {
    checkThread();
    if (DEBUG_DRAW) Log.v(TAG, "Invalidate child: " + dirty);

    if (dirty == null) {
        invalidate();
        return null;
    } else if (dirty.isEmpty() && !mIsAnimating) {
        return null;
    }

    if (mCurScrollY != 0 || mTranslator != null) {
        mTempRect.set(dirty);
        dirty = mTempRect;
        if (mCurScrollY != 0) {
            dirty.offset(0, -mCurScrollY);
        }
        if (mTranslator != null) {
            mTranslator.translateRectInAppWindowToScreen(dirty);
        }
        if (mAttachInfo.mScalingRequired) {
            dirty.inset(-1, -1);
        }
    }

    final Rect localDirty = mDirty;
    if (!localDirty.isEmpty() && !localDirty.contains(dirty)) {
        mAttachInfo.mSetIgnoreDirtyState = true;
        mAttachInfo.mIgnoreDirtyState = true;
    }

    // Add the new dirty rect to the current one
    localDirty.union(dirty.left, dirty.top, dirty.right, dirty.bottom);
    // Intersect with the bounds of the window to skip
    // updates that lie outside of the visible region
    final float appScale = mAttachInfo.mApplicationScale;
    final boolean intersected = localDirty.intersect(0, 0,
            (int) (mWidth * appScale + 0.5f), (int) (mHeight * appScale + 0.5f));
    if (!intersected) {
        localDirty.setEmpty();
    }
    if (!mWillDrawSoon && (intersected || mIsAnimating)) {
        scheduleTraversals();
    }
    return null;
}可以看出,该方法所做的工作与上面的差不多,都进行了offset和union对坐标的调整,然后把dirty区域的信息保存在mDirty中,最后调用了scheduleTraversals方法,触发View的工作流程,由于没有添加measure和layout的标记位,因此measure、layout流程不会执行,而是直接从draw流程开始。
总结:当子View调用了invalidate方法后,会为该View添加一个标记位,同时不断向父容器请求刷新,父容器通过计算得出自身需要重绘的区域,直到传递到ViewRootImpl中,最终触发performTraversals方法,进行开始View树重绘流程(只绘制需要重绘的视图)
4.postInvalidate:
这个方法与invalidate方法的作用是一样的,都是使View树重绘,但两者的使用条件不同,postInvalidate是在非UI线程中调用,invalidate则是在UI线程中调用。
接下来我们分析postInvalidate方法的原理。
首先看View#postInvalidate:
public void postInvalidate() {
    postInvalidateDelayed(0);
}

public void postInvalidateDelayed(long delayMilliseconds) {
    // We try only with the AttachInfo because there's no point in invalidating
    // if we are not attached to our window
    final AttachInfo attachInfo = mAttachInfo;
    if (attachInfo != null) {
        attachInfo.mViewRootImpl.dispatchInvalidateDelayed(this, delayMilliseconds);
    }
}由以上代码可以看出,只有attachInfo不为null的时候才会继续执行,即只有确保视图被添加到窗口的时候才会通知view树重绘,因为这是一个异步方法,如果在视图还未被添加到窗口就通知重绘的话会出现错误,所以这样要做一下判断。接着调用了ViewRootImpl#dispatchInvalidateDelayed方法:
public void dispatchInvalidateDelayed(View view, long delayMilliseconds) {
    Message msg = mHandler.obtainMessage(MSG_INVALIDATE, view);
    mHandler.sendMessageDelayed(msg, delayMilliseconds);
}
这里用了Handler,发送了一个异步消息到主线程,显然这里发送的是MSG_INVALIDATE,即通知主线程刷新视图,具体的实现逻辑我们可以看看该mHandler的实现:
final ViewRootHandler mHandler = new ViewRootHandler();

final class ViewRootHandler extends Handler {
        @Override
        public String getMessageName(Message message) {
            ....
        }

        @Override
        public void handleMessage(Message msg) {
            switch (msg.what) {
            case MSG_INVALIDATE:
                ((View) msg.obj).invalidate();
                break;
            ...
        }
    }
}
可以看出,参数message传递过来的正是View视图的实例,然后直接调用了invalidate方法,然后继续invalidate流程。
到目前为止,对于常用的刷新视图的方法已经分析完毕。
5.requestLayout、invalidate的区别:
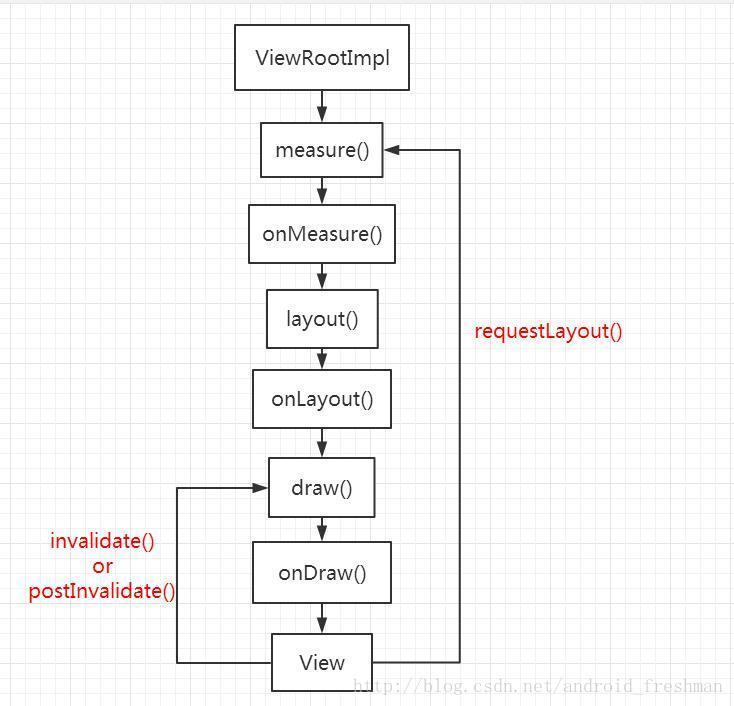
一般来说,如果View确定自身不再适合当前区域,比如说它的LayoutParams发生了改变,需要父布局对其进行重新测量、布局、绘制这三个流程,往往使用requestLayout。而invalidate则是刷新当前View,使当前View进行重绘,不会进行测量、布局流程,因此如果View只需要重绘而不需要测量,布局的时候,使用invalidate方法往往比requestLayout方法更高效.
重复一遍:出自简书Android View 深度分析requestLayout、invalidate与postInvalidate