基础环境
CUDA8.0 + CUDNN5.1 + Opencv2.4 + png++0.2.9 + torch+LuaJIT 安装以及配置问题(为MC-CNN铺垫)
2018年04月20日 22:05:18 阅读数:85 标签: CUDA8.0CUDNN5.1png 0.2.9OpenCV2.4Torch更多
个人分类: 系统安装
前段时间博主为了项目 进行了MC-CNN代码的复现。其中走了很多弯路,写出来防止以后大家踏坑。
以下的安装配置是完全适用于GitHub的那位博主的代码的。
以下就是那位GitHub的网址:
https://github.com/jzbontar/mc-cnn
安装步骤:
1.安装CUDA 8.0
2.安装CUDNN 5.1
3.安装OpenCV 2.4
4.安装png++ 0.2.9
5.安装Torch,LuaJIT
1.安装CUDA 8.0
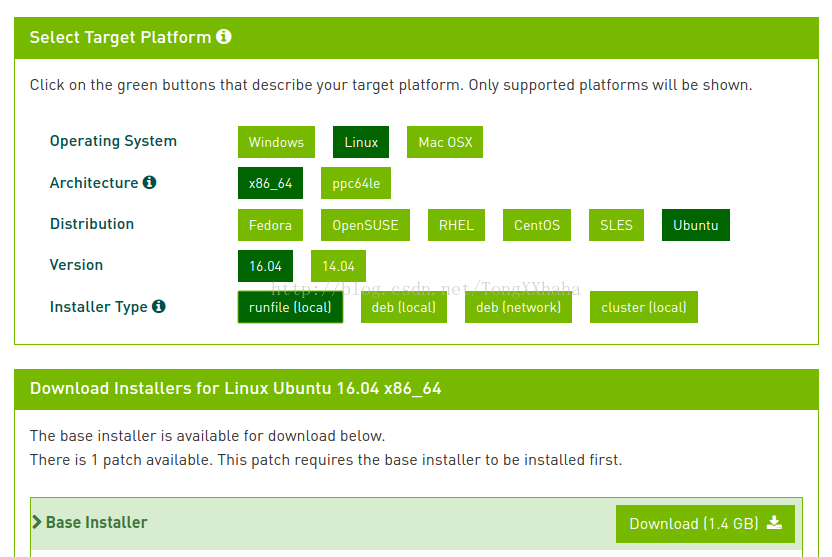
CUDA分network版本与local版本,建议下载local版本,因为network版本是在安装过程中下载的,选择本地版较好,同时建议下载runfile版本,据说deb版本太多坑,我之前用deb版本安装的时候也觉得不太方便....
下载完成之后,cd到该文件所在处,根据官网提示输入:
sudo sh cuda_8.0.61_375.26_linux.run

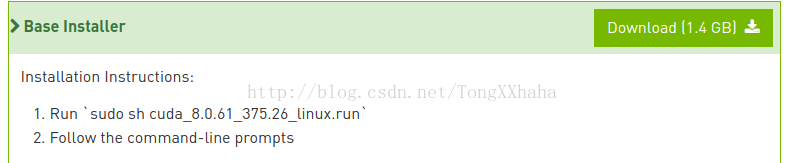
然后会让你选择安装内容,个人觉得除了cuda toolkit是必须的外,其他可选可不选。
具体可以参考下图
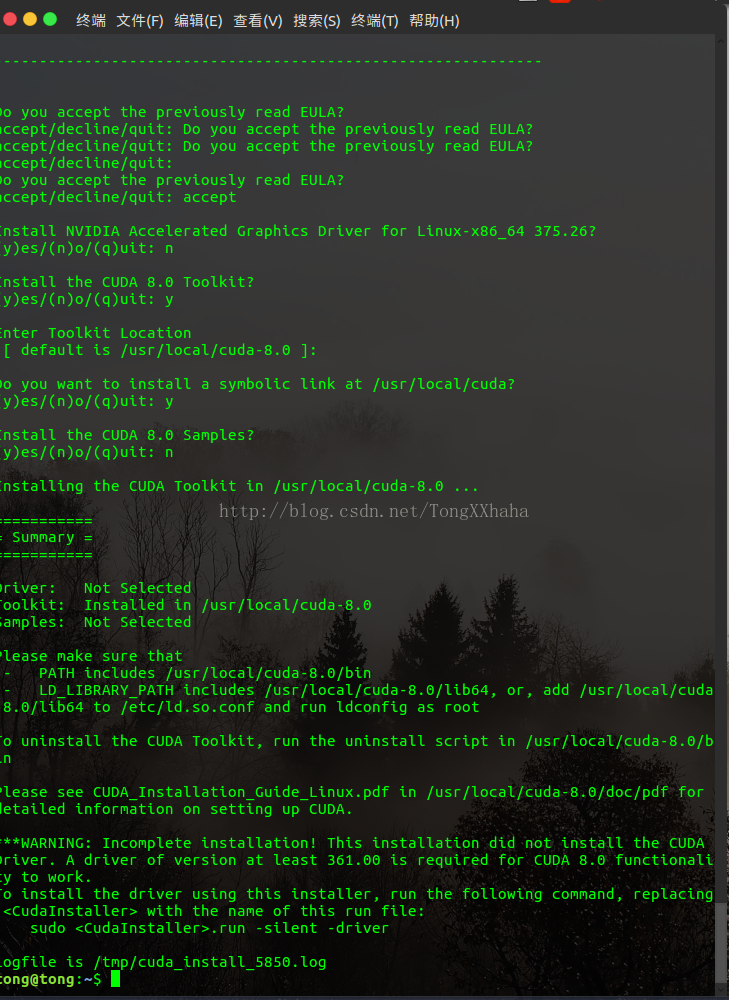
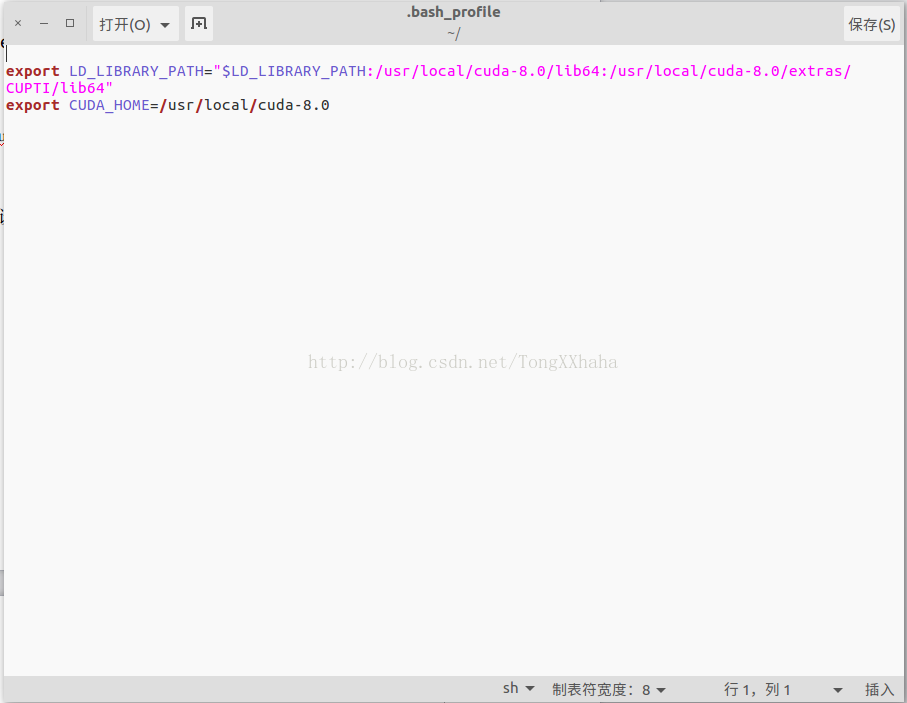
设置Cuda环境变量
输入:sudo gedit ~/.bash_profile
然后在文末添加以下两行:export LD_LIBRARY_PATH="$LD_LIBRARY_PATH:/usr/local/cuda-8.0/lib64:/usr/local/cuda-8.0/extras/CUPTI/lib64"
export CUDA_HOME=/usr/local/cuda-8.0
务必记得:
source ~/.bashrc
即保存后立即生效。
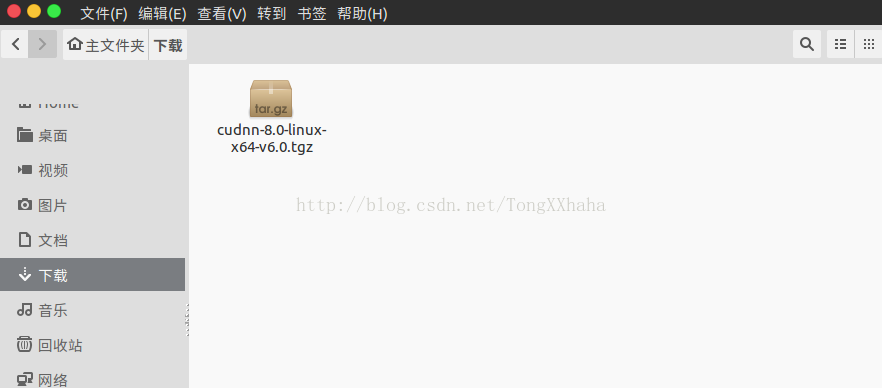
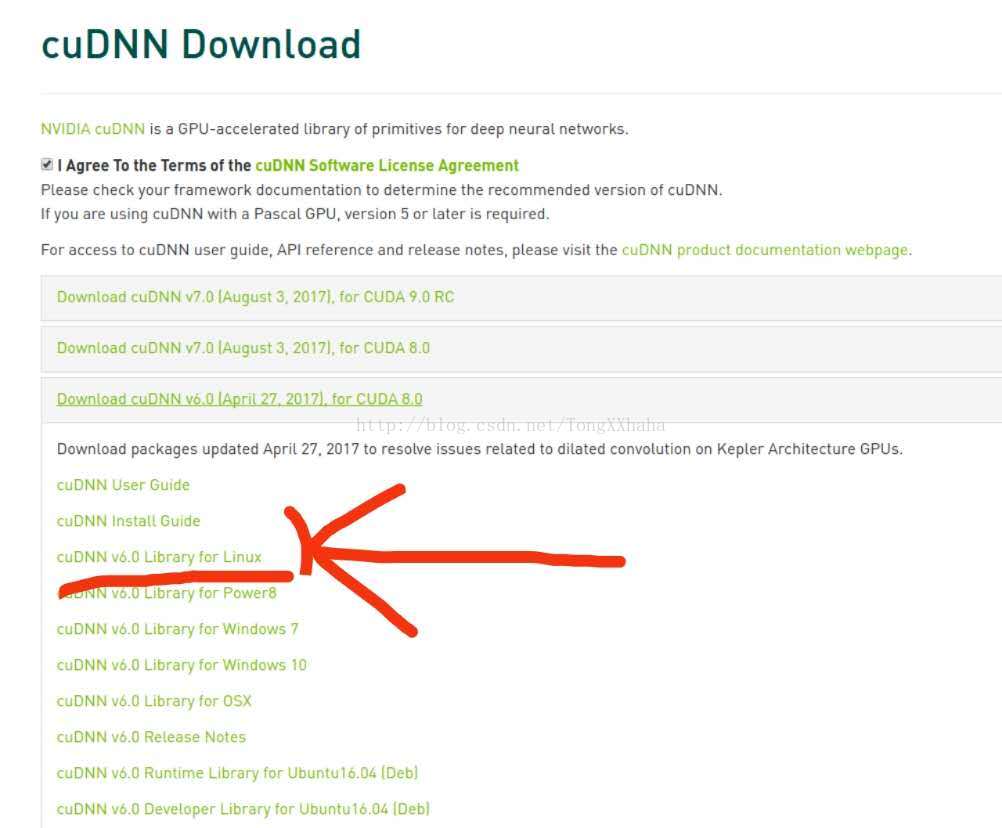
2.安装cudnn
初次下载cudnn需要在网上填写一堆问卷,耐心填吧。(下载地址:https://developer.nvidia.com/cudnn)
下载好后,打开终端依次输入以下命令:
cd ‘cudnn文件所在位置’
tar xvzf cudnn-8.0-linux-x64-v5.1.tgz###(解压这个文件)
sudo cp cuda/include/cudnn.h /usr/local/cuda/include###(复制)
sudo cp cuda/lib64/libcudnn* /usr/local/cuda/lib64###(复制)
sudo chmod a+r /usr/local/cuda/include/cudnn.h /usr/local/cuda/lib64/libcudnn*
3.安装Opencv2.4.10
这个尽量不要手动安装, Github上有人已经写好了完整的安装脚本:https://github.com/jayrambhia/Install-OpenCV
下载该脚本,进入Ubuntu/2.4 目录, 给所有shell脚本加上可执行权限
sudo chmod +x *.sh然后安装最新版本 (当前为2.4.910)
sudo sh ./opencv2_4_10.sh脚本会自动安装依赖项,下载安装包,编译并安装OpenCV。整个过程大概半小时左右。
4.PNG++安装
我们首先安装libpng和zlib
4.1安装libpng和zlib
由于PNG++是基于libpng-1.2.x的版本,所以这里我们下载1.2.53版本
下载地址:
http://sourceforge.net/projects/libpng/files/libpng12/1.2.53/libpng-1.2.53.tar.xz/download
解压后进入文件夹,编译
-
./configure -
make check -
sudo make install -
make check -
sudo ldconfig
4.2安装png++
首先,下载png++0.2.9版本
http://download.savannah.gnu.org/releases/pngpp/
解压后进入文件夹
-
Issue make to test how it's doing: -
$ make -
This will compile examples in the example directory. If everything goes well, try -
$ make test -
(or make check which is the same as above) to run the test suite. If tests do not produce error messages then probably all is OK. -
Now you can create documentation (optional). Use -
$ make docs -
to run doxygen in the sources directory. -
Now it is time to become root and install png++ into your system. It's OK to issue make install under ordinary user permissions if you want to install png++ into your home directory. Run the following command: -
$ make install PREFIX=$HOME -
to copy png++ header files to ~/include/png++ and documentation files to ~/share/doc/png++-0.2.x. Without a PREFIX png++ installs to /usr/local.
(博主在 make docs 的出现了一个小问题,直接用sudo make install安装它就好了)
5.Torch安装
Torch的安装还是有点麻烦的,如果前面没装好的话在后面安装会出现一系列的bug。
然后torch的安装主要按照官网上的步骤来就好了。
http://torch.ch/docs/getting-started.html
-
git clone https://github.com/torch/distro.git ~/torch --recursive -
cd ~/torch
bash install-deps
安装LuaJIT
./install.sh安装其他
-
$ luarocks install image -
$ luarocks list
参考于:
https://blog.csdn.net/xiaozhun07/article/details/49865785
https://blog.csdn.net/TongXXhaha/article/details/77605315
https://blog.csdn.net/weixin_38416334/article/details/80024397
https://blog.csdn.net/helloworld_fly/article/details/79580719
nvcc找不到
添加环境变量,打开~/.bashrc ,添加环境变量export PATH=$PATH:/usr/local/cuda/bin
home文件夹下双击打开
4.再在terminal中输入nvcc --version可以看到已经可以显示为8.0版本了
https://github.com/jzbontar/mc-cnn 博客
-执下一句出错
./main.lua kitti fast -a predict -net_fname net/net_kitti_fast_-a_train_all.t7 -left samples/input/kittiL.png -right samples/input/kittiR.png -disp_max 70我觉得可能是cudnn安装没好,没有加入bashrc里面,或者说下载的不是cudnn.