最开始我直接去看的源码,发现一个问题,虽然我知道红黑树是什么,但是我对红黑树的一些概念甚是模糊。所以再了解源码之前,还是要先了解一下什么是红黑树。
红黑树
概念
红黑树是二叉查找树的一种,再二叉树的基础上加入了color,所以也叫R-B tree。数据结构如图:

红黑树的几个基本原则:
1,每个节点都有一种颜色,非黑即红。
2,根节点必须是黑色。
3,每个叶节点或空节点必须为黑色。
4,如果有一个节点是红,那么他的子节点必须是黑色。
5,从一个节点到该节点的子孙节点上,必须有相同数量的黑色节点。
这几点非常重要需要牢记。
红黑树的基本操作
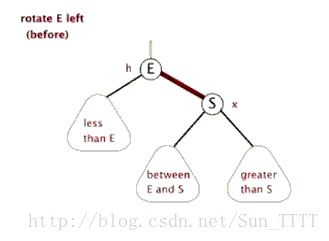
左旋右旋
这里引用一下别人做的图片,看图自然就非常明了了
左旋
右旋

需要注意的是在左旋右旋之后,必须还是一个二叉查找树。
根据以上的几点我们再回到代码中看一下treeMap的实现。
TreeMap
treeMap是java中实现的红黑树的一个集合类。他实现了NavigableMap接口,而NavigableMap接口又实现了SortedMap,这里我们可以看出来treeMap带有排序功能,他会根据key的大小对key进行排序。可以通过自然排序和构造时传入的比较器进行排序。
先让我们看一下TreeMap的一个内部类entry,同样他继承与Map接口的Entry。
    static final class Entry<K,V> implements Map.Entry<K,V> {
        K key;  //存入的key
        V value;  //存入的value
        Entry<K,V> left;  //左子节点
        Entry<K,V> right;  //右子节点
        Entry<K,V> parent; //父节点
        boolean color = BLACK; //颜色

        /**
         * Make a new cell with given key, value, and parent, and with
         * {@code null} child links, and BLACK color.
         */
        Entry(K key, V value, Entry<K,V> parent) {
            this.key = key;
            this.value = value;
            this.parent = parent;
        }

        /**
         * Returns the key.
         *
         * @return the key
         */
        public K getKey() {
            return key;
        }

        /**
         * Returns the value associated with the key.
         *
         * @return the value associated with the key
         */
        public V getValue() {
            return value;
        }

        /**
         * Replaces the value currently associated with the key with the given
         * value.
         *
         * @return the value associated with the key before this method was
         *         called
         */
        public V setValue(V value) {
            V oldValue = this.value;
            this.value = value;
            return oldValue;
        }

        public boolean equals(Object o) {
            if (!(o instanceof Map.Entry))
                return false;
            Map.Entry<?,?> e = (Map.Entry<?,?>)o;

            return valEquals(key,e.getKey()) && valEquals(value,e.getValue());
        }

        public int hashCode() {
            int keyHash = (key==null ? 0 : key.hashCode());
            int valueHash = (value==null ? 0 : value.hashCode());
            return keyHash ^ valueHash;
        }

        public String toString() {
            return key + "=" + value;
        }
    }
和之前分析过的hashMap一样,这个entry就是真正存储我们数据的地方。他提供了一个构造器和setValue的方法还有一个取key一个取value的方法,并且提供了equal和hashcode用来比较还有一个toString方法。
很简单就不多展开了。
put方法
那么我们从put方法看一下treeMap的真正实现,挨行去看。
    public V put(K key, V value) {
        //root是根节点
        Entry<K,V> t = root;
        if (t == null) {
            //根节点不存在的情况
            compare(key, key); // type (and possibly null) check
            //将k-v构建到root节点上
            root = new Entry<>(key, value, null);
            size = 1;
            modCount++;
            return null;
        }
        //根节点存在的情况
        int cmp;
        Entry<K,V> parent;
        // split comparator and comparable paths
        Comparator<? super K> cpr = comparator;
        if (cpr != null) {
            //初始化时传入了初始化了比较器
            do {
                parent = t;
                cmp = cpr.compare(key, t.key);
                //根据比较器比较
                if (cmp < 0)
                    //key小于root的key时放左边
                    t = t.left;
                else if (cmp > 0)
                    //key大于root的key时放右边
                    t = t.right;
                else
                    //key==root的key时更改值
                    return t.setValue(value);
            } while (t != null);
        }
        else {
            //没有比较器
            if (key == null)
                throw new NullPointerException();
            @SuppressWarnings("unchecked")
                Comparable<? super K> k = (Comparable<? super K>) key;
            do {
                //同样的逻辑不赘述了
                parent = t;
                cmp = k.compareTo(t.key);
                if (cmp < 0)
                    t = t.left;
                else if (cmp > 0)
                    t = t.right;
                else
                    return t.setValue(value);
            } while (t != null);
        }
        //构建entry
        Entry<K,V> e = new Entry<>(key, value, parent);
        //修改父节点的子节点数据
        if (cmp < 0)
            parent.left = e;
        else
            parent.right = e;
        //对整个红黑树进行调整
        fixAfterInsertion(e);
        size++;
        modCount++;
        return null;
    }
整个代码逻辑还是很清楚的。这里非常值得深入去看的是他的fixAfterInsertion方法。这个方法是当每次进行添加时,对红黑树的整个数据结构进行调整以用来符合红黑树规范的一个方法。我们挨着每行看一下逻辑。
private void fixAfterInsertion(Entry<K,V> x) {
        //默认将传入的entry设为红色。
        x.color = RED;
        //如果当前不是根节点并且是红色节点
        while (x != null && x != root && x.parent.color == RED) {
            //当前节点的父节点是当前节点的祖父节点的左节点
            if (parentOf(x) == leftOf(parentOf(parentOf(x)))) {
                //取出当前节点的叔叔节点为y
                Entry<K,V> y = rightOf(parentOf(parentOf(x)));
                //如果叔叔节点是红色
                if (colorOf(y) == RED) {
                    //当前节点的父节点更改为黑色
                    setColor(parentOf(x), BLACK);
                    //当前节点的叔叔节点更改为黑色
                    setColor(y, BLACK);
                    //当前节点的祖父节点更改为红色
                    setColor(parentOf(parentOf(x)), RED);
                    //将当前节点的祖父节点赋值给当前节点,再次进入循环操作
                    x = parentOf(parentOf(x));
                }
                //如果叔叔节点是黑色
                else {
                    //当前节点是父节点的右节点
                    if (x == rightOf(parentOf(x))) {
                        //把父节点赋值给当前节点
                        x = parentOf(x);
                        //然后对其进行左旋操作
                        rotateLeft(x);
                    }
                    //无论是左节点还是右节点,都要进行的操作
                    //当前节点的父节点更改为黑色
                    setColor(parentOf(x), BLACK);
                    //当前节点的祖父节点为红色
                    setColor(parentOf(parentOf(x)), RED);
                    //再对当前节点的祖父节点进行右旋操作
                    rotateRight(parentOf(parentOf(x)));
                }
            }
            //当前节点的父节点是当前节点的祖父节点的右节点
            else {
                //当前节点的祖父节点的左节点为y节点,也就是他的叔叔节点
                Entry<K,V> y = leftOf(parentOf(parentOf(x)));
                //如果叔叔节点是红色
                if (colorOf(y) == RED) {
                    //当前节点的父节点修改为黑色
                    setColor(parentOf(x), BLACK);
                    //叔叔节点修改为黑色
                    setColor(y, BLACK);
                    //当前节点的祖父节点修改为红色
                    setColor(parentOf(parentOf(x)), RED);
                    //并且把当前节点的祖父节点赋值给当前节点,再次进入循环操作
                    x = parentOf(parentOf(x));
                }
                //如果叔叔节点是黑色
                else {
                    //如果当前节点是父节点的左节点
                    if (x == leftOf(parentOf(x))) {
                        //把当前节点的父节点赋值给当前节点
                        x = parentOf(x);
                        //对当前节点进行右旋操作
                        rotateRight(x);
                    }
                    //无论是左节点还是右节点,都要进行的操作
                    //给当前节点的父节点修改为黑色
                    setColor(parentOf(x), BLACK);
                    //给当前节点的祖父节点修改为红色
                    setColor(parentOf(parentOf(x)), RED);
                    //给当前节点的祖父节点进行左旋操作
                    rotateLeft(parentOf(parentOf(x)));
                }
            }
        }
        //将根节点修改为黑色
        root.color = BLACK;
    }
列一下上面用到的这些个方法,比较简单。
    private static <K,V> void setColor(Entry<K,V> p, boolean c) {
        if (p != null)
            p.color = c;
    }

    private static <K,V> Entry<K,V> parentOf(Entry<K,V> p) {
        return (p == null ? null: p.parent);
    }

    private static <K,V> Entry<K,V> leftOf(Entry<K,V> p) {
        return (p == null) ? null: p.left;
    }

    private static <K,V> Entry<K,V> rightOf(Entry<K,V> p) {
        return (p == null) ? null: p.right;
    }

    private void rotateLeft(Entry<K,V> p) {
        if (p != null) {
            Entry<K,V> r = p.right;
            p.right = r.left;
            if (r.left != null)
                r.left.parent = p;
            r.parent = p.parent;
            if (p.parent == null)
                root = r;
            else if (p.parent.left == p)
                p.parent.left = r;
            else
                p.parent.right = r;
            r.left = p;
            p.parent = r;
        }
    }

    private void rotateRight(Entry<K,V> p) {
        if (p != null) {
            Entry<K,V> l = p.left;
            p.left = l.right;
            if (l.right != null) l.right.parent = p;
            l.parent = p.parent;
            if (p.parent == null)
                root = l;
            else if (p.parent.right == p)
                p.parent.right = l;
            else p.parent.left = l;
            l.right = p;
            p.parent = l;
        }
    }
按照逻辑解释一下:
从我们新添加的节点开始传入fixAfterInsertion方法,方法中整体分两部分,一部分是给entry分配颜色,一部分是对数据结构进行左旋和右旋。
最开始我们将最新添加进来的entry设置为红色。因为一个红黑树中每一条路径上的黑色节点都应该是相同数量的,如果我们添加了一个黑色节点,那么整个红黑树就被破坏了,我们需要调整整个红黑树的结构。但如果我们添加了一个红色节点,那么我们的改动就小很多了。
再看一下红黑树的几个基本原则:
1,每个节点都有一种颜色,非黑即红。
2,根节点必须是黑色。
3,每个叶节点或空节点必须为黑色。
4,如果有一个节点是红,那么他的子节点必须是黑色。
5,从一个节点到该节点的子孙节点上,必须有相同数量的黑色节点。
6,每个红色节点的子节点和其父节点不能为红色。换言之,红色节点不能连续。
然后将上面代码的逻辑我画了一个导图:

大概过程就是这样了。
get方法
    public V get(Object key) {
        Entry<K,V> p = getEntry(key);
        return (p==null ? null : p.value);
    }
final Entry<K,V> getEntry(Object key) {
// Offload comparator-based version for sake of performance
if (comparator != null)
return getEntryUsingComparator(key);
if (key == null)
throw new NullPointerException();
@SuppressWarnings("unchecked")
Comparable<? super K> k = (Comparable<? super K>) key;
Entry<K,V> p = root;
while (p != null) {
int cmp = k.compareTo(p.key);
if (cmp < 0)
p = p.left;
else if (cmp > 0)
p = p.right;
else
return p;
}
return null;
}get方法调用的其实就是取entry节点的值。然后从根节点一直去找,直到=0时去除相对应的值。
remove
    public V remove(Object key) {
        Entry<K,V> p = getEntry(key);
        if (p == null)
            return null;

        V oldValue = p.value;
        deleteEntry(p);
        return oldValue;
    }
private void deleteEntry(Entry<K,V> p) {
modCount++;
size--;
// If strictly internal, copy successor's element to p and then make p
// point to successor.
if (p.left != null && p.right != null) {
Entry<K,V> s = successor(p);
p.key = s.key;
p.value = s.value;
p = s;
} // p has 2 children
// Start fixup at replacement node, if it exists.
Entry<K,V> replacement = (p.left != null ? p.left : p.right);
if (replacement != null) {
// Link replacement to parent
replacement.parent = p.parent;
if (p.parent == null)
root = replacement;
else if (p == p.parent.left)
p.parent.left = replacement;
else
p.parent.right = replacement;
// Null out links so they are OK to use by fixAfterDeletion.
p.left = p.right = p.parent = null;
// Fix replacement
if (p.color == BLACK)
fixAfterDeletion(replacement);
} else if (p.parent == null) { // return if we are the only node.
root = null;
} else { // No children. Use self as phantom replacement and unlink.
if (p.color == BLACK)
fixAfterDeletion(p);
if (p.parent != null) {
if (p == p.parent.left)
p.parent.left = null;
else if (p == p.parent.right)
p.parent.right = null;
p.parent = null;
}
}
}remove就是先取出来要删除的节点,然后通过deleteEntry方法,改变他的大小,还有相关节点的数据。
除了put方法的红黑树调整方法以外,其实都不太难。如有疑问请指点。
本文参考:
https://www.cnblogs.com/CarpenterLee/p/5503882.html
https://blog.csdn.net/sun_tttt/article/details/65445754
谢谢大神的文章。