组件定义使用
在项目的/component目录下存放组件,在要显示组件的页面中则分为3步:导入、注册和使用。
<template>
	<view class="phone">
		// <uni-coms />
		<uni-coms ></uni-coms>  //第三步:使用组件(这里单标签双标签都可以)
	</view>
</template>

<script>
import uniComs from "@/components/uni-coms/uni-coms.vue" //第一步:导入组件
export default {
	components: {
		uniComs  //第二部:注册组件
	}
}
</script>
注意:
uni-app只支持vue单文件组件(.vue 组件)。其他的诸如:动态组件,自定义 render,和<script type="text/x-template"> 字符串模版等,在非H5端不支持。
easycom 的使用
传统vue组件,需要安装、引用、注册,三个步骤后才能使用组件。easycom将其精简为一步。 只要组件安装在项目的components目录下,并符合components/组件名称/组件名称.vue目录结构。就可以不用引用、注册,直接在页面中使用。(HBuilderX 2.5.5起支持easycom组件模式)
1、在uni-app插件市场下载符合components/组件名称/组件名称.vue目录结构的组件,自己写的也可以哦 ( 我下载的这个)
2、在page.json中自定义easycom配置:
"easycom": {
	"autoscan": true,
		 "custom": {
		   "uni-(.*)": "@/components/uni-$1/uni-$1.vue" //路径(正则表达式)
		 }
}
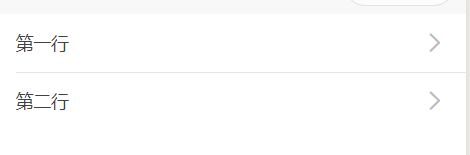
3、在页面中直接写
<template>
    <view class="container">
        <uni-list>
            <uni-list-item title="第一行"></uni-list-item>
            <uni-list-item title="第二行"></uni-list-item>
        </uni-list>
    </view>
</template>
<script>
// 这里不用import引入,也不需要在components内注册uni-list组件。template里就可以直接用
export default {
    data() {
        return {

        }
    }
}
</script>
结果:
uni-app内置基础组件
uni内置了小程序的所有组件,需要以 vue 的事件绑定语法来绑定,如 bindchange="eventName" 事件,需要写成 @change="eventName" 哦
<picker mode="date" :value="date" start="2015-09-01" end="2017-09-01" @change="bindDateChange">
    <view class="picker">
      当前选择: {{date}}
    </view>
</picker>
全局组件
需在 main.js 里进行全局注册,注册后就可在所有页面里使用该组件。
import Vue from 'vue'
import App from './App'
import uniList from './components/uni-list/uni-list.vue'
import uniListItem from './components/uni-list-item/uni-list-item.vue'

Vue.component('uni-list',uniList)
Vue.component('uni-list-item',uniListItem)
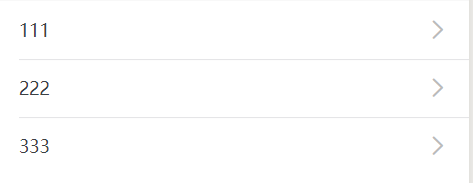
index.vue (所有页面)里可直接使用组件
<template>
	<view>
		<uni-list>
			<uni-list-item title="111"></uni-list-item>
			<uni-list-item title="222"></uni-list-item>
			<uni-list-item title="333"></uni-list-item>
		</uni-list>
	</view>
</template>
结果:
注意:
Vue.component的第一个参数必须是静态的字符串。nvue页面暂不支持全局组件- 在
uni-app中的关键字,不可作为组件名 (详见)。
父子组件传值
1、父组件向子组件传递数据( props )
子组件:
<template>
	<view>
		//在子类标签写上引用
		<view class="content" :style="[{background:pageList}]"></view>
	</view>
</template>

<script>
export default {
  //在子类props里定义接收参数
	props:{
		 pageList:{            //参数名
			 type:String,      //参数类型
			 default:'#999'    //参数默认
		 }
	 },
}
</script>
<style lang="scss">
.content{
		width: 400upx;
		height: 400upx;
	}
</style>
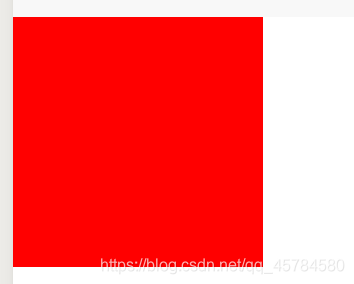
父组件:
<template>
	<view class="phone">
		//然后在父类写上准备传递的参数
		<uni-coms :pageList="noticesList"></uni-coms>
	</view>
</template>
<script>
import uniComs from '../../components/uni-coms/uni-coms.vue'
export default {
	components:{
		uniComs
	},
	data(){
		return{
			noticesList: "#f00"
		}
	}
}
</script>
这样子组件拿到父组件的背景颜色,就会去覆盖默认的背景颜色,就变成了红色
2、子组件向父组件传递数据( emit )
子组件:
<template>
	<view>
		//在子类写上触发事件
		<view class="content" :style="[{background:pageList}]"></view>
		<button type="primary" @click="passValue">点击传值</button>
	</view>
</template>

<script>
export default {
	//需要首先在子类组件定义事件
	methods:{
		passValue(){    //方法名     //值
			this.$emit("returnDate","111")
		}
	}
}
</script>
//然后点击子类触发,就可以传值给父类
父组件:
<template>
	<view class="phone">
		//在父类引用标签上写上在子类$emit里面定义的方法名,以及接收方法
		<uni-coms  @returnDate=returnDate :pageList="returnDate"></uni-coms>
	</view>
</template>

<script>
import uniComs from '../../components/uni-coms/uni-coms.vue'
export default {
	components:{
		uniComs
	},
	methods:{ //接收方法
		returnDate(val){
			console.log("接收的值:"+val)
		}
	}
}
</script>
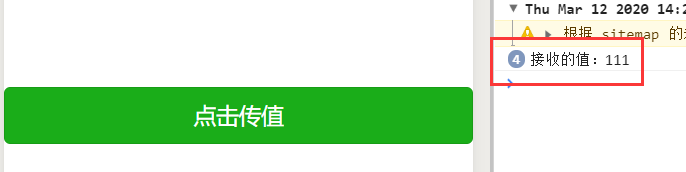
点击传值:
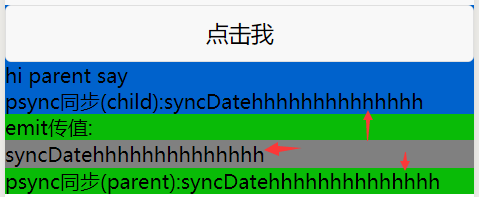
3、子组件与父组件数据同步( .sync )
子组件:
<template>
	<view class="container" style="background: #0062CC;">
			<button @tap="childClick" >点击我 </button>
			<view class="child"> hi  {{showModal}}</view>
			<view>psync同步(child):{{syncDate}}</view>
	</view>
</template>

<script>
export default {
props: {
	showModal: {
		type: String,
		default: 'hello'
	},
	syncDate: {
		type: String,
		default: 'hello'
	}
},
data() {
	return {
		childdata:'child value'
	};
},
methods:{
	childClick(){
		console.info(this.childdata);
		this.$emit("changes",this.childdata);
	}
}
}
</script>
父组件:
<template>
	<view class="phone">
		<uni-coms :syncDate.sync='syncDate' :showModal="showModal" @changes="childClick"></uni-coms>
		<view class="parent" style="background: #09BB07;">
			<view>emit传值:{{parentValue}}</view>
			<input v-model="syncDate" style="background: #808080;" />
			<view>psync同步(parent):{{syncDate}}</view>
		</view>
	</view>
</template>

<script>
import uniComs from '../../components/uni-coms/uni-coms.vue'
export default {
	components:{
		uniComs
	},
	data(){
		return {
			showModal: " parent say",
			parentValue: '',
			syncDate: 'syncDate'
		}
	},
	methods:{
		childClick(e) {
				console.info(e);
				this.parentValue = e;
		}
	}
}
</script>
结果: