The total experimental environment is as follows
master 192.168.100.102 ::slave1 192.168.100.103
slave2 192.168.100.104 : :Amoba 192.168.100.105
Client 192.168.100.106
All operating systems are centos7, vm network are vm1
I need all the packages are placed in the following link
Links: https://pan.baidu.com/s/17AGcvkgUPYCPAZcz4rFnpQ
extraction code: 13s4
It requires separate read and write operation on the basis of the master copy
Set up a master-slave replication
1) Firstly, time synchronization, establishing time synchronization server of the master node 100.102
Install and configure the NTP
[CentOS7-02 the root @ ~] # yum the install -Y NTP
[CentOS7-02 the root @ ~] # Vim /etc/ntp.conf (add the following two lines)
server 127.127.1.0
fudge 127.127.1.0 stratum 8
[the root CentOS7-02 @ ~] # systemctl the ntpd the restart
[CentOS7-02 the root @ ~] # systemctl enable the ntpd
2) Do the same from entering the node 100.103,100.104, time synchronization
[root @ centos7-03 ~] # ntpdate 192.168.100.102
25 Oct 03:31:48 ntpdate[1070]: adjust time server 192.168.100.102 offset 0.052240 sec
above normal this error, if the network server will not report this wrong, so that you can
3) Turn off the firewall on all servers
[root@centos7-03 ~]# systemctl stop firewalld
[root@centos7-03 ~]# systemctl disable firewalld
4) install mysql database, the master 102, and slave1, slave2: 103,104 host operating
Note that this three servers to be installed, I am here only to demonstrate a server installation, exactly the same operation
1. compile and install mysql
[root@CentOS7-02 ~]# yum -y install ncurses-devel
cmake包拖入Xshell中
[root@CentOS7-02 ~]# tar zxf cmake-2.8.6.tar.gz
[root@CentOS7-02 ~]# cd cmake-2.8.6
[root@CentOS7-02 cmake-2.8.6]# ./configure && gmake && gmake install
[root@CentOS7-02 ~]# cd …
The package mysql drag Xshell
[@ CentOS7-02 the root mysql-5.6.36] # the tar-5.6.36.tar.gz zxf mysql
[@ CentOS7-02 the root mysql-5.6.36] # CD-mysql 5.6.36
[ @ CentOS7-02 MySQL-5.6.36 root] # cmake -DCMAKE_INSTALL_PREFIX = / usr / local / MySQL -DDEFAULT_CHARSET = utf8 utf8_general_ci -DWITH_EXTRA_CHARSETS -DDEFAULT_COLLATION = = = All -DSYSCONFDIR / etc
(above this is very important, not the wrong letter , or else behind mysql service not play)
[root @ CentOS7-02 mysql-5.6.36] # the make the make install &&
2. Optimize adjustment
[root@CentOS7-02 mysql-5.6.36]# cp support-files/my-default.cnf /etc/my.cnf
cp:是否覆盖"/etc/my.cnf"? y
[root@CentOS7-02 mysql-5.6.36]# cp support-files/mysql.server /etc/rc.d/init.d/mysqld
[root@CentOS7-02 mysql-5.6.36]# chmod +x /etc/rc.d/init.d/mysqld
[root@CentOS7-02 ~]# chkconfig --add mysqld
[root@CentOS7-02 mysql-5.6.36]# echo "PATH=$PATH:/usr/local/mysql/bin" >> /etc/profile
[root@CentOS7-02 mysql-5.6.36]# . /etc/profile
3. initialize the database
[root@centos7-03 ~]# groupadd mysql
[root@centos7-03 ~]# useradd -M -s /sbin/nologin mysql -g mysql
[root@centos7-03 ~]# chown -R mysql:mysql /usr/local/mysql
[root@centos7-03 ~]# /usr/local/mysql/scripts/mysql_install_db --basedir=/usr/local/mysql --datadir=/usr/local/mysql/data --user=mysql
4. Start the mysql service, three mysql password is set to the same
[root@CentOS7-02 ~]# systemctl start mysqld
[root@CentOS7-02 ~]# mysqladmin -u root password 'pwd123'
Warning: Using a password on the command line interface can be insecure.
(The above is not an error, right)
He reiterated general, above which is a small step 4 should operate on three mysql server again
5) mysql configuration master 100.102
Update the configuration file
[root @ CentOS7-02 ~] # vim /etc/my.cnf (in the end, add the following, do not add the # is interpreted) # turn on binary log # allowed to come from the server to update [root @ CentOS7-02 ~] # systemctl restart mysqld
server-id = 11
log_bin = master-bin
log-slave-updates = true
Landing mysql, to the slave server permissions
[root @ CentOS7-02 ~] # MySQL -u root -p
Enter password: (password here I pwd123)
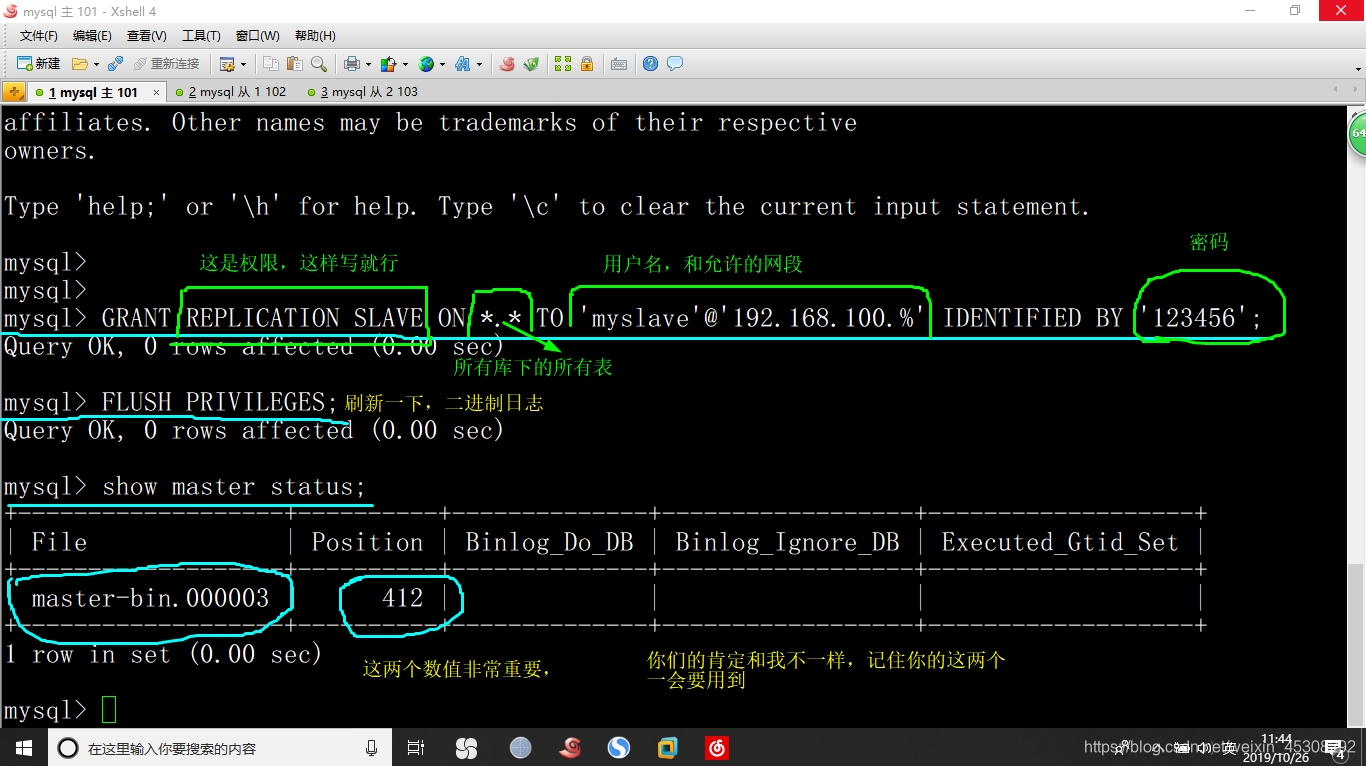
went in to do the following figure configuration, have to look at the picture below, behind or else there will be problems do when
MySQL> GRANT REPLICATION SLAVE ON . the TO 'myslave'@'192.168.100.%'IDENTIFIED BY '123456';
Query OK, 0 rows affected (0.00 sec)
mysql> FLUSH PRIVILEGES;
Query OK, 0 rows affected (0.00 sec)
mysql> show master status;
6) from the server configuration
This step is 100.103, 100.104 done, I was here just a demo, the operation is exactly the same
1 Enter from the server, modify the configuration file
[centos7-03 the root @ ~] # Vim /etc/my.cnf (also added to the last)
server_id = 22 # here is the same and not just the primary, id from the same two servers
relay-log=relay-log-bin # open relay log
relay-log-index=slave-relay-bin.index # Set the relay log
[ centos7-03 ~ @ root] # systemctl restart mysqld
2 mysql landing configuration, configuration synchronization,
[root @ centos7-03 ~] # MySQL -u root -p
configuration below, I have to lay back but incomplete, but you have to look at the chart, or you'll go wrong

following is a lay figure, you can copy, but not all, you need something to fill
mysql>change master to master_host='192.168.100.102',master_user='myslave',master_password='123456',master_log_file='',master_log_pos=;
3 view status, ensure that the two YES
mysql> show slave status\G;
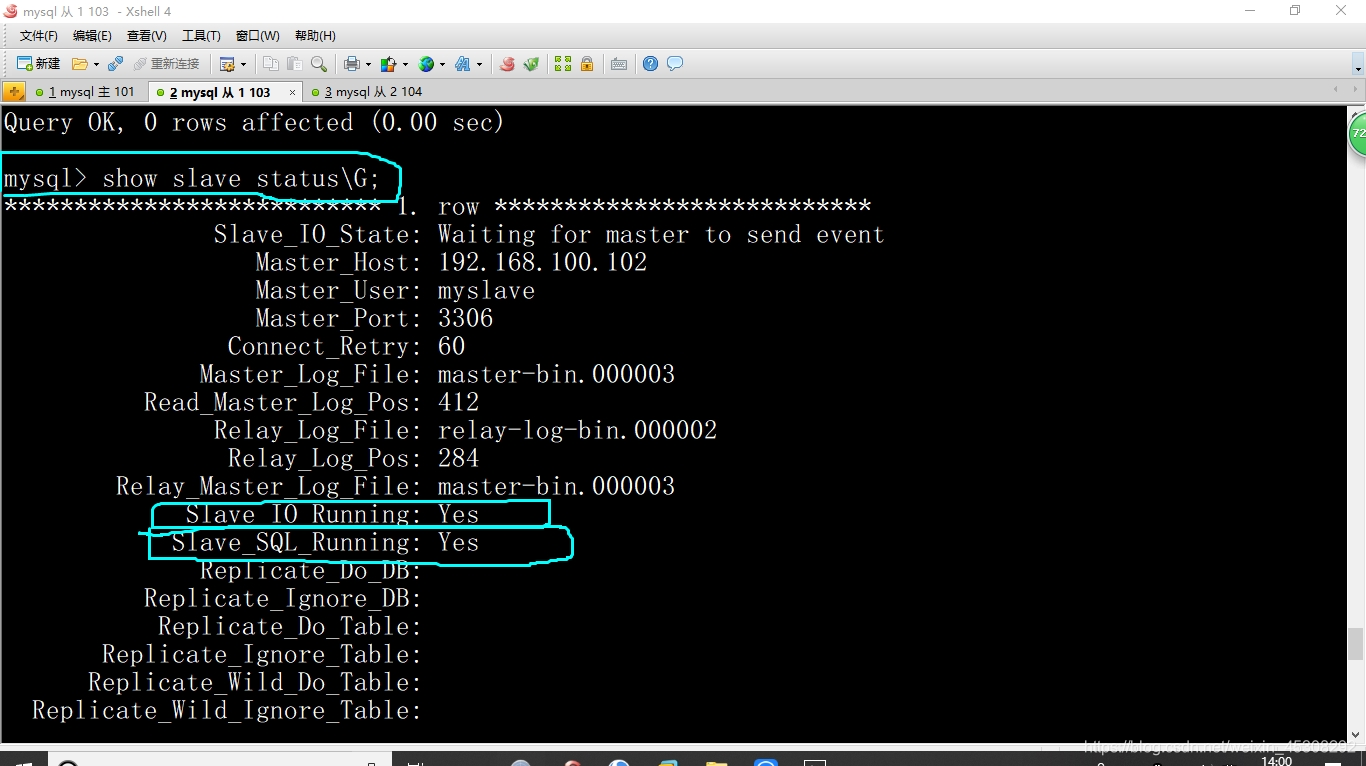
To reiterate again, this little three-step, from servers in two to do
7) from the master copy to verify the effect of
1 first into the main database, create a table
mysql> create database db_test;
Query OK, 1 row affected (0.00 sec)
2. From the View from the server into the two, should be synchronized over the fishes
mysql> show databases;
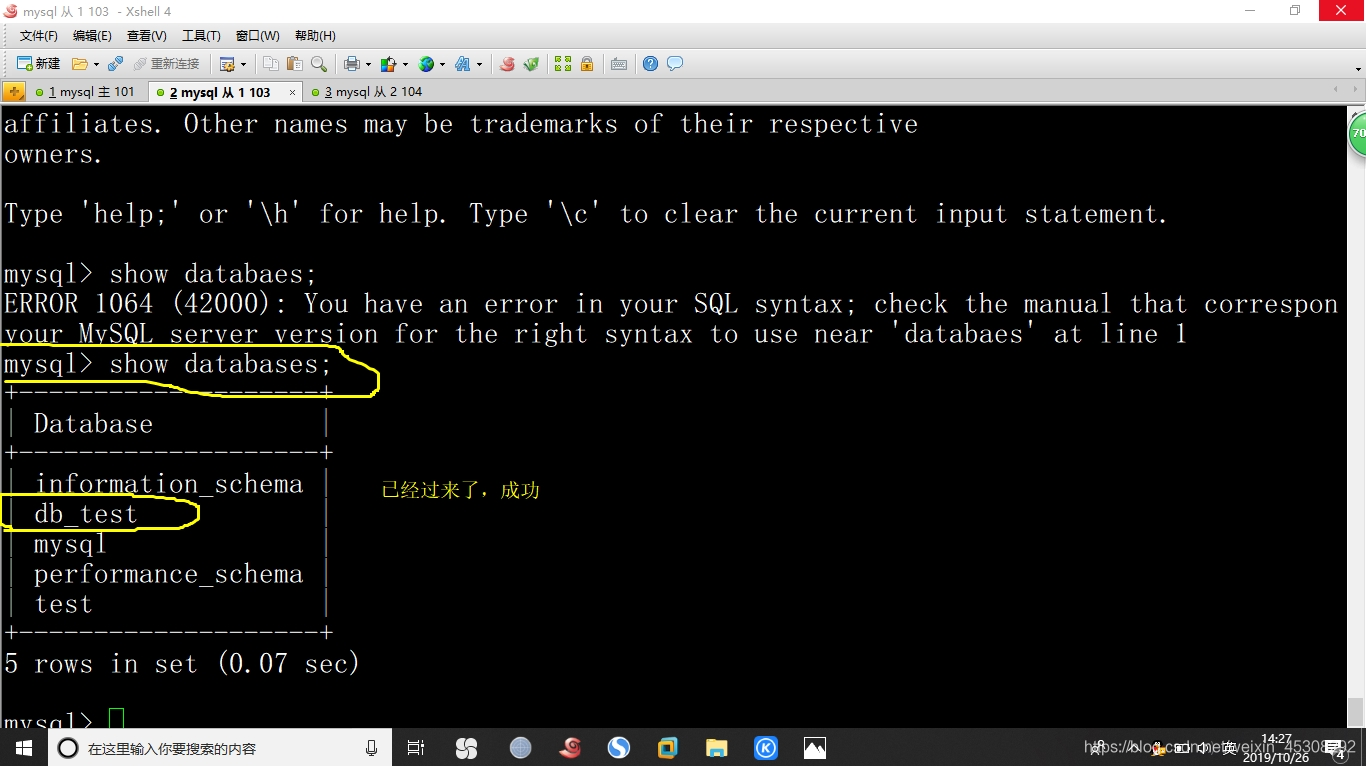
So far from complete master copy
Set up separate read and write, test environment remains unchanged, continue to
Here it is used in front of the Amoba 100.105, and 100.106 clients
1) mounted on the main Java environment Amoeba 105
The jdk .bin file I provided above drag
[root @ centos7-05 ~] # chmod + the JDK-6u14-the X-Linux-x64.bin
[root @ centos7-05 ~] # ./jdk-6u14-linux-x64 .bin
(after execution, has been pressing enter, then you will be prompted yes, no, yes waiting to enter)
[root @ centos7-05 ~] # mv jdk1.6.0_14 / /usr/local/jdk1.6 (behind the jdk1.6 hand play)
[root @ centos7-05 ~] # vim / etc / Profile (at the end of the file, add the following)
export JAVA_HOME=/usr/local/jdk1.6
export CLASSPATH=$CLASSPATH:$JAVE_HOME/lib:$JAVA_HOME/jre/lib
export PATH=$JAVA_HOME:/lib:$JAVA_HOME/jre/bin:$PATH:$HOME/bin
export AMOEBA_HOME=/usr/local/amoeba/
export PATH=$PATH:$AMOEBA_HOME/bin
[root @ centos7-05 ~] # Source / etc / Profile
[root @ centos7-05 ~ ] # the Java -version
java version "1.6.0_14"
Java(TM) SE Runtime Environment (build 1.6.0_14-b08)
Java HotSpot(TM) 64-Bit Server VM (build 14.0-b16, mixed mode)
after running the command, show this display configuration successful Java environment, there must be Jave environment before they can
2) Install and configure Amoeba Software
Or 100.105 operation, drag package
[centos7-05 the root @ ~] # mkdir / usr / local / Amoeba
[centos7-05 the root @ ~] # the tar-zxf Amoeba MySQL-binary-2.2.0.tar.gz - C / usr / local / Amoeba /
[the root centos7-05 @ ~] # the chmod -R & lt 755 / usr / local / Amoeba /
[the root centos7-05 @ ~] # / usr / local / Amoeba / bin / Amoeba (suggested as follows represents a successful installation)
amoeba start|stop
3) Configure Amoeba separate read and write, read load balancing two Slave
1. Master and Slave 1, from 2 to Amoba open access rights, this operation should be playing in three mysql
mysql> grant all on *.* to test@'192.168.100.%' identified by '123.com';
2. Edit the file amoeba.xml
Amoeba back in 100.105
[root @ centos7-05 ~] # cd / usr / local / Amoeba /
[root @ centos7-05 Amoeba] # vim conf / amoeba.xml
Change or add to the place where I draw the figures underlined, do not move elsewhere
This user is a remote connection to the database via a proxy user name and password
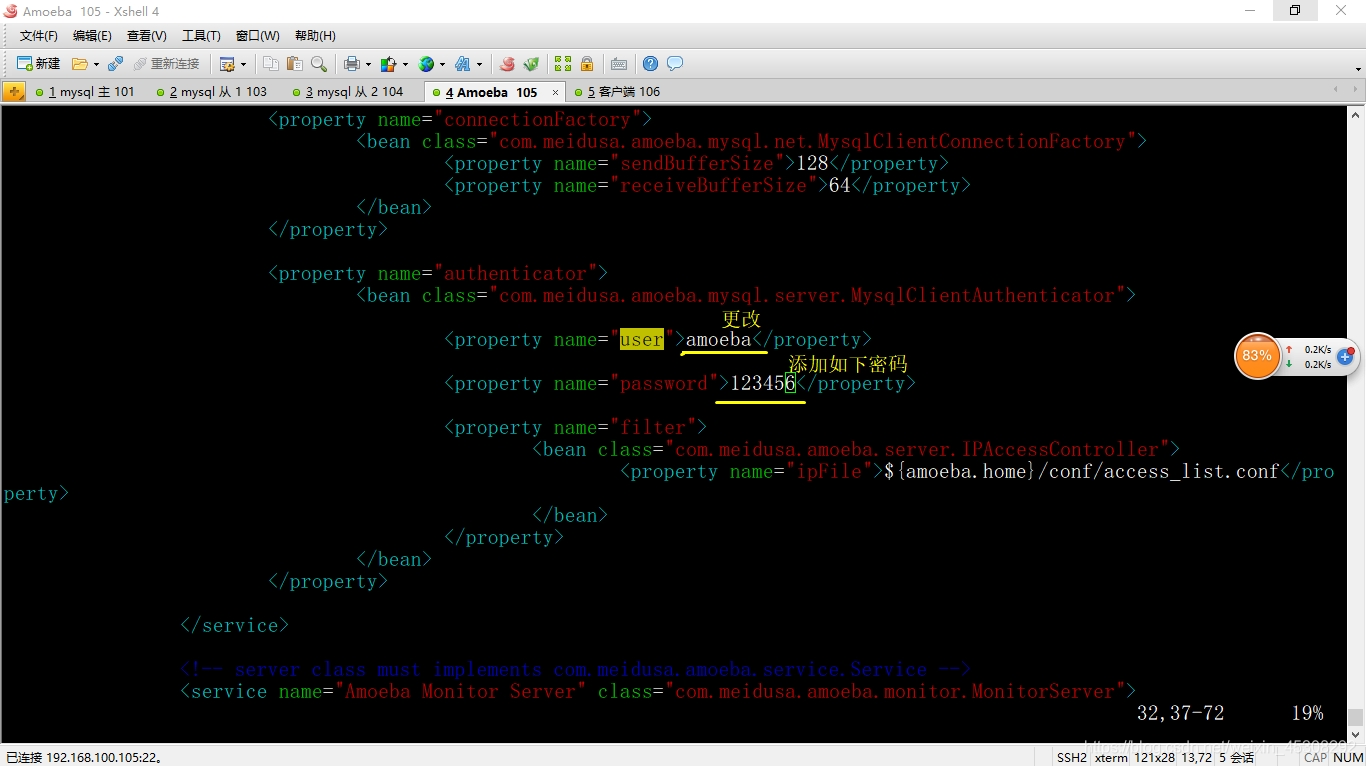
Continue sliding down
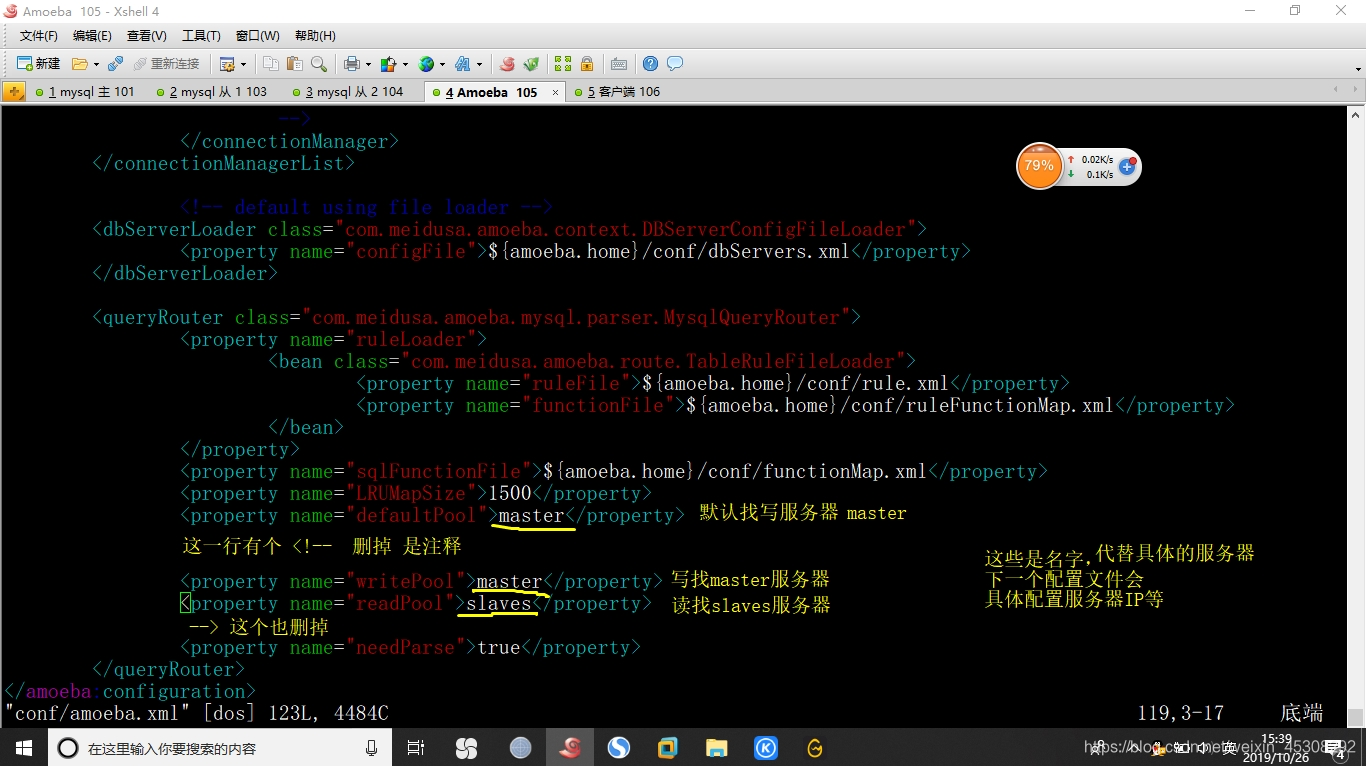
to save and exit
3. Edit profile dbServers.xml
[root @ centos7-05 Amoeba] # vim conf / dbServers.xml
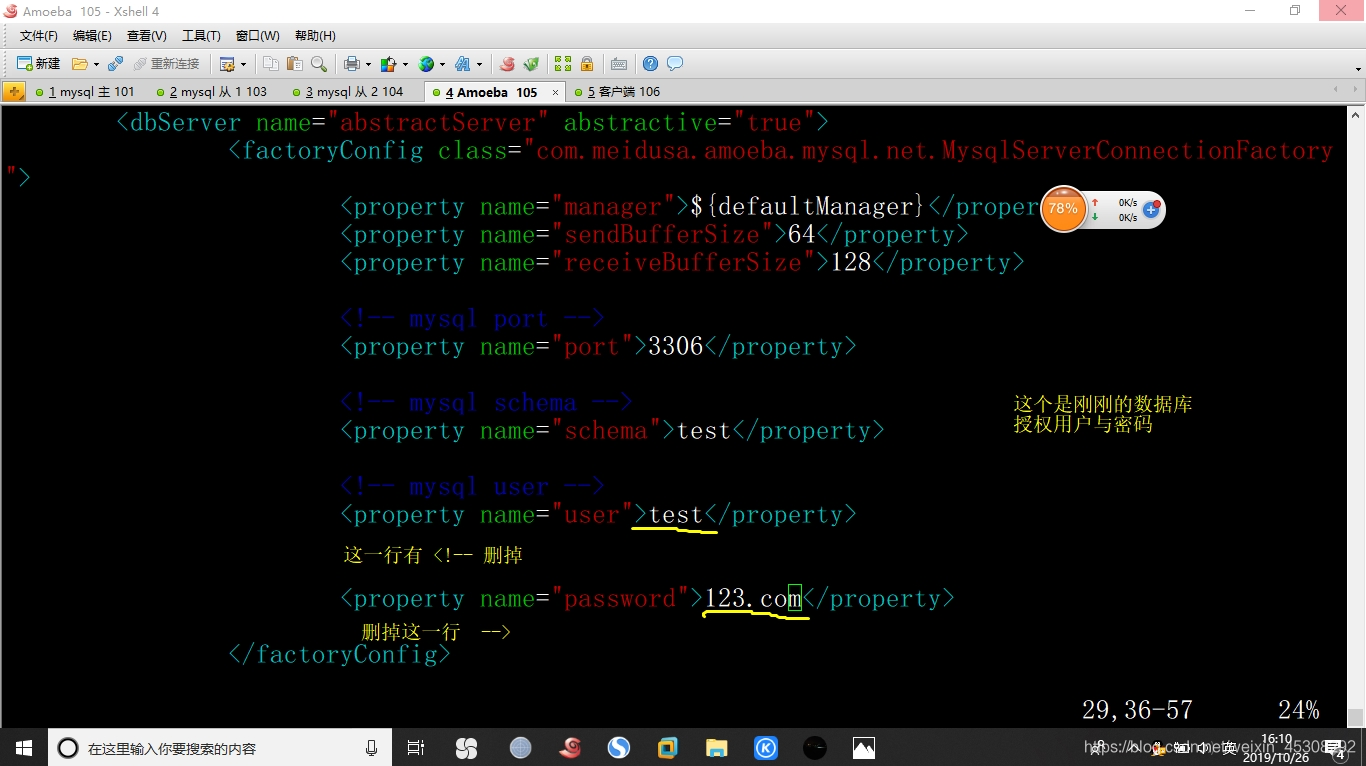
continue sliding down
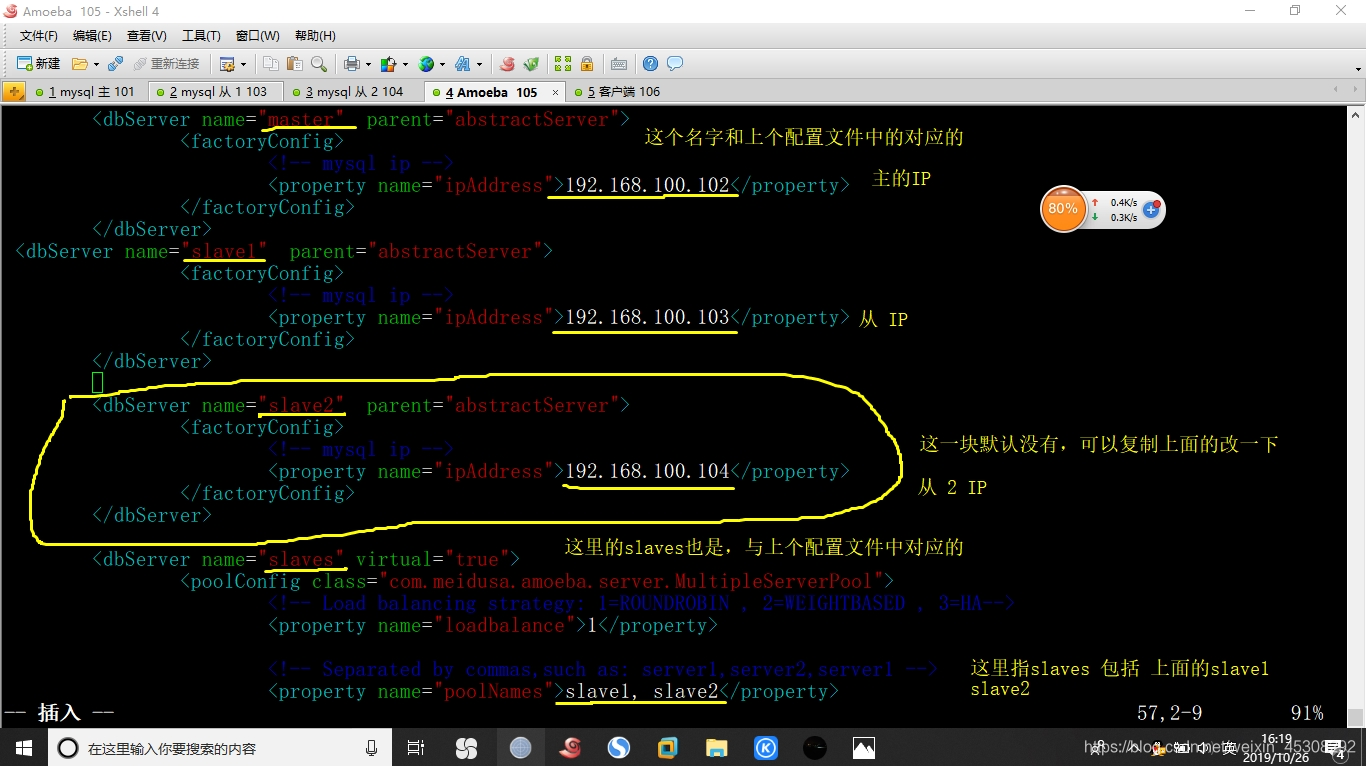
to save and exit
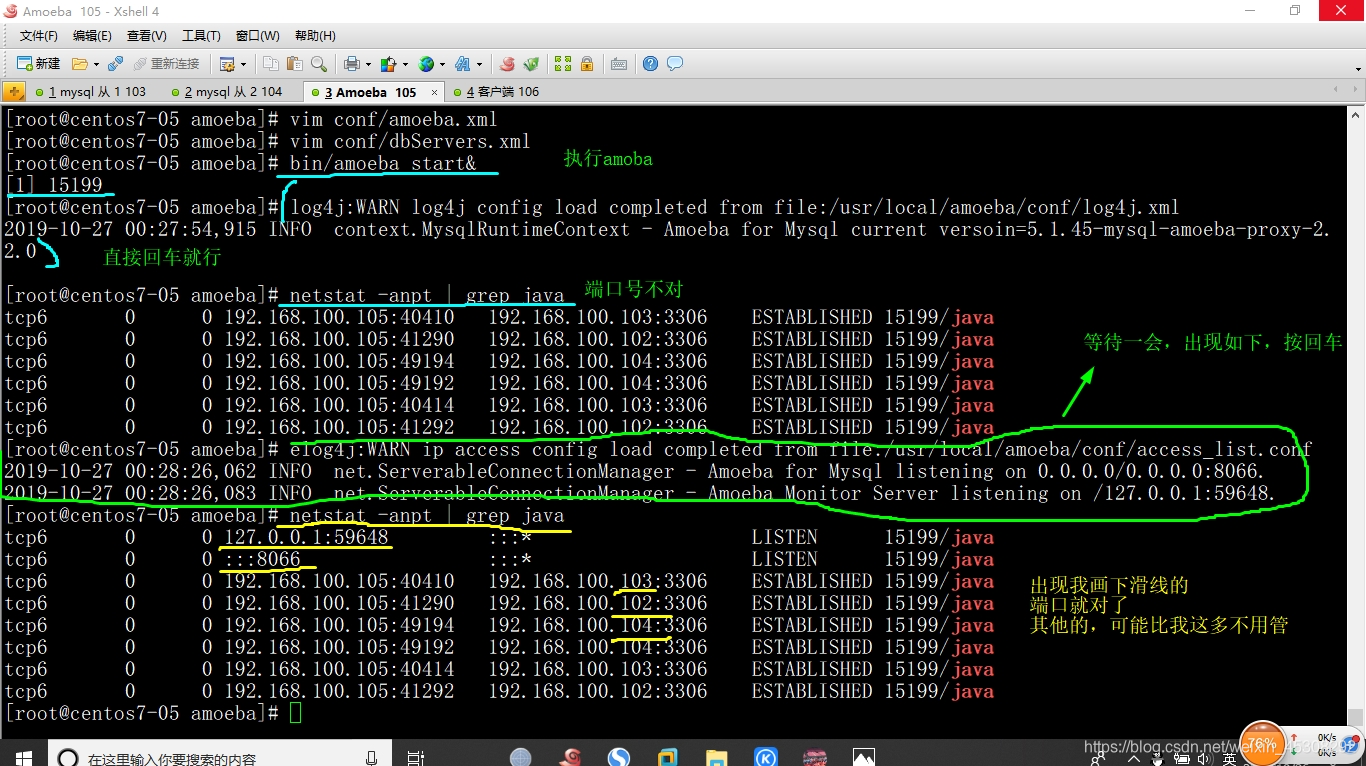
4. Start Amoeba software, port 8066
[root @ centos7-05 Amoeba] # bin / Start & Amoeba (note to look at the picture below)
4) Test separate read and write
This test is a little difficult to understand, finally, I will specifically for the principle of first-come, according to my below
1. In the client 106, through proxy access msql, here is the username and password above amoeba.xml profile
[centos7-06 the root @ ~] # yum the install MySQL -Y
[centos7-06 the root @ ~] # MySQL -u amoeba -p123456 -H 192.168.100.105 -P8066
(note 105 is above the amoeba IP, after the upper-case the P, shown below even on)
MySQL [(none)]>
2. Create a table in the main mysql, each synchronized to the server, and then closed from the slave server (that is, from the master copy) function, then insert statement difference
On the main mysql 102 server
MySQL> use db_test; (This library is above test master-slave replication synchronization,)
Database changed
MySQL> Create Table Zang (ID int (10), name VARCHAR (10), address VARCHAR (20 is));
Query OK, 0 rows affected (0.70 sec)
Perform the following two from the server (103) in
MySQL> STOP Slave;
Query OK, 0 rows affected (0.01 sec)
In the back to the main server mysql
mysql> use db_test;
mysql> INSERT INTO Zang values ('1','zhang','this_is_master');
Query OK, 1 row affected (0.09 sec)
mysql> the SELECT * from Zang;
+------+-------+----------------+
| id | name | address |
+------+-------+----------------+
| 1 | zhang | this_is_master |
+------+-------+----------------+
3. Turn off the main not copied from the server when synchronization from the table, then off will not sync, not synchronized content, and are inserted into the difference statement
从 1 103 中
mysql> use db_test;
mysql> insert into zang values('2','zhang','this_is_slave1');
Query OK, 1 row affected (0.00 sec)
mysql> select * from zang;
+------+-------+----------------+
| id | name | address |
+------+-------+----------------+
| 2 | zhang | this_is_slave1 |
+------+-------+----------------+
从2 104 中
mysql> use db_test;
mysql> insert into zang values('3','zang','this_is_slave2');
Query OK, 1 row affected (0.00 sec)
mysql> select * from zang;
+------+------+----------------+
| id | name | address |
+------+------+----------------+
| 3 | zang | this_is_slave2 |
+------+------+----------------+
4. The test read operation, back to the client 106
Below, will cycle back and forth from the server 1 Table 2
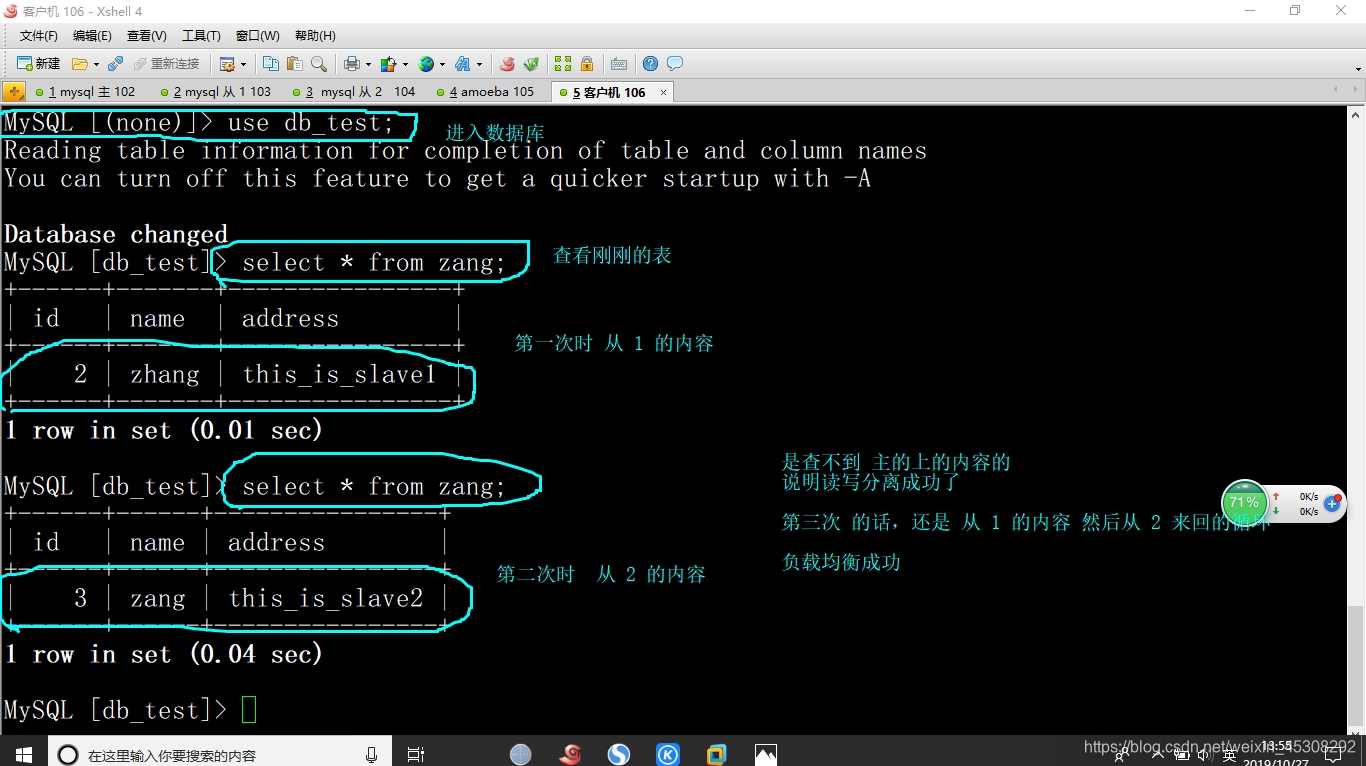
5. Test the write operation
Also in 100.106, insert a statement
the MySQL [db_test]> INSERT INTO Zang values ('4','zhang','write_test');
Query OK, 1 row affected (0.16 sec)
In finding out 106, because there is no written, 103 and 104, only in the final, the main mysql found, indicating a write operation, in the main on the right, into the main view 102
mysql> SELECT * from zang;
+------+-------+----------------+
| id | name | address |
+------+-------+----------------+
| 1 | zhang | this_is_master |
| 4 | zhang | write_test |
+------+-------+----------------+
It now focuses on what this test principle
First, explain why the number of master-slave replication closed, because if you do not shut the case, data will be synchronized, can not verify
Then, the test read there will only read from the server
Write, check out the client, because there is no synchronization to the server from
In real life, the two data from the server is certainly to be the same, in order to achieve load balancing, do not forget to then separate read and write Open
