(1) Experimental environment: two high-availability hosts, two web hosts
(2) On Ha1 and Ha2 servers, use keepalived to achieve high availability and high load
1. Configure the load scheduler (Ha1, Ha2 are the same)
1.1. Turn off the firewall & selinux
systemctl stop firewalld
systemctl enable firewalld
setenforce 0
1.2. Install high availability service and ipvsadm tool
yum -y install ipvsadm keepalived
modprobe ip_vs
cat /proc/net/ip_vs
1.3. Configure keeplived (Ha1 (main) and Ha2 (standby) must be configured)
#配置keeplived(Ha1、Ha2上都要设置)
cd /etc/keepalived/
cp keepalived.conf keepalived.conf.bak
vim keepalived.conf

global_defs {
   notification_email {
     [email protected]
     [email protected]
     [email protected]
   }
   notification_email_from [email protected]
   smtp_server 127.0.0.1     #邮件服务指向本地
   smtp_connect_timeout 30
   router_id LVS_01   #指定服务器名称,主备服务器名称不同
   vrrp_skip_check_adv_addr
  # vrrp_strict   #禁用vrrp_strict
   vrrp_garp_interval 0
   vrrp_gna_interval 0
}

vrrp_instance VI_1 {  #定义VRRP热备实例参数
    state MASTER   #指定热备状态,主:MASTER,备:BACKUP
    interface ens160   #指定承载地址的物理接口
    virtual_router_id 1   #指定虚拟路由器的ID号,主备保持一致
    priority 100     #指定服务器优先级,主:100,备:90
    advert_int 1   #通告间隔秒数(心跳频率)
    authentication {     #定义认证信息
        autu_type PASS      #认证类型
        auth_pass P@ssw0rd  #指定验证密码,主备保持一致
    }
    virtual_ipaddress {    #指定集群地址
        192.168.100.200
    }
}

virtual_server 192.168.100.200 80 {  #指定虚拟服务器地址、端口,定义虚拟服务器和web服务器参数
    delay_loop 6    #健康检查的间隔时间(秒)
    lb_algo rr     #指定调度算法,轮询(rr)
    lb_kind DR  #指定集群工作模式,直接路由(DR)
    persistence_timeout 50 #连接保持时间(秒)
    protocol TCP    #应用服务采用的是TCP协议

    real_server 192.168.100.37 80 {     #指定第一个web节点地址、端口
        weight 1            #节点的权重
        TCP_CHECK {
            connect_port 80         #添加检查的目标端口
            connect_timeout 3       #添加连接超时(秒)
            nb_get_retry 3          #添加重试次数
            delay_before_retry 4    #添加重试间隔
          }
        }
    real_server 192.168.100.38 80 {     #指定第二个web节点的地址、端口
        weight 1
        HTTP_GET {
            connect_port 80
            connect_timeout 3
            nb_get_retry 3
            delay_before_retry 4
           }
        }
    }
注释:删除后面多余的配置
#启动keepalived
systemctl start keepalived
1.4. Back up server-related configuration files
! Configuration File for keepalived

global_defs {
   notification_email {
     [email protected]
     [email protected]
     [email protected]
   }
   notification_email_from [email protected]
   smtp_server 127.0.0.1
   smtp_connect_timeout 30
   router_id LVS_02
   vrrp_skip_check_adv_addr
  # vrrp_strict
   vrrp_garp_interval 0
   vrrp_gna_interval 0
}

vrrp_instance VI_1 {
    state BACKUP
    interface ens160
    virtual_router_id 1
    priority 90
    advert_int 1
    authentication {
        auth_type PASS
        auth_pass P@ssw0rd
    }
    virtual_ipaddress {
        192.168.100.200
    }
}

virtual_server 192.168.100.200 80 {
    delay_loop 6
    lb_algo rr
    lb_kind DR
    persistence_timeout 50
    protocol TCP

    real_server 192.168.100.37 80 {
        weight 1
         TCP_CHECK {
            connect_port 80
            connect_timeout 3
            nb_get_retry 3
            delay_before_retry 4
           }
        }
    real_server 192.168.100.38 80 {
        weight 1
        HTTP_GET {
            connect_port 80
            connect_timeout 3
            nb_get_retry 3
            delay_before_retry 4
           }
        }
    }
1.5. Start the keepalived service
systemctl start keepalived
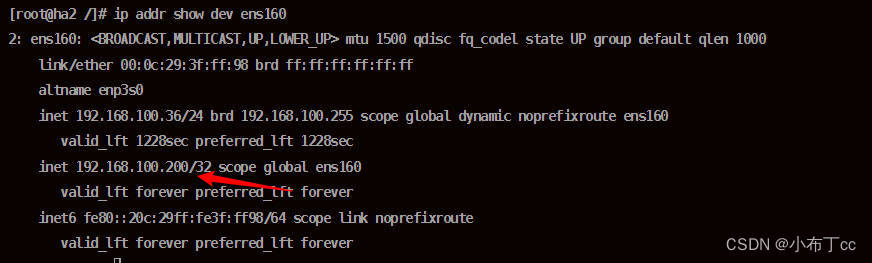
ip addr show dev ens160 #查看集群IP是否添加成功
1.6. Configure distribution strategy (master, backup)
ipvsadm-save > /etc/sysconfig/ipvsadm
systemctl start ipvsadm
ipvsadm -C
ipvsadm -A -t 192.168.100.200:80 -s rr
ipvsadm -a -t 192.168.100.200:80 -r 192.168.100.37:80 -g
ipvsadm -a -t 192.168.100.200:80 -r 192.168.100.38:80 -g
ipvsadm

ipvsadm -ln
ipvsadm-save > /etc/sysconfig/ipvsadm
1.7. Adjust the kernel proc response parameters, turn off the redirection parameter response of the Linux kernel
vim /etc/sysctl.conf
net.ipv4.conf.all.send_redirects = 0
net.ipv4.conf.default.send_redirects = 0
net.ipv4.conf.ens160.send_redirects = 0

sysctl -p
(3) Configure virtual IP addresses and add loopback routes for the two web servers
1. Adjust kernel parameters
vim /etc/sysctl.conf
net.ipv4.conf.lo.arp_ignore = 1
net.ipv4.conf.lo.arp_announce = 2
net.ipv4.conf.all.arp_ignore = 1
net.ipv4.conf.all.arp_announce = 2

sysctl -p
2. Configure the loopback address (the address is the cluster address)
ifconfig lo:0 192.168.100.200 netmask 255.255.255.255 broadcast 192.168.100.200
3. Add routing
route add -host 192.168.10.150 dev lo:0
(4) Test web service cluster
1. Turn off the firewall and selinux of the two web servers
systemctl stop firewalld
systemctl enable firewalld
setenforce 0
2. Create a test web page on two web servers
/usr/share/nginx/html
rm -rf *
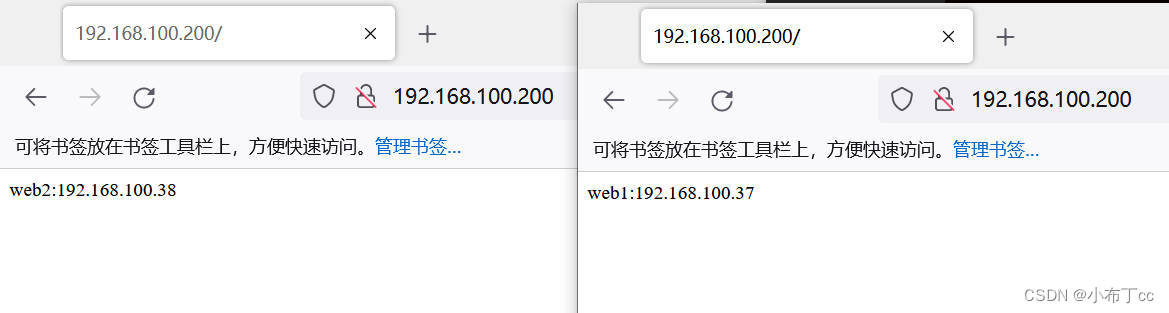
echo "web1:192.168.100.37" > index.html
echo "web2:192.168.100.38" > index.html
3. Restart the web server
systemctl restart nginx
4. Check the highly available server, currently only the main server has a virtual IP
5. Client access test, successfully achieve load balancing

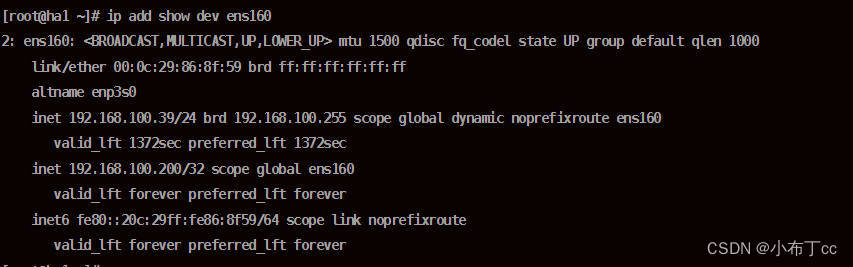
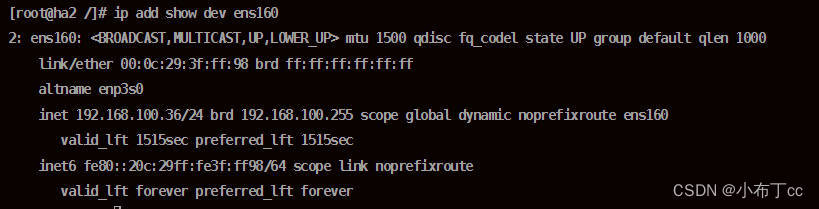
6. High-availability server test, shut down the main server, check the backup server, the backup server successfully seized the virtual IP