一、效果展示
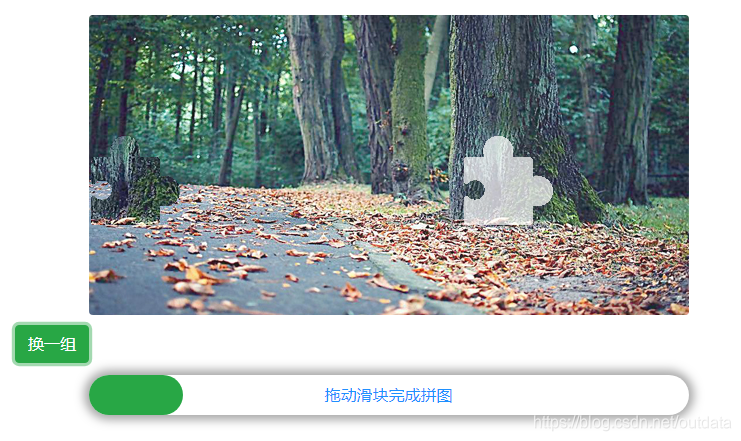
实现原理:
- 背景图片是一张目标图片target,图片类型是jpg(在这里称之为target图片)。target图片透明部分是通过java代码实现的,并记录起想x,y 的坐标(目标位置)。
- 被抠出的图片是模板图片(templates图片),它的背景是透明的,只能看到抠图部分,图片类型是png。
- templates图片滑动的时候会随时产生相应的偏移量offsetHorizontal,当最终偏移量与目标位置x坐标相等时(可以设置一定的偏差),验证成功!
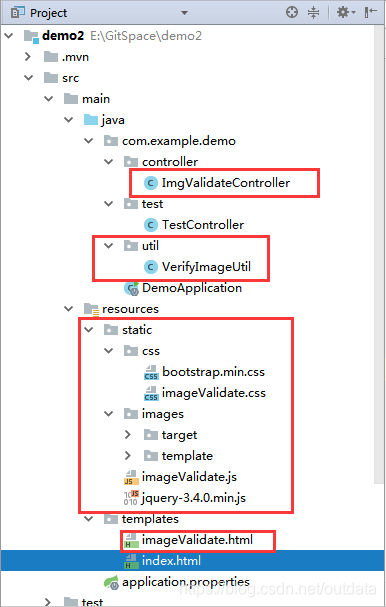
二、demo示例
背景: 新建springboot的demo
demo文件目录展示
1.后端
- VerifyImageUtil工具类
该类编写主要是为了实现图片的抠图,坐标位置等对图片处理的功能,是实现图片滚动验证码的核心代码。
代码解析:
pictureTemplatesCut()方法是VerifyImageUtil类的入口函数,主要是初始化参数,首次加载滑块的两张图片,便是调用改方法(在controller层的创建滑块图片:createImgValidate()方法实现加载)。返回的pictureMap 集合是两张 效果处理的图片(背景图片:jpg 和 抠图模板: png)
package com.example.demo.util;

import javax.imageio.ImageIO;
import javax.imageio.ImageReadParam;
import javax.imageio.ImageReader;
import javax.imageio.stream.ImageInputStream;
import java.awt.*;
import java.awt.image.BufferedImage;
import java.io.ByteArrayOutputStream;
import java.io.File;
import java.io.FileInputStream;
import java.io.InputStream;
import java.text.NumberFormat;
import java.util.HashMap;
import java.util.Iterator;
import java.util.Map;
import java.util.Random;

/**
 * 滑块验证工具类
 * VerifyImageUtil
 */
public class VerifyImageUtil {

    /** 源文件宽度 */
    private static final int ORI_WIDTH = 600;
    /** 源文件高度 */
    private static final int ORI_HEIGHT = 300;
    /** 抠图坐标x */
    private static int X;
    /** 抠图坐标y */
    private static int Y;
    /** 模板图宽度 */
    private static int WIDTH;
    /** 模板图高度 */
    private static int HEIGHT;

    public static int getX() {
        return X;
    }

    public static int getY() {
        return Y;
    }

    /**
     * 根据模板切图
     * @param templateFile 模板文件
     * @param targetFile 目标文件
     * @param templateType 模板文件类型
     * @param targetType 目标文件类型
     * @return 切图map集合
     * @throws Exception 异常
     */
    public static Map<String, byte[]> pictureTemplatesCut(File templateFile, File targetFile, String templateType, String targetType) throws Exception {
        Map<String, byte[]> pictureMap = new HashMap<>(2);

        InputStream targetIs = new FileInputStream(targetFile);
        // 模板图
        BufferedImage imageTemplate = ImageIO.read(templateFile);
        WIDTH = imageTemplate.getWidth();
        HEIGHT = imageTemplate.getHeight();
        // 随机生成抠图坐标
        generateCutoutCoordinates();
        // 最终图像
        BufferedImage newImage = new BufferedImage(WIDTH, HEIGHT, imageTemplate.getType());
        Graphics2D graphics = newImage.createGraphics();
        graphics.setBackground(Color.white);

        int bold = 5;
        // 获取感兴趣的目标区域
        BufferedImage targetImageNoDeal = getTargetArea(X, Y, WIDTH, HEIGHT, targetIs, targetType);

        // 根据模板图片抠图
        newImage = dealCutPictureByTemplate(targetImageNoDeal, imageTemplate, newImage);

        // 设置“抗锯齿”的属性
        graphics.setRenderingHint(RenderingHints.KEY_ANTIALIASING, RenderingHints.VALUE_ANTIALIAS_ON);
        graphics.setStroke(new BasicStroke(bold, BasicStroke.CAP_BUTT, BasicStroke.JOIN_BEVEL));
        graphics.drawImage(newImage, 0, 0, null);
        graphics.dispose();

        //模板图像矩阵 加阴影边框
        //boundaryShadow(newImage);

        //新建流。
        ByteArrayOutputStream os = new ByteArrayOutputStream();
        //利用ImageIO类提供的write方法,将bi以png图片的数据模式写入流。
        ImageIO.write(newImage, "png", os);
        byte[] newImages = os.toByteArray();
        pictureMap.put("newImage", newImages);

        // 源图生成遮罩
        BufferedImage oriImage = ImageIO.read(targetFile);
        byte[] oriCopyImages = dealOriPictureByTemplate(oriImage, imageTemplate, X, Y);
        pictureMap.put("oriCopyImage", oriCopyImages);
        System.out.println("X="+X+";y="+Y);
        return pictureMap;
    }

    /**
     * 抠图后原图生成
     * @param oriImage 原始图片
     * @param templateImage 模板图片
     * @param x 坐标X
     * @param y 坐标Y
     * @return 添加遮罩层后的原始图片
     * @throws Exception 异常
     */
    private static byte[] dealOriPictureByTemplate(BufferedImage oriImage, BufferedImage templateImage, int x,
                                                   int y) throws Exception {
        // 源文件备份图像矩阵 支持alpha通道的rgb图像
        BufferedImage oriCopyImage = new BufferedImage(oriImage.getWidth(), oriImage.getHeight(), BufferedImage.TYPE_4BYTE_ABGR);
        // 源文件图像矩阵
        int[][] oriImageData = getData(oriImage);
        // 模板图像矩阵
        int[][] templateImageData = getData(templateImage);

        //copy 源图做不透明处理
        for (int i = 0; i < oriImageData.length; i++) {
            for (int j = 0; j < oriImageData[0].length; j++) {
                int rgb = oriImage.getRGB(i, j);
                int r = (0xff & rgb);
                int g = (0xff & (rgb >> 8));
                int b = (0xff & (rgb >> 16));
                //无透明处理
                rgb = r + (g << 8) + (b << 16) + (240 << 24);
                oriCopyImage.setRGB(i, j, rgb);
            }
        }

        for (int i = 0; i < templateImageData.length; i++) {
            for (int j = 0; j < templateImageData[0].length - 5; j++) {
                int rgb = templateImage.getRGB(i, j);
                //对源文件备份图像(x+i,y+j)坐标点进行透明处理(被抠图的阴影部分)
                if (rgb != 16777215 && rgb <= 0) {
                    int rgb_ori = oriCopyImage.getRGB(x + i, y + j);
                    int r = (0xff & rgb_ori);
                    int g = (0xff & (rgb_ori >> 8));
                    int b = (0xff & (rgb_ori >> 16));
                    rgb_ori = r + (g << 8) + (b << 16) + (70 << 24);
                    oriCopyImage.setRGB(x + i, y + j, rgb_ori);
                } else {
                    //do nothing
                }
            }
        }
        //新建流
        ByteArrayOutputStream os = new ByteArrayOutputStream();
        //利用ImageIO类提供的write方法,将bi以png图片的数据模式写入流
        ImageIO.write(oriCopyImage, "png", os);
        //从流中获取数据数组
        return os.toByteArray();
    }

    /**
     * 根据模板图片抠图
     * @param oriImage 原始图片
     * @param templateImage 模板图片
     * @return 扣了图片之后的原始图片
     */
    private static BufferedImage dealCutPictureByTemplate(BufferedImage oriImage, BufferedImage templateImage,
                                                          BufferedImage targetImage) throws Exception {
        // 源文件图像矩阵
        int[][] oriImageData = getData(oriImage);
        // 模板图像矩阵
        int[][] templateImageData = getData(templateImage);

        System.out.println("shi:" + templateImageData.length);
        // 模板图像宽度
        for (int i = 0; i < templateImageData.length; i++) {
            // 模板图片高度
            for (int j = 0; j < templateImageData[0].length; j++) {
                // 如果模板图像当前像素点不是白色 copy源文件信息到目标图片中
                int rgb = templateImageData[i][j];
                if (rgb != 16777215 && rgb <= 0) {
                    targetImage.setRGB(i, j, oriImageData[i][j]);
                }
            }
        }
        return targetImage;
    }

    /**
     * 获取目标区域
     * @param x            随机切图坐标x轴位置
     * @param y            随机切图坐标y轴位置
     * @param targetWidth  切图后目标宽度
     * @param targetHeight 切图后目标高度
     * @param ois          源文件输入流
     * @return 返回目标区域
     * @throws Exception 异常
     */
    private static BufferedImage getTargetArea(int x, int y, int targetWidth, int targetHeight, InputStream ois,
                                               String fileType) throws Exception {
        Iterator<ImageReader> imageReaderList = ImageIO.getImageReadersByFormatName(fileType);
        ImageReader imageReader = imageReaderList.next();
        // 获取图片流
        ImageInputStream iis = ImageIO.createImageInputStream(ois);
        // 输入源中的图像将只按顺序读取
        imageReader.setInput(iis, true);

        ImageReadParam param = imageReader.getDefaultReadParam();
        Rectangle rec = new Rectangle(x, y, targetWidth, targetHeight);
        param.setSourceRegion(rec);
        return imageReader.read(0, param);
    }

    /**
     * 生成图像矩阵
     * @param bufferedImage 图片流
     * @return 图像矩阵
     */
    private static int[][] getData(BufferedImage bufferedImage){
        int[][] data = new int[bufferedImage.getWidth()][bufferedImage.getHeight()];
        for (int i = 0; i < bufferedImage.getWidth(); i++) {
            for (int j = 0; j < bufferedImage.getHeight(); j++) {
                data[i][j] = bufferedImage.getRGB(i, j);
            }
        }
        return data;
    }

    /**
     * 随机生成抠图坐标
     */
    private static void generateCutoutCoordinates() {
        Random random = new Random();
        int widthDifference = ORI_WIDTH - WIDTH;
        int heightDifference = ORI_HEIGHT - HEIGHT;

        if (widthDifference <= 0) {
            X = 5;
        } else {
            X = random.nextInt(ORI_WIDTH - 3*WIDTH) + 2*WIDTH + 5;
        }

        if (heightDifference <= 0) {
            Y = 5;
        } else {
            Y = random.nextInt(ORI_HEIGHT - HEIGHT ) + 5;
        }

        NumberFormat numberFormat = NumberFormat.getInstance();
        numberFormat.setMaximumFractionDigits(2);
    }
}
- ImgValidateController 类
ImgValidateController 控制器方法实现为了方便前端的调用。
代码解析:
createImgValidate() 方法初始化加载图片。传入原始的本地图片,通过工具类的方法处理图片并返回给前端。
checkImgValidate() 方法通过前端传入的偏移量offsetHorizontal与target图片中的x坐标对比,判断是否验证成功。
package com.example.demo.controller;

import com.example.demo.util.VerifyImageUtil;
import org.springframework.stereotype.Controller;
import org.springframework.util.ResourceUtils;
import org.springframework.web.bind.annotation.RequestMapping;
import org.springframework.web.bind.annotation.ResponseBody;

import java.io.*;
import java.util.HashMap;
import java.util.Map;
import java.util.Random;

@Controller
@RequestMapping(value = "imgVerify")
public class ImgValidateController {

    /**
     * 跳转前台 图片滑块验证码 页面
     */
    @RequestMapping(value = "imgValidate")
    public String toImgValidate() {
        return "imageValidate";
    }

    /**
     * 创建滑块图片
     */
    @RequestMapping(value = "createImgValidate")
    @ResponseBody
    public Map<String, byte[]> createImgValidate(){
        Map<String, byte[]> resultMap = new HashMap<>();
        try{
            Integer templateNum = new Random().nextInt(4) + 1;
            Integer targetNum = new Random().nextInt(1) + 1;

            File templateFile = ResourceUtils.getFile("classpath:static/images/template/"+templateNum+".png");
            File targetFile = ResourceUtils.getFile("classpath:static/images/target/"+targetNum+".jpg");
            resultMap =  VerifyImageUtil.pictureTemplatesCut(templateFile, targetFile,"PNG","JPG");
        }catch (FileNotFoundException e){
            e.printStackTrace();
        }catch (IOException e){
            e.printStackTrace();
        }catch (Exception e){
            e.printStackTrace();
        }

        return resultMap;
    }

    /**
     * 校验 滑动验证码是否正确
     */
    @RequestMapping(value = "checkImgValidate")
    @ResponseBody
    public boolean checkImgValidate(int offsetHorizontal){
        boolean flag = false;
        int x = VerifyImageUtil.getX()+67;
        if(offsetHorizontal > x - 5 && offsetHorizontal < x + 5 ){
            flag = true;
            return flag;
        }
        return flag;
    }


}
2.前端
1.imageValidate.html页面
在pom.xml中需用引入thymeleaf 的依赖
<dependency>
	<groupId>org.springframework.boot</groupId>
	<artifactId>spring-boot-starter-thymeleaf</artifactId>
</dependency>
<!DOCTYPE html>
<html xmlns:th="http://www.thymeleaf.org">
<head>
    <meta charset="UTF-8">
    <title>图片验证</title>
    <link rel="stylesheet" type="text/css" th:href="@{/css/bootstrap.min.css}" />
    <link rel="stylesheet" type="text/css" th:href="@{/css/imageValidate.css}" />
</head>
<body>
<div id="container">
    <div class="imageDiv">
        <img id="validateImage" src=""/>
        <img id="slideImage" src=""/>
    </div>
    <div class="resultDiv">
        <button class="btn btn-success" onclick="exchange();">换一组</button>
        <span id="operateResult"></span>
    </div>
    <div>
        <div id="sliderOuter">
            <div id="dragDiv">拖动滑块完成拼图</div>
            <div id="sliderInner">
               <!-- <div class="coverIcon">滑动条</div>-->
            </div>
        </div>
    </div>
</div>

</body>
<script type="text/javascript" th:src="@{/jquery-3.4.0.min.js}" ></script>
<script type="text/javascript" th:src="@{/imageValidate.js}" ></script>
</html>
- imageValidate.css
给imageValidate.html页面加入基本的显示效果。
body{
    overflow: hidden;
}
#container{
    width: 100%;
}
.fontDiv{
    margin: 16px 0;
}
.dragFont{
    font-size: 16px;
    color: dodgerblue;
}
.imageDiv{
    width: 600px;
    height: 300px;
    margin: 20px auto 0 auto;
    position: relative;
}
.resultDiv{
    margin: 10px 20px;
}
#validateImage{
    border-radius: 4px;
}
#slideImage{
    position: absolute;
    top: 5px;
    left: 0;
}
#sliderOuter{
    width: 600px;
    height: 40px;
    margin: 12px auto;
    border-radius: 20px;
    box-shadow: 0 0 10px 5px darkgrey;
    display: flex;
    align-items: center;
    justify-content: center;
    position: relative;
}
#dragDiv{
    width: 100%;
    height: 40px;
    position: absolute;
    font-size: 16px;
    color: dodgerblue;
    text-align: center;
    line-height: 40px;
    -webkit-user-select: none;
    -moz-user-select: none;
    -ms-user-select: none;
    user-select: none;
}
#sliderInner{
    width: 94px;
    height: 40px;
    border-radius: 20px;
    font-size: 2rem;
    background-color: #28a745;
    cursor: pointer;
    position: absolute;
    left: 0;
}
/*
#sliderInner i{
    position: relative;
    top: -2px;
    left: 36px;
    color: white;
}
.coverIcon{
    width: 100%;
    height: 100%;
    position: absolute;
    top: 0;
}*/
- imageValidate.js
显示滑动验证吗的前端逻辑。initImageValidate()初始化加载图片。checkImageValidate()判断验证是否成功。
var left = 0;

$(function(){
    // 初始化图片验证码
    initImageValidate();

    /* 初始化按钮拖动事件 */
    // 鼠标点击事件
    $("#sliderInner").mousedown(function(){
        // 鼠标移动事件
        document.onmousemove = function(ev) {
            left = ev.clientX;
            if(left >= 67 && left <= 573){
                $("#sliderInner").css("left",(left-67)+"px");
                $("#slideImage").css("left",(left-67)+"px");
            }
        };
        // 鼠标松开事件
        document.onmouseup=function(){
            document.onmousemove=null;
            checkImageValidate();
        };
    });

});

function initImageValidate(){
    $.ajax({
        async : false,
        type : "POST",
        url : "/imgVerify/createImgValidate",
        dataType: "json",
        data:{
        },
        success : function(data) {
            //console.log(data);
            if(data){
                $("#validateImage").attr("src", "data:image/png;base64,"+data.oriCopyImage);
                $("#slideImage").attr("src", "data:image/png;base64,"+data.newImage);
            }else {
                console.log("初始化出错!!");
            }
        },
        error : function() {}
    });
}

function exchange(){
    initImageValidate();
}

// 校验
function checkImageValidate(){
    $.ajax({
        async : false,
        type : "POST",
        url : "/imgVerify/checkImgValidate",
        dataType: "json",
        data:{
            offsetHorizontal:left
        },
        success : function(data) {
            //console.log("data:"+data);
            if(data == true){
                $("#operateResult").css("color","#28a745");
                alert("验证成功");
            }else{
                $("#operateResult").css("color","#dc3545");
                // 验证未通过,将按钮和拼图恢复至原位置
                $("#sliderInner").animate({"left":"0px"},200);
                $("#slideImage").animate({"left":"0px"},200);
                alert("验证失败请重试");
            }
        },
        error : function() {}
    });
}
附代码下载
链接 https://pan.baidu.com/s/1d9UQkmj3I1P1YR-T118UFQ
提取码: z82v
