效果图:

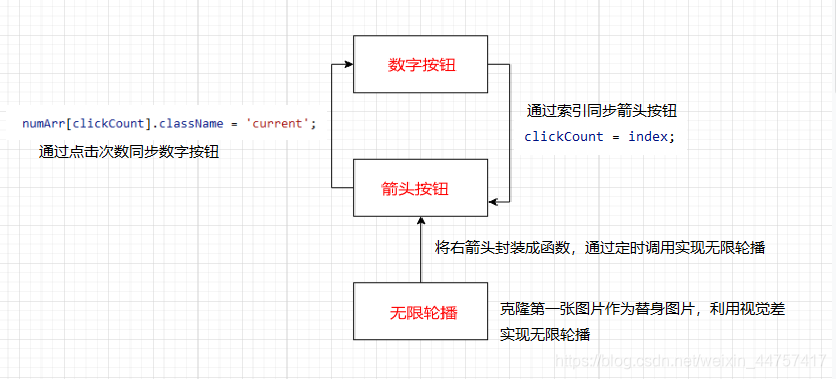
思路:
<!DOCTYPE html>
<html lang="en">
<head>
<meta charset="UTF-8" />
<title></title>
<style type="text/css">
* {
padding: 0;
margin: 0;
list-style: none;
border: 0;
}
.all {
width: 500px;
height: 200px;
padding: 7px;
border: 1px solid #ccc;
margin: 100px auto;
position: relative;
}
.screen {
width: 500px;
height: 200px;
overflow: hidden;
position: relative;
}
.screen li {
width: 500px;
height: 200px;
overflow: hidden;
float: left;
}
.screen ul {
position: absolute;
left: 0;
top: 0px;
width: 3000px;
}
.all ol {
position: absolute;
right: 10px;
bottom: 10px;
line-height: 20px;
text-align: center;
}
.all ol li {
float: left;
width: 20px;
height: 20px;
background: #fff;
border: 1px solid #ccc;
margin-left: 10px;
cursor: pointer;
}
.all ol li.current {
background: yellow;
}
#arr {
display: none;
}
#arr span {
width: 40px;
height: 40px;
position: absolute;
left: 5px;
top: 50%;
margin-top: -20px;
background: #000;
cursor: pointer;
line-height: 40px;
text-align: center;
font-weight: bold;
font-family: "黑体";
font-size: 30px;
color: #fff;
opacity: 0.6;
border: 1px solid #fff;
}
#arr #right {
right: 5px;
left: auto;
}
</style>
</head>
<body>
<div class="all" id="box">
<div class="screen">
<ul>
<li><img src="img/1.jpg" width="500" height="200" /></li>
<li><img src="img/2.jpg" width="500" height="200" /></li>
<li><img src="img/3.jpg" width="500" height="200" /></li>
<li><img src="img/4.jpg" width="500" height="200" /></li>
<li><img src="img/5.jpg" width="500" height="200" /></li>
<!-- 如果要实现无缝轮播,要使用js来添加一张替身图片 -->
</ul>
<ol>
<!-- 动态创建的小方块,添加在这里,样式已经给写好了-->
</ol>
</div>
<div id="arr">
<span id="left"><</span>
<span id="right">></span>
</div>
</div>
<script src="../animation.js"></script>
<script>
// 获取需要的元素
let box = document.getElementById("box");
let moveWidth = document.getElementsByClassName("screen")[0].offsetWidth; //单位位移距离
let ulBox = document.getElementsByTagName("ul")[0];
let olBox = document.getElementsByTagName("ol")[0];
let arrow = document.getElementById('arr');
let arrLeft = document.getElementById('left');
let arrRight = document.getElementById('right');
let liArr = ulBox.children;
let timeID;
// 《----------------------数字按钮---------------------------》
// 1.创建数字按钮(通过图片的张数)————>追加
for (let i = 0; i < liArr.length; i++) {
// 2.创建数字按钮
let numBox = document.createElement('li');
// 3.添加数字内容
numBox.innerText = i + 1;
// 4.给第一个数字设置默认选中状态
if (i == 0) {
numBox.setAttribute('class', 'current');
}
// 5.追加到olBox中
olBox.appendChild(numBox);
}
// <----点击改变背景色与图片同步---->
// 1.获取所有的数字按钮
let numArr = olBox.children;
for (let i = 0; i < numArr.length; i++) {
// 2.设置索引
numArr[i].setAttribute('index', i);
// 3.设置点击事件
numArr[i].onclick = function () {
//4.数组排他
reset();
this.setAttribute('class', 'current');
// 5.获得索引
let index = this.getAttribute('index');
// 6.计算位移距离(往左位移为负数)
let target = -index * moveWidth;
//7.调用动画函数
moveAnimation(ulBox, target);
// 同步箭头按钮
clickCount = index;
}
}
//封装一个排他函数
function reset() {
for (let i = 0; i < numArr.length; i++) {
numArr[i].className = '';
}
}
// 《----------------------箭头按钮---------------------------》
// 1.设置鼠标移入移出事件
box.onmouseover = function () {
arrow.style.display = 'block';
// 鼠标移入清除定时器
clearInterval(timeID);
}
box.onmouseout = function () {
arrow.style.display = 'none';
timeID = setInterval(moveNext, 1000);
}
// 2.给左右箭头设置点击事件(点击次数有限制)
let clickCount = 0;
// arrRight.onclick = function () {
// if (clickCount < liArr.length - 1) {
// clickCount++;
// }
// // 计算位移距离(往左位移为负数)
// let target = -clickCount * moveWidth;
// // 调用动画函数
// moveAnimation(ulBox, target);
// // 与数字按钮同步
// // 排他
// reset();
// numArr[clickCount].className = 'current';
// }
arrRight.onclick = moveNext;
arrLeft.onclick = function () {
if (clickCount > 0) {
clickCount--;
}
let target = -clickCount * moveWidth;
moveAnimation(ulBox, target);
reset();
numArr[clickCount].className = 'current';
}
// 《----------------------无限轮播---------------------------》
// 1.克隆一张替身图片追加到ulBox中
ulBox.appendChild(liArr[0].cloneNode(true)); //深克隆
// 将右箭头封装成函数,通过定时调用实现无限轮播
// 图片到第0张时立即切换为替身图片
function moveNext() {
if (clickCount == 5) {
clickCount = 0;
ulBox.style.left = -clickCount * moveWidth;
}
clickCount++;
// if (clickCount < liArr.length - 1) {
// clickCount++;
// }
// 计算位移距离(往左位移为负数)
let target = -clickCount * moveWidth;
// 调用动画函数
moveAnimation(ulBox, target);
// 与数字按钮同步
// 排他
reset();
// 点击箭头的时候,同步数字按钮的背景
// index:0 1 2 3 4
// clickCount:1 2 3 4 5
// 如果点击右箭头显示5的时候,此刻显示的图片一个是替身图片-->本质上就是第0张
if (clickCount < 5) {
numArr[clickCount].className = 'current';
} else {
// 显示的是替身图片,本质上就是第0张;
numArr[0].className = 'current';
}
}
timeID = setInterval(moveNext, 1000);
</script>
</body>
</html>