文章目录
Linux云计算架构-rsync+sersync实现数据实时同步
1. rsync介绍
Rsync(Remote Sync)是Linux系统下的数据镜像备份工具。该工具可以实现远程同步、不同主机之间的同步,也能实现全量备份和增量备份,保持数据链接和权限,并采用优化的同步算法,传输前对数据进行压缩,故该工具非常适合架构集中式备份或异地备份。也支持本地复制或与ssh、rsync同步。
官网地址:https://rsync.samba.org/
优点:
①scp无法备份大量数据,而rsync备份、统计、比较一起进行。
②可以备份整个目录树和文件系统,并保持文件原来的权限、时间、软硬链接。
③安装较容易,无需特殊权限。
④同步快速,首次同步完全备份,再次同步增量备份。
⑤可以使用scp和ssh等方式传输备份文件
⑥支持匿名传输
⑦选择性保持:符号链接、硬链接、文件属性、权限、时间等
⑧传输速度快:压缩再传输、解压再使用,减少带宽。
# 查看版本信息
[root@server ~]# rsync --version
rsync  version 3.1.2  protocol version 31
Copyright (C) 1996-2015 by Andrew Tridgell, Wayne Davison, and others.
Web site: http://rsync.samba.org/
Capabilities:
    64-bit files, 64-bit inums, 64-bit timestamps, 64-bit long ints,
    socketpairs, hardlinks, symlinks, IPv6, batchfiles, inplace,
    append, ACLs, xattrs, iconv, symtimes, prealloc

rsync comes with ABSOLUTELY NO WARRANTY.  This is free software, and you
are welcome to redistribute it under certain conditions.  See the GNU
General Public Licence for details.
备份分类:
①完全备份:所有文件进行备份
②差异备份:备份自上次完全备份以来所有的修改
③增量备份:备份自上次备份依赖所作的修改
2. rsync运行原理
rsync采用C/S模式,即点到点的传输。通过xinetd服务监听873端口,再让xinetd服务下的rsync服务作出响应。
源主机:需要同步数据的服务器
目标主机:存放服务器同步数据的主机
数据同步方式:push 和 pull
①推push:主动同步,把数据发送给目标主机。服务器开销大,适合后端服务器较少的情况。【服务器备份推给rsync客户端存放,主动模式】
目的主机配置为 rsync 服务端,源主机周期性的使用 rsync 命令把要同步的目录推过去。
②拉pull:所有客户端主机去服务器上面拉数据,导致数据传输缓慢。【rsync客户端去服务器上拉数据,存放到客户端上,被动模式】
源主机配置为 rsync 服务端,目的主机周期性的使用 rsync 命令把要同步的目录拉过来。
3. rsync部署
# rsync服务由xinetd服务进行管理,故也需要安装xinetd服务
# 客户端和服务器都需要安装xinetd服务和rsync服务
[root@server ~]# yum install xinetd rsync -y
[root@client ~]# yum install xinetd rsync -y

# rsync运行在daemon模式
[root@server ~]# rsync --daemon
[root@client ~]# rsync --daemon

# 查看是否监听873端口号
[root@server ~]# netstat -antup | grep 873
tcp        0      0 0.0.0.0:873             0.0.0.0:*               LISTEN      18927/rsync
tcp6       0      0 :::873                  :::*                    LISTEN      18927/rsync
[root@client ~]# netstat -antup | grep 873
tcp        0      0 0.0.0.0:873             0.0.0.0:*               LISTEN      9367/rsync
tcp6       0      0 :::873                  :::*                    LISTEN      9367/rsync
| 参数 | 作用 |
|---|---|
| -a | –archive archive mode权限保存模式【递归、保持属性】 |
| -r | 递归处理 |
| -p | 保留文件原有属性 |
| -t | 保留文件原有时间 |
| -g | 保留属组 |
| -o | 保留档案所有者 |
| -D | 保留device咨询 |
| -l | 复制所有的连接 |
| -z | 压缩传输 |
| -H | 保留硬链接文件 |
| -A | 保留文件的ACL属性 |
| -P | –progress |
| –version | 输出rsync版本信息 |
| -v | 显示输出过程 |
| -u | 仅进行更新 |
| –port | 指定端口号,默认873 |
| –delete | 删除那些目标位置有的文件而备份源没有的文件,最大程度的保持一致。 |
| –password-file | 指定密码文件 |
| –bwlimit | 限制I/O带宽 |
| –filter | 需要过滤的文件 |
| –exclude | 需要过滤的文件 |
| –progress | 显示备份过程 |
| –avz | 常用:保留权限、显示同步过程、压缩传输 |
4. 备份测试
# 由于rsync备份是会保持目录及其文件的权限、时间、软硬连接不变的,那要求备份在ssh传输过程中一路顺畅,不会因权限不足而备份失败。
# 这里创建test用户用于测试
[root@server ~]# useradd test && echo 123456 | passwd --stdin test
更改用户 test 的密码 。
passwd:所有的身份验证令牌已经成功更新。
[root@client ~]# useradd test && echo 123456 | passwd --stdin test
更改用户 test 的密码 。
passwd:所有的身份验证令牌已经成功更新。

# 服务端上创建测试目录/data
# g+s权限的作用在于/data目录下新增的文件的所属组都会是test
# setfacl为test用户创建在/data的rwx权限
[root@server ~]# mkdir /data
[root@server ~]# chown -R test:test /data
[root@server ~]# chmod g+s /data
[root@server ~]# setfacl -m u:test:rwx /data
[root@server ~]# cp -r  /boot/* /data

# 客户端上创建备份存放目录
[root@client ~]# mkdir  -p /data/backup/
[root@client ~]# chown test:test /data/backup/
[root@client ~]# ll -d /data/backup/
drwxr-xr-x. 2 test test 6 8月   6 23:52 /data/backup/

# 备份/data目录下的数据到客户端上
[root@server ~]# rsync -avz /data/ [email protected]:/data/backup
[email protected]'s password:
sending incremental file list
./
。。。省略备份信息。。。
sent 138,094,794 bytes  received 6,296 bytes  5,211,361.89 bytes/sec
total size is 152,364,618  speedup is 1.10

# 客户端上验证备份内容,可以看到有数据传输进去
[root@client ~]# du -sh /data/backup/
146M	/data/backup/

# 如果同步的时候,使用的不是ssh的22号端口,而是其他端口,比如222,要加-e参数指定端口号
rsync -avz /data/  -e "ssh -p 222" [email protected]:/data/backup
5. 使用非系统用户备份数据
5.1 rsync的配置文件介绍
rsync的配置文件:/etc/rsync.conf
# /etc/rsync.conf
全局参数:对rsync服务器生效,优先级较低
port     # rsync占用端口号,默认是873
address  # 监听地址,一般是目标主机的IP地址
uid      # 运行进程的用户
gid      # 运行进程的用户组
max connections  # 最大连接数
lock file   # 最大连接数的锁文件
motd file   # 同步登录后的提示语,填写欢迎同步信息,自行创建
log file    # 日志文件
pid file    # 进程PID文件,自动生成
hosts allow  # 允许同步的主机

模块参数:针对某一个目录定义的参数,优先级较高
[mod_name]    # 同步目录名
comment       # 描述信息
path          # 同步目录
read only     # 同步目录的读写权限
exclude
exclude from
include
include from
auth users   # 备份的用户,自动创建,与系统用户无关
secrets file  # 存放rsync用户的密码文件
hosts allow
hosts deny
list
timeout

# 启动rsync就会生成一个对应的pid
[root@server ~]# ll /var/run/rsyncd.pid
-rw-r--r--. 1 root root 6 8月   8 09:46 /var/run/rsyncd.pid
[root@server ~]# cat /var/run/rsyncd.pid
18933
# 查看下/etc/rsyncd.conf的默认内容
# 可以使用man rsyncd.conf 命令查看更多选项信息
[root@server ~]# ll /etc/rsyncd.conf
-rw-r--r--. 1 root root 458 4月  11 2018 /etc/rsyncd.conf
[root@server ~]# cat /etc/rsyncd.conf
# /etc/rsyncd: configuration file for rsync daemon mode

# See rsyncd.conf man page for more options.

# configuration example:

# uid = nobody
# gid = nobody
# use chroot = yes
# max connections = 4
# pid file = /var/run/rsyncd.pid
# exclude = lost+found/
# transfer logging = yes
# timeout = 900
# ignore nonreadable = yes
# dont compress   = *.gz *.tgz *.zip *.z *.Z *.rpm *.deb *.bz2

# [ftp]
#        path = /home/ftp
#        comment = ftp export area
5.2 配置备份目录
服务器:server 192.168.43.178
客户端:client 192.168.43.143
# 在客户端上编写rsync配置文件,创建一个存放备份的同步目录
[root@client ~]# vim /etc/rsyncd.conf
port=873
address = 192.168.43.143
uid = root
gid = root
use chroot = yes
max connections = 4
pid file = /var/run/rsyncd.pid
lock file = /var/run/rsync.lock
log file = /var/log/rsyncd.log
motd file = /etc/rsyncd.motd
hosts allow = 192.168.43.0/24
[data]
path = /data/backup
comment = bakcup data
read only = false
list = yes
auth users = rsyncuser
secrets file = /etc/rsync.passwd

# 创建欢迎信息文件
[root@client ~]# echo "Welcome to Backup Server" > /etc/rsyncd.motd

# 创建密码文件,格式   用户名:密码
# 设置密码文件权限为600或者700
[root@client ~]# echo "rsyncuser:123456" > /etc/rsync.passwd
[root@client ~]# chmod 600 /etc/rsync.passwd
# 启动xinetd服务,并加入到开机自启中
[root@client ~]# systemctl start xinetd
[root@client ~]# systemctl enable xinetd
# 如果已经启动了rsync服务,要使用非系统用户登录,则必须先把原先的rsync停下来。
[root@client ~]# systemctl stop rsyncd
[root@client ~]# rsync --daemon --config=/etc/rsyncd.conf

# 开放873端口号,允许通过873端口号同步数据
[root@client ~]# firewall-cmd --permanent --zone=public --add-port=873/tcp
success
[root@client ~]# firewall-cmd --reload
success
5.3 使用rsync用户备份测试
# rsync用户一般是第一个普通用户,即UID为1001,故备份的所有者和所属组都为1001
# 服务端推送数据到共享目录位置
rsync 选项 需要备份的目录 rsync用户名@存放备份的服务器IP::共享模块名 --password-file=密码文件
[root@server ~]# rsync -avz /data [email protected]::data
Welcome to Backup Server

Password:
sending incremental file list
。。。省略同步信息。。。
sent 138,094,811 bytes  received 6,297 bytes  6,137,827.02 bytes/sec
total size is 152,364,618  speedup is 1.10

# 如果想不输入密码,可以使用--password-file参数指定密码
[root@server ~]# cat /etc/rsync.passwd
123456
[root@server ~]# rsync -avz /data [email protected]::data --password-file=/etc/rsync.passwd

# 如果想定时同步数据,可以设置定时任务。
[root@server ~]# vim autobackup.sh
[root@server ~]# cat autobackup.sh
#!/bin/bash
rsync -avz /data [email protected]::data --password-file=/etc/rsync.passwd
[root@server ~]# chmod +x autobackup.sh
[root@server ~]# crontab -e
50 19 * * * bash /root/autobackup.sh
5.4 演示一下pull拉取数据
以上的同步过程都是服务端主动推送数据给目标主机,这里演示下目标主机主动拉取数据进行同步。
# 服务端上配置/etc/rsyncd.conf文件
[root@server ~]# vim /etc/rsyncd.conf
port=873
address = 192.168.43.178
uid = root
gid = root
use chroot = yes
max connections = 4
pid file = /var/run/rsyncd.pid
lock file = /var/run/rsync.lock
log file = /var/log/rsyncd.log
motd file = /etc/rsyncd.motd
hosts allow = 192.168.43.0/24
[data]
path = /data
comment = master data
read only = false
list = yes
auth users = rsyncuser
secrets file = /etc/rsync.passwd
# 认证文件
[root@server ~]# cat /etc/rsync.passwd
rsyncuser:123456
# 服务端上启动rsync
[root@server ~]# rsync --daemon --config=/etc/rsyncd.conf
[root@server ~]# netstat -antup | grep 873
tcp        0      0 192.168.43.178:873      0.0.0.0:*               LISTEN      11040/rsync
# 看到以上结果,说明服务端的rsync服务已经配置完成。
# 开放873端口号,允许通过873端口号拉取数据
[root@server ~]# firewall-cmd --permanent --zone=public --add-port=873/tcp
success
[root@server ~]# firewall-cmd --reload
success
# 目标主机上拉取数据
[root@client ~]# rsync -avz [email protected]::data /data/backup/
Welcome to Backup Server

Password:
receiving incremental file list
。。。省略拉取过程。。。
sent 6,342 bytes  received 138,094,913 bytes  11,048,100.40 bytes/sec
total size is 152,364,627  speedup is 1.10
6. rsync+sersync 实现数据实时同步
6.1 数据同步原理
1、为什么要是用rsync+sersync
sersync是基于inotify开发的,可以记录目录中发生变化的内容,具体到某个文件或者目录,在使用rsync同步的时候,只同步发生变化的文件或者目录。【差异同步】
2、rsync+inotify-tools 与 rsync+sersync 架构的区别?
①inotify-tools只能记录目录发生了变化,但是不能具体到某个文件或者目录。
②rsync同步不清楚哪些文件或目录发生了变化,就会整个目录都同步,效率低。
3、同步过程:
①同步服务器上开启sersync记录指定路径的文件系统变化情况。
②目标服务器上使用rsync命令把变化的数据同步到目标服务器上。
③同步服务器上配置sersync服务,目标服务器安装rsync服务。
6.2 部署rsync+sersync
sersync服务端【同步服务器】:192.168.43.178
rsync客户端【存放备份,目标服务器】:192.168.43.143
由于sersync只能监控到差异变化,同步还是需要rsync去做,所以先确保rsync运行正常。可以测试一遍,看能否做完全同步。
[root@client ~]# rsync --daemon --config=/etc/rsyncd.conf
[root@client ~]# netstat -antup | grep rsync
tcp        0      0 192.168.43.143:873      0.0.0.0:*               LISTEN      9298/rsync
# 添加到开机自启
[root@client ~]# vim /etc/rc.d/rc.local
rsync --daemon --config=/etc/rsyncd.conf

[root@server ~]# rsync -avz /data [email protected]::data --password-file=/etc/rsync.passwd
开始部署sersync守护进程
# 解压并重命名为sersync
[root@server ~]# cd /opt
[root@server opt]# ll
总用量 712
-rw-r--r--. 1 root root 727290 8月   9 09:52 sersync2.5.4_64bit_binary_stable_final.tar.gz
[root@server opt]# tar xzf sersync2.5.4_64bit_binary_stable_final.tar.gz
[root@server opt]# ll
总用量 712
drwxr-xr-x. 2 root root     41 10月 26 2011 GNU-Linux-x86
-rw-r--r--. 1 root root 727290 8月   9 09:52 sersync2.5.4_64bit_binary_stable_final.tar.gz
[root@server opt]# mv GNU-Linux-x86 sersync
[root@server opt]# ll
总用量 712
drwxr-xr-x. 2 root root     41 10月 26 2011 sersync
-rw-r--r--. 1 root root 727290 8月   9 09:52 sersync2.5.4_64bit_binary_stable_final.tar.gz

# 修改sersync的配置文件
# sersync服务总共就两个文件,一个配置文件,一个启动文件
[root@server ~]# cd /opt/sersync/
[root@server sersync]# ll
总用量 1772
-rwxr-xr-x. 1 root root    2109 8月   9 09:59 confxml.xml
-rwxr-xr-x. 1 root root 1810128 10月 26 2011 sersync2
[root@server ~]# vim /opt/sersync/confxml.xml
# 定义监控路径、同步的目标主机、共享模块
23     <sersync>
24         <localpath watch="/data">
25             <remote ip="192.168.43.143" name="data"/>
26         </localpath>
# 开启用户认证,并设置账号和密码
29             <auth start="true" users="rsyncuser" passwordfile="/etc/rsync.pa    sswd"/>
# 开启sersync守护进程同步数据,即实时同步。
# -r参数,先做一次完全同步,再做差异同步。
[root@server ~]# /opt/sersync/sersync2 -d -r -o /opt/sersync/confxml.xml
set the system param
execute:echo 50000000 > /proc/sys/fs/inotify/max_user_watches
execute:echo 327679 > /proc/sys/fs/inotify/max_queued_events
parse the command param
option: -d 	run as a daemon
option: -r 	rsync all the local files to the remote servers before the sersync work
option: -o 	config xml name:  /opt/sersync/confxml.xml
daemon thread num: 10
parse xml config file
host ip : localhost	host port: 8008
daemon start,sersync run behind the console
use rsync password-file :
user is	rsyncuser
passwordfile is 	/etc/rsync.passwd
config xml parse success
please set /etc/rsyncd.conf max connections=0 Manually
sersync working thread 12  = 1(primary thread) + 1(fail retry thread) + 10(daemon sub threads)
Max threads numbers is: 22 = 12(Thread pool nums) + 10(Sub threads)
please according your cpu ,use -n param to adjust the cpu rate
------------------------------------------
rsync the directory recursivly to the remote servers once
working please wait...
execute command: cd /data && rsync -artuz -R --delete ./ [email protected]::data --password-file=/etc/rsync.passwd >/dev/null 2>&1
[root@server ~]# run the sersync:
watch path is: /data   # 可以看到监控的是/data

# 打开监控,查看实时同步情况
# 当目录/data下的文件或者目录有任何的变化,都会被监控到,并同步到目标主机上。
[root@server data]# watch ls -l
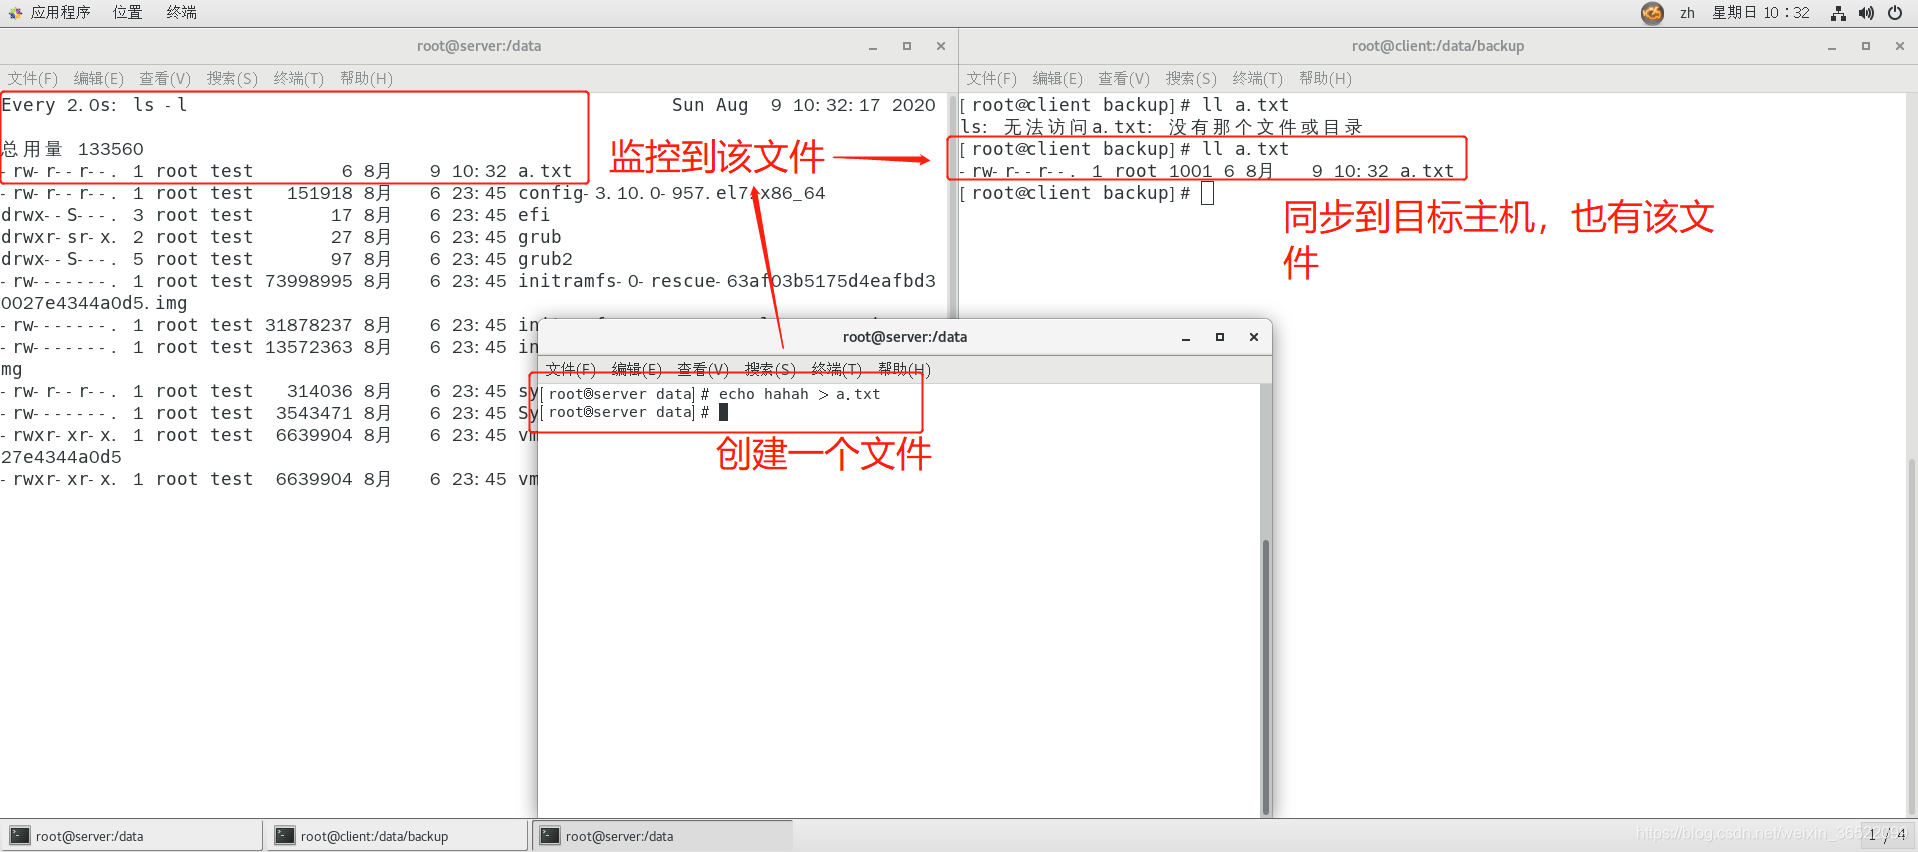
从以上测试可以看出,rsync+sersync已经部署完成,可以正常的同步数据到目标主机上。
6.3 设置rsync+sersync开机自启
# 设置开机自启
[root@server ~]# vim /etc/rc.d/rc.local
/opt/sersync/sersync2 -d -r -o /opt/sersync/confxml.xml
# 如sersync正常运行,通过ps命令可以看到进程已经开启。
[root@server ~]# ps aux | grep sersync2 | grep -v 'grep'| wc -l
1

# 检查sersync是否正常运行
[root@server ~]# vim /opt/check_sersync.sh
#!/bin/sh
sersync="/opt/sersync/sersync2"
confxml="/opt/sersync/confxml.xml"
status=$(ps aux |grep 'sersync2'|grep -v 'grep'|wc -l)
if [ $status -eq 0 ] ; then
  echo "sersync未开启,现在开启"
  echo "==============================="
  $sersync -d -r -o $confxml
  echo "==============================="
  bash $0
else
  echo "sersync已正常开启"
  exit 0;
fi
[root@server ~]# chmod  +x /opt/check_sersync.sh
[root@server ~]# bash /opt/check_sersync.sh

# 设置两分钟检查一次sersync是否正常运行
[root@server ~]# crontab -e
*/2 * * * * sh /opt/check_sersync.sh &> /dev/null
7.总结
①rsync可以进行数据的同步,可以使用推和拉两种方式。推即源主机推数据到目标主机,拉即目标主机从源主机上拉数据。
②push:服务器向客户端推送数据,要在目标主机上配置一个共享目录,在服务端上使用rsync命令推送数据给目标主机。
③pull:客户端向服务器拉去数据,需要把服务器上的同步目录配置成一个共享目录,然后客户端去这个共享目录上拉去数据。
④仅使用rsync同步数据,不会记录数据的变化,每次同步都是同步整个目录,不适合大量数据的同步。
⑤结合使用rsync+sersync,sersync负责监控源主机上同步目录的数据变化,rsync负责同步变化的部分,极大地提高了同步的效率。