一、组网介绍
本次实验使用两台主机:
qll251 角色:Rsync server + Sersync server
qll252 角色: Rsync client
本次实验采用CentOS7.7系统;同时禁用防火墙,关闭selinux
[root@qll251 ~]# cat /etc/redhat-release
CentOS Linux release 7.7.1908 (Core)
[root@qll251 ~]# systemctl stop firewalld && systemctl disable firewalld
[root@qll251 ~]# sed -i 's/SELINUX=enforcing/SELINUX=disabled/' /etc/selinux/config
[root@qll251 ~]# reboot #重启使selinux配置生效
[root@qll251 ~]# getenforce
Disabled
###以上便是本次实验环境的准备工作
二、开始部署
- 在备份源机器上部署sersync+rsync服务
1) 下载sersync的可执行文件
[root@qll251 ~]# wget https://sersync.googlecode.com/files/sersync2.5.4_64bit_binary_stable_final.tar.gz

2)解压sersync可执行文件
[root@qll251 ~]# tar -zxvf sersync2.5.4_64bit_binary_stable_final.tar.gz
GNU-Linux-x86/
GNU-Linux-x86/sersync2
GNU-Linux-x86/confxml.xml
[root@qll251 ~]# ls
GNU-Linux-x86  sersync2.5.4_64bit_binary_stable_final.tar.gz
[root@qll251 ~]# mv GNU-Linux-x86/ sersync2.5.4 #文件夹重命名
[root@qll251 ~]# ls
sersync2.5.4  sersync2.5.4_64bit_binary_stable_final.tar.gz
[root@qll251 ~]#
3)修改/root/sersync2.5.4/confxml.xml配置文件
[root@qll251 ~]# cd /root/sersync2.5.4/
[root@qll251 sersync2.5.4]# ls
confxml.xml sersync2
[root@qll251 sersync2.5.4]# cp confxml.xml confxml.xml.bak #大家养成一个好习惯,修改配置文件,第一件事情是:对它进行备份!
[root@qll251 sersync2.5.4]# vim confxml.xml
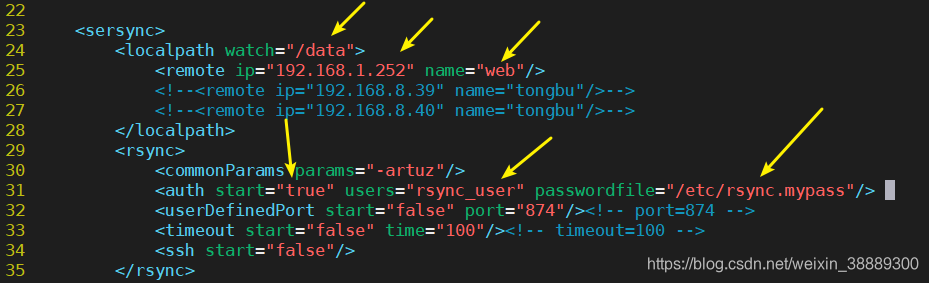
#####################下面是配置文件
23 <sersync>
24 <localpath watch="/data"> #本地备份源路径
25 <remote ip="192.168.1.252" name="web"/> #对端IP地址;web为对端模块名称
26 <!--<remote ip="192.168.8.39" name="tongbu"/>-->
27 <!--<remote ip="192.168.8.40" name="tongbu"/>-->
28 </localpath>
29 <rsync>
30 <commonParams params="-artuz"/>
31 <auth start="true" users="rsync_user" passwordfile="/etc/rsync.mypass"/> #开启认证模式,对端认证用户,及指定本地密码文本
###################
下图黄色箭头所指的代表本次实验需要修改的配置
4)创建本地备份源目录及rsync密码文本/etc/rsync.mypass,并设置相应权限
[root@qll251 ~]# mkdir /data
[root@qll251 ~]# echo 123123 > /etc/rsync.mypass
[root@qll251 ~]# chmod 600 /etc/rsync.mypass
[root@qll251 ~]#
5)安装并启动rsync服务
[root@qll251 ~]# yum -y install rsync xinetd
[root@qll251 ~]# systemctl start rsyncd && systemctl enable rsyncd
[root@qll251 ~]# systemctl start xinetd && systemctl enable xinetd
[root@qll251 ~]# rsync --daemon
- 在qll252主机上部署rsync服务
1)客户端安装rsync服务
[root@qll252 ~]# yum -y install rsync
2)修改/etc/rsyncd.conf配置文件
## vim /etc/rsyncd.conf          //若文件不存在,需要自己创建
uid = root        #运行进程的身份
gid = root       #运行进程的组
address =192.168.1.252   #监听IP
port =873          #监听端口
hosts allow =192.168.1.0/24   #允许客户端的IP地址,可以是网段,或者用*表示所有
use chroot = yes     #若rsync被黑客入侵,则锁定家目录,黑客无法再rsync运行的家目录之外创建文件
max connections =5        #最大连接数
pid file =/var/run/rsyncd.pid       #进程PID,自动生成
lock file =/var/run/rsync.lock      #指max connectios参数的锁文件
log file =/var/log/rsyncd.log       #日志文件位置
motd file =/etc/rsyncd.motd #客户端登陆之后弹出的消息,需要创建
[web]             #共享模块名称,sersync端需要跟它保持一致
path =/mybak   #接收备份源端文件的路径
comment = used for mysql-data    #描述
read only = false     #设置服务端文件读写权限
list = yes            #是否允许查看模块信息
auth users = rsync_user   #指定备份用户,sersync端需要跟它保持一致
secrets file =/etc/rsync.passwd     #本地存放用户的密码文件,格式是  用户名:密码
3)创建待接收备份文件的目录;创建密码文件/etc/rsync.passwd,并指定权限600
[root@qll252 ~]# mkdir /mybak
[root@qll252 ~]# echo "rsync_user:123123" > /etc/rsync.passwd  #格式是  用户名:密码
[root@qll252 ~]# chmod 600 /etc/rsync.passwd
4)以守护进程方式运行rsync;同时确保开机自动运行该守护进程
[root@qll252 ~]# rsync --daemon --config=/etc/rsyncd.conf
[root@qll252 ~]# echo "rsync --daemon --config=/etc/rsyncd.conf" >> /etc/rc.local
三、开启sersync守护进程进行同步数据
我们先手动同步一次,
[root@qll251 ~]# rsync -avz /data [email protected]::web --password-file=/etc/rsync.mypass

手动同步成功,说明我们部署的环境是正确的!
接下来,我们开启sersync守护进程,实现两台服务器之间的数据实时同步
[root@qll251 ~]# /root/sersync2.5.4/sersync2 -d -r -o /root/sersync2.5.4/confxml.xml
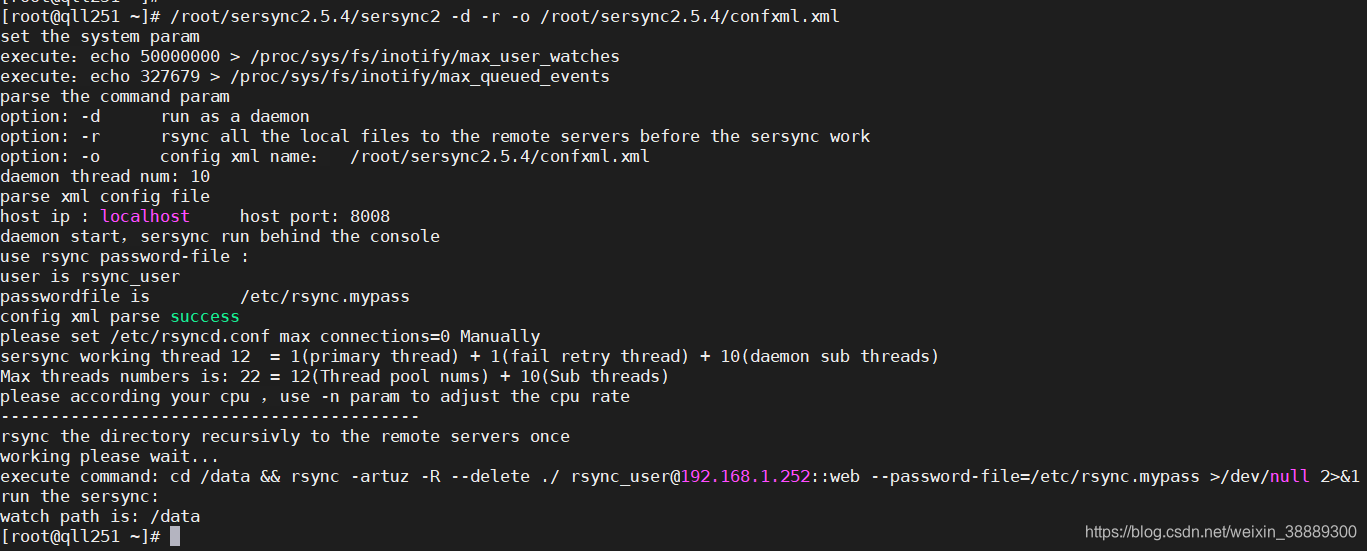
已开启sersync守护进程,现在我们进行验证
验证方式:在服务器端批量创建文件,同时在客户端watch -n /mybak。以0.1秒的时间间隔进行刷新
验证结果:数据实时同步,如下图所示:
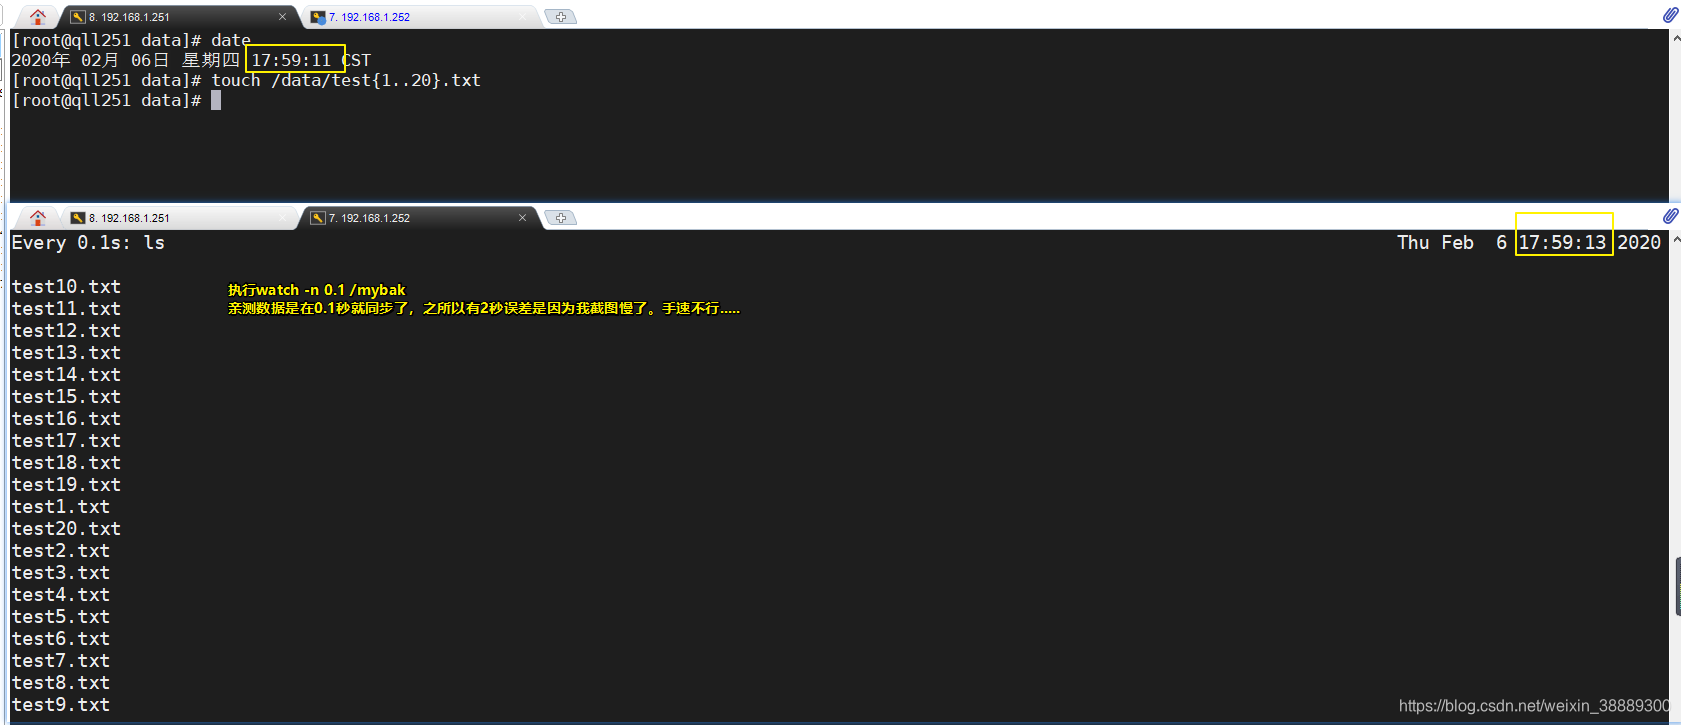
我们已经实现了,两台主机之间的数据实时同步。接下来我们研究下sersync开机自动监控数据同步
实现sersync开机自动监控数据同步
编辑/etc/rc.local
(最后一行添加追加该命令)
/root/sersync2.5.4/sersync2 -d -r -o /root/sersync2.5.4/confxml.xml
编辑完毕,reboot,如果一切正常。便可实现数据的实时同步
若重启主机后,
/etc/rc.local内的配置命令并未生效。
这时要确保/etc/rc.local和/etc/rc.d/rc.local都有可执行权限
原因如下:
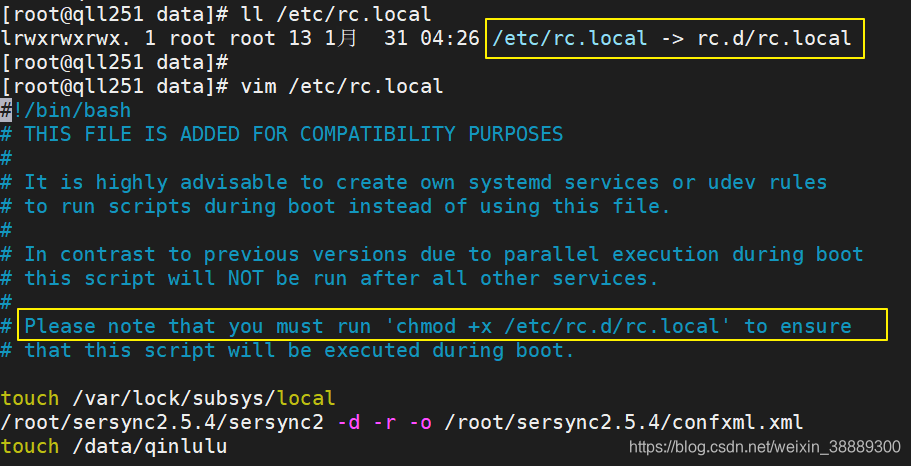
上图中,我用黄线圈了两处:
第一句说明:/etc/rc.local是/etc/rc.d/rc.local的软链接
第二句:Please note that you must run ‘chmod +x /etc/rc.d/rc.local’ to ensure
通过以上得到结论:
由于/etc/rc.local是/etc/rc.d/rc.local的软链接,所以必须确保/etc/rc.local 和 /etc/rc.d/rc.local都有可执行权限。
解决办法:chmod +x /etc/rc.d/rc.local
重启,问题解决。
关于/etc/rc.local的小技巧,你今天get到了吗?
更多IT技术,请微信搜索公众号秦露露或者扫描下方二维码关注

