源代码&数据集下载地址:https://download.csdn.net/download/princessyang/12504757
一、获取世界各国疫情历史数据
1.1 选取数据源
选择网易的疫情实时动态播报平台作为数据源,其地址如下:
https://wp.m.163.com/163/page/news/virus_report/index.html?nw=1&anw=1
# 首先导入使用的包,使用request进行网页请求,使用pandas保存数据。
import requests
import pandas as pd
import time
pd.set_option('max_rows',500)

# 设置请求头,伪装为浏览器
headers = {


    'user-agent': 'Mozilla/5.0 (Windows NT 6.1; Win64; x64) AppleWebKit/537.36 (KHTML, like Gecko) Chrome/83.0.4103.61 Safari/537.36'
}

# 发起请求,将找到的第一个数据源作为请求目标。
url = 'https://c.m.163.com/ug/api/wuhan/app/data/list-total'   # 定义要访问的地址
r = requests.get(url, headers=headers)  # 使用requests发起请求
print(r.status_code)  # 查看请求状态,响应状态为200表示请求成功
print(type(r.text))    #查看类型。 r.text——文本获取。 r.content——图片、音频获取。
print(len(r.text))    # 查看文本长度
200
<class ‘str’>
301443
返回后的内容是一个30万长度的字符串,由于字符串格式不方便进行分析,并且在网页预览中发现数据为类似字典的json格式,所以这里将其转为json格式。
# 将字符串格式转为json格式。
import json
data_json = json.loads(r.text)
data_json.keys()    # data键存放着需要的数据
dict_keys([‘reqId’, ‘code’, ‘msg’, ‘data’, ‘timestamp’])
取出 json 中的需要使用的数据
data = data_json['data'] # 取出json中的数据
data.keys()
dict_keys([‘chinaTotal’, ‘chinaDayList’, ‘lastUpdateTime’, ‘overseaLastUpdateTime’, ‘areaTree’])
数据中总共有四个键,每个键存储着不同的内容:
| 键名称 | 数据内容 |
|---|---|
| chinaTotal | 全国当日数据 |
| chinaDayList | 全国历史数据 |
| lastUpdateTime | 更新时间 |
| areaTree | 世界各地实时数据 |
1.2 世界各国实时数据获取 today_data
自定义函数
# 将提取数据的方法封装为函数
def get_data(data,info_list):
    info = pd.DataFrame(data)[info_list] # 主要信息

    today_data = pd.DataFrame([i['today'] for i in data ]) # 生成today的数据
    today_data.columns = ['today_'+i for i in today_data.columns] # 修改列名

    total_data = pd.DataFrame([i['total'] for i in data ]) # 生成total的数据
    total_data.columns = ['total_'+i for i in total_data.columns] # 修改列名

    return pd.concat([info,total_data,today_data],axis=1) # info、today和total横向合并最终得到汇总的数据

# 定义保存数据方法
def save_data(data,name):
    file_name = name+'_'+time.strftime('%Y_%m_%d',time.localtime(time.time()))+'.csv'
    data.to_csv(file_name,index=None,encoding='utf_8_sig')
    print(file_name+' 保存成功!')
time.strftime('%Y_%m_%d',time.localtime(time.time()))
在 json 数据 data 中的 areaTree 是列表格式,每个元素都是一个国家的实时数据,每个元素的 children 是各国家省份的数据,现在来提取世界各国实时数据。
areaTree = data['areaTree'] # 取出 areaTree——世界各地实时数据
areaTree[0] # 查看第一个国家的数据
{‘today’: {‘confirm’: 2,
‘suspect’: 0,
‘heal’: 1,
‘dead’: 0,
‘severe’: 0,
‘storeConfirm’: 1},
‘total’: {‘confirm’: 1086,
‘suspect’: 0,
‘heal’: 965,
‘dead’: 48,
‘severe’: 0},
‘extData’: {},
‘name’: ‘突尼斯’,
‘id’: ‘9577772’,
‘lastUpdateTime’: ‘2020-06-03 14:01:28’,
‘children’: []}
areaTre 中每个键值的含义:
| 键名称 | 数据内容 |
|---|---|
| today | 当日数据 |
| total | 累计数据 |
| extData | 无数据 |
| name | 国家名称 |
| id | 各国编号 |
| lastUpadateTime | 更新时间 |
| chilfren | 各国下一级数据 |
使用 for 循环查看前5个国家的名称和更新时间
for i in range(len(areaTree)):  # 查看各国家名称和更新时间
    print(areaTree[i]['name'],areaTree[i]['lastUpdateTime'])
    if i == 5:
        break
突尼斯 2020-06-03 14:01:28
塞尔维亚 2020-06-03 14:23:53
中国 2020-06-03 14:18:58
日本 2020-06-03 10:03:11
泰国 2020-06-03 10:03:38
新加坡 2020-06-03 10:05:02
从 areaTree 中提取各个国家的实时数据。
today_world = get_data(areaTree,['id','lastUpdateTime','name'])
today_world.head()   # 查看获取数据的前5行
| id | lastUpdateTime | name | total_confirm | total_suspect | total_heal | total_dead | total_severe | total_input | today_confirm | today_suspect | today_heal | today_dead | today_severe | today_storeConfirm | today_input | |
|---|---|---|---|---|---|---|---|---|---|---|---|---|---|---|---|---|
| 0 | 9577772 | 2020-06-03 14:01:28 | 突尼斯 | 1086 | 0 | 965 | 48 | 0 | NaN | 2.0 | 0.0 | 1.0 | 0.0 | 0.0 | 1.0 | NaN |
| 1 | 9507896 | 2020-06-03 14:23:53 | 塞尔维亚 | 11454 | 0 | 6766 | 245 | 0 | NaN | 24.0 | 0.0 | 40.0 | 1.0 | 0.0 | -17.0 | NaN |
| 2 | 0 | 2020-06-03 14:18:58 | 中国 | 84602 | 3 | 79825 | 4645 | 2 | 1762.0 | 7.0 | 0.0 | 3.0 | 0.0 | 0.0 | 4.0 | 1.0 |
| 3 | 1 | 2020-06-03 10:03:11 | 日本 | 17712 | 0 | 15304 | 914 | 0 | NaN | 51.0 | NaN | 173.0 | 2.0 | NaN | -124.0 | NaN |
| 4 | 2 | 2020-06-03 10:03:38 | 泰国 | 3083 | 0 | 2966 | 58 | 0 | NaN | 1.0 | 0.0 | 1.0 | 1.0 | 0.0 | -1.0 | NaN |
将获取数据保存到本地
save_data(today_world,'today_world')
1.3 世界各国历史数据获取 alltime_world
因为原始数据中没有国家名称,为了得到每个国家的名称,需要生成国家编号和国家名称的键值对,这样就可以存储国家名称,在之前的世界各国实时数据 today_world 中有国家的编号和名称,可以用它来生成键值对。
today_world[['id','name']].head()
country_dict = {

    key:value for key,value in zip(today_world['id'], today_world['name'])}

# 查看前五个内容
count = 0
for i in country_dict:
    print(i,country_dict[i])
    count += 1
    if count == 5:
        break
9577772 突尼斯
9507896 塞尔维亚
0 中国
1 日本
2 泰国
通过每个国家的编号访问每个国家历史数据的地址,然后获取各个国家的历史数据。
start = time.time()
for country_id in country_dict: # 遍历每个国家的编号

    try:
        # 按照编号访问每个国家的数据地址,并获取json数据
        url = 'https://c.m.163.com/ug/api/wuhan/app/data/list-by-area-code?areaCode='+country_id
        r = requests.get(url, headers=headers)
        json_data = json.loads(r.text)

        # 生成每个国家的数据
        country_data = get_data(json_data['data']['list'],['date'])
        country_data['name'] = country_dict[country_id]

        # 数据叠加
        if country_id == '9577772':
            alltime_world = country_data
        else:
            alltime_world = pd.concat([alltime_world,country_data])

        print('-'*20,country_dict[country_id],'成功',country_data.shape,alltime_world.shape,
              ',累计耗时:',round(time.time()-start),'-'*20)

        time.sleep(10)

    except:
        print('-'*20,country_dict[country_id],'wrong','-'*20)
-------------------- 突尼斯 成功 (80, 15) (80, 15) ,累计耗时: 1 --------------------
-------------------- 突尼斯 wrong --------------------
-------------------- 塞尔维亚 成功 (84, 15) (164, 15) ,累计耗时: 11 --------------------
-------------------- 中国 成功 (120, 15) (284, 15) ,累计耗时: 22 --------------------
-------------------- 日本 成功 (123, 15) (407, 15) ,累计耗时: 37 --------------------
……省略号
将获取数据保存到本地
save_data(alltime_world,'alltime_world')
二、数据预处理
导入数据
#读取数据疫情数据alltime_world_2020_05_31.csv
import pandas as pd
alltime_world = pd.read_csv('alltime_world_2020_05_31.csv', encoding='utf-8')   # 1)读文件
print( alltime_world.info() )     # 2)查看基本信息
name_dict = {

    'date':'日期','name':'名称','id':'编号','lastUpdateTime':'更新时间',
             'today_confirm':'当日新增确诊','today_suspect':'当日新增疑似',
             'today_heal':'当日新增治愈','today_dead':'当日新增死亡',
             'today_severe':'当日新增重症','today_storeConfirm':'当日现存确诊', 'today_input':'当日输入',
             'total_confirm':'累计确诊','total_suspect':'累计疑似','total_heal':'累计治愈',
             'total_dead':'累计死亡','total_severe':'累计重症','total_input':'累计输入'}   # 3)创建中文列名字典
alltime_world.rename(columns=name_dict, inplace=True)   # 4)将英文列名更改中文列名
<class ‘pandas.core.frame.DataFrame’>
RangeIndex: 12331 entries, 0 to 12330
Data columns (total 15 columns):
# Column Non-Null Count Dtype
— ------ -------------- -----
0 date 12331 non-null object
1 total_confirm 12331 non-null int64
2 total_dead 12331 non-null int64
3 total_heal 12331 non-null int64
4 total_input 12331 non-null int64
5 total_severe 12331 non-null int64
6 total_suspect 12331 non-null int64
7 today_confirm 12331 non-null int64
8 today_dead 12331 non-null int64
9 today_heal 12331 non-null int64
10 today_input 12135 non-null float64
11 today_severe 10408 non-null float64
12 today_storeConfirm 0 non-null float64
13 today_suspect 10808 non-null float64
14 name 12331 non-null object
dtypes: float64(4), int64(9), object(2)
memory usage: 1.4+ MB
## 使用下面属性和函数查看数据的大概信息
alltime_world.info()   # 查看二维数据表的大信息
print('\n\n查看二维数据表的统计消息,统计数值型数据: \n', alltime_world.describe() )
print('\n\n查看二维数据表的列标签:\n', alltime_world.columns )
print('\n\n查看二维数据表的行标签:\n', alltime_world.index )
print('\n\n查看二维数据表的值:\n', alltime_world.values )
print('\n\n查看二维数据表的前5行:\n', alltime_world.head() )
print('\n\n查看二维数据表的后5行:\n', alltime_world.tail() )
<class ‘pandas.core.frame.DataFrame’>
RangeIndex: 12331 entries, 0 to 12330
Data columns (total 15 columns):
# Column Non-Null Count Dtype
— ------ -------------- -----
0 日期 12331 non-null object
1 累计确诊 12331 non-null int64
2 累计死亡 12331 non-null int64
3 累计治愈 12331 non-null int64
4 累计输入 12331 non-null int64
5 累计重症 12331 non-null int64
6 累计疑似 12331 non-null int64
7 当日新增确诊 12331 non-null int64
8 当日新增死亡 12331 non-null int64
9 当日新增治愈 12331 non-null int64
10 当日输入 12135 non-null float64
11 当日新增重症 10408 non-null float64
12 当日现存确诊 0 non-null float64
13 当日新增疑似 10808 non-null float64
14 名称 12331 non-null object
dtypes: float64(4), int64(9), object(2)
memory usage: 1.4+ MB
……省略号
查看 alltime_world 数据每列的缺失值比例
# 计算缺失值比例
alltime_world_nan = alltime_world.isnull().sum()/len(alltime_world)
# 转变为百分数
alltime_world_nan.apply(lambda x: format(x, '.1%'))
日期 0.0%
累计确诊 0.0%
累计死亡 0.0%
累计治愈 0.0%
累计输入 0.0%
累计重症 0.0%
累计疑似 0.0%
当日新增确诊 0.0%
当日新增死亡 0.0%
当日新增治愈 0.0%
当日输入 1.6%
当日新增重症 15.6%
当日现存确诊 100.0%
当日新增疑似 12.4%
名称 0.0%
dtype: object
可以现当日新增相关数据缺失值较多,这主要由于采集数据的当天一些国家没有更新数据,因此这里将不再对其进行分析。当日现存确诊一列虽然全部为空,但该缺失值可以通过已有数据直接计算,公式为:
当日现存确诊=累计确诊-累计治愈-累计死亡
缺失值处理
# 先使用线性插值的方式填充缺失值
alltime_world.interpolate(method='linear', inplace=True)

# 再使用0填充缺失值
alltime_world.fillna(0, inplace=True)

# 计算当日现存确诊人数(当日现存确诊=累计确诊-累计治愈-累计死亡)
alltime_world['当日现存确诊'] = alltime_world['累计确诊']-alltime_world['累计治愈']-alltime_world['累计死亡']

# 将日期改成datetime格式
alltime_world['日期'] = pd.to_datetime(alltime_world['日期'])

alltime_world.info()
<class ‘pandas.core.frame.DataFrame’>
RangeIndex: 12331 entries, 0 to 12330
Data columns (total 15 columns):
# Column Non-Null Count Dtype
— ------ -------------- -----
0 日期 12331 non-null datetime64[ns]
1 累计确诊 12331 non-null int64
2 累计死亡 12331 non-null int64
3 累计治愈 12331 non-null int64
4 累计输入 12331 non-null int64
5 累计重症 12331 non-null int64
6 累计疑似 12331 non-null int64
7 当日新增确诊 12331 non-null int64
8 当日新增死亡 12331 non-null int64
9 当日新增治愈 12331 non-null int64
10 当日输入 12331 non-null float64
11 当日新增重症 12331 non-null float64
12 当日现存确诊 12331 non-null int64
13 当日新增疑似 12331 non-null float64
14 名称 12331 non-null object
dtypes: datetime64ns, float64(3), int64(10), object(1)
memory usage: 1.4+ MB
三、数据分析可视化1–matplotlib绘图
3.1 绘制多个国家的累计确诊人数折线图
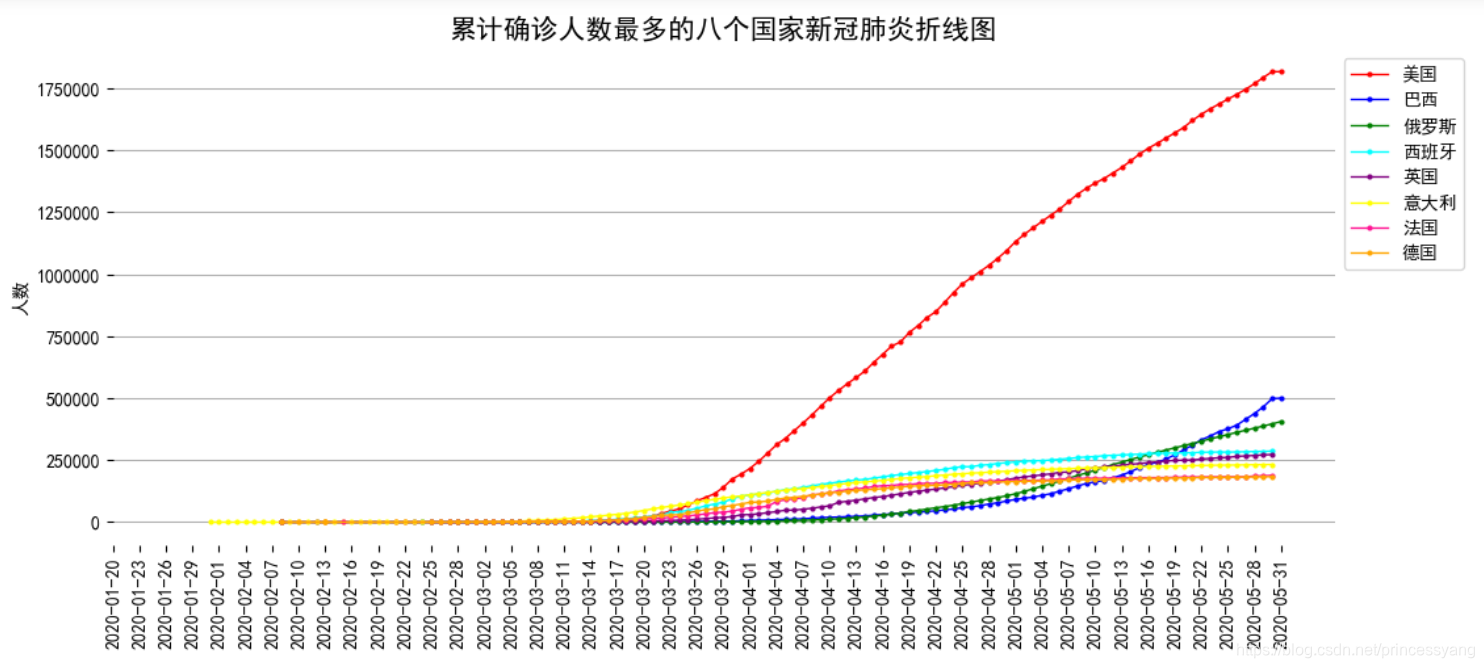
使用 matplotlib 库绘制累计确诊人数最多的8个国家(‘美国’,‘巴西’,‘俄罗斯’,‘西班牙’,‘意大利’,‘英国’,‘法国’,‘德国’)的累计确诊人数折线图
# 查看“累计确诊”人数最多的8个国家数据,并可视化
import matplotlib.pyplot as plt
import matplotlib as mpl

# 自定义函数,接收国家和颜色两个参数,每次调用绘制一个国家的折线图
def line_chart(name,color1):
    x = alltime_world.loc[alltime_world.名称==name,'日期']
    y_total = alltime_world.loc[alltime_world.名称==name,'累计确诊']
    ax.plot(x,y_total,color=color1,lw=1,marker='o',ms=2,label=name)

# 创建画布,切分绘图区域,绘制两条曲线
figure = plt.figure(figsize=(12,5))
ax = plt.subplot()

# 设置绘图区字体
mpl.rcParams['font.family'] = 'simhei' # 设置显示字体
mpl.rcParams['font.size'] = 10 # 设置显示字体大小

# 数据准备
country_name = alltime_world.groupby(by='名称')['累计确诊'].max().sort_values(ascending=False)[:8].index # 累计确诊人数最多的八个国家
color1 = ['red','blue','green','cyan','purple','yellow','deeppink','orange'] # 设置八个颜色

# 遍历八个国家,调用自定义函数绘图
for i in range(len(country_name)):
    line_chart(country_name[i],color1[i])

# 设置图外观(图标题,y轴标题,图例等)
plt.title('累计确诊人数最多的八个国家新冠肺炎折线图',size=15)
plt.ylabel('人数')
plt.legend(bbox_to_anchor=[1,1])  # 图例位置调整
plt.grid(axis='y')   # 添加y轴横线
plt.box(False)

# 设置x轴日期显示格式等
ax.xaxis.set_major_formatter(mpl.dates.DateFormatter('%Y-%m-%d')) # 设置时间标签显示格式
plt.xticks(pd.date_range(min(alltime_world.日期),max(alltime_world.日期),freq='3D'),rotation=90)# 设置时间标签显示格式

plt.show()
3.2 绘制各国新增确诊人数折线图
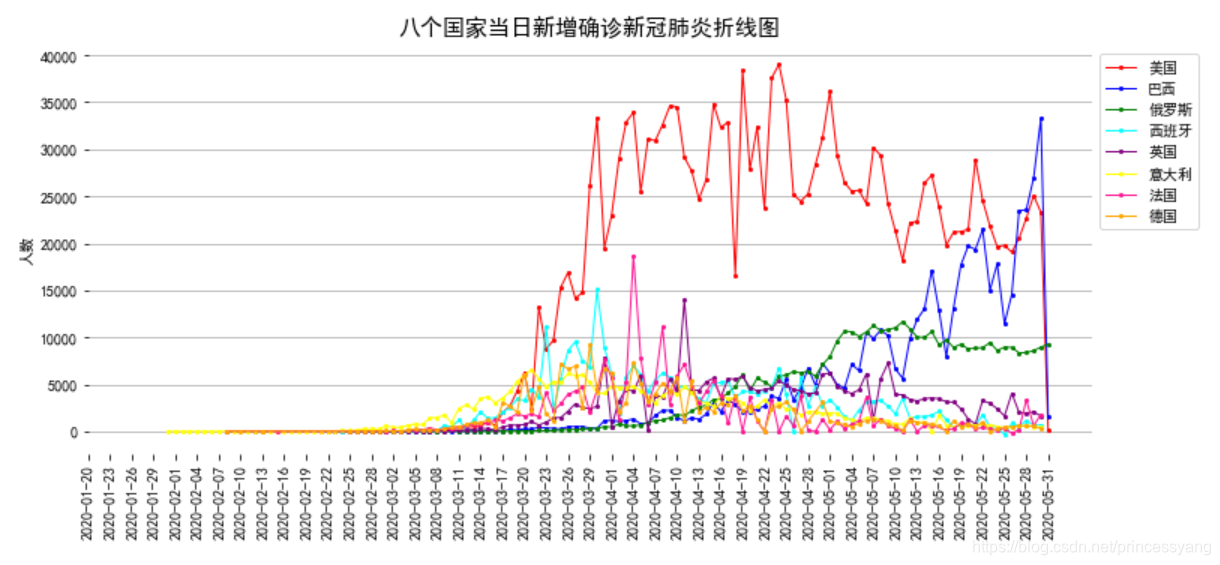
使用 matplotlib 库绘制累计确诊人数最多的8个国家(‘美国’,‘巴西’,‘俄罗斯’,‘西班牙’,‘意大利’,‘英国’,‘法国’,‘德国’)的新增确诊人数折线图
# 查看“累计确诊”人数最多的8个国家的“当日新增确诊”的数据,并可视化
import matplotlib.pyplot as plt
import matplotlib as mpl

# 自定义函数,接收国家和颜色两个参数,每次调用绘制一个国家的折线图
def line_chart(name,color1):
    x = alltime_world.loc[alltime_world.名称==name,'日期']
    y_total = alltime_world.loc[alltime_world.名称==name,'当日新增确诊']
    ax.plot(x,y_total,color=color1,lw=1,marker='o',ms=2,label=name)

# 创建画布,切分绘图区域,绘制两条曲线
figure = plt.figure(figsize=(12,5))
ax = plt.subplot()

# 设置绘图区字体
mpl.rcParams['font.family'] = 'simhei' # 设置显示字体
mpl.rcParams['font.size'] = 10 # 设置显示字体大小

# 数据准备
country_name = alltime_world.groupby(by='名称')['累计确诊'].max().sort_values(ascending=False)[:8].index # 累计确诊人数最多的八个国家
color1 = ['red','blue','green','cyan','purple','yellow','deeppink','orange'] # 设置八个颜色

# 遍历八个国家,调用自定义函数绘图
for i in range(len(country_name)):
    line_chart(country_name[i],color1[i])

# 设置图外观(图标题,y轴标题,图例等)
plt.title('八个国家当日新增确诊新冠肺炎折线图',size=15)
plt.ylabel('人数')
plt.legend(bbox_to_anchor=[1,1])  # 图例位置调整
plt.grid(axis='y')   # 添加y轴横线
plt.box(False)

# 设置x轴日期显示格式等
ax.xaxis.set_major_formatter(mpl.dates.DateFormatter('%Y-%m-%d')) # 设置时间标签显示格式
plt.xticks(pd.date_range(min(alltime_world.日期),max(alltime_world.日期),freq='3D'),rotation=90)# 设置时间标签显示格式

plt.show()
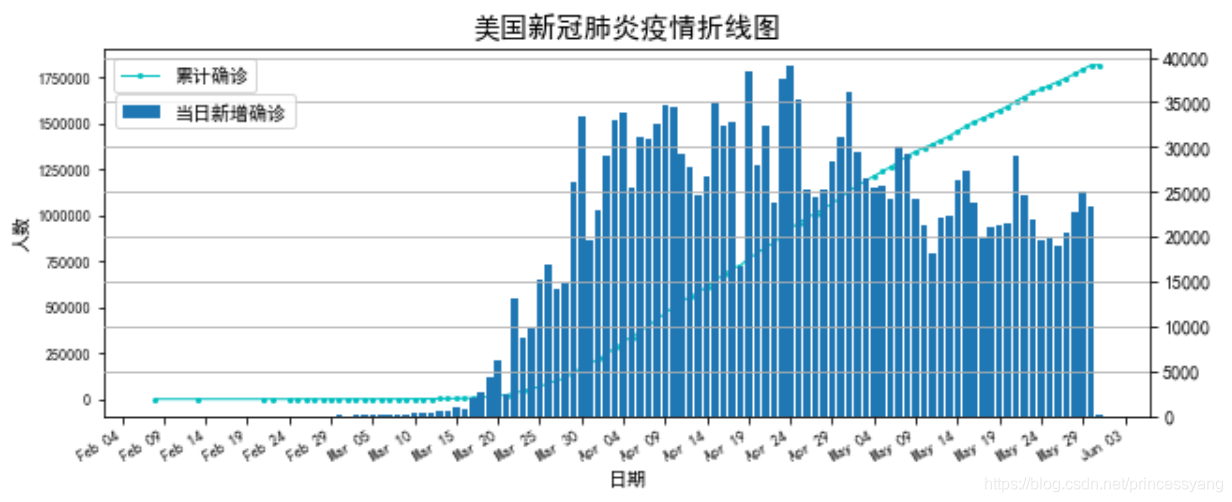
3.3 美国新冠肺炎的累计确诊和当日新增确诊绘制
绘制美国新冠肺炎的累计确诊和当日新增确诊的折线图与柱形图
# 数据准备
American = alltime_world[alltime_world['名称']=='美国']
American.set_index('日期',inplace=True)# 设置日期为索引

# 创建画布
fig, ax = plt.subplots(figsize=(10, 4))

# 设置绘图区字体
mpl.rcParams['font.family'] = 'simhei' # 设置显示字体
mpl.rcParams['font.size'] = 10 # 设置显示字体大小

# 画图
American['累计确诊'].plot(ax=ax, fontsize=8,style='-',lw=1,color='c',marker='o',ms=2,legend=True)   # 累计确诊折线图
ax1 = ax.twinx()
ax1.bar(American.index, American['当日新增确诊'])   # 当日新增确诊柱形图

# 设置x轴日期显示格式等
ax1.xaxis.set_major_locator(mpl.dates.DayLocator(interval = 5))    #设置间距
ax1.xaxis.set_major_formatter(mpl.dates.DateFormatter('%b %d'))    #设置日期格式
fig.autofmt_xdate()    #自动调整日期倾斜

# 设置图外观(图标题,y轴标题,图例等)
plt.title('美国新冠肺炎疫情折线图',size=15)
ax.set_ylabel('人数', fontsize=10)
ax.set_xlabel('日期', fontsize=10)
ax1.legend(['当日新增确诊'],loc='upper left',bbox_to_anchor=(0.001, 0.9))   # 设置图例
plt.grid(axis='y')
plt.box(False)

plt.show()
四、数据分析可视化2–pyecharts绘图
数据准备
# 导入数据
import pandas as pd
world_data = pd.read_csv('alltime_world_2020_05_31.csv', encoding='utf-8')

# 缺失值处理
# 先使用线性插值的方式填充缺失值
world_data.interpolate(method='linear', inplace=True)

# 再使用0填充缺失值
world_data.fillna(0, inplace=True)

# 计算当日现存确诊人数
world_data['today_storeConfirm'] = world_data['total_confirm']-world_data['total_heal']-world_data['total_dead']

# 将日期改成datetime格式
world_data['date'] = pd.to_datetime(world_data['date'])

# 选取最新更新的各国数据
world_data_groupby = world_data[['name','date','total_confirm']].groupby(by=['name'], as_index=False).max()
world_data_merge = pd.merge(world_data_groupby, world_data, on=['name','date','total_confirm'], how='left')
4.1 世界各国家现存确诊人数地图
将各个国家数值信息映射到地图上,通过颜色变化来表示数值的大小或范围。颜色地图适合带有地理位置信息的数据的展现,将颜色和地图相结合,直观显示数据的地理分布,通过颜色深浅容易判断数值的大小。下图显示的是截止到5月31日,世界各国现有确诊人数地图,每个区域被赋予一种颜色,通过查看左下角的图例可以明确每种颜色对应的数值范围。图例中的颜色由下至上依次从浅到深,数值范围也相应地由小到大。
# 导入pyecharts库以及绘图需要的相关类
import pyecharts
import pyecharts.options as opts   # 调整配置项
from pyecharts.charts import Map   # Map类用于绘制地图
from pyecharts.charts import Pie   # Pie类用于绘制玫瑰图
from datetime import datetime,timedelta   # datetime模块生成时间数据
import matplotlib.pyplot as plt    # 载入Matplotlib库
利用 Map类绘制世界地图时,需要输入各国家的英文名称和对应的数值,首先要将数据的中文名称转换为英文名称。
# 载入国家中英文对照表,使用Series类的replace方法将各国家对应的中文名称替换成英文名称
contry_name = pd.read_csv('county_china_english.csv', encoding='gbk')
world_data_merge['eg_name'] = world_data_merge['name'].replace(contry_name['中文'].values ,contry_name['英文'].values)

# 提取出需要的数据,保存成一个嵌套列表的形式
heatmap_data = world_data_merge[['eg_name','today_storeConfirm']].values.tolist()
heatmap_data[:10]
[[‘Bhutan’, 37.0],
[‘Timor-Leste’, 0.0],
[‘China’, 118.0],
[‘Central African Rep.’, 938.0],
[‘Denmark’, 735.0],
[‘Ukraine’, 13426.0],
[‘Uzbekistan’, 757.0],
[‘Uganda’, 341.0],
[‘Uruguay’, 117.0],
[‘Chad’, 224.0]]
接下来开始绘图
# 首先初始化类对象Map,并调用add方法添加绘图基本配置
map_ = Map().add(series_name = "现存确诊人数", # 设置提示框标签
                 data_pair = heatmap_data, # 输入数据
                 maptype = "world", # 设置地图类型为世界地图
                 is_map_symbol_show = False # 不显示标记点
                )

# 设置系列配置项
map_.set_series_opts(label_opts=opts.LabelOpts(is_show=False))  # 不显示国家(标签)名称

# 设置全局配置项
map_.set_global_opts(title_opts = opts.TitleOpts(title="世界各国家现存确诊人数地图"), # 设置图标题
                     # 设置视觉映射配置项
                     visualmap_opts = opts.VisualMapOpts(pieces=[ # 自定义分组的分点和颜色
                                                               {

    "min": 10000,"color":"#800000"}, # 栗色
                                                               {

    "min": 5000, "max": 9999, "color":"#B22222"}, # 耐火砖
                                                               {

    "min": 999, "max": 4999,"color":"#CD5C5C"}, # 印度红
                                                               {

    "min": 100, "max": 999, "color":"#BC8F8F"}, # 玫瑰棕色
                                                               {

    "max": 99, "color":"#FFE4E1"}, # 薄雾玫瑰
                                                              ],
                     is_piecewise = True))  # 显示分段式图例

# 调用render_notebook方法直接在jupyter notebook中渲染图形
map_.render_notebook()

4.2 世界国家累计死亡人数玫瑰图
玫瑰图是一种二维极坐标统计图。玫瑰图与饼状图类似,饼状图各个扇形的半径相同,角度不同,角度表示每一部分占比的大小;玫瑰图各个扇形的半径和角度都不同,角度依然表示每一部分的占比大小,半径表示每一部分的数值大小。下图是一个特殊的玫瑰图,扇形角度一致,半径不同,可以很清楚观察到海外每个国家累计确诊人数的大小对比关系。
绘制累计死亡人数超过1000人的国家的累计死亡人数玫瑰图
# 首先筛选出累计死亡人数超过1000人的世界国家,并按人数进行降序排序
need_data = world_data_merge[['name','total_dead']][world_data_merge['total_dead'] >1000]
rank = need_data[['name','total_dead']].sort_values(by='total_dead',ascending=False).values

# 接着导添加绘图的基本配置
pie = Pie().add("累计死亡人数", # 添加提示框标签
                rank, # 输入数据
                radius = ["20%", "80%"],  # 设置内半径和外半径
                center = ["60%", "60%"],  # 设置圆心位置
                rosetype = "radius")   # 玫瑰图模式,通过半径区分数值大小,角度大小表示占比

# 最后设置全局和系列配置项并绘制玫瑰图
pie.set_global_opts(title_opts = opts.TitleOpts(title="世界国家累计死亡人数玫瑰图",  # 设置图标题
                                                pos_right = '60%'),  # 图标题的位置
                    legend_opts = opts.LegendOpts( # 设置图例
                                                orient='vertical', # 垂直放置图例
                                                pos_right="75%", # 设置图例位置
                                                pos_top="20%"))
pie.set_series_opts(label_opts = opts.LabelOpts(formatter="{b} : {d}%")) # 设置标签文字形式为(国家:占比(%))

# 在notebook中进行渲染
pie.render_notebook()

4.3 五月世界国家累计确诊人数动态条形图
条形图由一些长度不等的横向长方形组成,以长方形的长度来表示数据,易于比较各组数据之间的差别。
动态图表是目前非常流行的一种可视化方法,可以按照时间序列动态展示条形图数据的变化。
绘制5月份累计确诊人数最多的10个国家的动态条形图(‘美国’, ‘巴西’, ‘俄罗斯’, ‘西班牙’, ‘英国’, ‘意大利’, ‘法国’, ‘德国’, ‘印度’, ‘土耳其’)
# 首先挑选出疫情最为严重的10个国家,并筛选出这些国家的历史疫情数据
country_list = world_data.groupby(by='name')['total_confirm'].max().sort_values(ascending=False)[:10].index # 累计确诊人数最多的10个国家
need_data = world_data[world_data['name'].isin(country_list)]

# 接下来使用datetime模块生成时间数据,构造时间列表
time_list = [(datetime(2020, 5, 1) + timedelta(i)).strftime('%Y-%m-%d') for i in range(31)]

# 载入Matplotlib库,并设置正常显示中文字体
import matplotlib.pyplot as plt
%matplotlib inline
plt.rcParams['font.sans-serif'] = ['SimHei']
plt.rcParams['figure.dpi'] = 100

# 为每个国家设置一种颜色
color_list = ['brown','peru','orange','blue','green','red','yellow','teal','pink','orchid']
country_color = pd.DataFrame()
country_color['country'] = country_list
country_color['color'] = color_list
自定义绘图函数
# 定义绘图函数
import matplotlib.ticker as ticker

def barh_draw(day):

    # 提取每一天的数据
    draw_data = need_data[need_data['date']==day][['name','total_confirm']].sort_values(by='total_confirm',ascending=True)

    # 清空当前的绘图
    ax.clear()

    # 绘制条形图
    ax.barh(draw_data['name'],draw_data['total_confirm'], color=[country_color[country_color['country']==i]['color'].values[0] for i in draw_data['name']])

    # 数值标签的间距
    dx = draw_data['total_confirm'].max()/200

    # 添加数值标签
    for j, (name, value) in enumerate(zip(draw_data['name'], draw_data['total_confirm'])):

        ax.text(value+dx, j, f'{value:,.0f}', size=10, ha='left', va='center')

    # 添加日期标签
    ax.text(draw_data['total_confirm'].max()*0.75, 0.4, day, color='#777777',size=40, ha='left')

    # 设置刻度标签的格式
    ax.xaxis.set_major_formatter(ticker.StrMethodFormatter('{x:,.0f}'))

    # 设置刻度的位置
    ax.xaxis.set_ticks_position('top')

    # 设置刻度标签的颜色和大小
    ax.tick_params(axis='x',colors='#777777', labelsize=15)

    # 添加网格线
    ax.grid(which='major',axis='x',linestyle='-')

    # 添加图标题
    ax.text(0, 11, '5月世界各国家累计确诊人数动态条形图',size=20, ha='left')

    # 去除图边框
    plt.box(False)

    # 关闭绘图框
    plt.close()
绘制动态条形图
# 动态绘图
fig, ax = plt.subplots(figsize=(12, 6))

import matplotlib.animation as animation
from IPython.display import HTML

animator = animation.FuncAnimation(fig, barh_draw, frames=time_list, interval=200)
HTML(animator.to_jshtml())

参考资料
[1] http://cookdata.cn/note/view_static_note/fa203bf68cc57b10af2773bf5b48fd34/
[2] http://cookdata.cn/note/view_static_note/f4edb8aed12abe451206406efee375d7/
[3] http://cookdata.cn/note/view_static_note/84230091c4104946ab3d22dd675df58d/