在开发Flutter应用程序时,您可能会遇到需要将一个大的UI组件分割成几个小的组件,以提高代码的可读性。对于多个组件,在它们之间实现有效的通信是至关重要的。所有的UI组件都应该在任何时候都知道应用程序的状态。这就是所谓的状态管理。
在Flutter中,你可以通过使用setState 来管理你的应用程序的状态。但是,虽然setState 可以成为你最好的朋友,但完全依赖它并不是一个好主意。在开发Flutter应用程序时,你还应该考虑许多其他因素,如架构、可扩展性、可读性、复杂性等。掌握一切需要一个有效的状态管理技术。
有无数的状态管理解决方案可用于Flutter,包括Provider、InheritedWidget和InheritedModel、Redux、BLoC、GetIt、MobX、Riverpod等。在本教程中,我们将重点介绍在Flutter中使用BLoC设计模式进行状态管理。我们将解释BLoC的含义,并演示如何用BLoC实现任何功能。
什么是BLoC?
业务逻辑组件(BLoC)允许你将业务逻辑与用户界面分开。用BLoC编写代码可以使测试的编写和重复使用更加容易。
简单地说,BLoC接受一个事件流,根据事件处理数据,并产生作为状态的输出。以下面这个简单的例子为例。
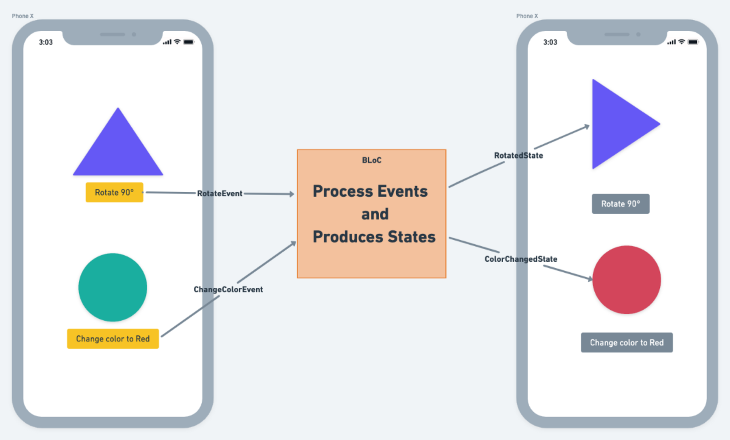
一旦旋转90°按钮被点击,RotateEvent ,就会被派发到BLoC,代表旋转的状态,即RotatedState ,就会被发射出来。三角形部件在收到来自BLoC的RotatedState ,就会进行自我旋转。同样,当点击 "将颜色改为红色"按钮时,圆形小组件也会改变其颜色。
由于BLoC处理旋转和改变颜色的操作,这两个操作可以在任何小组件上执行。这有利于代码的重用性。
重要的BLoC概念
在我们深入研究之前,让我们回顾一下BLoC的一些基本概念和术语,这样我们就会有一个共同的认识。
事件
事件告诉BLoC要做什么。一个事件可以从任何地方触发,例如从一个UI小部件。外部事件,如网络连接的变化、传感器读数的变化等,看起来像这样。
class RotateEvent {
  final double angle;

  const RotateEvent(this.angle);

  @override
  List<Object> get props => [angle];
}

复制代码
BLoC
BLoC是一个居中的人。所有的业务逻辑都位于BLoC文件内。它只是接受事件,执行逻辑,并输出状态。下面是它的样子。
class TransformationBloc
    extends Bloc<TransformationEvent, TransformationState> {
  TransformationBloc() : super(RotatedState(angle: 0);

  @override
  Stream<TransformationState> mapEventToState(
      TransformationEvent event) async* {
    if (event is RotateEvent) {
      yield RotatedState(angle: event.angle);
    }
  }
}

复制代码
状态
状态代表了要由任何部件处理的信息。一个widget根据状态来改变自己。
class RotatedState {
  final double angle;

  const RotatedState({@required this.angle});

  @override
  List<Object> get props => [angle];
}

复制代码
Cubit
Cubit是BLoC模式的一个更简单的版本。它消除了编写事件的需要。
Cubit暴露了直接的函数,这可以导致适当的状态。编写Cubit而不是BLoC也减少了模板代码,使代码更容易阅读。
这里有一个简单的例子。
class TransformCubit extends Cubit<TransformState> {
  TransformCubit() : super(RotatedState(angle: 0));

  void rotate(double angle) {
    emit(RotatedState(angle: angle));
  }

}

复制代码在Flutter中用setState (无BLoC)管理状态
在我们强调用BLoC在Flutter中管理状态的好处之前,让我们来看看用setState 来代替状态管理的过程。
我们的例子Flutter应用程序将显示一个可用产品的列表。通过点击产品名称旁边的图标,可以将产品从购物车中添加或删除。购物车中的商品数量也会相应更新。
通过setState ,整个UI被分解成三个类。
home.dart是容纳支架和AppBar的主文件。AppBar包含购物车图标小部件product_list.dart显示产品的列表product_tile.dart显示单个产品项目。
下面是它的外观。
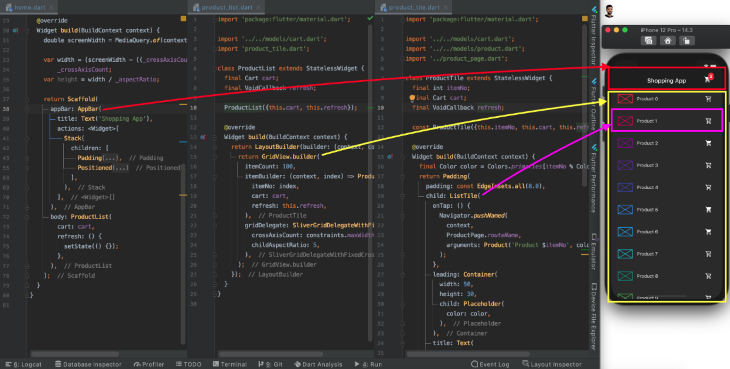
购物车中的项目列表从Home (顶部)一直传递到ProductTile (底部)部件,以检查某个项目是否退出了购物车。如果它是,购物车图标将被突出显示。
![]()
点击产品名称旁边的购物车图标,就可以将该商品添加到购物车中。在AppBar上刷新购物车图标的回调是由ProductTile (底部)到Home (顶部)。

的问题setState
Flutter中的setState 状态管理方法对于只有几个组件的简单应用来说效果不错。但对于更复杂的、具有深层部件树的实际Flutter应用程序,使用setState ,会导致以下问题。
- 代码重复 - 数据必须从所有部件传递到底部部件,这使得代码难以阅读
- 性能下降,因为将
setState提升到具有深层次结构的父部件而导致不必要的重绘
如何用BLoC在Flutter中管理状态
现在让我们用BLoC实现同样的功能。
首先,添加BLoC库。
dependencies:
  flutter:
    sdk: flutter
  cupertino_icons: ^1.0.2
  flutter_bloc: ^7.0.0

复制代码
接下来,创建并添加一个BLoC观察器。这可以帮助你确定已经发生的事件和状态的顺序,这对于调试应用程序是非常好的。
void main() {
  Bloc.observer = SimpleBlocObserver();
  runApp(MyApp());
}
import 'package:flutter_bloc/flutter_bloc.dart';

/// Custom [BlocObserver] which observes all bloc and cubit instances.
class SimpleBlocObserver extends BlocObserver {
  @override
  void onEvent(Bloc bloc, Object event) {
    super.onEvent(bloc, event);
    print(event);
  }

  @override
  void onTransition(Bloc bloc, Transition transition) {
    super.onTransition(bloc, transition);
    print(transition);
  }

  @override
  void onError(BlocBase bloc, Object error, StackTrace stackTrace) {
    print(error);
    super.onError(bloc, error, stackTrace);
  }
}

复制代码
创建事件以从购物车项目列表中添加和删除产品。
import 'package:equatable/equatable.dart';

abstract class CartEvent extends Equatable {
  const CartEvent();

  @override
  List<Object> get props => [];
}

class AddProduct extends CartEvent {
  final int productIndex;
  const AddProduct(this.productIndex);
  @override
  List<Object> get props => [productIndex];
  @override
  String toString() => 'AddProduct { index: $productIndex }';
}

复制代码
现在,创建表示产品被添加和删除的状态。
import 'package:flutter/material.dart';

abstract class CartState {
  final List<int> cartItem;
  const CartState({@required this.cartItem});

  @override
  List<Object> get props => [];
}

class ProductAdded extends CartState {
  final List<int> cartItem;
  const ProductAdded({@required this.cartItem}) : super(cartItem: cartItem);

  @override
  List<Object> get props => [cartItem];
  @override
  String toString() => 'ProductAdded { todos: $cartItem }';
}

复制代码编写业务逻辑,将产品添加和删除到cartItems ,并发出相应的状态。购物车中的实际物品列表是在BLoC级别维护的。
class CartBloc extends Bloc<CartEvent, CartState> {
  CartBloc() : super(ProductAdded(cartItem: []));

  final List<int> _cartItems = [];
  List<int> get items => _cartItems;

  @override
  Stream<CartState> mapEventToState(CartEvent event) async* {
    if (event is AddProduct) {
      _cartItems.add(event.productIndex);
      yield ProductAdded(cartItem: _cartItems);
    } else if (event is RemoveProduct) {
      _cartItems.remove(event.productIndex);
      yield ProductRemoved(cartItem: _cartItems);
    }
  }
}

复制代码
接下来,将脚手架部件包裹在 [BlocProvider](https://pub.dev/packages/flutter_bloc#blocprovider).
BlocProvider 是一个Flutter小组件,它使任何BLoC对它下面的整个小组件树可用。在我们的例子中,在Home (顶部)和ProductTile (底部)之间的任何widget都可以访问购物车,所以不需要将购物车数据从widget树的顶部传递到底部。
BlocProvider(
    create: (_) => CartBloc(),
    child: Scaffold(
      appBar: CartCounter(),
      body: ProductList(),
    ));

复制代码将购物车图标和产品列表包裹在BlocBuilder 内。BlocBuilder 在收到BLoC的新状态时,只需重建其内部的widget。
// Cart icon
BlocBuilder<CartBloc, CartState>(builder: (_, cartState) {
  List<int> cartItem = cartState.cartItem;
  return Positioned(
    left: 30,
    child: Container(
      padding: EdgeInsets.all(5),
      decoration: BoxDecoration(
          borderRadius: BorderRadius.circular(10),
          color: Colors.red),
      child: Text(
        '${cartItem.length}',
        style: TextStyle(fontWeight: FontWeight.bold),
      ),
    ),
  );
}),
//Product list
 BlocBuilder<CartBloc, CartState>(builder: (_, cartState) {
  List<int> cart = cartState.cartItem;
  return LayoutBuilder(builder: (context, constraints) {
    return GridView.builder(
      itemCount: 100,
      itemBuilder: (context, index) => ProductTile(
        itemNo: index,
        cart: cart,
      ),
      gridDelegate: SliverGridDelegateWithFixedCrossAxisCount(
        crossAxisCount: constraints.maxWidth > 700 ? 4 : 1,
        childAspectRatio: 5,
      ),
    );
  });
});

复制代码注意:CartBloc 的BlocBuilder 只添加在两个地方,因为我们只想让这两个widget在CartBloc 发生变化时重建。这种只刷新需要的小部件的方法大大减少了不必要的重绘数量。
下一步是为添加和删除购物车中的物品向CartBloc 拍摄事件。BlocProvider.of<CartBloc>(context) 在widget树中找到最近的CartBloc 的实例并向其添加事件。
IconButton(
  key: Key('icon_$itemNo'),
  icon: cart.contains(itemNo)
      ? Icon(Icons.shopping_cart)
      : Icon(Icons.shopping_cart_outlined),
  onPressed: () {
    !cart.contains(itemNo)
        ? BlocProvider.of<CartBloc>(context).add(AddProduct(itemNo))
        : BlocProvider.of<CartBloc>(context).add(RemoveProduct(itemNo));
  },
)

复制代码现在用BlocConsumer 替换BlocBuilder 。BlocConsumer 允许我们重建小组件并对状态做出反应。它应该只在你想重建小组件并执行一些动作时使用。
在我们的例子中,我们想刷新列表,并在有产品被添加或从购物车中删除时显示一个购物车。
BlocConsumer<CartBloc, CartState>(
listener: (context, state) {
  Scaffold.of(context).showSnackBar(
    SnackBar(
      content: Text(
          state is ProductAdded ? 'Added to cart.' : 'Removed from cart.'),
      duration: Duration(seconds: 1),
    ),
  );
},
builder: (_, cartState) {
  List<int> cart = cartState.cartItem;
  return LayoutBuilder(builder: (context, constraints) {
    return GridView.builder();
  });
});

复制代码另外,如果你想减少一些模板代码,而且状态的顺序对你来说并不重要,可以试试Cubit。下面是CartCubit 的样子。
class CartCubit extends Cubit<CartState> {
  CartCubit() : super(ProductAdded(cartItem: []));

  final List<int> _cartItems = [];
  List<int> get items => _cartItems;

  void add(int productIndex) {
    _cartItems.add(productIndex);
    emit (ProductAdded(cartItem: _cartItems));
  }

  void remove(int productIndex) {
    _cartItems.remove(productIndex);
    emit (ProductRemoved(cartItem: _cartItems));
  }
}

复制代码注意:用CartCubit 替换整个代码中的CartBloc ,并按如下所示触发事件。
onPressed: () {
  !cart.contains(itemNo)
      ? BlocProvider.of<CartCubit>(context).add(itemNo)
      : BlocProvider.of<CartCubit>(context).remove(itemNo);
},

复制代码
输出是一样的,但是改进了状态管理。
结论
有了一个坚实的BLoC架构,就可以很好地分离关注点。尽管使用BLoC模式比使用setState 需要更多的代码,但它使代码更易读、可扩展和可测试。
在本教程中,我们介绍了在Flutter中使用BLoC模式的基础知识,并通过一个实际的例子来强调在Flutter中使用BLoC进行状态管理比使用setState 的好处。
你可以在GitHub上找到这个例子的完整源代码。
The postState management in Flutter using the BLoC design patternappeared first onLogRocket Blog.