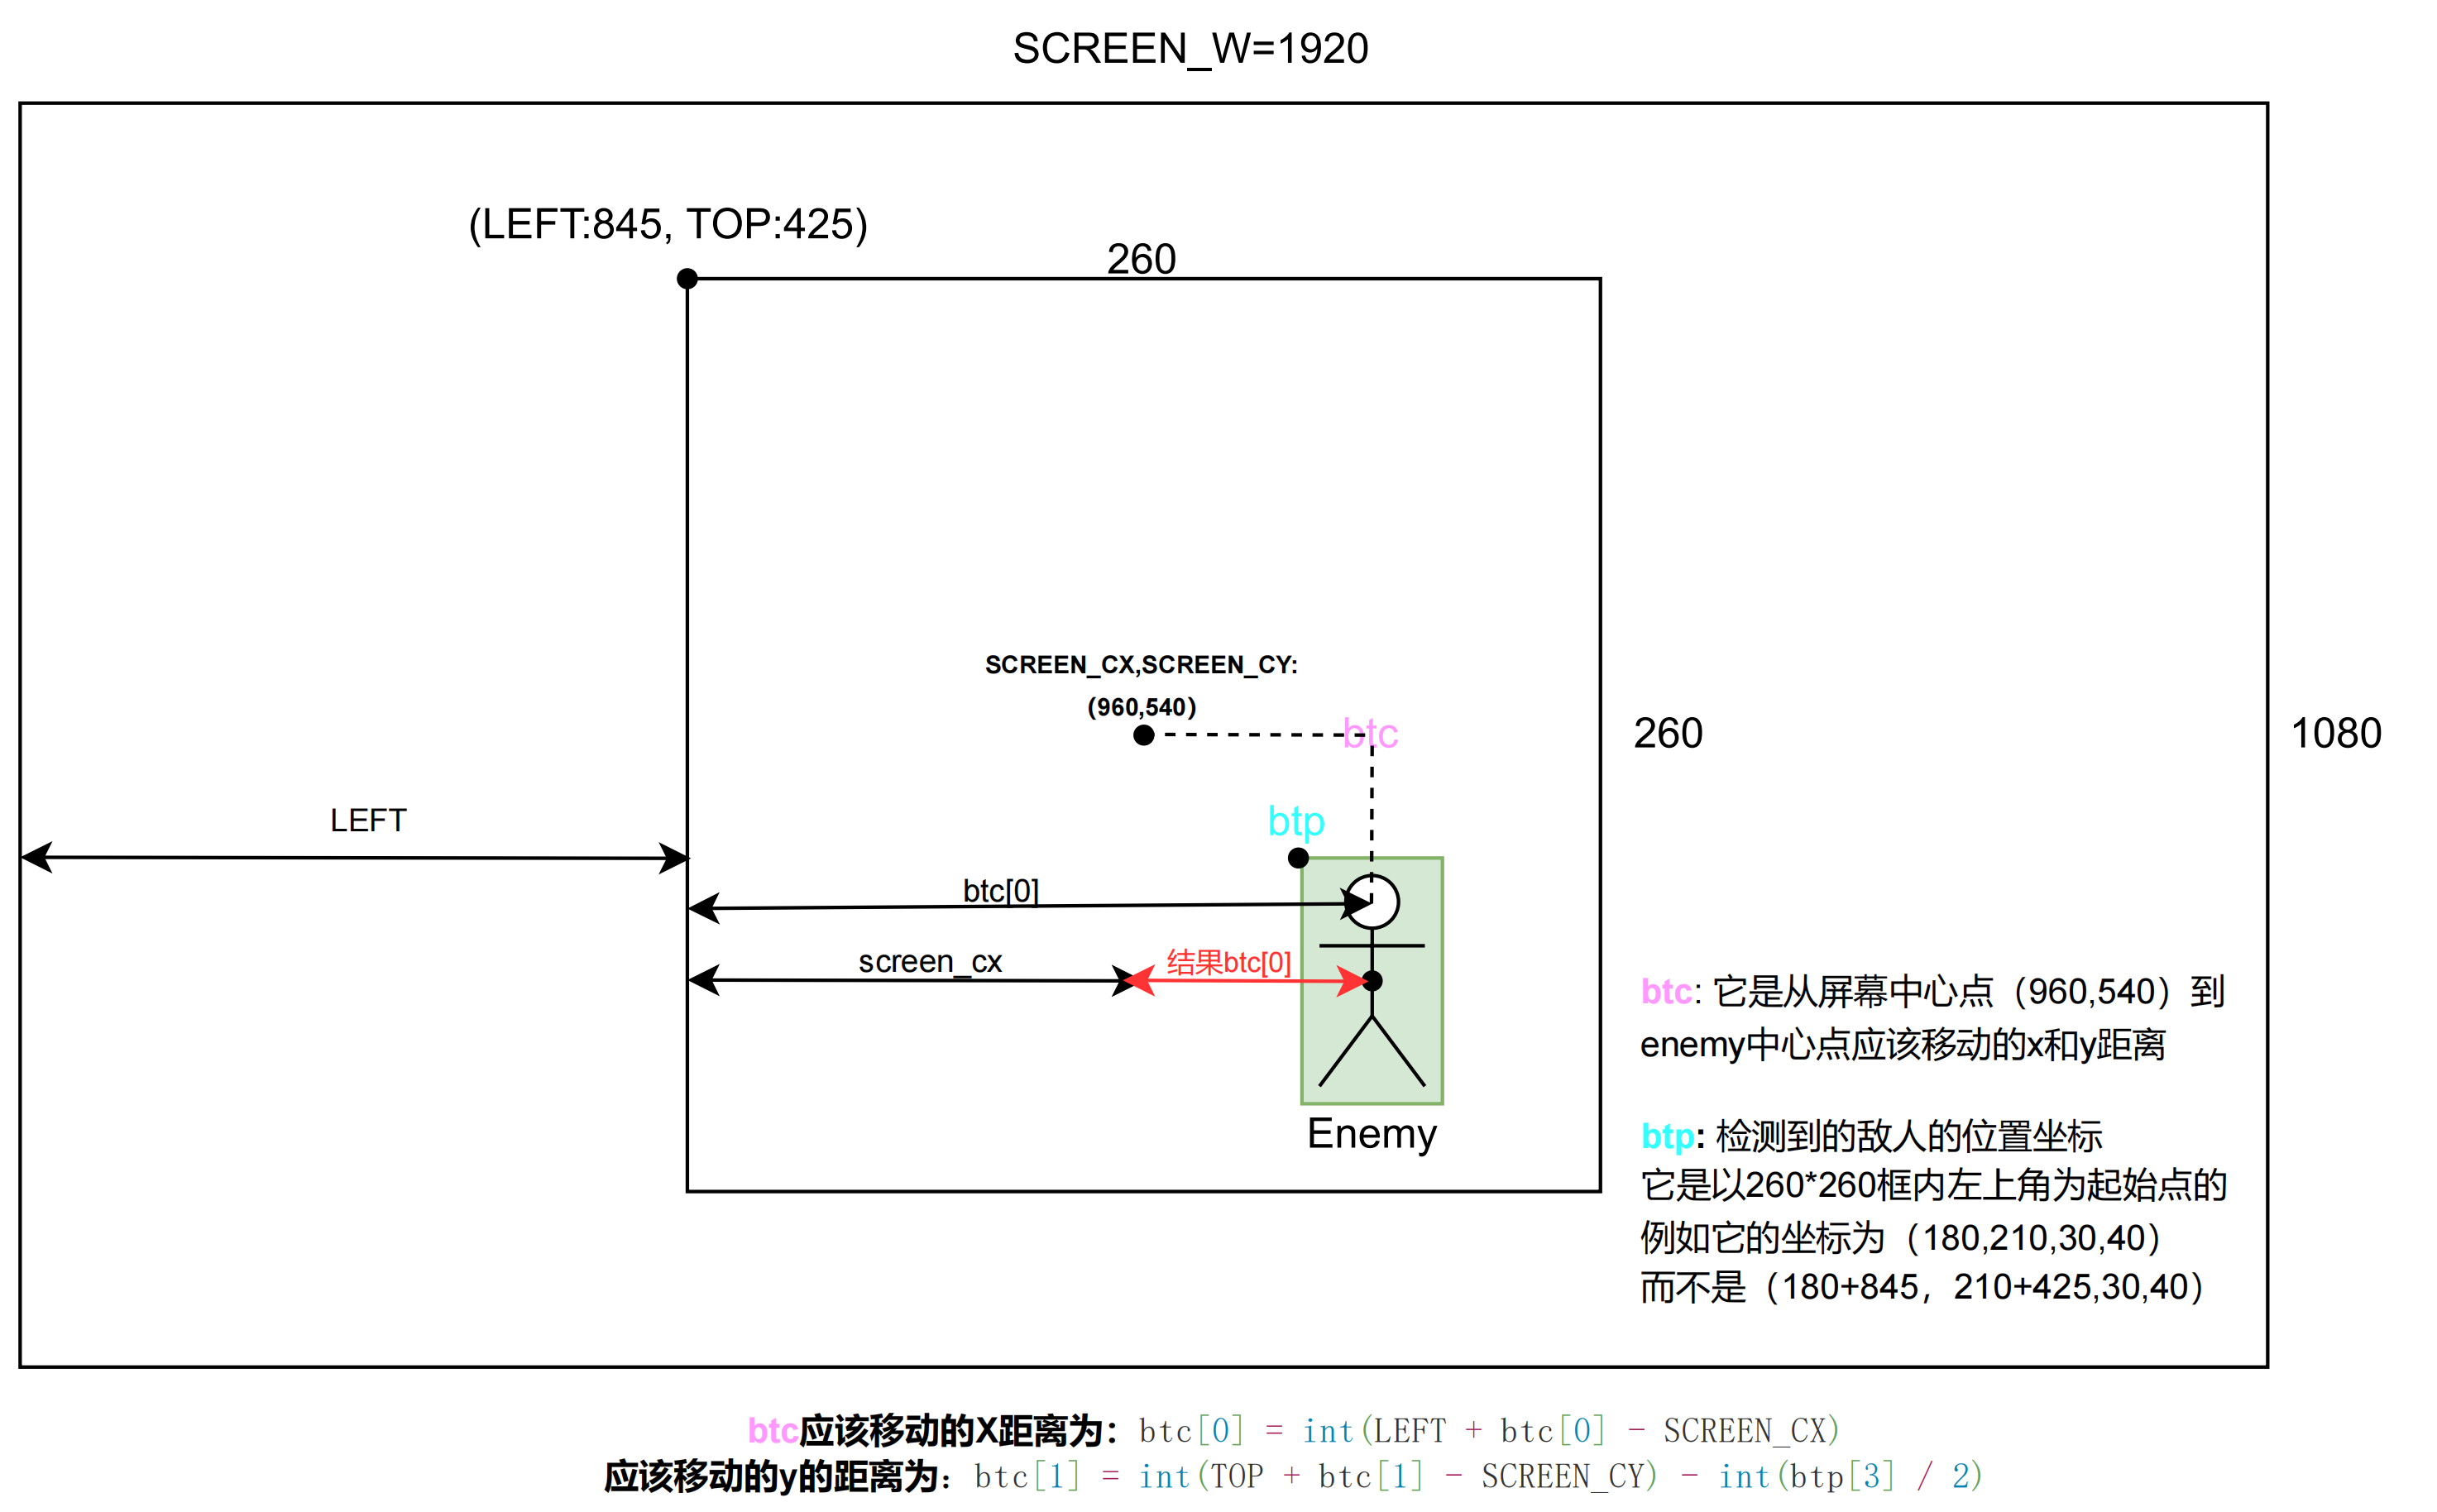
说明:
- 最外面1920*1080的大框是屏幕的长宽
- 第二个框是YOLO要在屏幕截取的位置
- 第三个人的框是对目标进行的位置标记(也就是model将目标标记了出来)
The main idea is as shown above:
The core code is as follows:
import math
from ctypes import *
import cv2
import numpy as np
import numpy.ctypeslib as npct
import pyautogui


SCREEN_W = 1920  # 屏幕长 : 3840
SCREEN_H = 1080  # 屏幕高 :2160
SCREEN_CX = SCREEN_W // 2  # 屏幕中心x
SCREEN_CY = SCREEN_H // 2  # 屏幕中心y
SCREEN_C = [SCREEN_CX, SCREEN_CY]  # 屏幕中心坐标
SCREENSHOT_W = 260  # 截图区域长
SCREENSHOT_H = 260  # 截图区域高
LEFT = SCREEN_CX - SCREENSHOT_W // 2  # 检测框左上角x : 845
TOP = SCREEN_CY - SCREENSHOT_H // 2   # 检测框左上角y : 425


def ScreenShout():
    """
    截取游戏中要检测区域的图片
    :return: (h,w,c)
    """
    img = pyautogui.screenshot(region=[LEFT, TOP, SCREENSHOT_W, SCREENSHOT_H])
    return np.array(img)


class Detector:
    def __init__(self, model_path, dll_path):
        self.bbox_array = None
        self.yolov5 = CDLL(dll_path)
        self.yolov5.Detect.argtypes = [c_void_p, c_int, c_int, POINTER(c_ubyte), npct.ndpointer(dtype=np.float32, ndim=2, shape=(50, 6), flags="C_CONTIGUOUS")]
        self.yolov5.Init.restype = c_void_p
        self.yolov5.Init.argtypes = [c_void_p]
        self.yolov5.cuda_free.argtypes = [c_void_p]
        self.c_point = self.yolov5.Init(model_path)

    def predict(self, img):
        try:
            rows, cols = img.shape[0], img.shape[1]
            res_arr = np.zeros((50, 6), dtype=np.float32)
            self.yolov5.Detect(self.c_point, c_int(rows), c_int(cols), img.ctypes.data_as(POINTER(c_ubyte)), res_arr)
            self.bbox_array = res_arr[~(res_arr == 0).all(1)]
            detections = []
            for temp in self.bbox_array:
                bbox = [temp[0], temp[1], temp[2], temp[3]]  # xywh
                clas = int(temp[4])
                score = temp[5]
                detections.append({'class': clas, 'conf': score, 'position': bbox})
            return detections
        except:
            return None

    def free(self):
        self.yolov5.cuda_free(self.c_point)


def visualize(img, bbox_array):
    for temp in bbox_array:
        bbox = [temp[0], temp[1], temp[2], temp[3]]  # xywh
        clas = int(temp[4])
        score = temp[5]
        cv2.rectangle(img, (int(temp[0]), int(temp[1])), (int(temp[0] + temp[2]), int(temp[1] + temp[3])), (105, 237, 249), 2)
        img = cv2.putText(img, "class:" + str(clas) + " " + str(round(score, 2)), (int(temp[0]), int(temp[1]) - 5), cv2.FONT_HERSHEY_SIMPLEX, 0.5, (105, 237, 249), 1)
    return img


def Center(p):
    """
    返回中心坐标;
    :param p: [lx,ly,w,h]->[左上x坐标,左上y坐标]
    :return: [x,y]
    """
    return [p[0] + p[2] // 2, p[1] + p[3] // 2]


def Distence(a, b):
    """
    两点间距离(欧氏距离)
    :param a:a点 (xa,ya)
    :param b: b点(xb,yb)
    :return: sqrt((xa-xb)**2 + (yb-ya)**2)
    """
    return math.sqrt(((a[0] - b[0]) ** 2) + ((a[1] - b[1]) ** 2))


def FindBestCenter(detections):
    """
    根据检测的结果,寻找最佳射击坐标
    :param detections: 检测结果
    :return:
    :btp: 目标框的位置信息
    :btc: 需要移动的X和Y的距离
    """
    ch = {'p': [0, 0, 0, 0], 'd': float('inf'), 'c': 0.0}  # 离枪口最近的头 p位置 d距离中心距离 c可信度
    for dt in detections:
        """
        遍历检测到的目标,找最近的头和身子
        """
        if dt['conf'] > 0.6:        # 只寻找置信度达到70%的头和身子
            dt_p = dt['position']   # 检测出来的目标位置, 'position': [66.0, 109.0, 114.0, 118.0] 【左上角的坐标x, 左上角的坐标y, 目标框的宽, 目标框的高】
            dt_c = Center(dt_p)     # The center coordinates of the target position: (w,h)

            if dt['class'] == 0:    # 判断是不是最优头
                dt_d = Distence(dt_c, SCREEN_C) # computer the distance of (enemy center and screen center).
                if dt_d < ch['d']:
                    ch['p'] = dt['position']
                    ch['d'] = dt_d
                    ch['c'] = dt['conf']
                    pass


    if ch['d'] < float('inf'):              # 自动选择瞄准部位
        btp = ch['p']                       # target position coordinates
        btc = Center(btp)                   # target center coordinates
        btc[0] = int(LEFT + btc[0] - SCREEN_CX)

        # 模式1、这样是瞄准人物的正中心
        # btc[1] = int(TOP + btc[1] - SCREEN_CY)

        # 模式2、这样是瞄准人物的头部正中心,就相当于在1的基础上减去半个目标框的y距离,这样就到了人物头部的最上面,然后在cftool中“btc[1] + tt”
        # y中心距离加了tt,意思就是向下移动一点,这样可以命中头部了就
        btc[1] = int(TOP + btc[1] - SCREEN_CY) - int(btp[3] / 2)

        if btp[2] < 8:
            return None, None
        return btc, btp
    return None, None
How can I move the mouse to that position like the code below:(move with relative position)
# 截图返回
import threading
import time
import warnings

import win32api
import win32con
from FpsDetect import ScreenShout, Detector, FindBestCenter


LAST_TIME = time.time()
tempX_val = 0

def clickLeft():
    global LAST_TIME
    LAST_TIME = time.time()
    win32api.mouse_event(win32con.MOUSEEVENTF_LEFTDOWN, 0, 0)   # The left button is down.
    win32api.mouse_event(win32con.MOUSEEVENTF_LEFTUP, 0, 0)     # The left button is up.


def work():
    global LAST_TIME
    global tempX_val
    det = Detector(model_path= b"./cfModel.engine", dll_path= "./yolov5.dll")  # b'' is needed
    while True:
        img = ScreenShout()                         # Capture an image of the area to be examined in the game
        # Output class, confidence, aim position
        # for example: [{'class': 0, 'conf': 0.89293504, 'position': [60.0, 109.0, 82.0, 119.0]}]
        detections = det.predict(img)
        if detections is not None:
            btc, btp = FindBestCenter(detections)   # Get Optimum shooting coordinates.
            print(detections)
            if btc is not None:
                print("The move distance is(btp) :", btp, "The target position coordinates is(btc):", btc)
                tt = 0
                if btp[2] < 25:
                    tt = 4
                else:
                    tt = 5

                win32api.mouse_event(win32con.MOUSEEVENTF_MOVE, int(btc[0]), btc[1] + tt, 0, 0)

                if 8 > btc[0] > -8 and 12 > btc[1]+tt > -12:
                    print("时间", time.time() - LAST_TIME)
                    if time.time() - LAST_TIME > 0.1:
                        threading.Thread(target=clickLeft, args=()).start()


if __name__ == '__main__':
    warnings.filterwarnings("ignore")
    # 开始截图线程
    a1 = threading.Thread(target=work, args=())
    a1.start()
Why use a relative position move instead of moving directly to that position?
因为在某些场景下,直接鼠标位置移动是实现不了的,只能使用如下相对位置鼠标移动:
win32api.mouse_event(win32con.MOUSEEVENTF_MOVE, int(btc[0]), btc[1] + tt, 0, 0)其中tt的含义看第一段代码,其中有解释.