
实战
1. 效果图
在本文中,我们综合前面所学的知识,来实现下面这个界面:

2. 展示图片
- 把图片 img 放到项目根目录的 images 文件夹下(如果没有,你需要自己创建一个)。
- 修改 pubspec.yaml,找到下面这个地方,然后把图片加进来
# The following section is specific to Flutter packages.
flutter:

  # The following line ensures that the Material Icons font is
  # included with your application, so that you can use the icons in
  # the material Icons class.
  uses-material-design: true

  assets:
    - images/avatar.png
    - images/img.jpg
- 现在,我们可以把这张图片展示出来:
void main() {


  runApp(MyApp());
}

class MyApp extends StatelessWidget {


  @override
  Widget build(BuildContext context) {


    return MaterialApp(
      title: 'Flutter First Demo',
      home: Scaffold(
        appBar: AppBar(
          title: Text('Flutter First Demo'),
        ),
        body: Image.asset(
          'images/img.jpg',
          width: 600.0,
          height: 240.0,
          fit: BoxFit.cover,
        )
      ),
    );
  }
}
如果您是初学 Flutter,强烈建议在遇到不熟悉的 API 时翻一翻文档,并在文档中找到 demo 所使用的 API。我们的例子不可能覆盖所有的 API,通过这种方式熟悉文档后,读者就可以根据文档实现出自己想要的效果。
3. 布局
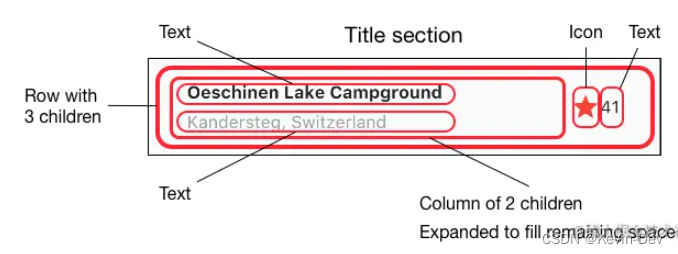
我们直接来看代码:
class _TitleSection extends StatelessWidget {


  final String title;
  final String subtitle;
  final int starCount;

  _TitleSection(this.title, this.subtitle, this.starCount);

  @override
  Widget build(BuildContext context) {


    // 为了给 title section 加上 padding,这里我们给内容套一个 Container
    return Container(
      // 设置上下左右的 padding 都是 32。类似的还有 EdgeInsets.only/symmetric 等
      padding: EdgeInsets.all(32.0),
      child: Row(
        children: <Widget>[
          // 这里为了让标题占满屏幕宽度的剩余空间,用 Expanded 把标题包了起来
          Expanded(
            // 再次提醒读者,Expanded 只能包含一个子元素,使用的参数名是 child。接下来,
            // 为了在竖直方向放两个标题,加入一个 Column。
            child: Column(
              // Column 是竖直方向的,cross 为交叉的意思,也就是说,这里设置的是水平方向
              // 的对齐。在水平方向,我们让文本对齐到 start(读者可以修改为 end 看看效果)
              crossAxisAlignment: CrossAxisAlignment.start,
              children: <Widget>[
                // 聪明的你,这个时候肯定知道为什么突然加入一个 Container 了。
                // 跟前面一样,只是为了设置一个 padding
                Container(
                  padding: const EdgeInsets.only(bottom: 8.0),
                  child: Text(
                    title,
                    style: TextStyle(fontWeight: FontWeight.bold),
                  ),
                ),
                Text(
                  subtitle,
                  style: TextStyle(color: Colors.grey[500]),
                )
              ],
            ),
          ),

          // 这里是 Row 的第二个子元素,下面这两个就没用太多值得说的东西了。
          Icon(
            Icons.star,
            color: Colors.red[500],
          ),

          Text(starCount.toString())
        ],
      ),
    );
  }
}
4. 对齐
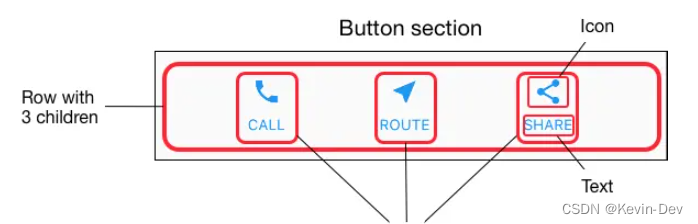
我们直接来看代码:
Widget _buildButtonColumn(BuildContext context, IconData icon, String label) {


  final color = Theme.of(context).primaryColor;

  return Column(
    // main axis 跟我们前面提到的 cross axis 相对应,对 Column 来说,指的就是竖直方向。
    // 在放置完子控件后,屏幕上可能还会有一些剩余的空间(free space),min 表示尽量少占用
    // free space;类似于 Android 的 wrap_content。
    // 对应的,还有 MainAxisSize.max
    mainAxisSize: MainAxisSize.min,
    // 沿着 main axis 居中放置
    mainAxisAlignment: MainAxisAlignment.center,

    children: <Widget>[
      Icon(icon, color: color),
      Container(
        margin: const EdgeInsets.only(top: 8.0),
        child: Text(
          label,
          style: TextStyle(
            fontSize: 12.0,
            fontWeight: FontWeight.w400,
            color: color,
          ),
        ),
      )
    ],
  );
}

class MyApp extends StatelessWidget {


  @override
  Widget build(BuildContext context) {


    //...

    Widget buttonSection = Container(
      child: Row(
        // 沿水平方向平均放置
        mainAxisAlignment: MainAxisAlignment.spaceEvenly,
        children: [
          _buildButtonColumn(context, Icons.call, 'CALL'),
          _buildButtonColumn(context, Icons.near_me, 'ROUTE'),
          _buildButtonColumn(context, Icons.share, 'SHARE'),
        ],
      ),
    );
  //...
}
5. 完整代码
import 'package:flutter/material.dart';

void main() {


  runApp(const MyApp());
}

class MyApp extends StatelessWidget {


  const MyApp({

    Key? key}) : super(key: key);

  @override
  Widget build(BuildContext context) {


    final titleSection = _TitleSection('Oeschinen Lake Campground', 'Kandersteg, Switzerland', 41);

    final buttonSection = Container(
      child: Row(
        mainAxisAlignment: MainAxisAlignment.spaceEvenly,
        children: [
          _buildButtonColumn(context, Icons.call, "Call"),
          _buildButtonColumn(context, Icons.near_me, 'ROUTE'),
          _buildButtonColumn(context, Icons.share, 'SHARE'),
        ],
      ),
    );

    final textSection = Container(
      padding: const EdgeInsets.all(32.0),
      child: Text(
          'Lake Oeschinen lies at the foot of the Blüemlisalp in the Bernese Alps.' * 20,
        softWrap: true,
      ),
    );


    return MaterialApp(
        title: 'Flutter First Demo',

        home: Scaffold(
            appBar: AppBar(
              title: Text('Flutter First Demo'),
            ),
            body: ListView(
              children: <Widget>[
                Image.asset(
                  "images/img.jpg",
                  width: 600.0,
                  height: 240.0,
                  fit: BoxFit.cover,
                ),
                titleSection,
                buttonSection,
                textSection,
              ],
            )
        )
    );
  }
}

class _TitleSection extends StatelessWidget {


  final String title;
  final String subTitle;
  final int starCount;

  _TitleSection(this.title,this.subTitle,this.starCount);

  @override
  Widget build(BuildContext context) {


    return Container(
      padding: EdgeInsets.all(32.0),
      child: Row(
        children: <Widget>[
          Expanded(
              child: Column(
                crossAxisAlignment: CrossAxisAlignment.start,
                children: <Widget>[
                  Container(
                    padding: const EdgeInsets.only(bottom: 8.0),
                    child: Text(
                      title,
                      style: TextStyle(fontWeight: FontWeight.bold),
                    ),
                  ),
                  Text(
                    subTitle,
                    style: TextStyle(color: Colors.grey[500]),
                  )
                ],
              )
          ),
          Icon(
            Icons.star,
            color: Colors.red[500],
          ),
          Text(starCount.toString())
        ],
      ),
    );
  }
}

Widget _buildButtonColumn(BuildContext context,IconData icon,String label) {


  final color = Theme.of(context).primaryColor;

  return Column(
    mainAxisSize: MainAxisSize.min,
    mainAxisAlignment: MainAxisAlignment.center,

    children: <Widget>[
      Icon(icon,color: color,),
      Container(
        margin: const EdgeInsets.only(top: 8.0),
        child: Text(
          label,
          style: TextStyle(
            fontSize: 12.0,
            fontWeight: FontWeight.w400,
            color: color,
          ),
        ),
      )
    ],
  );
}