1.安装node.js
下载安装node.js,win7使用node.js v12版的(为目前通用,建议都是用这个版本),win10可以使用最新版本的。CLI至少要求v12版本的。
安装完成后开启cmd,检验版本:
node -v
2.配置淘宝镜像
搜索npm淘宝镜像,加速后续包的下载,在cmd中配置:
npm config set registry https://registry.npm.taobao.org
检验配置的淘宝镜像:
npm config get registry
3.下载CLI
搜索VUE CLI,安装下载 :
npm install -g @vue/cli
4.使用CLI安装VUE2
在cmd中cd到需要建立项目的目录下,安装vue2:
vue create project_name
注:
project_name为项目名称,请自定义创建
后续参数配置如下:
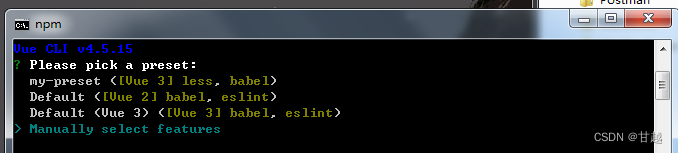
4.1.人工选择特性
4.2.选择以下两项特性

4.3.选择vue版本


4.4. 选择将包独立存放

4.5.选择保存以上配置,供以后使用

4.6. 安装完成后,按提示运行,访问首页面测试

5.安装外部包
5.1安装vant2
npm i vant@latest-v2 -S
5.2安装element-ui
npm i element-ui -S
5.3.安装Axios
npm install axios
6.包统一配置并按需引入
在src下新建plugins文件夹,里面一个文件就是一个包的配置文件,最后逐个引入main.js:
6.1.vant2按需引入
npm i babel-plugin-import -D
新建VantUI.js:
import Vue from "vue"
import { Button, Form, Field?} from "vant"

Vue.use(Button)
Vue.use(Form)
Vue.use(Field)
6.2.element-ui按需引入
npm install babel-plugin-component -D
新建ElementUI.js:
import Vue from 'vue'
import { Button } from "element-ui"

Vue.use(Button)
6.3.Axios配置
新建Axios.js:
import Vue from "vue";
import axios from "axios";

const url = "http://localhost/" //后台地址
axios.defaults.baseURL = url; //请求默认后台地址
axios.defaults.headers.post['Content-Type'] = 'application/json;charset=UTF-8';
Vue.prototype.$http = axios //后续请求使用
Vue.prototype.$http_url = url //全局后台地址
7.修改main.js配置
import Vue from 'vue'
import App from './App.vue'
import router from './router'

import './plugins/VantUI'
import './plugins/ElementUI'
import './plugins/Axios'

Vue.config.productionTip = false

new Vue({
? router,
? render: h => h(App)
}).$mount('#app')
使用了按需引入后,需要修改项目根目录下babel.config.js,修改为:
module.exports = {
? presets: [
? ? '@vue/cli-plugin-babel/preset',
? ? [
? ? ? "@babel/preset-env", { "modules": false }
? ? ]
? ],
? plugins: [
? ? [
? ? ? "component",
? ? ? {
? ? ? ? "libraryName": "element-ui",
? ? ? ? "styleLibraryName": "theme-chalk"
? ? ? }
? ? ],
? ? [
? ? ? 'import',
? ? ? {
? ? ? libraryName: 'vant',
? ? ? libraryDirectory: 'es',
? ? ? style: true
? ? ? },
? ? ? 'vant'
? ? ]
? ]
}
8.路由配置修改
router/index.js修改如下:
import Vue from 'vue'
import VueRouter from 'vue-router'

Vue.use(VueRouter)

const routes = [
? //初始路由
? {
? ? name: '/',
? ? path: "/",
? ? redirect: {
? ? ? ? name: 'NotFound', //默认导向的路由名
? ? }
? },
? //未匹配到的路由默认导向这里
  {
? ? path: '/:pathMatch(.*)*',
? ? name: 'NotFound',
? ? component: () => import('../components/Error.vue'),
? },
]

const router = new VueRouter({
? mode: 'history',
? base: '/web',
? routes
})

export default router
9.修改App.vue,增加默认样式
修改为如下:
<template>
? <div id="app">
? ? <router-view/>
? </div>
</template>

<style>
*{
  margin: 0;
  padding: 0;
  list-style: none;
  text-decoration: none;
  box-sizing: border-box;
  }
html{
  width: 100%;
  height: 100%;
}
body {
  width: 100%;
  height: 100%;
  font-family: "Helvetica Neue", Helvetica, Arial, Tahoma, "Microsoft Yahei","PingFang SC", "Hiragino Sans GB", "WenQuanYi Micro Hei", sans-serif;
  }
#app{
  width: 100%;
  height: 100%;
}
</style>
10.修改index.html配置
在public/index.html,需要修改如下属性:
<meta name="viewport" content="width=device-width,initial-scale=1.0,minimum-scale=1.0,maximum-scale=1.0,user-scalable=no">
可变更项目标题与logo。
11.修改vue.config.js文件,发布配置
项目根目录下增加如下内容的vue.config.js:
module.exports = {
? publicPath: '/web/',
}
注:指定访问相对路径前缀为:根目录/web/下。目前项目都以web为访问前缀。比如:原访问地址为:http://www.demo.com/现在需要为http://www.demo.com/web。作用在于后续与后端结合,为避免跨域使用。
12.增加Error.vue,启动服务
删除views文件夹,为与vue3统一,所有组件放在components中,放置Error.vue :
<template>
? <p>hello man</p>
</template>
在文件夹地址前加cmd,回车直接打开运行:
npm run serve
运行成功后,复制地址,在浏览器上查看。
13.定制化文件目录
13.1.在项目根目录下建立static文件夹
这里统一放置静态资源与文件。
13.2.在项目src下建立model文件夹
这里放置模板文件。