一、Pix2Pix概述
图像翻译适用于各种任务,从简单的照片增强和编辑到更细微的任务,如灰度到 RGB。例如,假设您的任务是图像增强,并且您的数据集是一组正常图像及其增强对应物。这里的目标是学习输入图像与其输出对应物的有效映射。
Pix2Pix 的作者建立在计算输入-输出映射的基础方法之上,并训练了一个额外的损失函数来加强这种映射。根据Pix2Pix 论文,他们的方法在各种任务中都很有效,包括(但不限于)从分割蒙版合成照片。
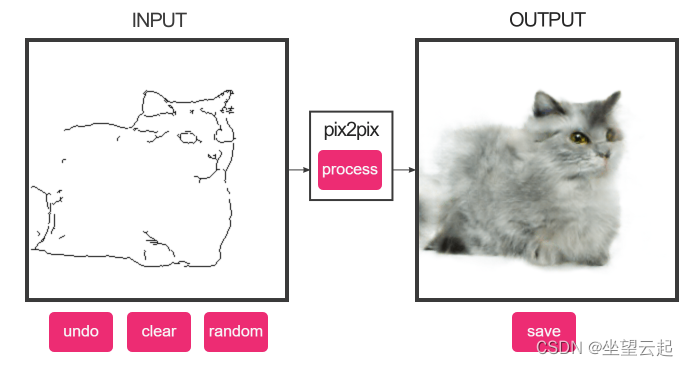
演示1:从边缘生成猫
演示2:生成建筑表面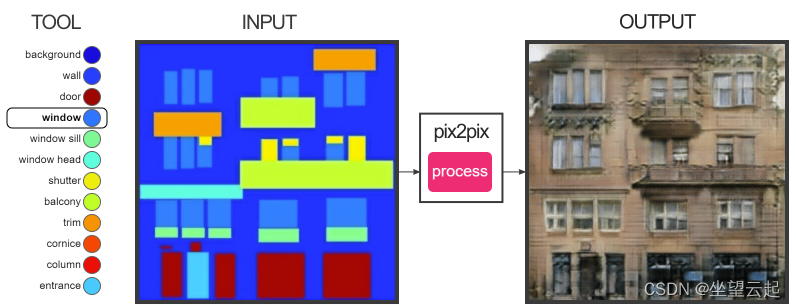
在条件 GAN 的基础上,Pix2Pix 还混合了真实图像和生成图像之间的 L1 距离(两点之间的距离)。
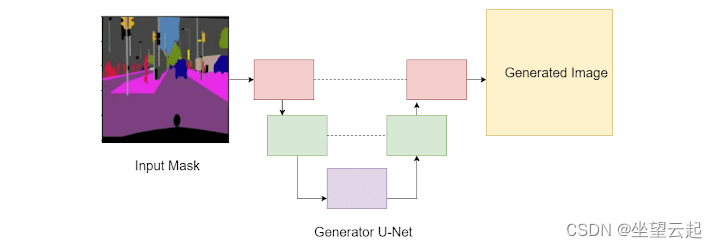
二、生成器
Pix2Pix 使用 U-Net(下图),因为它具有跳跃连接。U-Net 的特征通常是其第一组下采样层,即瓶颈层,然后是上采样层。这里要记住的关键点是下采样层连接到相应的上采样层,如下图中的虚线所示。
参考代码
# import the necessary packages
from tensorflow.keras.layers import BatchNormalization
from tensorflow.keras.layers import Conv2DTranspose
from tensorflow.keras.layers import LeakyReLU
from tensorflow.keras.layers import concatenate
from tensorflow.keras.layers import MaxPool2D
from tensorflow.keras.layers import Conv2D
from tensorflow.keras.layers import Dropout
from tensorflow.keras import Model
from tensorflow.keras import Input

class Pix2Pix(object):
	def __init__(self, imageHeight, imageWidth):
		# initialize the image height and width
		self.imageHeight = imageHeight
		self.imageWidth = imageWidth

	def generator(self):
		# initialize the input layer
		inputs = Input([self.imageHeight, self.imageWidth, 3])

		# down Layer 1 (d1) => final layer 1 (f1)
		d1 = Conv2D(32, (3, 3), activation="relu", padding="same")(
			inputs)
		d1 = Dropout(0.1)(d1)
		f1 = MaxPool2D((2, 2))(d1)

		# down Layer 2 (l2) => final layer 2 (f2)
		d2 = Conv2D(64, (3, 3), activation="relu", padding="same")(f1)
		f2 = MaxPool2D((2, 2))(d2)

		#  down Layer 3 (l3) => final layer 3 (f3)
		d3 = Conv2D(96, (3, 3), activation="relu", padding="same")(f2)
		f3 = MaxPool2D((2, 2))(d3)

		# down Layer 4 (l3) => final layer 4 (f4)
		d4 = Conv2D(96, (3, 3), activation="relu", padding="same")(f3)
		f4 = MaxPool2D((2, 2))(d4)

		# u-bend of the u-bet
		b5 = Conv2D(96, (3, 3), activation="relu", padding="same")(f4)
		b5 = Dropout(0.3)(b5)
		b5 = Conv2D(256, (3, 3), activation="relu", padding="same")(b5)

		# upsample Layer 6 (u6)
		u6 = Conv2DTranspose(128, (2, 2), strides=(2, 2),
			padding="same")(b5)
		u6 = concatenate([u6, d4])
		u6 = Conv2D(128, (3, 3), activation="relu", padding="same")(
			u6)

		# upsample Layer 7 (u7)
		u7 = Conv2DTranspose(96, (2, 2), strides=(2, 2),
			padding="same")(u6)
		u7 = concatenate([u7, d3])
		u7 = Conv2D(128, (3, 3), activation="relu", padding="same")(
			u7)

		# upsample Layer 8 (u8)
		u8 = Conv2DTranspose(64, (2, 2), strides=(2, 2),
			padding="same")(u7)
		u8 = concatenate([u8, d2])
		u8 = Conv2D(128, (3, 3), activation="relu", padding="same")(u8)

		# upsample Layer 9 (u9)
		u9 = Conv2DTranspose(32, (2, 2), strides=(2, 2),
			padding="same")(u8)
		u9 = concatenate([u9, d1])
		u9 = Dropout(0.1)(u9)
		u9 = Conv2D(128, (3, 3), activation="relu", padding="same")(u9)

		# final conv2D layer
		outputLayer = Conv2D(3, (1, 1), activation="tanh")(u9)

		# create the generator model
		generator = Model(inputs, outputLayer)

		# return the generator
		return generator
三、鉴别器
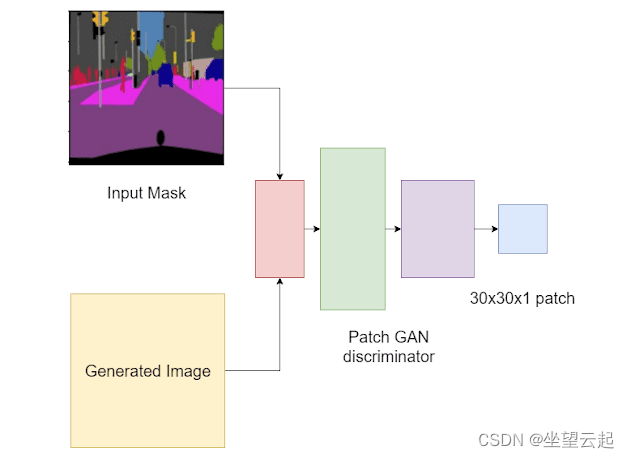
鉴别器是一个 Patch GAN 鉴别器。普通 GAN 判别器将图像作为输入并输出单个值 0(假)或 1(真实)。补丁 GAN 鉴别器将输入作为本地图像补丁进行分析。它将评估图像中的每个补丁是真实的还是虚假的。
参考代码
	def discriminator(self):
		# initialize input layer according to PatchGAN
		inputMask = Input(shape=[self.imageHeight, self.imageWidth, 3],
			name="input_image"
		)
		targetImage = Input(
			shape=[self.imageHeight, self.imageWidth, 3],
			name="target_image"
		)

		# concatenate the inputs
		x = concatenate([inputMask, targetImage])

		# add four conv2D convolution layers
		x = Conv2D(64, 4, strides=2, padding="same")(x)
		x = LeakyReLU()(x)
		x = Conv2D(128, 4, strides=2, padding="same")(x)
		x = LeakyReLU()(x)
		x = Conv2D(256, 4, strides=2, padding="same")(x)
		x = LeakyReLU()(x)
		x = Conv2D(512, 4, strides=1, padding="same")(x)

		# add a batch-normalization layer => LeakyReLU => zeropad
		x = BatchNormalization()(x)
		x = LeakyReLU()(x)

		# final conv layer
		last = Conv2D(1, 3, strides=1)(x)

		# create the discriminator model
		discriminator = Model(inputs=[inputMask, targetImage],
			outputs=last)

		# return the discriminator
		return discriminator
四、训练过程
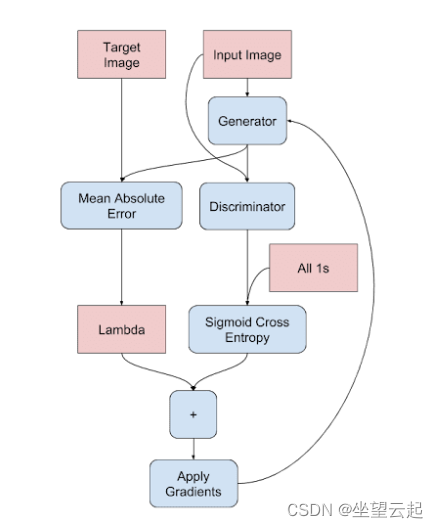
在 Pix2Pix 中,Patch GAN 将接收一对图像:输入掩码和生成图像以及输入掩码和目标图像。这是因为输出取决于输入。因此,将输入图像保持在混合中很重要(如下图所示,其中判别器采用两个输入)。
五、完整代码
 https://github.com/bashendixie/ml_toolset/tree/main/%E6%A1%88%E4%BE%8B100%20%E4%BD%BF%E7%94%A8Pix2Pix%E8%BF%9B%E8%A1%8C%E5%9B%BE%E5%83%8F%E7%BF%BB%E8%AF%91
六、相关参考
Image-to-Image Translation with Conditional Adversarial Networks![]() https://phillipi.github.io/pix2pix/
https://phillipi.github.io/pix2pix/