布局的概念
布局即将我们的控件,如图片、按钮、文本框等等进行一定规律的排布。Android中最常用的布局就是线性布局和相对布局。
线性布局
线性布局顾名思义是元素进行线性排布的布局。
常用属性:
android:id,用于标识布局的唯一名称,便于引用android:layout_width,布局宽度android:layout_height,布局高度android:background,布局的背景色android:layout_magin,布局的外边距android:layout_padding,布局的内边距android:orientation,布局内元素的排列方向,水平或垂直
线性布局举例:
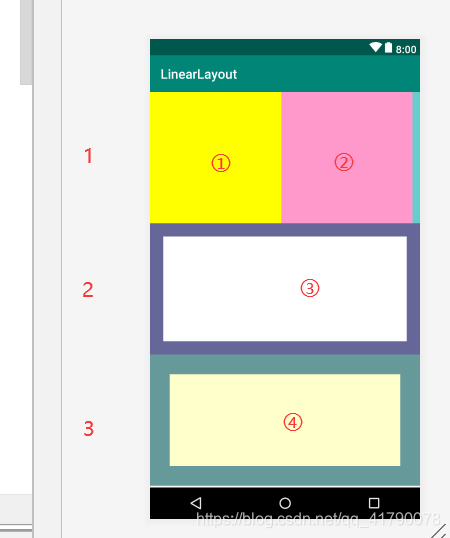
最终实现效果:

- 分析:
拆解为垂直排布的三个线性布局,在每个线性布局里布局相应的元素。
- 布局源码拆解:
- 首先放置一个线性布局作为根布局,根布局设置内部元素垂直排列,放置三个线性布局。
    <!--  根布局  -->
    <LinearLayout
        android:id="@+id/ll_root"
        android:layout_width="match_parent"
        android:layout_height="match_parent"
        android:orientation="vertical">
        <!--  布局1   -->
        <LinearLayout
            android:id="@+id/ll_1"
            android:layout_width="match_parent"
            android:layout_height="200dp"
            android:background="#66CCCC">
        </LinearLayout>
        <!--  布局2   -->
        <LinearLayout
            android:id="@+id/ll_2"
            android:layout_width="match_parent"
            android:layout_height="200dp"
            android:background="#666699"
            android:padding="20dp">
        </LinearLayout>
        <!--  布局3   -->
        <LinearLayout
            android:id="@+id/ll_3"
            android:layout_width="match_parent"
            android:layout_height="200dp"
            android:background="#669999">
        </LinearLayout>
    </LinearLayout>
效果:

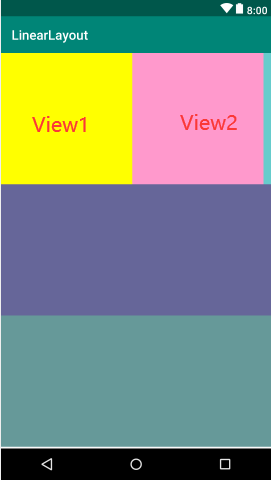
2. 布局1内水平排列两个View基础控件,设置不同背景色。
        <!--  布局1   -->
        <LinearLayout
            android:id="@+id/ll_1"
            android:layout_width="match_parent"
            android:layout_height="200dp"
            android:background="#66CCCC">
            <View
                android:id="@+id/view_1"
                android:layout_width="200dp"
                android:layout_height="match_parent"
                android:background="#FFFF00"/>
            <View
                android:id="@+id/view_2"
                android:layout_width="200dp"
                android:layout_height="match_parent"
                android:background="#FF99CC"/>
        </LinearLayout>
效果:
- 设置布局2内边距padding为20dp,放置一个View。
        <!--  布局2   -->
        <LinearLayout
            android:id="@+id/ll_2"
            android:layout_width="match_parent"
            android:layout_height="200dp"
            android:background="#666699"
            android:padding="20dp">

            <View
                android:id="@+id/view_3"
                android:layout_width="match_parent"
                android:layout_height="match_parent"
                android:background="#ffffff"/>
        </LinearLayout>
效果:

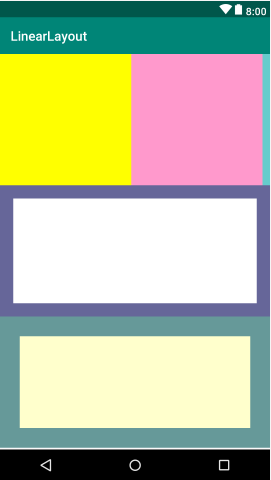
4. 布局3放置一个View控件,控件设置layout_margin属性值30dp。
        <!--  布局3   -->
        <LinearLayout
            android:id="@+id/ll_3"
            android:layout_width="match_parent"
            android:layout_height="200dp"
            android:background="#669999">
            <View
                android:layout_width="match_parent"
                android:layout_height="match_parent"
                android:background="#FFFFCC"
                android:layout_margin="30dp"/>
        </LinearLayout>
效果:

注意区分
padding和margin:padding是内边距,margin是外边距,一个在上层设置,一个在本层设置。
- 最终效果:
<?xml version="1.0" encoding="utf-8"?>
<LinearLayout xmlns:android="http://schemas.android.com/apk/res/android"
    xmlns:app="http://schemas.android.com/apk/res-auto"
    xmlns:tools="http://schemas.android.com/tools"
    android:layout_width="match_parent"
    android:layout_height="match_parent"
    tools:context=".MainActivity">
    <!--  根布局  -->
    <LinearLayout
        android:id="@+id/ll_root"
        android:layout_width="match_parent"
        android:layout_height="match_parent"
        android:orientation="vertical">
        <!--  布局1   -->
        <LinearLayout
            android:id="@+id/ll_1"
            android:layout_width="match_parent"
            android:layout_height="200dp"
            android:background="#66CCCC">
            <View
                android:id="@+id/view_1"
                android:layout_width="200dp"
                android:layout_height="match_parent"
                android:background="#FFFF00"/>
            <View
                android:id="@+id/view_2"
                android:layout_width="200dp"
                android:layout_height="match_parent"
                android:background="#FF99CC"/>
        </LinearLayout>
        <!--  布局2   -->
        <LinearLayout
            android:id="@+id/ll_2"
            android:layout_width="match_parent"
            android:layout_height="200dp"
            android:background="#666699"
            android:padding="20dp">

            <View
                android:id="@+id/view_3"
                android:layout_width="match_parent"
                android:layout_height="match_parent"
                android:background="#ffffff"/>
        </LinearLayout>
        <!--  布局3   -->
        <LinearLayout
            android:id="@+id/ll_3"
            android:layout_width="match_parent"
            android:layout_height="200dp"
            android:background="#669999">
            <View
                android:layout_width="match_parent"
                android:layout_height="match_parent"
                android:background="#FFFFCC"
                android:layout_margin="30dp"/>
        </LinearLayout>
    </LinearLayout>
</LinearLayout>
相对布局
相对布局:好像也没什么好解释的,就是相对布局,懂的都懂。比如:a在b的左边,那么b就在a的右边,这就是相对。
常用属性:
android:layout_toLeftOf,位于xx元素左边,值为某个控件或元素的id。android:layout_toRightOf,位于xx元素右边,值为某个控件或元素的id。android:layout_alignBottom,对齐xx元素的底部android:layout_alignParentBottom,对齐父控件的底部android:layout_below,位于xx元素下方
相对布局举例:
实现与上一个例子相同的效果:

代码也是相类似的,就不分析了:
<?xml version="1.0" encoding="utf-8"?>
<RelativeLayout xmlns:android="http://schemas.android.com/apk/res/android"
    xmlns:app="http://schemas.android.com/apk/res-auto"
    xmlns:tools="http://schemas.android.com/tools"
    android:layout_width="match_parent"
    android:layout_height="match_parent">
    <!--  布局1 -->
    <RelativeLayout
        android:id="@+id/rl_1"
        android:layout_width="match_parent"
        android:layout_height="200dp"
        android:background="#66CCCC">
        <View
            android:id="@+id/View1"
            android:layout_width="200dp"
            android:layout_height="200dp"
            android:background="#FFFF00"/>
        <View
            android:layout_toRightOf="@+id/View1"
            android:layout_width="200dp"
            android:layout_height="200dp"
            android:background="#FF99CC"/>
    </RelativeLayout>
    <!--  布局2 -->
    <RelativeLayout
        android:id="@+id/rl_2"
        android:layout_width="match_parent"
        android:layout_height="200dp"
        android:background="#666699"
        android:layout_below="@+id/rl_1"
        android:padding="20dp">

        <View
            android:id="@+id/view_3"
            android:layout_width="match_parent"
            android:layout_height="match_parent"
            android:background="#ffffff"/>
    </RelativeLayout>
    <!--  布局3 -->
    <RelativeLayout
        android:id="@+id/rl_3"
        android:layout_width="match_parent"
        android:layout_height="200dp"
        android:background="#669999"
        android:layout_below="@+id/rl_2">
        <View
            android:layout_width="match_parent"
            android:layout_height="match_parent"
            android:background="#FFFFCC"
            android:layout_margin="30dp"/>
    </RelativeLayout>

</RelativeLayout>