卷积可视化
以ResNet为例:
对图片提取特征:

可视化第一层结果如下:

第一个卷积层是conv1_x的输出,图片轮廓较为清楚
第二、七个卷积层是conv2_x首个和末尾卷积层的输出,我们将其与第一个卷积层输出对比可以得到特征逐渐高层化的结论
第十五个卷积层是conv3_x的输出
第二十八个卷积层是conv4_x的输出
最后一个卷积层,其每个通道的像素仅仅为7x7,可视化也看不出什么东西。
参考连接:https://blog.csdn.net/Viraha_/article/details/120597339
源码如下:
import numpy as np
import torch
import torchvision
from PIL import Image
from torchvision import transforms as T
import matplotlib.pyplot as plt
import cv2

class SaveOutput:
    def __init__(self):
        self.outputs = []

    def __call__(self, module, module_in, module_out):
        self.outputs.append(module_out)

    def clear(self):
        self.outputs = []

# 这个函数是为了将64个通道的图像 放在一起  可视化呈现
def grid_gray_image(imgs, num_column: int):
    '''
        imgs shape: batch * size (e.g., 64x32x32, 64 is the number of the gray images, and (32, 32) is the size of each gray image)
    '''

    # num_row 是行数  num_column 是列数
    # 通道数 / 列数 = 行数
    num_row = imgs.shape[0]//num_column
    for i in range(num_row):
        img = imgs[i * num_column] # 先拿到每一行的第一个
        img = (img - img.min()) / (img.max() - img.min())
        for j in range(1, num_column):  # 从每一行的第二个开始
            tmp_img = imgs[ i * num_column + j]
            tmp_img = (tmp_img - tmp_img.min()) / (tmp_img.max() - tmp_img.min())
            img = np.hstack((img, tmp_img))  # 水平方向拼接 从左往右
        if i == 0:
            ans = img
        else:
            ans = np.vstack((ans, img)) # 垂直方向拼接  从上往下
    return ans

def main():
    # resnet
    feature_extractor = torchvision.models.resnet34(pretrained=True)
    if torch.cuda.is_available():
        feature_extractor.cuda()

    device = torch.device('cuda') if torch.cuda.is_available() else torch.device('cpu')
    # 为卷积层注册hook
    save_output = SaveOutput()
    hook_handles = []
    for layer in feature_extractor.modules():
        if isinstance(layer, torch.nn.Conv2d):
            handle = layer.register_forward_hook(save_output)
            hook_handles.append(handle)
    # 读入图像  resize  转为tensor
    image = Image.open('./cat.jpg')
    transform = T.Compose([T.Resize((224, 224)), T.ToTensor()])
    x = transform(image).unsqueeze(dim=0).to(device)
    # 提取到的特征
    out = feature_extractor(x)
    print(len(save_output.outputs))

    # 可视化第1、6、15、28、35层
    a_list = [0, 1, 6, 15, 28, 35]
    for i in a_list:
        print(save_output.outputs[i].cpu().detach().squeeze(0).shape)

    img0 = save_output.outputs[0].cpu().detach().squeeze(0)
    img0 = grid_gray_image(img0.numpy(), 8)
    # cv2.imshow("aaa",img0)
    # cv2.waitKey(0)
    # 可视化显示第一层
    plt.figure(figsize=(15, 15))
    plt.imshow(img0, cmap='gray')
    plt.show()

    # img1 = save_output.outputs[1].cpu().detach().squeeze(0)
    # img1 = grid_gray_image(img1.numpy(), 8)
    # plt.imshow(img1, cmap='gray')
    #
    # plt.show()
    # img6 = save_output.outputs[6].cpu().detach().squeeze(0)
    # img6 = grid_gray_image(img6.numpy(), 8)
    # img15 = save_output.outputs[15].cpu().detach().squeeze(0)
    # img15 = grid_gray_image(img15.numpy(), 16)
    # img29 = save_output.outputs[28].cpu().detach().squeeze(0)
    # img29 = grid_gray_image(img29.numpy(), 16)

if __name__ == '__main__':
    main()
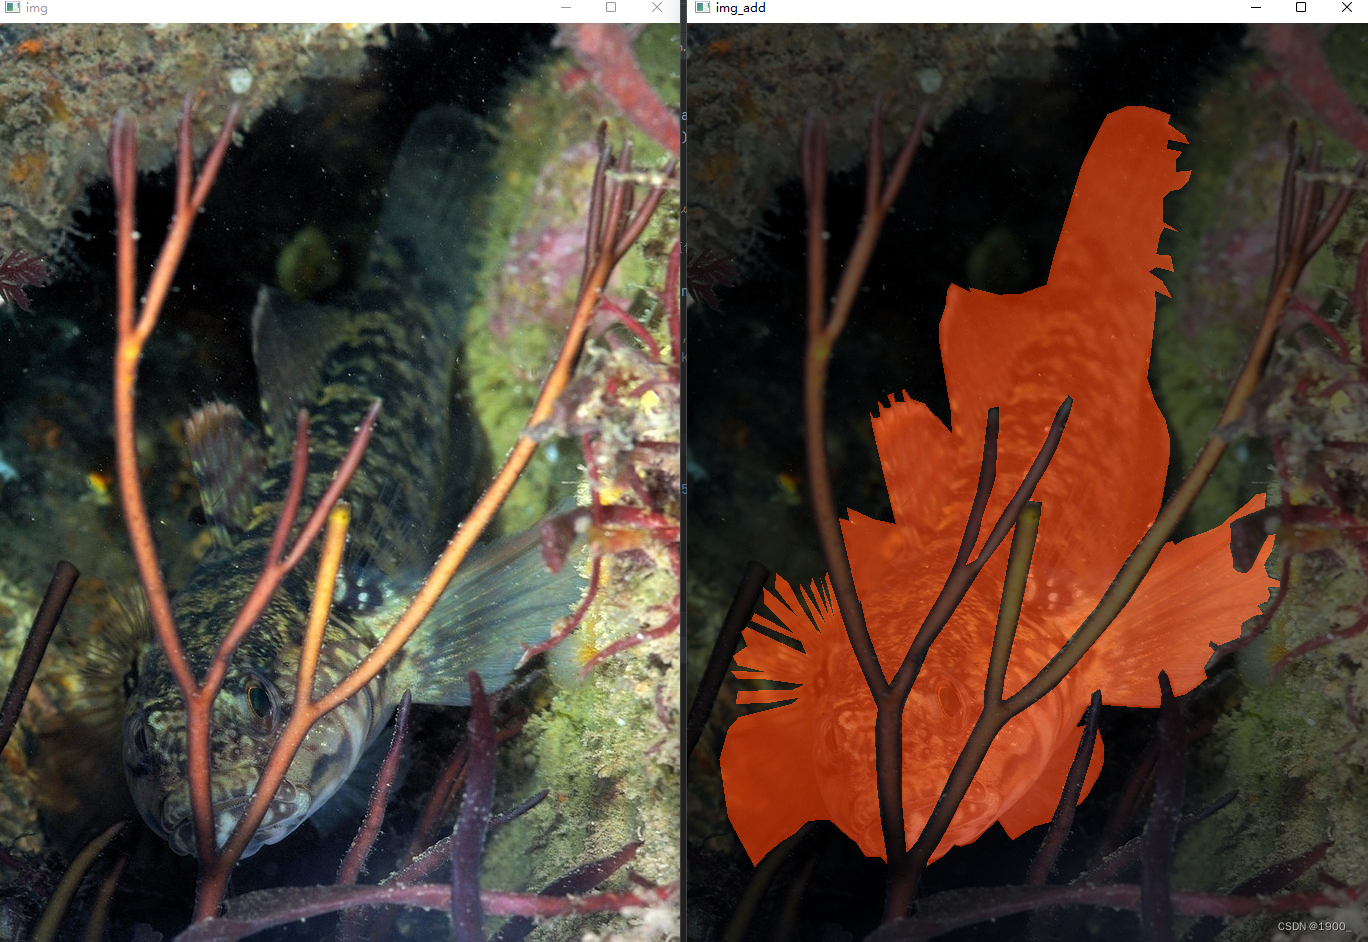
生成彩色掩码图
效果如下:
源码如下:
import os
import cv2
import numpy as np

# 参数设置
img_path = './mask_img/Img/'  # img
gt_path = './mask_img/GT/' # gt
save_path = './mask_img/mask/' #
img_name = 'xxxx.jpg'
# gt_name与save_name保持一致  一一对应
gt_name = 'xxxx.png'
save_name = "xxxx.png"
is_save = False

img = cv2.imread(img_path + img_name)  # 读入原始图片
gt = cv2.imread(gt_path + gt_name)  # 读入gt
cv2.imshow("gt",gt) # 二值化后
# 先处理mask 二值化
ret,binary = cv2.threshold(gt,100,255,cv2.THRESH_BINARY)
h, w, c = binary.shape
cv2.imshow("binary",binary) # 二值化后
# 生成一张纯黑色的图
img_red = np.zeros((h,w,3),dtype=np.uint8)

# 对应mask 将目标区域涂成彩色
for i in range(h):
    for j in range(w):
        if binary[i][j][0] > 0:
            img_red[i][j][2] = 255
            img_red[i][j][1] = 70
            img_red[i][j][0] = 0


cv2.imshow("img",img) # 原始图像
# 融合
img_add = cv2.addWeighted(img, 0.4, img_red, 0.6, 0)

cv2.imshow("img_add",img_add) # 融合之后图像
if is_save:
    cv2.imwrite(save_path + save_name, img_add)
cv2.waitKey(0)