一、信号处理器
import QtQuick 2.2
import QtQuick.Contrils 1.2

Rectangle {
  width: 320;
  height: 240;
  color: "gray";

  Button {
    text: "Quit";
    anchors.centerIn: parent;
    onClicked: {  //a
      Qt.quit();  //b
    }
  }
}
信号处理器,其实等价于Qt中的槽,上述代码中a处就是一个信号处理器,可以看到它是大括号包围起来的代码块,可以将其理解为匿名函数。
信号处理器一般是on<Signal>这种形式(信号首字母大写),上述代码中a处,Button对象有信号:clicked(),所以其对应的信号处理器为onClicked: {}。
上述代码b处,Qt对象是Qt Quick导出到QML环境中的对象,它的quit()方法用于退出应用。
本文福利,莬费领取Qt开发学习资料包、技术视频,内容包括(C++语言基础,C++设计模式,Qt编程入门,QT信号与槽机制,QT界面开发-图像绘制,QT网络,QT数据库编程,QT项目实战,QSS,OpenCV,Quick模块,面试题等等)↓↓↓↓↓↓见下面↓↓文章底部点击莬费领取↓↓
二、附加信号处理器
信号处理器放在拥有信号的元素内部,当元素信号发射时,处理器被调用;如果要处理的信号不是当前元素发出来的,而是其它类型(对象),比如Keys,这就是附加信号处理器。
在QML语法中,有一个附加属性和附加信号处理器的概念,这是附加到一个对象上的额外的属性。
从本质上来讲,这些属性是由附加类型来实现和提供的,它们可能被附加到另一种类型的对象上。
附加属性与普通属性的区别在于,对象的属性普遍是由对象本身或其基类(或沿继承层级向上追溯的祖先)提供的。
import QtQuick 2.2

item {
  width: 100;
  height: 100;

  focus: true;
  Keys.enabled: false;
  Keys.onReturnPressed: console.log("Return key was pressed");
}上述代码中,enable是Keys对象的一个属性,onReturnPressed是Keys对象的returnPressed信号的附加信号处理器,returnPressed信号是Keys对象发出来的,不是item对象发出来的,所以onReturnPressed: {}就是附加信号处理器。
对于附加信号处理器,和普通信号处理器有所不同。普通信号处理器,你只要知道信号名字,然后按照on<Signal>语法来定义信号处理器的名字即可;而附加信号处理器,则要遵循<AttachingType>.on<Signal>语法。
Component对象也有一些附加信号,如complated()、destruction(),可以用来在Component创建完成或销毁时执行一些JS代码来做初始化或反初始化相关的工作,例如:

Rectangle { Component.onCompleted: console.log("Completed!"); Component.onDestruction: console.log(Destruction!); }
三、Connections
信号处理器与附加信号处理器有一个共性:响应信号的代码都放在元素内部,通过JS代码块就地实现,Qt Quick还有另一种方式来处理信号与槽,那就是:专业的Connections
使用信号处理器处理QML信号,都是用on<Signal>这种就地代码块的方式,而在有些情况下,这样的处理并不方便,例如:
你需要将多个对象连接到同一个QML信号上;
你需要在发出信号的对象的作用域之外来建立连接;
发射信号的对象没有在QML中定义(可能是通过C++导出的)
Connections有一个属性:target,它指向发出信号的对象。
Connections {
target: area;
on<Signal>: function or code block;
}
实例:界面防止两个文本,一个按钮,每点击按钮一次,两个文本对象都变颜色,而他们的颜色是随机的
import QtQuick 2.2
import QtQuick.Controls 2.0

Rectangle {
    width: 320;
    height: 240;
    color: "gray";

    Text {
        id: text1;
        anchors.horizontalCenter: parent.horizontalCenter;
        anchors.top: parent.top;
        anchors.topMargin: 20;
        text: qsTr("text one");
        color: "blue";
        font.pixelSize: 28;
    }

    Text {
        id: text2;
        anchors.horizontalCenter: parent.horizontalCenter;
        anchors.top: text1.bottom;
        anchors.topMargin: 8;
        text: qsTr("text two");
        color: "blue";
        font.pixelSize: 28;
    }

    Button {
        id: changeButton;
        anchors.top: text2.bottom;
        anchors.topMargin: 8;
        anchors.horizontalCenter: parent.horizontalCenter;
        text: "Change";
    }

    Connections {
        target: changeButton;
        onClicked: {
            text1.color = Qt.rgba(Math.random(),Math.random(),Math.random(),1);
            text2.color = Qt.rgba(Math.random(),Math.random(),Math.random(),1);
        }
    }
}
四、信号查询
(1)Qt帮助文档
例如Button,检索Button,沿层级继承关系向上索引
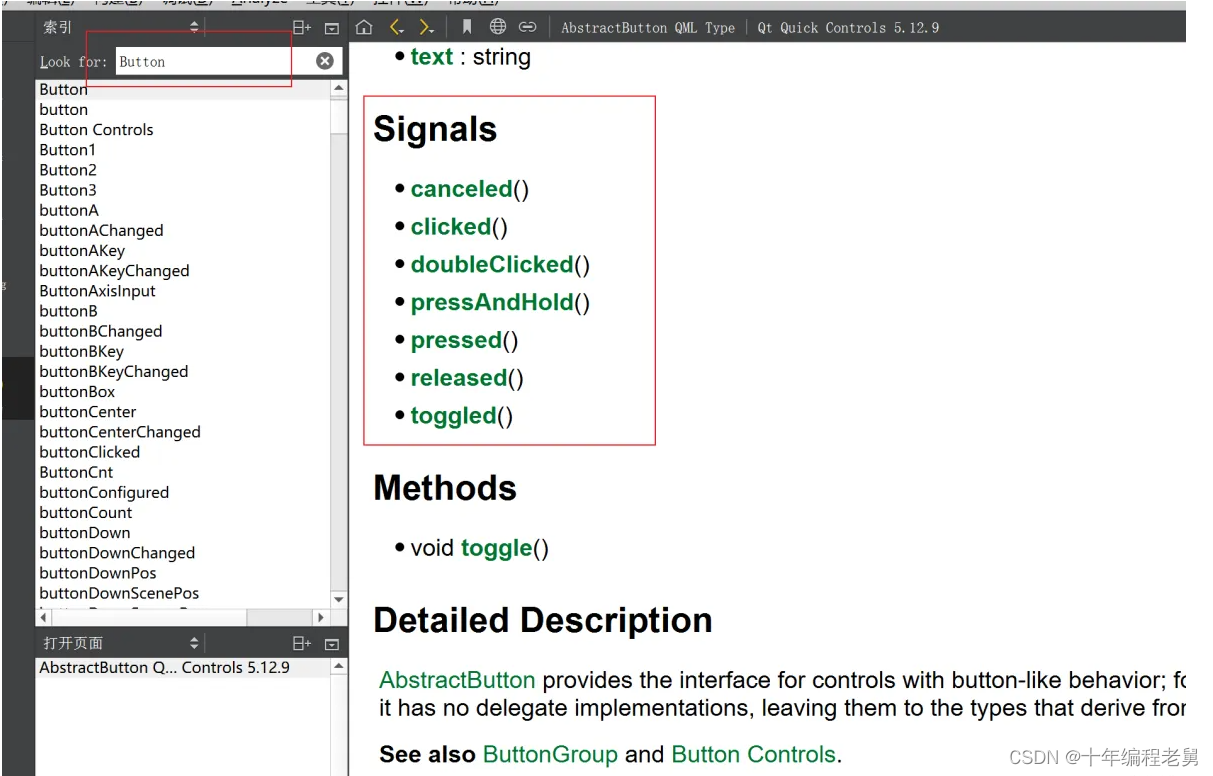
Qt帮助中说,属性变化是会自动发出一个信号,形如<property>Changed,它对应的信号处理器形如on<Property>Changed,比如Text元素有一个text属性,你可以写一个名为onTextChanged的信号处理器,但是不见得每个属性都好使,需要自己仔细测试。
(2)从Qt Quick头文件查看属性相关的信号
Qt Quick中你看到的很多对象,都是在Qt C++中实现,然后导入到QML环境中的。所以,如果你关心那些被文档隐藏了的信号,你可以这么做:
找到QML类型对象的C++类型;
找到C++类型的头文件,查看属性声明来确认是否有信号与属性关联;
使用Component.onCompleted附加信号,在附加信号处理器中输出类型信息,例如:
import QtQuick 2.2
import QtQuick.Controls 2.0

Rectangle {
    width: 320;
    height: 240;
    color: "gray";

    Text {
        id: text1;
        anchors.centerIn: parent;
        text: qsTr("Hello World");
        color: "blue";
        font.pixelSize: 32;
    }

    Button {
        id: button1;
        text: "A Button";
        anchors.top: text1.bottom;
        anchors.topMargin: 4;
    }

    Image {
        id: image1;
    }

    Component.onCompleted: {
        console.log("QML Text\'s C++ type - ", text1);
        console.log("QML Button\'s C++ type - ", button1);
        console.log("QML Image\'s C++ type - ", image1);
    }
}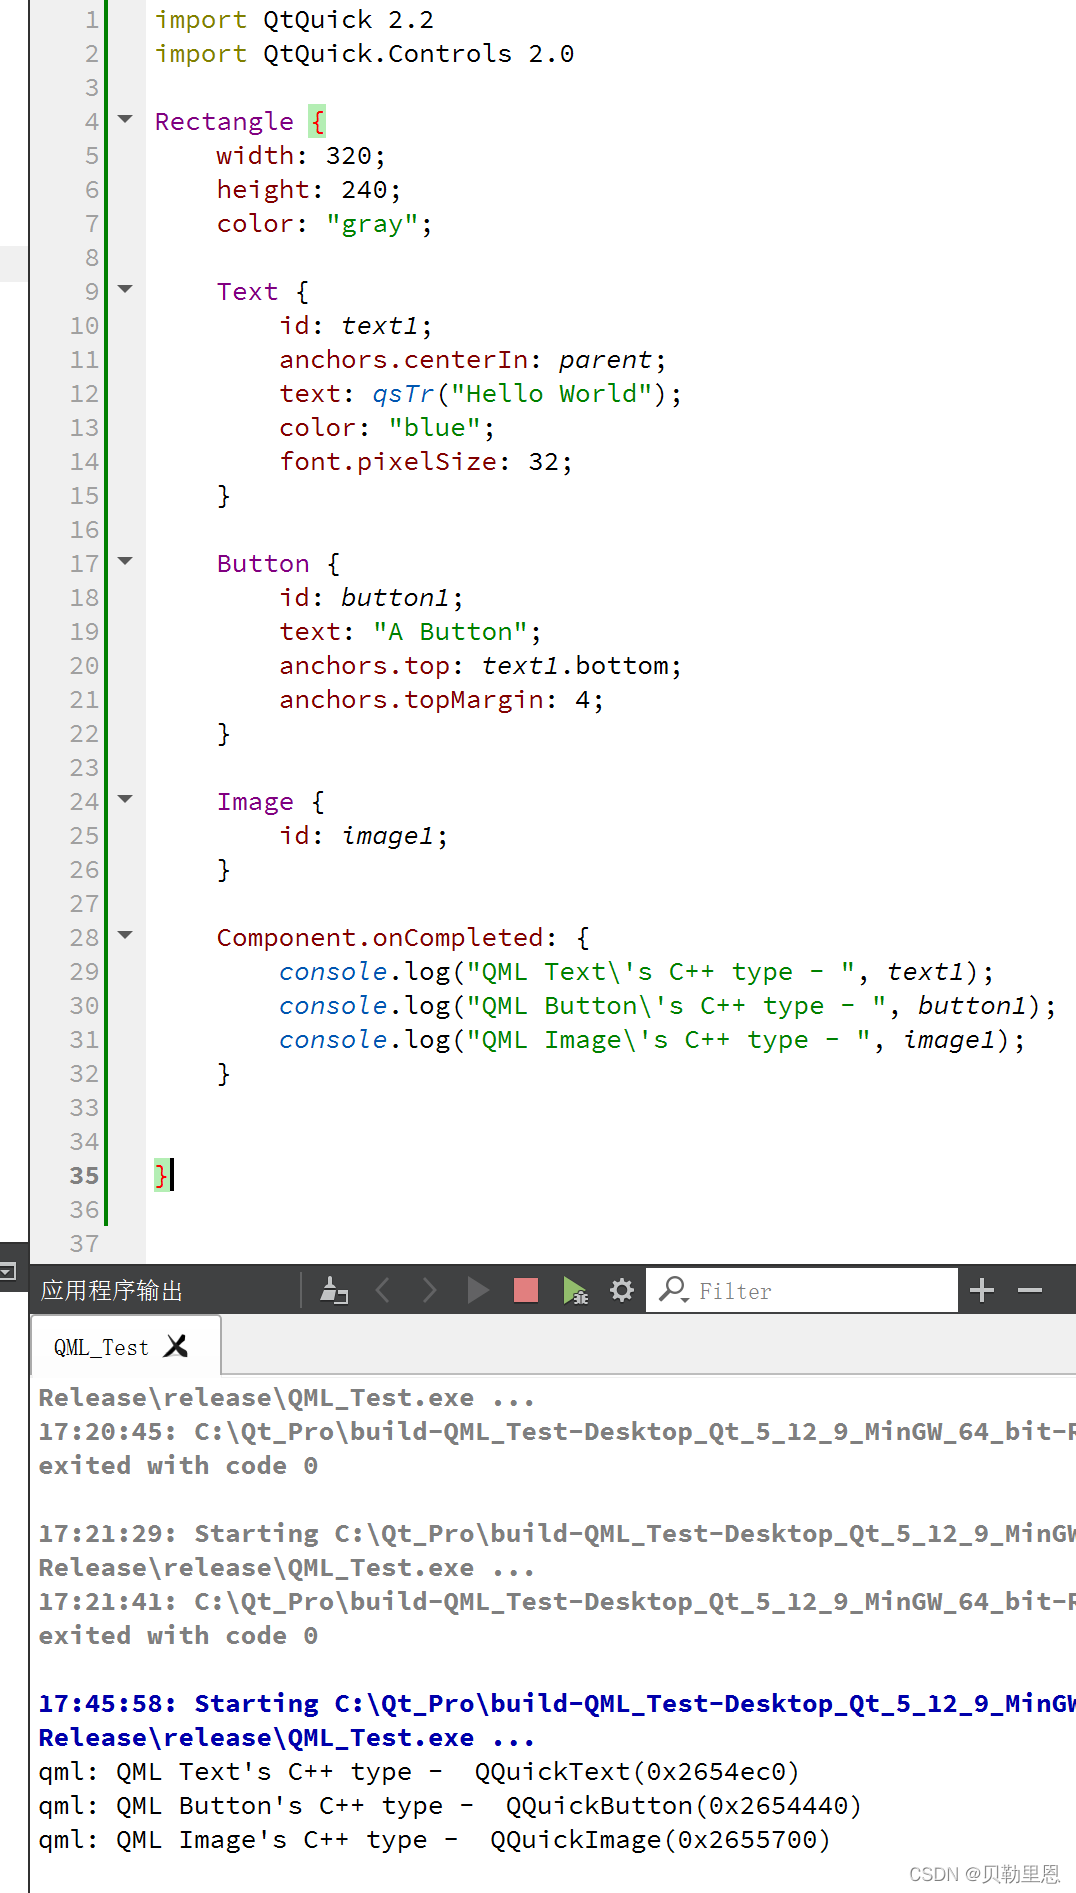
知道了QML Text对应的C++类型是QQuickText,就可以去安装路径中寻找类文件(安装路径不同,路径会有差异,根据自身情况而定)
C:\Qt\Qt5.12.9\5.12.9\mingw73_64\include\QtQuick\5.12.9\QtQuick\private

五、自定义信号
如果自己定义新的QML类型,可以使用signal关键字给你的类型添加信号,语法如下:
signal <name>[([<type> <parameter name>[,...]])]信号其实就是个方法(函数),所以它的发射实际是通过以信号名为名的方法达成的。
实例:界面上放一个字符串、两个代表颜色的小方块,点方块,字符串的颜色就变成小方块的颜色
import QtQuick 2.2

Rectangle {
    width: 320;
    height: 240;
    color: "#C0C0C0";

    Text {
        id: coloredText;
        anchors.horizontalCenter: parent.horizontalCenter;
        anchors.top: parent.top;
        anchors.topMargin: 4;
        text: qsTr("Hello World");
        font.pixelSize: 32;
    }

    Component {
        id: colorComponent;
        Rectangle {
            id: colorPicker;
            width: 50;
            height: 30;
            signal colorPicked(color clr);
            MouseArea {
                anchors.fill: parent;
                onPressed: colorPicker.colorPicked(colorPicker.color);
            }
        }
    }

    Loader {
        id: redLoader;
        anchors.left: parent.left;
        anchors.leftMargin: 4;
        anchors.bottom: parent.bottom;
        anchors.bottomMargin: 4;
        sourceComponent: colorComponent;
        onLoaded: {
            item.color = "red";
        }
    }

    Loader {
        id: blueLoader;
        anchors.left: redLoader.right;
        anchors.leftMargin: 4;
        anchors.bottom: parent.bottom;
        anchors.bottomMargin: 4;
        sourceComponent: colorComponent;
        onLoaded: {
            item.color = "blue";
        }
    }

    Connections {
        target: redLoader.item;
        onColorPicked: {
            coloredText.color = clr;
        }
    }

    Connections {
        target: blueLoader.item;
        onColorPicked: {
            coloredText.color = clr;
        }
    }

}
Component定义了一个组件,组件内定义了一个Rectangle对象,定义了信号colorPicked;
在Rectangle对象中的鼠标区域(MouseArea)的onPressed信号处理器中调用了信号,所以信号的触发就是一个函数调用;
组件是可以重复利用的,一个组件可以在一个单独的QML文件中定义,也可以嵌入到其它QML文档中来定义,以方便简单组件的使用;
定义好了组件,就可以使用Loader来加载组件;
Loader是专门用来动态创建组件的,它可以从QML文件中创建组件,也可以指定sourceComponent来创建;
Loader中的onLoader事件处理器中的item,实际就是它Loader创建的对象(colorComponent);
使用Connections来建立信号的连接,target指向Loader对象的item属性,因为item是指向colorComponent,所以可以使用onColorPicked信号处理器(自定义的信号);
因为定义的信号带有名为clr的参数,所以Connections的信号处理器可以直接使用clr来给coloredText对象的color属性赋值;
本文福利,莬费领取Qt开发学习资料包、技术视频,内容包括(C++语言基础,C++设计模式,Qt编程入门,QT信号与槽机制,QT界面开发-图像绘制,QT网络,QT数据库编程,QT项目实战,QSS,OpenCV,Quick模块,面试题等等)↓↓↓↓↓↓见下面↓↓文章底部点击莬费领取↓↓
六、信号与槽的连接
前面我们使用信号时,要么通过信号处理器,要么使用Connections对象。其实在QML中还有一种更一般的方式,在QML中,其实signal是个对象,它也有一个connect()方法,可以使用它连接到任意的方法上,有connect()和disconnect();
signal对象的connect()方法允许你连接一个信号到另外一个信号或者方法。当信号发射时,连接到信号上的其它信号或者方法会被调用;
signal对象的这种连接方式,使用起来比信号处理器更加灵活,信号处理器与信号是一对一的关系,而signal对象的这种连接方式,使得一个信号能够连接多个方法;
信号连接方法示例
import QtQuick 2.2

Rectangle {
    id: relay;

    signal messageReceived(string person, string notice);

    Component.onCompleted: {
        relay.messageReceived.connect(sengToPost);
        relay.messageReceived.connect(sengToTelegraph);
        relay.messageReceived.connect(sengToEmail);
    }

    function sengToPost(person, notice) {
        console.log("Sending to post: " + person + ", " + notice);
    }
    function sengToTelegraph(person, notice) {
        console.log("Sending to telegraph: " + person + ", " + notice);
    }
    function sengToEmail(person, notice) {
        console.log("Sending to email: " + person + ", " + notice);
    }
}
信号连接信号示例
import QtQuick 2.2

Rectangle {
    id: forwarder;

    signal send();
    onSend: {
        console.log("Send clicked");
    }

    MouseArea {
        id: mousearea;
        anchors.fill: parent;
        onClicked: {
            console.log("MouseArea clicked");
        }
    }

    Component.onCompleted: {
        mousearea.clicked.connect(send);
    }

}我们给Rectangle定义了一个信号send(),在Component.onCompleted附加信号处理器中,吧MouseArea对象的clicked信号连接到了Rectangle的send()信号上;
七、鼠标事件
与以前的窗口部件不同,在QML中如果一个元素想要处理鼠标事件,则要在其上放置一个MouseArea元素,也就是说,用户只能在MouseArea确定的范围内进行鼠标的动作。
(1)Rect.qml
import QtQuick 2.0

Rectangle {
    width: 50; height: 50
    color: "teal"
    MouseArea {
        anchors.fill: parent
        /*拖拽属性设置*/  //(a)
        drag.target: parent
        drag.axis: Drag.XAxis
        drag.minimumX: 0
        drag.maximumX: 360 - parent.width
        acceptedButtons: Qt.LeftButton | Qt.RightButton  //(b)
        onClicked: {
            if(mouse.button === Qt.RightButton){  //(c)
                parent.color = "blue"
                parent.width -= 5
                parent.height -= 5
            }else if((mouse.button === Qt.LeftButton)&&(mouse.modifiers & Qt.ShiftModifier)) {  //(d)
                parent.color = "teal"
                parent.width = 50
                parent.height = 50
            }else {
                parent.color = "green"
                parent.width += 5
                parent.he  += 5
            }
        }
    }
}(a)拖拽属性设置:MouseArea中的drag分组属性提供了一个使元素可被拖拽的简便方法。drag.target属性用来指定被拖拽的元素的id(这里为parent表示被拖拽的就是所在元素本身);drag.active属性获取元素当前是否正在被拖拽的信息;drag.axis属性用来指定拖拽的方向,可以是水平方向(Drag.XAxis)、垂直方向(Drag.YAxis)或者两个方向都可以(Drag.XandYAxis);drag.minimumX和drag.maximumX限制了元素在指定方向上被拖拽的范围。
(b)acceptedButtons:Qt.LeftButton | Qt.RightButton:MouseArea所能接受的鼠标按键,可取的值有Qt.LeftButton(鼠标左键)、Qt.RightButton(鼠标右键)和Qt.MiddleButton(鼠标中键)。
(c)mouse.button:为MouseArea信号中所包含的鼠标事件参数,其中mouse为鼠标事件对象,可以通过它的x和y属性获取鼠标当前的位置;通过button属性获取按下的按键。
(d)mouse.modigiers & Qt.ShiftModifier:通过modifiers属性可以获取按下的键盘修饰符,modifiers的值由多个按键进行位组合而成,在使用时需要将modifiers与这些特殊的按键进行按位与来判断按键,常用的按键有Qt.NoModifier(没有修饰键)、Qt.ShiftModifier(一个Shift键)、Qt.ControlModifier(一个Ctrl键)、Qt.AltModifier(一个Alt键)。
(2)MainForm.qml
import QtQuick 2.7

Rectangle {
    width: 360; height: 360
    property alias mouseArea: mouseArea

    MouseArea {
        id: mouseArea
        anchors.fill: parent
    }

   Rect {
       x: 25; y: 25
       opacity: (360.0 - x)/360
   }

}
(3)运行效果
八、键盘事件
当一个按键按下或释放时,会产生一个键盘事件,并将其传递给获得了焦点的QML元素。在QML中,Keys属性提供了基本的键盘事件处理器,所有可视化元素都可以通过它来进行按键处理。
(1)MainForm.qml
import QtQuick 2.7

Rectangle {
    width: 360; height: 360
    property alias mouseArea: mouseArea

    MouseArea {
        id: mouseArea
        anchors.fill: parent
    }

   Row {
       x: 50; y: 50
       spacing: 30
       Rectangle {
           id: music
           width: 100; height: 100
           radius: 6
           color: focus ? "red" : "lightgray"

           scale: focus ? 1 : 0.8
           focus: true
           KeyNavigation.tab: play  //(a)
           /*移动图标位置*/  //(b)
           Keys.onUpPressed: music.y -= 10
           Keys.onDownPressed: music.y += 10
           Keys.onLeftPressed: music.x -= 10
           Keys.onRightPressed: music.x += 10
           Text {
               anchors.centerIn: parent
               color: parent.focus ? "black" : "gray"
               font.pixelSize: 20
               text: "音乐"
           }
       }

       Rectangle {
           id: play
           width: 100; height: 100
           radius: 6
           color: focus ? "green" : "lightgray"

           scale: focus ? 1 : 0.8
           KeyNavigation.tab: movie
           /*移动图标位置*/
           Keys.onUpPressed: play.y -= 10
           Keys.onDownPressed: play.y += 10
           Keys.onLeftPressed: play.x -= 10
           Keys.onRightPressed: play.x += 10
           Text {
               anchors.centerIn: parent
               color: parent.focus ? "black" : "gray"
               font.pixelSize: 20
               text: "游戏"
           }
       }

       Rectangle {
           id: movie
           width: 100; height: 100
           radius: 6
           color: focus ? "blue" : "lightgray"

           scale: focus ? 1 : 0.8
           KeyNavigation.tab: music
           /*移动图标位置*/
           Keys.onUpPressed: movie.y -= 10
           Keys.onDownPressed: movie.y += 10
           Keys.onLeftPressed: movie.x -= 10
           Keys.onRightPressed: movie.x += 10
           Text {
               anchors.centerIn: parent
               color: parent.focus ? "black" : "gray"
               font.pixelSize: 20
               text: "影视"
           }
       }

   }
}(a)KeyNavigation.tab: play:QML中的KeyNavigation元素是一个附加属性,可以用来实现使用方向键或Tab键来进行元素的导航。它的子属性有backtab、down、left、priority、right、tab和up等,本例中使用tab属性设置焦点转移次序,“KeyNavigation.tab: play”表示按下Tab键,焦点转移到id为“play”的元素(“游戏”图标)。
(b)/*移动图标位置*/:这里使用Keys熟悉来进行按下方向键后的事件处理,它也是一个附加属性,对QML所有的基本可视元素均有效。Keys属性一般与focus属性配合使用,只有当focus值为true时,它才起作用,由Keys属性获取相应键盘事件的类型,进而决定所要进行的操作。本例中Keys.onUpPressed表示方向键↑被按下的事件,相应地执行该元素y坐标-10(上移)操作,其余方向的操作与之类同。
(2)运行效果

九、输入控件与焦点
QML用于接收键盘输入的有两个元素:TextInput和TextEdit。TextInput是单行文本输入框,支持验证器、输入掩码和现实模式等,与QLineEdit不同,QML的文本输入元素只有一个闪动的光标和用户输入的文本,没有边框等可视元素。因此,为了能够让用户意识到这是一个可输入元素,通常需要一些可视化修饰,比如绘制一个矩形框,但更好的办法是创建一个组件,组件被定义好后可在编程中作为“输入控件”直接使用,效果与可视化设计的文本框一样。
(1)TextBox.qml
import QtQuick 2.0

FocusScope {
    property alias label: label.text
    property alias text: input.text
    Row {
        spacing: 5
        Text {
            id: label
            text: "标签"
        }
        Rectangle {
            width: 100; height: 20
            color: "white"
            border.color: "gray"
            TextInput {
                id: input
                anchors.fill: parent
                anchors.margins: 4
                focus: true
                text: "请输入内容..."
            }
        }
    }
}
(2)MainForm.qml
import QtQuick 2.7

Rectangle {
    property alias mouseArea: mouseArea
    width: 360; height: 360
    color: "lightgray"

    MouseArea {
        id: mouseArea
        anchors.fill: parent
    }

    TextBox {
        id: tBx1
        x: 25; y: 25
        focus: true
        label: "学号"
        text: focus ? "" : "请输入内容..."

        KeyNavigation.tab: tBx2
    }

    TextBox {
        id: tBx2
        x: 25; y: 60
        label: "姓名"
        text: focus ? "" : "请输入内容..."

        KeyNavigation.tab: tBx1
    }

}
(3)运行效果
TextEdit与TextInput非常类似,唯一的区别是:TextEdit是多行的文本编辑组件。与TextInput一样,它没有一个可视化的显示,所以用户在使用时也要像上述步骤一样将它定制成一个复合组件,然后使用。
十、定时器
在QML中,Timer类代表定时器,使用起来也很简单,响应器triggered信号即可。
interval:指定定时周期,单位是ms,默认值是1000ms;
repeat:设定定时器是周期性触发还是一次性触发,默认是一次性的;
running:设置为true定时器就开始工作,设置为false就歇菜,默认值是false;
triggeredOnStart:设置为true,那么定时器开始执行时立马先触发一次,默认值是false;
Timer还有start()、stop()、restart()三个方法可以调用;
import QtQuick 2.2
import QtQuick.Controls 2.0

Rectangle {
    width: 320;
    height: 240;
    color: "gray";

    QtObject {
        id: attrs;
        property int counter;
        Component.onCompleted: {
            attrs.counter = 10;
        }
    }

    Text {
        id: countShow;
        anchors.centerIn: parent;
        color: "blue";
        font.pixelSize: 40;
    }

    Timer {
        id: countDown;
        interval: 1000;
        repeat: true;
        triggeredOnStart: true;
        onTriggered: {
            countShow.text = attrs.counter;
            attrs.counter -= 1;
            if(attrs.counter < 0) {
                countDown.stop();
                countShow.text = "Clap Now!";
            }
        }
    }

    Button {
        id: startButton;
        anchors.top: countShow.bottom;
        anchors.topMargin: 20;
        anchors.horizontalCenter: countShow.horizontalCenter;
        text: "start";
        onClicked: {
            attrs.counter = 10;
            countDown.start();
        }
    }


}
十一、触摸事件
前面介绍的时间都是电脑上常用的事件,接下来介绍在智能手机上常用的触摸事件。
PinchArea(捏拉手势)
属性
PinchArea是Item的派生类,除了继承自Item的属性外,还有两个专属属性:enabled和pinch;
enabled属性的默认值是true,如果设置为false,那么PinchArea就不起作用,捏拉区域对鼠标、触摸事件就变透明了;
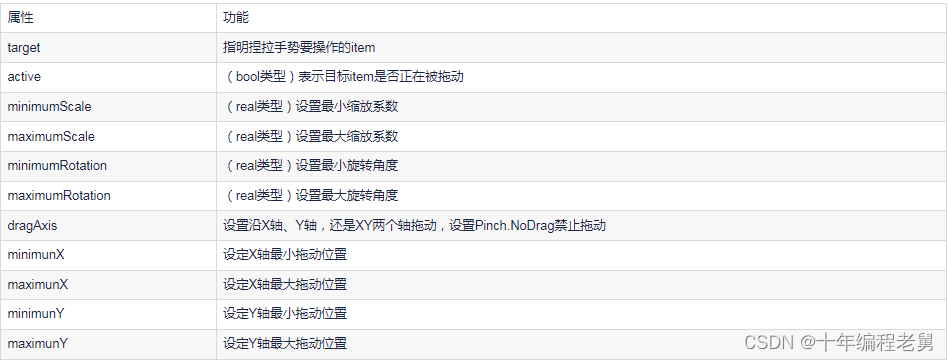
pinch属性描述捏拉手势的详情,它是一个组合属性,包含:
信号
PinchArea有三个信号:pinchStarted()、pinchUpdated()、pinchFinished(),他们都有一个名为pinch的参数,类型是PinchEvent;
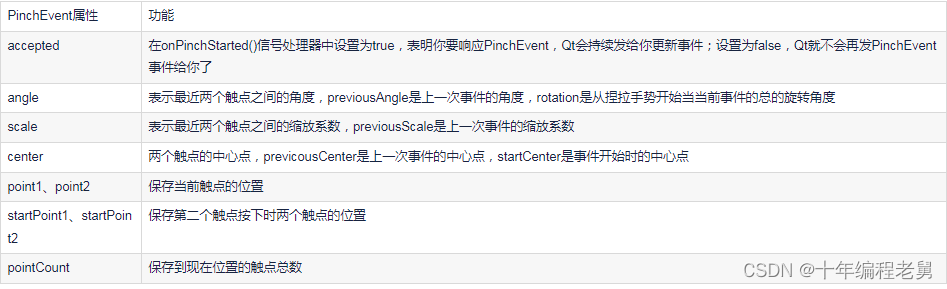
pinchStarted()信号在第一次识别到捏拉手势时发出,如果你要处理它,那就要将pinch参数的accepted属性设置为true;
当你在onPinchStarted()信号处理器中接收了TouchEvent事件后,Qt就会不断地发送新事件给你,pinchUpdated()信号就会不断地发射,你可以在它的信号处理器中通过pinch参数,摘取你需要的值来更新PinchArea寄生的Item的状态;
pinchFinished()信号在用户手指离开屏幕时触发;
使用
要想使用PinchArea来变换一个Item,有两个办法:
设定target属性,将其指向要变换的Item,然后PinchArea就会在合适的时候帮你变换它;
处理pinchStarted()、pinchUpdated()、pinchFinished()信号,在信号处理器中变换目标Item,这种方式更灵活,甚至可以同时处理多个Item;
选定一种方式后,你可能还要配置PinchArea.pinch属性,给不同的参数设置合理的值,比如说最大可以放大到多少倍。
缩放与旋转实例
(1)使用pinch.target
使用pinch.target这种方式,你什么都不用关心,甚至不需要弄明白pinch属性到底是什么含义,就可以得到一个不错的变换效果,Qt Quick默认帮你处理所有的事情。
import QtQuick 2.2
import QtQuick.Controls 2.0

Rectangle {
    width: 360;
    height: 360;
    focus: true;

    Rectangle {
        width: 100;
        height: 100;
        color: "blue";
        id: transformRect;
        anchors.centerIn: parent;
    }

    PinchArea {
        anchors.fill: parent;
        pinch.maximumScale: 20;
        pinch.minimumScale: 0.2;
        pinch.maximumRotation: 90;
        pinch.minimumRotation: 0;
        pinch.target: transformRect;
    }
}
(2)使用信号
import QtQuick 2.2
import QtQuick.Controls 2.0

Rectangle {
    width: 360;
    height: 360;
    focus: true;

    Rectangle {
        width: 100;
        height: 100;
        color: "blue";
        id: transformRect;
        anchors.centerIn: parent;
    }

    PinchArea {
        anchors.fill: parent;
        pinch.maximumScale: 20;
        pinch.minimumScale: 0.2;
        pinch.maximumRotation: 90;
        pinch.minimumRotation: 0;

        onPinchStarted: {
            pinch.accepted = true;
        }

        onPinchUpdated: {
            transformRect.scale *= pinch.scale;
            transformRect.rotation += pinch.rotation;
        }

        onPinchFinished: {
            transformRect.scale *= pinch.scale;
            transformRect.rotation += pinch.rotation;
        }

    }
}
多点触摸
MultiPointTouchArea本身是一个不可见的Item,可以放在其他可见的Item内来跟踪多点触摸;使用MultiPointTouchArea的一种方式是定义一系列的触摸点,将它们和其它Item绑定。

import QtQuick 2.12
import QtQuick.Window 2.12

Window {
    visible: true
    width: 640
    height: 480

    MultiPointTouchArea {
        anchors.fill: parent;
        touchPoints: [
            TouchPoint {id: tp1;},
            TouchPoint {id: tp2;},
            TouchPoint {id: tp3;}
        ]
    }

    Image {
        source: "qrc:/Image/Sources/1.png"
        x: tp1.x;
        y: tp1.y;
    }

    Image {
        source: "qrc:/Image/Sources/1.png"
        x: tp2.x;
        y: tp2.y;
    }

    Image {
        source: "qrc:/Image/Sources/1.png"
        x: tp3.x;
        y: tp3.y;
    }

}
上述代码使用了三个Image对象显示图标,定义了三个TouchPoint,Image对象的x、y属性和TouchPoint的x、y绑定,这样手指在手机的触摸屏上移动时,图标就会跟着手指移动;
MultiPointTouchArea还有很多pressed、released、updated、touchUpdated、canceled、gestureStarted等信号:
pressed信号:在有新触点诞生时触发,比如你先按下一个手指,稍等会再按下另一个手指,就会触发两次;当然如果设置minimumTouchPoints属性是2,那么只有按下两个手指后才会触发这个信号;
released信号:和pressed信号相对于;
update信号:在已有触点位置变化时触发,比如你两个手指在屏幕上划来划去,就会不停地触发这个信号;它的touchPoints参数是一个列表,包含了更新的触点
touchUpdated信号:在有新增触点,已有触点移动、释放、取消时都会触发;它的参数也是touchPoints。
canceled信号:如果别的Item偷走了你的触摸事件,就会触发canceled信号。例如在Flickable里放了一个MultiPointTouchArea,它的触点就可能被Flickable偷走;参数touchPoints包含了取消的触点信息。
gestureStarted信号:多用于MultiPointTouchArea嵌套在Flickable或另外的MultiPointTouchArea中这些情景中。在你收到这个信号时,有权决定是否霸占当前触点,如果不霸占,那么它们就可以被外围的MultiPointTouchArea或Flickable处理。gestureStarted信号的参数是GestureEvent类型的gesture,想独占的话就在onGestureStarted信号处理器内调用gesture.grab()。
本文福利,莬费领取Qt开发学习资料包、技术视频,内容包括(C++语言基础,C++设计模式,Qt编程入门,QT信号与槽机制,QT界面开发-图像绘制,QT网络,QT数据库编程,QT项目实战,QSS,OpenCV,Quick模块,面试题等等)↓↓↓↓↓↓见下面↓↓文章底部点击莬费领取↓↓