LVM就是动态卷管理,可以将多个硬盘和硬盘分区做成一个逻辑卷,并把这个逻辑卷作为一个整体来统一管理,动态对分区进行扩缩空间大小,安全快捷方便管理。 后期出现问题恢复数据也比较麻烦。
概念:
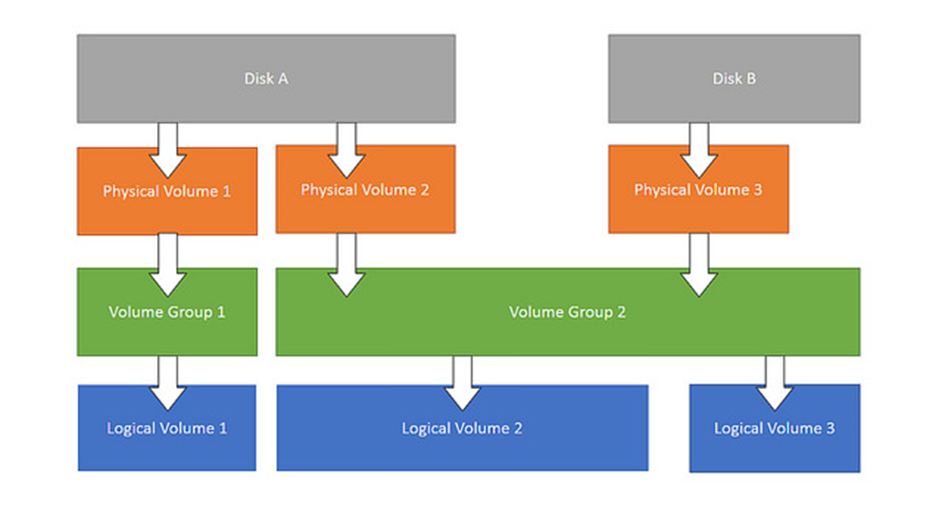
①PE(Physical Extend) 物理拓展
②PV(Physical Volume) 物理卷
③VG(Volume Group) 卷组
④LV(Logical Volume) 逻辑卷
特点:
LVM最大的特点就是可以对磁盘进行动态管理。因为逻辑卷的大小是可以动态调整的,而且不会丢失现有的数据。我们如果新增加了硬盘,其也不会改变现有上层的逻辑卷。作为一个动态磁盘管理机制,逻辑卷技术大大提高了磁盘管理的灵活性!
原理:
(1)物理磁盘被格式化为PV,空间被划分为一个个的PE
(2)不同的PV加入到同一个VG中,不同PV的PE全部进入到了VG的PE池内
(3)LV基于PE创建,大小为PE的整数倍,组成LV的PE可能来自不同的物理磁盘
(4)LV现在就直接可以格式化后挂载使用了
(5)LV的扩充缩减实际上就是增加或减少组成该LV的PE数量,其过程不会丢失原始数据
工作流程:
磁盘分区-->创建物理卷-->划分为卷组-->划分成逻辑卷-->格式化、挂载-->扩容。
实例:
首先从磁盘/sdb划分三个分区,每个磁盘为1G,把类型改变为8e,也就是lvm类型。只要改变分区类型,才能去做物理卷。
1、安装lvm软件包
2、fdisk /dev/sdb
3、n 创建三个新分区,分别1G
4、t 改变分区类型为8e
[root@linux-xl ~]# yum install -y lvm2-2.02.177-4.el7.x86_64
[root@linux-xl ~]# fdisk /dev/sdb
Welcome to fdisk (util-linux 2.23.2).
Changes will remain in memory only, until you decide to write them.
Be careful before using the write command.
Device does not contain a recognized partition table
Building a new DOS disklabel with disk identifier 0x342d0935.
Command (m for help): n
Partition type:
p primary (0 primary, 0 extended, 4 free)
e extended
Select (default p):
Using default response p
Partition number (1-4, default 1):
First sector (2048-20971519, default 2048):
Using default value 2048
Last sector, +sectors or +size{K,M,G} (2048-20971519, default 20971519): +1G
Partition 1 of type Linux and of size 1 GiB is set
Command (m for help): t
Selected partition 1
Hex code (type L to list all codes): 8e
Changed type of partition 'Linux' to 'Linux LVM'
Command (m for help): n
Partition type:
p primary (1 primary, 0 extended, 3 free)
e extended
Select (default p): p
Partition number (2-4, default 2): 2
First sector (2099200-20971519, default 2099200):
Using default value 2099200
Last sector, +sectors or +size{K,M,G} (2099200-20971519, default 20971519): +1G
Partition 2 of type Linux and of size 1 GiB is set
Command (m for help): t
Partition number (1,2, default 2):
Hex code (type L to list all codes): 8e
Changed type of partition 'Linux' to 'Linux LVM'
Command (m for help): n
Partition type:
p primary (2 primary, 0 extended, 2 free)
e extended
Select (default p): p
Partition number (3,4, default 3): 3
First sector (4196352-20971519, default 4196352):
Using default value 4196352
Last sector, +sectors or +size{K,M,G} (4196352-20971519, default 20971519): +1G
Partition 3 of type Linux and of size 1 GiB is set
Command (m for help): t
Partition number (1-3, default 3): 3
Hex code (type L to list all codes): 8e
Changed type of partition 'Linux' to 'Linux LVM'
Command (m for help): w
The partition table has been altered!
Calling ioctl() to re-read partition table.
WARNING: Re-reading the partition table failed with error 16: Device or resource busy.
The kernel still uses the old table. The new table will be used at
the next reboot or after you run partprobe(8) or kpartx(8)
Syncing disks.
[root@linux-xl ~]# fdisk -l /dev/sdb
Disk /dev/sdb: 10.7 GB, 10737418240 bytes, 20971520 sectors
Units = sectors of 1 * 512 = 512 bytes
Sector size (logical/physical): 512 bytes / 512 bytes
I/O size (minimum/optimal): 512 bytes / 512 bytes
Disk label type: dos
Disk identifier: 0x05c1aa40
Device Boot Start End Blocks Id System
/dev/sdb1 2048 2099199 1048576 8e Linux LVM
/dev/sdb2 2099200 4196351 1048576 8e Linux LVM
/dev/sdb3 4196352 6293503 1048576 8e Linux LVM
一般情况在创建完分区后系统会自动生成相应的分区文件“/dev/sdb”,但是当系统未自动生成时无法完成物理卷创建任务,需要执行命令
“partprobe” 生成相应文件再执行pvcreate命令。
创建PV物理卷,使用pvs&pvdisplay查看物理卷的信息。
[root@linux-xl ~]# partprobe /dev/sdb
[root@linux-xl ~]# pvcreate /dev/sdb1 #创建物理卷
WARNING: ext4 signature detected on /dev/sdb1 at offset 1080. Wipe it? [y/n]: y
Wiping ext4 signature on /dev/sdb1.
Physical volume "/dev/sdb1" successfully created.
[root@linux-xl ~]# pvcreate /dev/sdb2
Physical volume "/dev/sdb2" successfully created.
[root@linux-xl ~]# pvcreate /dev/sdb3
Physical volume "/dev/sdb3" successfully created.
[root@linux-xl ~]# pvs #查看创建的物理卷详细信息
PV VG Fmt Attr PSize PFree
/dev/sdb1 lvm2 --- 1.00g 1.00g
/dev/sdb2 lvm2 --- 1.00g 1.00g
/dev/sdb3 lvm2 --- 1.00g 1.00g
创建VG卷组,使用vgs&vgdisplay查看卷组的详细信息。
[root@linux-xl ~]# vgcreate vg1 /dev/sdb1 /dev/sdb2 #vg1为卷组名,把sdb1,sdb2加入
Volume group "vg1" successfully created
[root@linux-xl ~]# vgs
#查看创建的卷组详细信息
VG #PV #LV #SN Attr VSize VFree
vg1 2 0 0 wz--n- 1.99g 1.99g
创建LV逻辑卷,使用lvs&display查看逻辑卷的详细信息
选项:
-L:指定逻辑卷的大小,单位为“kKmMgGtT”字节
-n:指定逻辑卷的名称。
[root@linux-xl ~]# lvcreate -L 100M -n lv1 vg1
#-L指定创建100M的空间,-n指定逻辑卷的名字为lv1,从vg1卷组里面划分100M的空间。
Logical volume "lv1" created.
[root@linux-xl ~]# lvs
LV VG Attr LSize Pool Origin Data% Meta% Move Log Cpy%Sync Convert
lv1 vg1 -wi-a----- 100.00m
格式化为ext4文件系统。
[root@linux-xl ~]# mkfs.ext4 /dev/vg1/lv1
mke2fs 1.42.9 (28-Dec-2013)
Filesystem label=
OS type: Linux
Block size=1024 (log=0)
Fragment size=1024 (log=0)
Stride=0 blocks, Stripe width=0 blocks
25688 inodes, 102400 blocks
5120 blocks (5.00%) reserved for the super user
First data block=1
Maximum filesystem blocks=33685504
13 block groups
8192 blocks per group, 8192 fragments per group
1976 inodes per group
Superblock backups stored on blocks:
8193, 24577, 40961, 57345, 73729
Allocating group tables: done
Writing inode tables: done
Creating journal (4096 blocks): done
Writing superblocks and filesystem accounting information: done
格式化后使用mount挂载
[root@linux-xl ~]# mount /dev/vg1/lv1 /mnt/
[root@linux-xl ~]# df -hT
Filesystem Type Size Used Avail Use% Mounted on
/dev/sda2 xfs 44G 1.8G 43G 5% /
devtmpfs devtmpfs 1.9G 0 1.9G 0% /dev
tmpfs tmpfs 1.9G 0 1.9G 0% /dev/shm
tmpfs tmpfs 1.9G 8.5M 1.9G 1% /run
tmpfs tmpfs 1.9G 0 1.9G 0% /sys/fs/cgroup
/dev/sda5 xfs 1014M 33M 982M 4% /home
/dev/sda1 xfs 1014M 135M 880M 14% /boot
tmpfs tmpfs 378M 0 378M 0% /run/user/0
/dev/mapper/vg1-lv1 ext4 93M 1.6M 85M 2% /mnt
[root@linux-xl ~]# ls -l /dev/vg1/lv1
lrwxrwxrwx. 1 root root 7 Jun 15 20:01 /dev/vg1/lv1 -> ../dm-0
[root@linux-xl ~]# ls -l /dev/mapper/vg1-lv1
lrwxrwxrwx. 1 root root 7 Jun 15 20:01 /dev/mapper/vg1-lv1 -> ../dm-0
扩容逻辑卷
工作流程:umount卸载挂载点-->重新设置逻辑卷大小(lvresize)-->检测磁盘错误(e2fsck -f)-->更新逻辑卷信息(resize2fs)
lvresize命令(=logical volume resize)用于调整LVM逻辑卷的空间大小,可以增大空间和缩小空间。使用lvresize命令调整逻辑卷空间大小和缩小空间时需要谨慎,因为它有可能导致数据丢失。
[root@linux-xl ~]# cd /mnt/
[root@linux-xl mnt]# mkdir 1212 #往里面写些数据
[root@linux-xl mnt]# touch 1.txt
[root@linux-xl mnt]# echo "11111111111" > 1.txt
[root@linux-xl ~]# umount /mnt/
[root@linux-xl ~]# lvresize -L 200M /dev/vg1/lv1 #原本是100M,现在扩容成200M
Size of logical volume vg1/lv1 changed from 100.00 MiB (25 extents) to 200.00 MiB (50 extents).
Logical volume vg1/lv1 successfully resized.
[root@linux-xl ~]# lvs
LV VG Attr LSize Pool Origin Data% Meta% Move Log Cpy%Sync Convert
lv1 vg1 -wi-a----- 200.00m
e2fsck 命令,检查磁盘是否有错误,只适用ext4文件系统
[root@linux-xl ~]# e2fsck -f /dev/vg1/lv1
e2fsck 1.42.9 (28-Dec-2013)
Pass 1: Checking inodes, blocks, and sizes
Pass 2: Checking directory structure
Pass 3: Checking directory connectivity
Pass 4: Checking reference counts
Pass 5: Checking group summary information
/dev/vg1/lv1: 13/25688 files (7.7% non-contiguous), 8899/102400 blocks
resize2fs命令,更新逻辑卷信息只适用ext4文件系统
[root@linux-xl ~]# resize2fs /dev/vg1/lv1
resize2fs 1.42.9 (28-Dec-2013)
Resizing the filesystem on /dev/vg1/lv1 to 204800 (1k) blocks.
The filesystem on /dev/vg1/lv1 is now 204800 blocks long.
[root@linux-xl ~]# lvs
LV VG Attr LSize Pool Origin Data% Meta% Move Log Cpy%Sync Convert
lv1 vg1 -wi-a----- 200.00m
[root@linux-xl ~]# !mount
mount /dev/vg1/lv1 /mnt/
[root@linux-xl ~]# df -hT
Filesystem Type Size Used Avail Use% Mounted on
/dev/sda2 xfs 44G 1.8G 43G 5% /
devtmpfs devtmpfs 1.9G 0 1.9G 0% /dev
tmpfs tmpfs 1.9G 0 1.9G 0% /dev/shm
tmpfs tmpfs 1.9G 8.5M 1.9G 1% /run
tmpfs tmpfs 1.9G 0 1.9G 0% /sys/fs/cgroup
/dev/sda5 xfs 1014M 33M 982M 4% /home
/dev/sda1 xfs 1014M 135M 880M 14% /boot
tmpfs tmpfs 378M 0 378M 0% /run/user/0
/dev/mapper/vg1-lv1 ext4 190M 1.6M 175M 1% /mnt
[root@linux-xl ~]# ls /mnt/ #扩容不会丢失数据
1212 1.txt lost+found
缩容逻辑卷(xfs不支持)
工作流程:卸载(umount)-->检测(e2fsck -f)-->更新逻辑卷信息大小(resize2fs)-->重置逻辑卷大小(lvresize)
注:合理缩容也不会使系统内文件丢失
[root@linux-xl ~]# umount /mnt/
[root@linux-xl ~]# e2fsck -f /dev/vg1/lv1
e2fsck 1.42.9 (28-Dec-2013)
Pass 1: Checking inodes, blocks, and sizes
Pass 2: Checking directory structure
Pass 3: Checking directory connectivity
Pass 4: Checking reference counts
Pass 5: Checking group summary information
/dev/vg1/lv1: 13/49400 files (7.7% non-contiguous), 11887/204800 blocks
[root@linux-xl ~]# resize2fs /dev/vg1/lv1 100M
resize2fs 1.42.9 (28-Dec-2013)
Resizing the filesystem on /dev/vg1/lv1 to 102400 (1k) blocks.
The filesystem on /dev/vg1/lv1 is now 102400 blocks long.
[root@linux-xl ~]# lvresize -L 100M /dev/vg1/lv1
WARNING: Reducing active logical volume to 100.00 MiB.
THIS MAY DESTROY YOUR DATA (filesystem etc.)
Do you really want to reduce vg1/lv1? [y/n]: y
Size of logical volume vg1/lv1 changed from 200.00 MiB (50 extents) to 100.00 MiB (25 extents).
Logical volume vg1/lv1 successfully resized.
[root@linux-xl ~]# !mount
mount /dev/vg1/lv1 /mnt/
[root@linux-xl ~]# lvs
LV VG Attr LSize Pool Origin Data% Meta% Move Log Cpy%Sync Convert
lv1 vg1 -wi-ao---- 100.00m
[root@linux-xl ~]# df -hT
Filesystem Type Size Used Avail Use% Mounted on
/dev/sda2 xfs 44G 1.8G 43G 5% /
devtmpfs devtmpfs 1.9G 0 1.9G 0% /dev
tmpfs tmpfs 1.9G 0 1.9G 0% /dev/shm
tmpfs tmpfs 1.9G 8.5M 1.9G 1% /run
tmpfs tmpfs 1.9G 0 1.9G 0% /sys/fs/cgroup
/dev/sda5 xfs 1014M 33M 982M 4% /home
/dev/sda1 xfs 1014M 135M 880M 14% /boot
tmpfs tmpfs 378M 0 378M 0% /run/user/0
/dev/mapper/vg1-lv1 ext4 93M 1.6M 85M 2% /mnt
[root@linux-xl ~]# ls /mnt/
1212 1.txt lost+found
格式化为XFS文件系统
[root@linux-xl ~]# umount /mnt/
[root@linux-xl ~]# mkfs.xfs -f /dev/vg1/lv1
meta-data=/dev/vg1/lv1 isize=512 agcount=4, agsize=6400 blks
= sectsz=512 attr=2, projid32bit=1
= crc=1 finobt=0, sparse=0
data = bsize=4096 blocks=25600, imaxpct=25
= sunit=0 swidth=0 blks
naming =version 2 bsize=4096 ascii-ci=0 ftype=1
log =internal log bsize=4096 blocks=855, version=2
= sectsz=512 sunit=0 blks, lazy-count=1
realtime =none extsz=4096 blocks=0, rtextents=0
对xfs文件系统的分区进行扩容
工作流程更改逻辑卷信息(lvresize)-->更新逻辑卷信息(xfs_growfs)
1.更改逻辑卷信息
[root@linux-xl ~]# lvresize -L 300M /dev/vg1/lv1
Size of logical volume vg1/lv1 changed from 100.00 MiB (25 extents) to 300.00 MiB (75 extents).
Logical volume vg1/lv1 successfully resized.
[root@linux-xl ~]# lvs
LV VG Attr LSize Pool Origin Data% Meta% Move Log Cpy%Sync Convert
lv1 vg1 -wi-ao---- 300.00m
[root@linux-xl ~]# df -hT
Filesystem Type Size Used Avail Use% Mounted on
/dev/sda2 xfs 44G 1.8G 43G 5% /
devtmpfs devtmpfs 1.9G 0 1.9G 0% /dev
tmpfs tmpfs 1.9G 0 1.9G 0% /dev/shm
tmpfs tmpfs 1.9G 8.5M 1.9G 1% /run
tmpfs tmpfs 1.9G 0 1.9G 0% /sys/fs/cgroup
/dev/sda5 xfs 1014M 33M 982M 4% /home
/dev/sda1 xfs 1014M 135M 880M 14% /boot
tmpfs tmpfs 378M 0 378M 0% /run/user/0
/dev/mapper/vg1-lv1 xfs 97M 5.2M 92M 6% /mnt
2.更新逻辑卷信息
注:执行xfs格式更新逻辑卷的命令,前提是分区必须要在挂载的状态下执行
[root@linux-xl ~]# !mount
mount /dev/vg1/lv1 /mnt/
[root@linux-xl ~]# xfs_growfs /dev/vg1/lv1
meta-data=/dev/mapper/vg1-lv1 isize=512 agcount=4, agsize=6400 blks
= sectsz=512 attr=2, projid32bit=1
= crc=1 finobt=0 spinodes=0
data = bsize=4096 blocks=25600, imaxpct=25
= sunit=0 swidth=0 blks
naming =version 2 bsize=4096 ascii-ci=0 ftype=1
log =internal bsize=4096 blocks=855, version=2
= sectsz=512 sunit=0 blks, lazy-count=1
realtime =none extsz=4096 blocks=0, rtextents=0
data blocks changed from 25600 to 76800
[root@linux-xl ~]# df -hT
Filesystem Type Size Used Avail Use% Mounted on
/dev/sda2 xfs 44G 1.8G 43G 5% /
devtmpfs devtmpfs 1.9G 0 1.9G 0% /dev
tmpfs tmpfs 1.9G 0 1.9G 0% /dev/shm
tmpfs tmpfs 1.9G 8.5M 1.9G 1% /run
tmpfs tmpfs 1.9G 0 1.9G 0% /sys/fs/cgroup
/dev/sda5 xfs 1014M 33M 982M 4% /home
/dev/sda1 xfs 1014M 135M 880M 14% /boot
tmpfs tmpfs 378M 0 378M 0% /run/user/0
/dev/mapper/vg1-lv1 xfs 297M 5.5M 292M 2% /mnt
vgextend命令扩容卷组(将sdb3加入到vg1)
使用vgs或者使用vgdisplay查看卷组的详细信息。
[root@linux-xl ~]# pvcreate /dev/sdb3 #扩展卷组时,先创建物理卷。
[root@linux-xl ~]# vgextend vg1 /dev/sdb3
Volume group "vg1" successfully extended
[root@linux-xl ~]# vgs
VG #PV #LV #SN Attr VSize VFree
vg1 3 1 0 wz--n- <2.99g <2.70g